Transcription
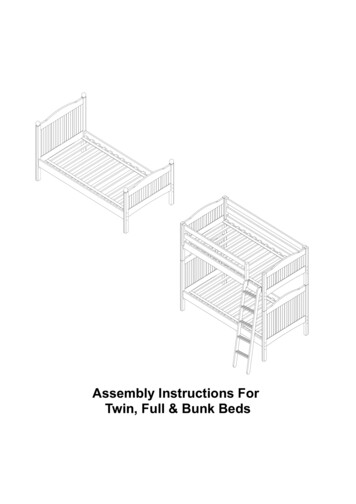
Assembly Instructions ForTwin, Full & Bunk Beds
Parts List For Twin or Full ide Rails2DBed Slats1FinialsDrawingDescriptionQty.H80mm Hex Bolt8ICross Dowel8JHex Wrench11CFNNO.4K30mm Wood Screw30LWooden Plugs13MInsert Plugs2NMushroom Plugs4Parts List For Twin/Twin or Full/Full Bunk dboardSide RailsBed Slats24Front Safety Rail1FBack Safety Rail1LadderKDescriptionQty.80mm Hex Bolt16Cross Dowel16Hex Wrench30mm wood screw164LWooden Plug24MInsert plug2NMushroom Plug8OSafety rail plug12EGJDrawingPSteel Dowel4Q20mm wood screw6RLadder hook2S50mm Hex Bolt31
Bed Assembly Instructions: Two people recommended for this assembly.Step 1Verify that you have all the parts.Step 2Bed Assembly: Position Headboard &Footboard (A & B) and Side Rails (C) inapproximate location where you want bed.Insert Cross Dowels (I) in pre-drilled holeson inside of side rails. Determine positionof side rails - upper or lower. NOTE: Ifusing optional under bed accessories,side rails must be in upper position.Attach side rails to bed ends by inserting80mm Hex Bolt (H) into thru holes on bedends - 8 places. Thread hex bolt intocross dowels in side rails. Using HexWrench (J) tighten hex bolts.Step 3Place Slat Roll (D) on the wooden cleatsof side rails. With counter sunk holes inslats up, center slats between Headboard& Footboard. Make sure the spacingbetween both beds ends and first and lastslat are less than 3 1/2". Screw slats towooden cleats using 30mm Wood Screws(K) - 28 places. Inserts Finials (FN) intopre-drilled holes in top the Headboard andFootboard bed post - 4 places.BCCAHCKDHFNDStep 4MInsert Wooden plugs (L) into counter sunkholes in Headboard & Footboard to coverhex bolt heads - 12 places. Place InsertPlug (M) in threaded inserts on footboard 2 places.LJ
Bunk Bed Assembly Instructions: Two people recommended for this assembly.Step 1Verify that you have all the parts.Step 2Botton Bed Assembly: Position (2)Headboards (B) and Side Rails (C) inapproximate location where you want bed.Insert Cross Dowels (I) in pre-drilled holeson inside of side rails. Determine positionof side rails - upper or lower. NOTE: Ifusing optional under bed accessaries,side rails must be in upper position.Attach side rails to bed ends by inserting80mm Hex Bolt (H) into thru holes on bedends. Thread hex bolt into cross dowelsin side rails. Using Hex Wrench (J)tighten hex bolts.BCBCCTop Bed Assembly: Position (2)Footboards (A) and Side Rails (C) inapproximate location where you want bed.Insert Cross Dowels (I) in pre-drilled holeson inside of side rails. NOTE: Side railsmust be in upper position on top bunkassembly. Attach side rails to bed endsby inserting 80mm Hex Bolt (H) into thruholes on bed ends. Thread hex bolt intocross dowels in side rails. NOTE: Do nottighten hex Bolts at this time! You willneed adjustibility to position Back SafetyRail between the two bed ends and overthe back side rail.HACACJ
Step 3Attach Back Safety Rail: Make sure thepilot holes on the posts of the Back SafetyRail (F) are facing the inside of the siderail(side with the cleat). Position Back SafetyRail (F) between 2 bed ends. Slide theSafety Rail over Side Rail. Using HexWrench (J), tighten the 80MM Hex Boltssecuring the bed ends to the side rails.SKFSecure Back Safety Rail to the bed endsby inserting 50 MM Hex Bolt (S) into thethru holes in safety rail posts, threadingthem into the inserts in both bed ends tighten using Hex Wrench (J). Securesafety rail posts to inside of side rail using30 MM Wood Screw (K) - 2 places.Attach Front Safety Rail: Make surethe pilot holes on the posts of the FrontSafety Rail (E) are facing the inside of thesiderail (side with the cleat). Slide theFront Safety Rail (E) over Side Rail.Position front safety rail to left or right endof bed.ESecure Front Safety Rail to bed ends byinserting 50 MM Hex Bolt (S) into thruhole in front safety rail post, threading itinto insert in bed end - tighten using HexWrench (J). Secure safety rail posts toinside of side rail using 30 MM WoodScrew (K) - 2 places.SStep 4Position Upper assembly on LowerAssembly: Insert Steel Dowel (P) intopredrilled holes in top rails/posts of LowerBed Assembly (4 places). Positon theupper bunk bed assembly by Aliegning thepre-drilled holes in bottom of bed post ofUpper Bed Assembly to the Steel Dowels(P) in Lower Bunk Assembly. Seat theUpper Bunk Assembly firmly down on topof the Lower bunk Assembly.P
Step 5RLadder Assembly: Attach Ladder Hooks(R) using 20MM screws (Q) into thepredrille holes in ladder (G) - 2 places.Hook the ladder over the side rails in theupper bunk - secure the ladder to theinside of the side rail using 20MM screws(Q) - 2 placesRQQGCKPlace Slat Roll (D) on the wooden cleatsof side rails in the upper and lower bunks.With counter sunk holes in slats up, centerslats between the bed ends. Make surethe spacing between both bed ends andfirst & last slat are less than 3 1/2". Screwslats to wooden cleats using 30mm woodscrew (K) - in 56 placesDStep 6Insert Wooden Plugs (L) into counter sunkholes in Bed ends of the upper and lowerstructures of bunk to cover hex bolt heads- 24 places.Insert Safety Rail Plug (O) into thru hole infront safety rail. Insert Mushroom Plug(N) into predrilled holes in top of post ofupper bunk structure - 4 places. NOTE:Do not use Finials that come with thisbed when configured as a Bunk Bed!!Place Insert Plug (M) into threaded insertin bed end (A) of upper structure of bunkon opposite end of where the front safetyrail is attached.OM
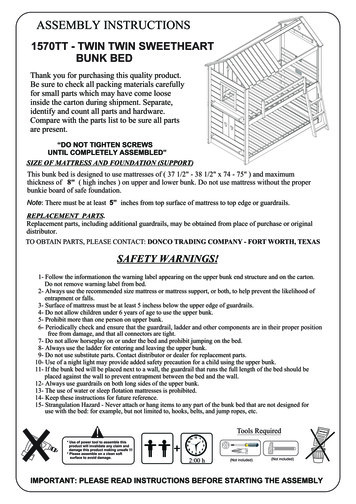
Safety Warnings:1) Follow the information on the warning label attached to the upper bunk end structure. Do notremove this label.2) Always use the recommended size mattress to help prevent the likelihood of entrapment orfalls. Use a mattress which is 75” long and 38 ½” wide for Twin, 53 1/2" wide for Full on the topbunk.3) Surface of mattress must be at least 5 inches below the upper edge of the guard rails.Ensure thickness of mattress and foundation combined does not exceed 8”.4) Do not allow children under 6 years of age to use the upper bunk.5) Prohibit more than one person on the upper bunk.6) Periodically check to ensure that the guard rails, ladder, and other components are in theirproper position, free from damage, and that all connectors are tight.7) Do not allow horseplay on or under the bed and prohibit jumping on the bed.8) Always use the ladder for entering and leaving the upper bunk.9) Do not use substitute parts. Contact the manufacturer or dealer for replacement parts.10) Use of a night light may provide an added safety precaution for a child using the bunk.11) If the bunk bed will be placed next to a wall, the guard rail that runs the full length of the bedshould be placed against the wall to prevent entrapment.12) Always use guard rails on both sides of the upper bunk.13) The use of water or sleep flotation mattresses is prohibited.14) Keep these instructions for future reference.STRANGULATION HAZARDNever attach or hang items to any part of the bunk bed that are not designed for use withthe bed. For example, but not limited to hooks, belts or jump ropes.** Warning - On Beds with finials that can be configured as Bunk Beds!The finials provided with certain beds, which are part of the design of the bed, are to beused only in one of the lower configuration – that is as a Twin, Full, Queen or Kingconfiguration.These finials are never to be used in the upper structure in a Bunk Bed configuration.Using the finials in the upper structure of a Bunk Bed will create a strangulation hazard.Never use finials in the upper structure of a Bunk Bed.A flat Mushroom Cap made to conform to the requirement is provided to take the place offinials in the upper structure in Bunk Bed configurations.
7) Do not allow horseplay on or under the bed and prohibit jumping on the bed. 8) Always use the ladder for entering and leaving the upper bunk. 9) Do not use substitute parts. Contact the manufacturer or dealer for replacement parts. 11) If the bunk bed will be placed next to a wall, the guard rail that runs th