Transcription
J-50190NISSAN / INFINITISIGNAL TECH II USER GUIDE1-800-662-2001 nissantechmate.com
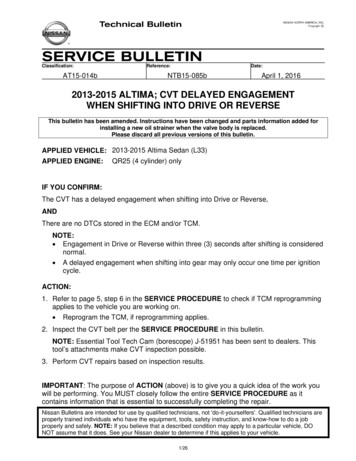
TECHMATE Signal Tech IIUser GuideIntroductionThe Signal Tech II tester is a powerful handheldtechnician tool designed for use in dealership serviceenvironments. The Signal Tech II is used to diagnoseTire Pressure Monitoring Systems (TPMS) and to checkIntelligent Key function.The Signal Tech II can be used by technicians, inExpress Service, or by service writers for preliminarydiagnosis and low tire pressure adjustments.The Signal Tech II can be updated, and has a longlasting internal battery that can be charged using thepower supply or USB.The Signal Tech II is used to: Activate and Display TPMS Sensor IDs & PSI Connect to OBDII & Display TPMS Trouble Codes Register ID’s and reset control module Display relative signal strength of Intelligent Key& vehicle componentsGetting StartedTo get started, refer to Quick Start Guide providedwith your tool kit.Note: Please charge your new tool for a minimum of 6hours prior to using it. The Signal Tech II ships from thefactory with a full battery charge, but it is recommendedfor use that the operator charge the tool first.Signal Tech II Font, Side and Top ViewNote: The Signal Tech II can be charged by using theprovided wall AC adaptor, or by connecting the tool byusing the provided USB cable to a PC or Laptop.i
TECHMATE Signal Tech IIUser GuideChargingThe Signal Tech II can be charged by using the powersupply that is included with the kit. Simply plug thepower supply into the MINI USB port and a standard110 volt outlet.The Signal Tech II will also charge while connected bythe supplied USB cable to a PC or Laptop.Please note the battery indicator on the tool screen andcharge the tool when the indicator is low or begins toflash.Before using you Signal Tech II, please charge the toolfor a minimum of 6 hours.Note: Only use the provide Wall AC adaptor orstandard Mini-USB Cable as shown. Using othersources to charge your tool may result in damage tothe tool.Tool Charging:When the tool is connected to a PC or Wall AC Adaptor,the Battery Icon (Charging indicator) will begin to cyclethrough, indicating that the tool is charging.It is recommended that you recharge your tool once youget below 2 bars on the Battery Level.Charging Indicatorii
TECHMATE Signal Tech IIUser GuideTable of ContentsIntroduction . . . . . . . . . . . . . . . . . . . . . . . . . . . . . . . . . . . . . . . . . . . . . .iGetting Started . . . . . . . . . . . . . . . . . . . . . . . . . . . . . . . . . . . . . . . . . . . .iCharging . . . . . . . . . . . . . . . . . . . . . . . . . . . . . . . . . . . . . . . . . . . . . . .iiTable of Contents . . . . . . . . . . . . . . . . . . . . . . . . . . . . . . . . . . . . . . . . . . iiiSafety Information . . . . . . . . . . . . . . . . . . . . . . . . . . . . . . . . . . . . . . . . . . 1Components and Features . . . . . . . . . . . . . . . . . . . . . . . . . . . . . . . . . . . . 2-3TPMS Operations . . . . . . . . . . . . . . . . . . . . . . . . . . . . . . . . . . . . . . . . . 4-14Nissan and Infiniti Vehicle Testing . . . . . . . . . . . . . . . . . . . . . . . . . . . . . . . . . . 4Intelligent Key Testing . . . . . . . . . . . . . . . . . . . . . . . . . . . . . . . . . . . . . . . 11Other OEM Vehicle Testing . . . . . . . . . . . . . . . . . . . . . . . . . . . . . . . . . . . . . 12Engine DTC Check . . . . . . . . . . . . . . . . . . . . . . . . . . . . . . . . . . . . . . . . . 14Troubleshooting and Screen Messages . . . . . . . . . . . . . . . . . . . . . . . . . . . . 15-16Updating tool with Asist . . . . . . . . . . . . . . . . . . . . . . . . . . . . . . . . . . . . . . 16Specifications . . . . . . . . . . . . . . . . . . . . . . . . . . . . . . . . . . . . . . . . . . . . 17Replacement Parts . . . . . . . . . . . . . . . . . . . . . . . . . . . . . . . . . . . . . . . . . 17Warranty . . . . . . . . . . . . . . . . . . . . . . . . . . . . . . . . . . . . . . . . . . . . . . . 18iii
TECHMATE Signal Tech IIUser GuideSafety InformationSafety DefinitionsAll Safety Precautions, including Danger, Warning, Important, and Notes messages, must be followed for your safety.Safety messages are in the following formats:DANGER: Means you risk possible loss of life.WARNING: Means you risk possible bodily harm.Means that the information demands special attention or that you risk damage to the vehicle or the tester.Information added to provide clarity and helpful tips.These safety messages cover situations Bosch is aware of. Bosch cannot know, evaluate and advise you as to all of thepossible hazards. You must be certain that any conditions or service procedures encountered do not jeopardize yourpersonal safety.DANGER PrecautionsDANGER: When an engine is operating, keep the service area WELL VENTILATED or attach a building exhaustremoval system to the engine exhaust system. Engines produce carbon monoxide, an odorless, poisonous gas thatcauses slower reaction time and can lead to serious injury or death.SAVE THIS MANUAL: This manual contains important safety procedures concerning the setup, operation, andmaintenance of this product. Failure to follow the instructions contained in this manual may result in serious injury. If youare unable to understand any of the contents of this manual, bring it to the attention of your supervisor. Do not operatethis equipment unless you have read and understand the contents of this manual.GENERAL OPERATION PRECAUTIONSWhen plugging the power cord into an electrical outlet, avoid wet floors to prevent electrical shock. When removing thepower cord from an electrical outlet, pull out by the plug to reduce damage to the power cord.Do not use an extension cord; use of an extension cord could result in risk of fire or electric shock.1
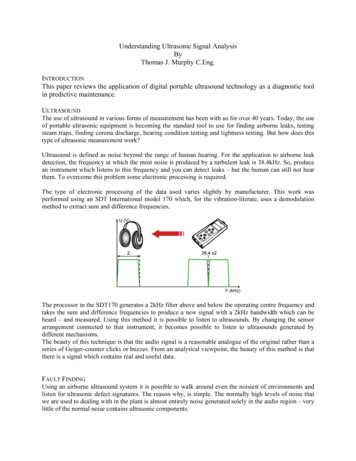
TECHMATE Signal Tech IIUser GuideComponents and FeaturesTool LayoutDisplay –SD Card – Allows for computer-less updating of the tool.TX/RX Light – Shows that the tool is sending/receivingdata via the OBDII. This is NOT a printer port.USB Port – Used to connect to the PC for updating andto print the Audit Report.(NOT a printer port)DB-15 OBD – Connection for the OBDII Cableto connect to the vehicle.– Navigates on the current screen– Takes you back one menu– Allows you to proceed withthe highlighted function– Gives you more information forthe highlighted item– Navigates on the current screen– This will power the tool on or off– Returns you to the Main Menu2
TECHMATE Signal Tech IIUser GuideComponents and Features Cont.OBDII to DB15 Female Cable, 6ftUSB Interface cable, 3ftUSB2.0 A-Male to Mini 5 pin MalePower Supply UnitInput 100-240V (50-60Hz)Output 5V 1.2AMini SD Card (Shipped in tool)Features Activate and Display TPMS Sensor IDs & PSI Connect to OBDII & Display TPMS Trouble Codes Register ID’s and reset control modules Other OEM TPMS Testing – the Signal Tech II canperform TPMS diagnostics and repair on otherOEM vehicles3
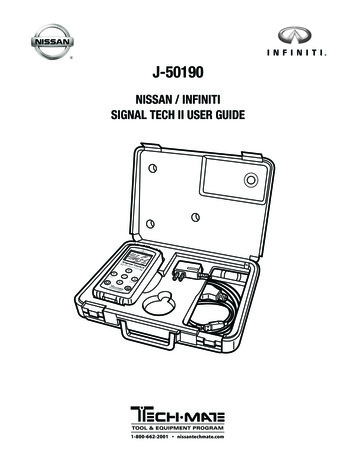
TECHMATE Signal Tech IIUser GuideTPMS OperationSSignal Tech II TPMS Registration MethodThe Signal Tech II activates all four Sensors, captures the Sensor IDs then writes the Sensor IDs directly to the ControlUnit, unlike CIII that places the vehicle in “Learn” mode and “Listens” for the Sensor IDs as they are activated by J-45295Valve Activation tool. The vehicle’s antenna then receives the Sensor IDs and they are written to the Control Unit.Nissan and Infiniti Vehicle Testings sALWAYS:3 Check the for the Indicator LightqA Flashing light means a system faultA Solid Light means low pressure3 Adjust the tire pressure per tire placardq3q Test the Left Front (LF) sensor first3 Work CLOCKWISE around the carq3 Connect to OBDIIq3q Print a report for your recordsStartEndUse the following steps to Diagnose TPMS Nissan / Infiniti Vehicles1. Press the On/Off button to turn On theSignal Tech II. The tools screen will populateand defaults to the Main Menu.2. From the Main Menu, highlight TPMS Checkand press the OK button3. From the Select Model listing, scroll using theUP or DOWN arrow key until the vehicle you areworking on is highlighted, press OK.4. You will now show the Model displayed at the topof the Screen and will be given a choice of years toselect. Scroll using the UP or DOWN Arrow keysuntil the year is highlighted and press OK.4
TECHMATE Signal Tech IIUser GuideTPMS OperationS Cont.5. The screen of the tool will now prompt you “Press toolagainst LF tire and press OK to activate”.a.Hold the Signal Tech II on the Tire, along side ofthe Wheel, where the Valve Stem is located.(Do not hold on the wheel, as this can effect theperformance of the tool)b.With the tool held at a 0 to 15 degree angle to thetire, press and release the OK button to activatethe sensor as shown below. You will need to holdthe tool steady until the test is completed. TheScreen will show “Search for Schr. TPM” andwill show Searching Data. A Status Bar will cycleacross the bottom of the screen.d. The Tool will Prompt for 3 attempts for asuccessful read before displaying a NO TPMFOUND message, and indicating as so withan X as shown below. The tool will also giveone audible beep. Continue to the OBDcommunications to confirm DTCs. If a sensoris not communicating, a corresponding DTCshould be stored.e.c.If the Incorrect TPM sensor type is found by thetool, the Signal Tech II will indicate the situationwith a ? at that wheel position as shown. Thetool will also give 3 audible beeps to indicatewrong sensor type. Ensure that the correctsensor is installed. Continue to the OBDcommunications to confirm DTCs. If thesensor type is incorrect, a correspondingDTC should be stored.As you activate the sensors, the tool will displaypressure at each wheel location and auto cycleyou to the next on a successful read. The toolwill give an audible sequence of beeps.NOTE: If an ‘X’ or ‘?’ appears, the DTCs can still beread but the ID registration will not complete.5
TECHMATE Signal Tech IIUser GuideTPMS OperationS Cont.6. Repeat step 5 for each wheel position, as the SignalTech II prompts you through each wheel position.7. Once all 4 positions are activated, the tool willscroll to the CON OBD box.a. If you haven’t done so already, connect theOBD cable to the base of the tool at theDB15 connection.b. Connect the OBD cable to the port on the vehicleand turn the ignition to the ON position6
TECHMATE Signal Tech IIUser GuideTPMS OperationS Cont.8. Once the tool is connected, the tool will display COMMS, press OK to continuea. If you are connected, and the display does not change, disconnect and try again.This feature is detecting power on the DLC and will not change until there is agood connection and the ignition is in the On position.9. The tool will connect to the BCM (control unit), read the VIN, read sensor IDs and checkfor TPMS DTCs. If DTCs related to TPMS are found, the tool will display them. WhenDTCs are displayed, further diagnosis may be required. If “Low Press” is displayed,this indicated that low tire pressure was detected in the past or is currently detected.This is normal operation of the TPMS system. Tire pressures must be verified andcorrected accordingly.DTC Screen:ID ComparedTo BCMPosition ComparedTO BCMStored FilesDTC if anyWheel positionaccording tothe toolPress to Write IDsor Clear DTCsWrite IDs or Clear DTCsDTCs are shown in the actual wheel position as found by the tool.The tool compensates for tire rotations.a. If DTCs or Low Pressure is stored, the DTC column will toggle between the code,code status, and ignition count of the code (when available). The status will bePast or Current. See example below.Ignition countnot available onall modelsToggle7
TECHMATE Signal Tech IIUser GuideTPMS OperationS Cont.b. The tool compares the TPMS sensors IDs found inthe wheel to the IDs stored in the control unit. Thetool displays this information for improveddiagnostics. See examples below.10. If no DTC is present or the repair has beencompleted, press OK to register IDs andclear DTC’sWrite IDs or Clear DTCs11. Once the tool has completed the Read/Writeprocess, the tool will display IDs Programmed.Press OK to print the Audit Report.IDs Programmed & DTCsNA - Not applicable because No ID foundCleared Successfully!OK - Wheel and sensor are inoriginal positionFile Saved as: .htm Printreport for recordsNEW - New ID found compared tocontrol unit. This will occur after partreplacementRT - Wheel has been rotatedLow Press - Low Pressure in the LeftRear tire (as shown)3 - Number of stored audit reports forthis VIN. This indicates previousdiagnosis or repairs? - Wrong Sensor Type Found by the Toolc. The tool may also display DTCs not related toa specific sensor location. See example below.DTC not related to a specific sensor8
TECHMATE Signal Tech IIUser GuidePrinting the Audit Report1. To print the Audit Reporta. Connect the USB cable to the PCb. With the tool still on, connect theUSB cable to the Signal Tech IIc. Open “My Computer” and locate the Signal Tech IIat “Removable Disk (x:)”d. The current vehicle report will be under“Removable Disk x:” with the name CURR REPe. Click on the reports folder to view savereports by VIN number.f. Locate the html file.g. Double click to open the html file.h. Complete the form and print.Note:At any point an audit report can be generatedduring the TPMS Check process.Note:If the VIN could not be read by the tool, the reportwill be stored as the CURR REP temporarily or inthe No VIN folder permanentlyPrinting1. To print the report click the “print” button onyour browser.9
TECHMATE Signal Tech IIUser GuideUnderstanding the Audit Report1. The audit report is meant to record all of the necessary information required to determine if maintenanceis required or further diagnosis and repair is needed. It also records the print date and VIN when possible.If a warranty repair is necessary, the report should be kept on file.Comments: It is clear from the above Audit Report that the Left Rear tire was Rotated to theRight Front and the Right Front Tire was Rotated to the Left Rear position.2. If part replacement is required, the suspect sensor can be matched to the audit report. The sensor ID is displayedin two formats on the audit file, Hex and Dec. The sensor ID is printed on the sensor itself. The ID format dependson the sensor manufacturer. Examples are shown below.WheelTool ID HexTool ID DecDTCs*Left Front00345D373431735C1704 - LF Low PressureRight Front00345CFC3431676NoneRight Rear003486BB3442363C1706 - RR Low PressureLeft Rear00B8FF8202176109C1705 - RF Low PressureC1709 - RF No Data10
TECHMATE Signal Tech IIUser GuideIntelligent Key TestingUse the following steps to check the Key Test functionon Nissan / Infiniti Vehicles (for vehicles equipped)1. Press the On/Off button to turn On the Signal Tech II.The tools screen will populate and defaults to theMain Menu.Inside Intelligent Key AntennaCenter Console AntennaHolding the Signal Tech II near the Center Console,Repeatedly press or tap the Ignition Push ButtonSwitch. The Relative Signal Strength will appear on theSignal Tech II as a bar graph. Refer to the appropriateESM for additional diagnostics.Outside Key Antenna2. From the Main Menu, scroll to KEY TEST. Oncehighlighted, press OKHold the tool at the door handle, press the RequestSwitch located on the door handle. RepeatedlyPress the Request Switch to verify that the vehicle istransmitting. The Relative Signal Strength will appearon the Signal Tech II as a bar graph. Please Refer tothe appropriate ESM to identify and test additionalOutside Key Antenna locations for the specificapplication.Key FobHolding the Key Fob to the front of the tool, press theLock, Unlock, and any other buttons located on theFob. The Relative Signal Strength will appear on theSignal Tech II as a bar graph. Verify that all buttons aretransmitting. Compare the Key Fob to other knowngood Key Fobs. Refer to the appropriate ESM foradditional diagnostics.Obtaining Key ID1. Connect OBDII cable to vehicles diagnostic port andselect KEY TEST.2. When an Intelligent key is successfully recognizedby the vehicle a box will fill in noting the sequence itwas discovered.Num.11
TECHMATE Signal Tech IIUser GuideTPMS OperationSOther OEM Vehicle TestingUse the following steps to Diagnose Other Vehicles1. Press the On/Off button to turn On the Signal Tech II.The tools screen will populate and defaults to theMain Menu.4. You will now show the Model displayed at the topof the Screen and will be given a choice of years toselect. Scroll using the UP or DOWN Arrow keysuntil the year is highlighted and press OK2. From the Main Menu, highlight Other Brandsand press the OK button3. From the Select Model listing, scroll using the UPor DOWN arrow key until the vehicle you are workingon is highlighted, press OK5. The screen of the tool will now prompt you “Presstool against LF tire and press OK to activate”.a. Hold the Signal Tech II on the Tire, against theWheel, where the Valve Stem is located.b.With the tool held at a 0 to 15 degree angle to thetire, press and release the OK button to activatethe sensor as shown below. You will need to holdthe tool steady until the test is completed. TheScreen will show “Searchfor Schr. TPM” and willshow Searching Data. AStatus Bar will cycle acrossthe bottom of the screen.12
TECHMATE Signal Tech IIUser GuideTPMS OperationS Cont.c. As you activate the sensors, the tool will displaypressure at each wheel location and auto cycleyou to the next on a successful read.6. Repeat step 5 for each wheel position, as the SignalTech II prompts you thru each wheel position.d. The Tool will Prompt for 3 attempts for asuccessful read before displaying a NO TPMFOUND message, and indicating as so withan X as shown below. The tool will also giveone audible beep. Continue to the OBDcommunications to confirm DTCs. If a sensoris not communicating, a corresponding DTCshould be stored.e.If the Incorrect TPM sensor type is found by thetool, the Signal Tech II will indicate the situationwith a ? at that wheel position as shown. Thetool will also give 3 audible beeps to indicatewrong sensor type. Ensure that the correctsensor is installed. Continue to the OBDcommunications to confirm DTCs. If thesensor type is incorrect, a correspondingDTC should be stored.13
TECHMATE Signal Tech IIUser GuideTPMS OperationS Cont.7. Once all 4 positions are activated, the tool will scrollto the CON OBD box.9. Once in the COMMS Menu, you can select Write IDSto vehicle or Read IDS from Vehicle.NOTE: This feature only available on vehicles thatthe tool supports.a. If you haven’t done so already, connect theOBD cable to the base of the tool at theDB15 connection.b. Connect the OBD cable to the port on the vehicleand turn the ignition to the ON positionOnce the tool has completed the COMMS process,the tool will display IDS Programmed.Note: at any point an audit report can be generatedduring this process.Engine DTC Check8. Once the tool is connected, the tool will displayCOMMS, press OK to continueThe SignalTech II can be used to check for genericOBDII DTC codes.a. If you are connected, and the display does notchange, disconnect and try again. This feature isdetecting power on the DLC and will not changeuntil there is a good connection and the ignitionis in the On positio
nissan and Infiniti Vehicle testing alWayS: q Check the for the Indicator Light. A Flashing light means a system fault A Solid Light means low pressure. q Adjust the tire pressure per tire placard q Test the Left Fr