Transcription
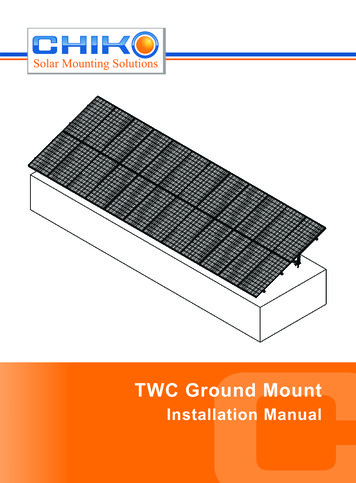
TWC Ground MountInstallation Manual
Alu TWC Ground MountI. Installation ToolsTape MeasureChalk LineEnd ClampFront V LegMid ClampRear V LegBig Transfer KitStrengthen PipeAllen keyBeamSmall Transfer KitRailLabor Protection ProductsOpen-end SpannerRail Splice KitII. Installation RuleInstallation of the framing shall conform to relevant local government standards, manufacturer'sspecifications and good building practice. The roof to which the panels are to be installed shall conform to therelevant local government standards.Follow the risk management process prior to commencing work – that is, identify all the hazards, assesstheir risks and eliminate or control them.Consult with those involved in the work.Develop safe work procedures for installing solar panels, using information from the risk managementprocess, which would include reviewing the following information:Provide appropriate information and training to anyone involved in performing the work.Provide appropriate tools and personal protective equipment (PPE).Ensure that a system is in place to prevent or arrest falls.Ensure there are adequate first aid facilities.Ensure all employees are aware of the emergency procedures.1
Alu TWC Ground MountIII. NOTICE1. Determine the installation distance between legs.1) Factors affect the distance·Solar panel dimension·The systems layout·Angle between solar panel and ground·Max wind speed in installation site·Max snow in installation site·Earthquake magnitude in installation site2) Chiko technology team could design the distance base on above factors and make the technologydrawing to show the distance between legs.3) When you have project, please offer above factors for our engineer to design the distance.2. Please refer our technology drawing and below installation step to install the mounting system.IV. Components235746182
Alu TWC Ground MountNo.1Item No.CK-FT-TW-15Item NameTW support structure2CK-FT-25R-100025# Rail3CK-FT-25SK-30025# Rail Splice K-GS-F2-1600-3.0T2TW Rail Fixed Side kitsT End clampT Mid clampI Strengthen KitGround screwPicturePart No.Part NamePart Qty1.1Base21.2Fasten kit41.3Tube Support41.4Beam11.5Small transfer kit21.6Big transfer kit125# Rail2000/3000/4000/5000/6000mm13.125# Rail Joiner13.2Self-drilling bolt 6.3*1944.1T clamp14.2T bolt M8*2514.3M8 nut14.4M8 spring washer14.5M8 flat washer15.1T End clamp15.2Nut for T clamp15.3Allen bolt M8 * 4515.4M8 nut15.5M8 spring washer16.1T Mid clamp16.2Nut for T clamp16.3Allen bolt M8 * 5016.4M8 nut16.5M8 spring washer17.1Aluminum Tube17.2M10 Hex Bolt17.3M10 nut17.4M10 Spring washer17.5M11 Flat washer18.11600mm flange ground screw18.2M12*35 hex bolt28.3M12 nut28.4M12 spring washer48.5M12 flat washer223
Alu TWC Ground MountV. Installation Steps1D1.11.21.3Insert ground screw into the ground according to Chiko’s technology drawing.2.1.1 Assemble beamand preassembledside support withsmall transfer kits byM10*90 hex bolt. (2flat washers, 1 springwasher, 1 nut);2.2.22.2.122.12.1.2 Assemble beam andpreassembled side support withbig transfer kits by M10*90 hexbolt. (2 flat washers, 1 springwasher, 1 nut);Kindly note: M10 bolt--tightentorque is 30N.m; safe torque is40N.m.2.32.2Assemble TW support structure before connect with ground screw.Connect the base of TW structure to ground screw by M10*35 hexbolts. (2 flat washers, 1 spring washer, 1 nut)p.s: The base and side support have been preassembled by CHIKO withM10*100 hex bolt. (2 Al-spacer, 1 spring washer, 1 nut);Kindly note: M10 bolt--tighten torque is 30N.m; safe torque is 40N.m.3 3.13.24
Alu TWC Ground Mount44.1Install T rail to the beam by rail fixed kit in bothside with M8*25 T bolt.(1 flat washer, 1 spring washer, 1 nut);Kindly note: M18 bolt--tighten torque is 15N.m;safe torque is 20N.m.Use rail splice kit to connect 2 rails by self drillingscrews.4.25Install the strength pipe between two TW structureback by M10*90 hex bolts. (2 flat washers,1 springwasher,1 nut).Kindly note: M10 bolt--tighten torque is 30N.m;safe torque is 40N.m.5
Alu TWC Ground Mount6hex boltM8*25hex boltM8*50Install solar panels onto T rail by fastening mid-clamps and end-clamps,-End clamps by inner hex bolts M8*45 (1 clamp, 1 nut, 1 spring washer)-Mid clamps by inner hex bolts M8 bolt ((1 clamp, 1 nut, 1 spring washer), the bolt length depend onsolar panel thickness.Kindly note: M18 bolt--tighten torque is 15N.m; safe torque is 20N.m.7Fasten all bolts andfinish the solar panelinstallation.6
Shanghai CHIKO Solar Technology Co., Ltd.Add: No.878 Cheng Liu Rd.,Jiading District, Shanghai 201808 ChinaTel: 86-21-59972267 / 59973712 / 59973713Fax: 86-21-59972938Email: sales@chikolar.comwww.chikosolar.com / www.chikolar.com
Alu TWC Ground Mount 5 4 4.1 4.2 Install T rail to the beam by rail fixed kit in both side with M8*25 T bolt. (1 flat washer, 1 spring washer, 1 nut); Kindly note: M18 bolt--tighten torque is 15N.m; safe torque is 20N.m. Use rail splice kit to connect 2 rails by