Transcription
Assessment for LineworkerProgression(ALP)Preparation Guide
Assessment forLineworker ProgressionTest Preparation GuideLearning ServicesLivermore Training Center
TABLE OF CONTENTSAssessment for Lineworker ProgressionClimbing Wooden PolesWorking from an Aerial LiftInstalling a CrossarmFollowing DirectionsLifting with Hand Line15791114
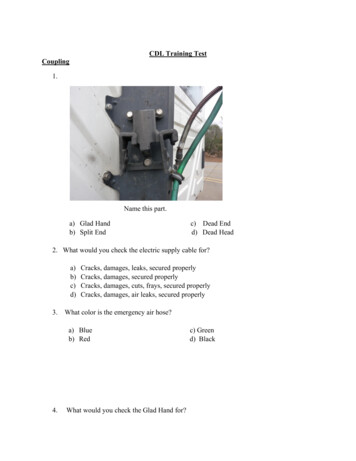
Assessment for Lineworker ProgressionIntroductionThe assessment for lineworker progression is designed to let personswho desire to be apprentice linemen demonstrate basic aptitude incommon lineman activities that are required for the lineman craft.Experienceworking withheightsDuring the assessment you will be required to climb wooden poles as wellas work from an aerial lift at a height from the ground. If you find that youare uncomfortable with heights, you should reconsider entering thelineman craft. The majority of PG&E linework requires challengingphysical activity in elevated positions.PhysicalstrengthLinework is outside construction work that requires the ability toperform strenuous activities without assistance. You will have severalopportunities to show that you can perform common tasks unaided.FollowinginstructionsWorking close to energized high-voltage equipment is quite safe, providedyou know the work procedures and safety rules and provided that you canfollow detailed instructions or work plans. The inability to recall instructionswill put you and the people you work with at risk. One component of theassessment requires that you demonstrate your ability to follow preciseinstructions.PracticeThere are 5 individual events that comprise the assessment. You willbe allowed to practice a total of six times. It will be up to you to decidewhich events you wish to practice and how many times you wish topractice each one. Your total number of practices may not exceed six.For example, you might choose to practice events 1 through 5 onetime each and then practice event 1 a second time. That would be atotal of six practices. Or, you could practice event 1 three times,events 2 through 4 one time each, and decide to skip practicing event5 altogether. Again the total number of practices is limited to sixattempts.Prior to the assessment, we will explain the events and then you canchoose the practices that you feel you need. Choose wisely.It is important to remember that a practice session is just that practice. Successfully completing a practice does not counttoward successfully completing an event.Continued on next page1
Assessment for Lineworker Progression, ContinuedStandardsSafety is the most important component of the assessment. Followdirections carefully. Ask for clarification before you begin if you do notunderstand the task at hand. Work carefully. Disregard for safety willcause disqualification.The assessment is not a race against the clock. Ample time has beenprovided for you to complete the required tasks. Faster times will notimprove your score. It is more important that you complete a taskcorrectly than it is to complete it quickly.It is important, however, that you complete all required tasks within thetime allowed. Time is an essential component of each task and thosewho take too long will be disqualified.In order to receive a qualifying score on the Assessment forLineworker Progression you must meet the standards of achievementfor all 5 events that comprise the assessment.Failure tomeetstandardsYou are allowed to complete all 5 events. Although failure to pass oneor more events will prevent you from becoming an apprentice linemanat this time, in most cases you may be permitted to participate in allthe events. If you do not qualify on all 5 events, PG&E HumanResources representatives will be available to discuss next steps andanswer any questions you may have.Weight LimitAll candidates will be weighed in before the assessment. The weightlimit of our equipment is 300 lbs. Our equipment may not operatesafely for candidates who weigh over 300 lbs. You must notify us inadvance if this applies to you.ClothingRequirementsFor your safety, you must wear hard-soled boots with square cut heelsthat extend at least ½ inch beyond the sole (see examples followingpage). Long pants and a long-sleeve shirt are also required. PG&Ewill provide all safety equipment, including a hard hat, gauntlet gloves,protective eyewear, etc.Continued on next page2
Ability toPerformAssessmentSome of the assessment activities may require unfamiliar, strenuousphysical activity. Before beginning any assessment activity, you mustbring to our attention a request for reasonable accommodation and/orany related issue that may limit your ability to perform the activity.Continued on next page3
Assessment for Lineworker ProgressionFootwear ExamplesRequired Style – Hard sole, ankle support, heelextends at least ½ inch beyond sole. Heel mustbe clearly defined with a sharp angle (square cut).Unacceptable – Insufficient heel. Taperedangle on heel may cause slipping from pole stepUnacceptable – Insufficient heel, open toe, nobackUnacceptable – Insufficient heel, soft soleContinued on next page4
Climbing Wooden PolesIntroductionMuch of the lineman’s work occurs at the top of wooden poles. Aftertraining, all linemen must be able to climb and descend wooden poles.In this event you will demonstrate that you can follow simpleinstructions and can safely climb and descend a wooden pole.SafetyDuring this event you will use personal protective equipment to ensureyour safety. The school will provide the following safety items: Gauntlet, leather glovesHard hatSafety glassesFull body harnessFall arrest lanyardEach candidate must provide acceptable footwear as follows: Boots with hard soles and square cut heels at least ½ inch highare required. Shoes and flat-soled footwear (tennis shoes,athletic shoes and shoes or boots without an acceptable heel)are prohibited.A long sleeve shirt is required.Long pants are required. Shorts are prohibited.If you drop your hard hat while ascending, stop immediately anddescend to retrieve your hard hat. Put your hard hat back on and startthe climb again. The stopwatch will be reset. If you drop your hard hatwhile descending, continue to descend.ClimbingtechniquePG&E uses a free climbing technique on wooden poles. In freeclimbing, the positioning strap is not used while ascending ordescending the pole. You use your legs to climb and your arms onlyto provide balance. You do not climb by using your arms to pullyourself up the pole.You are not a trained climber so you will use a modified free climbingtechnique. You will use the metal pole steps to support your feet whileclimbing. You will place your hands on the pole steps for balance.The body harness and fall arrest cable will prevent you from falling ifyou slip from the pole for any reason.Continued on next page5
Climbing Wooden Poles, ContinuedProcedureThe following procedures will apply:1. Put on all personal protective equipment.2. When you reach the bottom of the pole, check that the boom isdirectly over your head.3. Once told to begin, climb to the top step of the pole.4. If you drop your hard hat while ascending, stop immediately anddescend to retrieve your hard hat. Put your hard hat back onand start the climb again. The stopwatch will be reset and youwill have the full time for this climb. If you drop your hard hatwhile descending, continue to descend.5. Use only your legs to climb. Do not pull yourself up using yourarms.6. Use your hands for balance and support.7. Stop when you are standing on the top pole steps and pause for20 seconds. The evaluator will time you and will tell you whento descend.8. When you are told to descend, climb down from the top step allthe way to the ground.9. Use your hands on the pole steps for balance and support.10. Stop when you are standing on the ground. Do not jump fromthe pole.Although this is a timed event, you must climb and descend at a pacethat is consistent with safety and control.ScoringIn order to receive a qualifying score on this event: You must stand on the top steps for 20 seconds until theevaluator tells you to descend.You must climb, stand at the top of the pole, and descend thepole within 2 minutes.You must climb and descend without losing your grip on thepole or pole step. You must not slip from the pole step. Youmust not jump from the pole.Continued on next page6
Working from an Aerial LiftIntroductionPG&E linemen must be able to work from an aerial lift. In this event,you will demonstrate that you can follow simple instructions and canperform simple tasks while in an elevated aerial lift.SafetyDuring this event you will use personal protective equipment to ensureyour safety. The school will provide the following safety items: TechniqueGauntlet, leather glovesHard hatSafety glassesFull body harnessSafety lanyardYou will be fitted with a full body harness and safety lanyard. Theaerial lift has two buckets. You will be in one bucket and an evaluatorlineman will be in the other. The evaluator will operate the controls ofthe aerial lift and will accompany you up to the work location.You will be required to attach an insulator onto a crossarm at the topof the pole. Once you have been raised to full height, the evaluatorwill indicate a vertical hole in the crossarm into which you must insertthe insulator's mounting bolt. Once you have placed the mounting boltthrough the hole, you will thread the retaining nut onto the bolt andtighten it "finger-tight."At the start of the evaluation, the insulator and bolt will be located in amaterials bag attached to the crossarm. You will remove the insulatorfrom the bag, place it in the indicated hole, and then attach and tightenthe nut.After the insulator is correctly mounted on the crossarm, the evaluatorwill tell you to remove the nut and insulator and place them in thematerials bag.Continued on next page7
Working from an Aerial Lift, ContinuedProcedureThe following procedures will apply:1. Put on all personal protective equipment. Gloves must be wornat all times.2. Attach the safety lanyard from your body harness to the aeriallift and then enter the bucket on the aerial lift. The evaluator willcheck all connections before you are lifted to the work location.3. Ascend in the bucket to the work location. You will bepositioned in front of the crossarm, one arm’s length (your arm’slength) away.4. Remove the insulator from the materials bag. Timing beginswhen you reach into the bag.5. Insert the threaded bolt that extends from the bottom of theinsulator into the hole in the crossarm. Obtain the retaining nutand thread it onto the insulator bolt (finger tight).6. After approval from the evaluator, remove the insulator from thecrossarm.7. Place the insulator and the nut into the materials bag (timingends).8. Request that materials bag be lowered to the ground.9. After the bucket of the aerial lift is returned to its stored position,remove the safety lanyard and leave the aerial lift. Face thetruck while climbing down from the aerial lift.ScoringIn order to receive a qualifying score on this event: You must correctly install the insulator on the crossarm andtighten the nut to finger tight.You must remove the insulator from the crossarm and place itand the nut in the materials bag.You must not drop the insulator or the nut to the ground.You must complete your work within 2 minutes. The time startswhen you reach into the materials bag and ends when youreturn the insulator and nut to the materials bag.Continued on next page8
Installing a CrossarmIntroductionIn many cases, the lineman works on facilities that are located abovehis head. You must be able to raise and lower materials and use toolsin this work area. In this event, you will demonstrate that you cansafely lift and install a heavy crossarm. You must lift the crossarmfrom waist level and must install it at eye level.SafetyDuring this event you will use personal protective equipment to ensureyour safety. The school will provide the following safety items: TechniqueGauntlet, leather glovesHard hatSafety glassesBody belt and positioning strapLinemen are expected to be able to install crossarms withoutassistance. The person on the ground uses a rope to hoist thecrossarm up to the lineman on the pole. The lineman places thecrossarm across his positioning strap, installs the crossarm bolt andthen raises the crossarm and places the bolt through a hole in thepole.You are not a trained climber so you will do this event at ground level.You will be fitted with a body-positioning belt and positioning strap andwill be attached to the pole at ground level. The crossarm will beplaced across your positioning strap and you will be given a mountingbolt with a washer.After you are told to begin, you will place the mounting bolt through thecrossarm and then raise the crossarm to eye level and insert the boltinto the mounting hole on the pole. The holes are numbered and youmust insert the bolt into the designated hole.Continued on next page9
Installing a Crossarm, ContinuedProcedureThe following procedures will apply:1. Put on all personal protective equipment including the body beltand positioning strap.2. Attach positioning strap around the pole (the evaluator willassist you) and lean back against the belt (beginning position).3. Place your feet on the supporting pole steps just above groundlevel.4. The evaluator will hand you the crossarm to balance on thepositioning strap.5. The evaluator will hand you the crossarm bolt with the washerand indicate the correct hole in the pole for the bolt.6. When told to begin, you will insert the bolt into the crossarm, liftthe crossarm and insert the bolt into the mounting hole. Placethe crossarm firmly against the pole. Timing starts when youare instructed to begin.7. When instructed, remove the crossarm from the pole and handthe bolt and washer to the evaluator. Timing ends when youhand the bolt and washer to the evaluator.ScoringIn order to receive a qualifying score on this event: You must not drop the crossarm, washer or bolt. They must nottouch the ground.You must mount and remove the crossarm within 90 seconds.You must insert the bolt into the correct hole on the pole.You must not remove either of your feet from the foot supportpole steps.Continued on next page10
Following DirectionsIntroductionBefore linemen begin a job, the foreman on the job gives theworkgroup a briefing that covers the day’s work. At PG&E, this iscalled a “tailboard briefing” and it covers all the important aspects ofthe work that will be accomplished. Each lineman must understand,remember and perform his specific duties as described in the tailboardbriefing.In this event, you will be given instructions to do simple tasks withcommon items. The specific tasks will be selected at random. Youmust complete the tasks correctly in the time allowed.SafetyDuring this event you will use personal protective equipment to ensureyour safety. The school will provide the following safety items: TechniqueGauntlet, leather glovesHard hatSafety glassesThe event begins with 16 common items that are placed on 4 tables (4items per table). You will be required to move 3 items in the ordergiven from their initial locations to the specified locations.The evaluator will mix the order of the cards (shuffle) so they have nospecific order. You will be assigned the items to move and theirdestinations by selecting a card from a mixed deck.This is an oral briefing. You may not read or study the cards.One at a time, the evaluator will name each item and tell you itsdestination. After you have been told the names of all 3 items andtheir destinations, you have up to 60 seconds to ask any questionsabout what you are supposed to move and where. At the end of the60 seconds you may not ask any more questions. When told to beginyou must find and move the specified items to their specificdestinations in the correct sequence. Once you are told to begin, youwill have 2 minutes to find and move all items.Allowing any item to hit the ground will cause disqualification.Safety is the first consideration. Do not run.Continued on next page11
Following Directions, ContinuedProcedureThe following procedures will apply:1.2.3.4.5.6.7.8.ScoringPut on all personal protective equipment.Receive job tailboard.Ask clarifying questions (up to 60 seconds maximum).Begin to move items when instructed to start.Move the items in the order they were given.Complete moving items within 2 minutes.Do not drop any item or cause it to hit the ground.Do not cause a safety hazard.In order to receive a qualifying score on this event: You must move all 3 items to the specified destinations beforethe 2-minute time limit expires.You must move the items in the order they were given.You may not drop any item.None of the items on the tables may hit the ground.You may not ask questions or receive help once you areinstructed to begin moving items.You must move safely (i.e., no running, slipping, tripping, etc.).Continued on next page12
Following Directions, ContinuedSample itemsThe table below contains photographs of items that are similar tothose you will be required to locate and to move during the FollowingDirections event.NOTEThe items used in the actual event may be different.Baseball GloveBicycle TireBicycle Tire TubeCar TireCar Tire TubeFrisbeeHacksawHammerHorse ShoeScrewdriverSlipperPaddleToy TruckWoman’s BootWoman’s ShoeWrenchItems to be Located and Moved During the Following Directions EventContinued on next page13
Lifting with Hand LineIntroductionThe lineman is a construction worker and must be able to performwork that requires physical strength. In this event, we require that youperform a simple job that occurs frequently in the field. You will berequired to use a rope to raise a standard crossarm to the top of apole, hold it there for 20 seconds, and then lower it under control to theground. The crossarm weighs approximately 70 pounds and must beraised about 35 feet.SafetyDuring this event you will use personal protective equipment to ensureyour safety. The school will provide the following safety items: Gauntlet, leather glovesHard hatSafety glasses.TechniqueAs an apprentice, your initial duties will be those of the groundman.You will get tools and materials and will hoist them up to the linemenwho are working high on the pole or in the aerial lift. You must havethe ability to raise heavy objects without the assistance of others.ProcedureThe following procedures will apply:1. Put on all personal protective equipment.2. You will stand outside the hazard zone that is marked in painton the ground.3. The evaluator will attach the crossarm to the lift line and willgive you the rope that you will pull to raise the crossarm.4. Once told to begin, you will raise the crossarm up to themaximum height permitted by the rope.5. Once the crossarm reaches the top, the evaluator will tell you tohold it there for 20 seconds. Use only your hands to hold therope.6. After the 20 seconds have elapsed, the evaluator will tell you tolower the crossarm, under control, to the ground.Continued on next page14
Lifting with Hand Line, ContinuedScoringIn order to receive a qualifying score on this event: You must maintain control of and not drop the crossarm. Thecrossarm must not slam to the ground.You must raise the crossarm to the maximum height permittedby the rope, hold for 20 seconds, and then lower the crossarmwithin 2 minutes.You may not stand on the rope.You may only use your hands to hold the rope. You must notloop or wrap the rope around your hands, arms, or any otherpart of your body.Your feet must remain outside the safety circle at all times. Youmust not step on or cross the safety circle line.15
The school will provide the following safety items: Gauntlet, leather gloves Hard hat Safety glasses Full body harness Safety lanyard . Technique . You will be fitted with a full body harness and safety lanyard. The aerial lift has two buckets. You wi