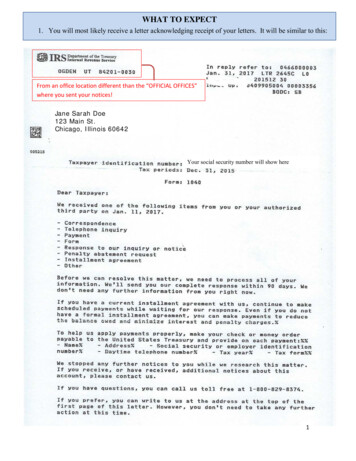
Transcription
HAV-CR22MANUAL (p. 2)CLOCK RADIOANLEITUNG (s. 4)UHRENRADIOMODE D’EMPLOI (p. 6)Radio réveilGEBRUIKSAANWIJZING (p. 8)KLOKRADIOMANUALE (p. 10)RADIOSVEGLIAMANUAL DE USO (p. 12)RADIO RELOJHASZNÁLATI ÚTMUTATÓ (o. 14.)ÓRÁS RÁDIÓKÄYTTÖOHJE (s. 16)KELLORADIOBRUKSANVISNING (s. 18)KLOCKRADIONÁVOD K POUŽITÍ (s. 20)Rádio s hodinamiMANUAL DE UTILIZARE (p. 22)RADIO CU CEASΕΓΧΕΙΡΙΔΙΟ XPHΣHΣ (σελ. 24)ΡΟΛΟΙ - ΡΑΔΙΟΦΩΝΟBRUGERVEJLEDNING (p. 26)CLOCK RADIOVEILEDNING (σελ. 28)KLOKKERADIO
ENGLISHLOCATION OF CONTROLS1. On/Off/Auto2. Time set3. Alarm set/Off4. Sleep5. Snooze button6. Hour7. Minute8. Volume control / Buzzer9. Band switch10. Tuning control11. AUTO indicatorBOTTOM: Battery compartment for 9-Volt (6F22) battery (not included) for back up power.CLOCK OPERATION1.2.3.Plug the mains cord into a 230V AC wall outletThe unit is now working; the time flashes in the display.To set the correct time, simultaneously press the TIME SET Button (2) and HOUR button (6) and releasewhen the correct hours are displayed. Now simultaneously press the MINUTE button (7) and the TIMESET button (2) to set the correct time.RADIO OPERATION1.2.3.4.5.Slide the ON/OFF/AUTO switch (1) to the ON position.Slide the BAND switch (9) to FM or AM.Turn the volume control (8) to the desired volume.Turn the TUNING control (10) to select your favourite station.AntennaFor AM reception, this radio incorporates a highly sensitive ferrite antenna.For FM reception, this set is equipped with an external FM wire antenna. Unwind to full length for peakperformance.WAKE UP TO RADIOAfter selecting your station and setting the volume to the desired level, proceed as follows:1. Slide the ON/OFF/AUTO switch (1) to the AUTO position.2. Press and hold the ALARM SET button (3) and press the HOUR button (6) and then the MINUTEbutton (7) until the correct alarm time is set. To check the alarm time, simply press the ALARM SETbutton (3) . The preset alarm time will continue to be registered in the time memory and the radio willswitch on the next day at the same time. To turn the radio off, simply press the ALARM OFF button (3).3. When the alarm is set, but you want to listen the radio before the set alarm time, press the SLEEPbutton (4) once to turn the radio on and press the SNOOZE button (5) again to turn the radio off.WAKE UP TO BUZZERSet the controls as for “Wake up to Radio” but with volume control (8) to the BUZZER position. The buzzer canbe switched off by pressing the ALARM OFF button (3) or change to radio by sliding the ON/OFF/AUTO switch(1) to the ON position.SLEEP TO RADIOThe radio can be set to play and to switch off automatically after 1 minute up to 1 hour and 59 minutes: Withall controls preset in the “Wake up to Radio” position press the SLEEP button (4) and the MINUTE button (7)to count down to the desired sleep time. To switch off the radio before the end of the registered sleep time,simply press the SNOOZE button (5).2
SNOOZE CONTROLThe SNOOZE button (5) turns the alarm/radio of for about 9 minutes. After these 9 minutes the radio/alarmwill go again.BACK-UP BATTERY(For Temporary Power Reserve Only)Connect a 9-Volt (6F22) battery (not included) inside the battery compartment. In the event of a power failurethe clock will keep all time settings. The clock display is lit. This also enables you to move the set from placeto place without resetting the clock every time. The battery back-up system is only used for temporary powerfailures. During longer disruptions the battery will be exhausted or there may be some deviation in accuracy.If the battery is exhausted, it must be removed from the set to prevent leakage. If you do not wish to takeadvantage of the battery back-up system, your set will work normal without a battery. However, if disconnectedfrom the mains power supply, the clock display will flash after reconnection and you must reset the clock asdescribed in the chapter Clock Operation.CARE AND MAINTENANCEThe cabinet can be cleaned with a slightly damp cloth (make sure the unit is disconnected from the mainspower supply).Avoid leaving the clock radio in direct sunlight or in hot, humid, dusty places.Keep the set away from heating appliances and appliances that generate noise, such as fluorescent lamps ormotors.SPECIFICATIONSPower supplyBatteryRadio frequency rangePower consumptionSafety precautions:CAUTIONRISK OF ELECTRIC SHOCKDO NOT OPENproduct to water or moisture.: 230V 50Hz: 9V (1 x 9V 6F22 not included): AM 530-1600kHz: FM 88-108MHz: 3WTo reduce risk of electric shock, this product should ONLY be opened by anauthorized technician when service is required. Disconnect the product frommains and other equipment if a problem should occur. Do not expose theMaintenance:Clean only with a dry cloth. Do not use cleaning solvents or abrasives.Warranty:No guarantee or liability can be accepted for any changes and modifications of the product or damage causeddue to incorrect use of this product.General:Designs and specifications are subject to change without notice.All logos brands and product names are trademarks or registered trademarks of their respective holders andare hereby recognized as such.Keep this manual for future reference.Attention:This product is marked with this symbol. It means that used electrical and electronic productsshould not be mixed with general household waste. There is a separate collections system for theseproducts.3
DEUTSCHBEDIENELEMENTE UND FUNKTIONEN1. Ein/Aus/Auto2. Zeiteinstellung3. Alarmeinstellung/Aus4. Sleeptimer5. Schlummertaste6. Stunden7. Minuten8. Lautstärke / Summer9. Bandumschalter10. Senderwahl11. AUTO-AnzeigeUNTERSEITE: Batteriefach für 9-Volt-Batterie (6F22) (nicht mitgeliefert) zur Gangreserve.BEDIENUNGSHINWEISE UHR1.2.3.Stecken Sie den Netzstecker in eine 230-V-Steckdose.Das Gerät ist nun in Betrieb, die Uhrzeit blinkt.Zum Einstellen der Uhrzeit drücken Sie gleichzeitig TIME SET (2) und HOUR (6). Anschließend drückenSie gleichzeitig MINUTE (7) und TIME SET (2) zum Einstellen der Minuten der Uhrzeit.BEDIENUNGSHINWEISE RADIO1.2.3.4.5.Schieben Sie den Umschalter ON/OFF/AUTO (1) auf ON.Schieben Sie den Umschalter BAND (9) auf FM (UKW) oder AM (Mittelwelle).Mit VOLUME (8) stellen Sie die Lautstärke ein.Mit TUNING (10) stellen Sie Ihren Lieblingssender ein.AntenneFür Mittelwellenempfang hat das Radio eine empfindliche eingebaute Ferritantenne.Für UKW-Empfang ist das Radio mit einer Wurfantenne ausgestattet. Wickeln Sie die Antenne für bestenEmpfang vollständig ab.AUFWACHEN MIT RADIONach dem Einstellen des Senders und der Lautstärke gehen Sie wie folgt vor:1. Schieben Sie den Umschalter ON/OFF/AUTO (1) auf AUTO.2. Halten Sie ALARM SET (3) gedrückt und drücken Sie gleichzeitig HOUR (6) und danach MINUTE (7),um die korrekte Weckzeit einzustellen. Zum Überprüfen der Weckzeit drücken Sie ALARM SET (3).Der eingestellte Weckalarm bleibt gespeichert und schaltet sich am kommenden Tag wieder ein. ZumAusschalten des Radios drücken Sie ALARM OFF (3).3. Nach dem Einstellen des Weckalarms drücken Sie einmal SLEEP (4), wenn Sie vor dem Weckalarm nochRadio hören möchten und SNOOZE (5) zum Ausschalten des Radios.AUFWACHEN MIT SUMMERDie Einstellung erfolgt wie unter „Aufwachen mit Radio“ beschrieben, jedoch mit dem Lautstärkeregler(8) auf BUZZER. Der Summer kann mit ALARM OFF (3) ausgeschaltet werden oder wechseln Sie zumRadioempfang, indem Sie den Umschalter ON/OFF/AUTO (1) auf ON schieben.EINSCHLAFEN MIT RADIODas Radio kann eingestellt werden, dass es sich automatisch nach 1 Minute oder bis zu 1 Stunde und 59Minuten ausschaltet: Mit allen Einstellungen wie „Aufwachen mit Radio“ drücken Sie SLEEP (4) und MINUTE(7), um die automatische Ausschaltzeit einzustellen. Zum Ausschalten des Radios vor der automatischenAusschaltzeit drücken Sie SNOOZE (5).4
SCHLUMMERFUNKTIONMit SNOOZE (5) unterbrechen Sie den Weckalarm für 9 Minuten. Anschließend erfolgt der Weckalarm erneut.BATTERIE(Nur als Gangreserve)Schließen Sie eine 9-Volt-Batterie (6F22) (nicht mitgeliefert) im Batteriefach an. Bei Netzausfall werdenIhre Einstellungen gehalten. Das Display ist beleuchtet. Mit dieser Funktion können Sie das Uhrenradioebenfalls umsetzen, ohne die Uhrzeit neu einstellen zu müssen. Die Batterie zur Gangreserve dient nur fürvorübergehenden Stromausfall. Bei längerem Batteriebetrieb ist sie schnell erschöpft oder die Uhrzeit wirdungenau. Eine erschöpfte Batterie muss aus dem Gerät entfernt werden, um ein Auslaufen zu vermeiden.Möchten Sie die Gangreserve nicht benutzen, so funktioniert das Uhrenradio auch ohne Batterie. BeiNetzausfall blinkt dann allerdings das Display und die Einstellungen müssen neu vorgenommen werden.REINIGUNG UND PFLEGEWischen Sie das Gehäuse mit einem leicht angefeuchteten Tuch ab (der Netzstecker muss gezogen sein).Setzen Sie das Uhrenradio nicht direkter Sonneneinstrahlung, Feuchtigkeit oder Staub aus.Schützen Sie das Uhrenradio vor Wärme erzeugenden und störenden Geräten wie Neonröhren und Radio FrequenzbereichLeistungsaufnahme: 230 V 50 Hz: 9 V (1 x 9 V 6F22 nicht mitgeliefert): MW 530-1600 kHz: UKW 88-108 MHz:3WSicherheitsvorkehrungen:Um das Risiko eines elektrischen Schlags zu verringern, sollte dieses ProduktAUSSCHLIESSLICH von einem autorisierten Techniker geöffnet werden. BeiProblemen trennen Sie das Gerät bitte von der Spannungsversorgung und vonanderen Geräten ab. Stellen Sie sicher, dass das Gerät nicht mit Wasser oder Feuchtigkeit in Berührung kommt.VORSICHTSTROMSCHLAGGEFAHRNICHT ÖFFNENWartung:Nur mit einem trockenen Tuch säubern. Keine Reinigungs- oder Scheuermittel verwenden.Garantie:Es kann keine Garantie oder Haftung für irgendwelche Änderungen oder Modifikationen des Produkts oderfür Schäden übernommen werden, die aufgrund einer nicht ordnungsgemäßen Anwendung des Produktsentstanden sind.Allgemeines:Design und technische Daten können ohne vorherige Ankündigung geändert werden.Alle Logos, Marken und Produktnamen sind Marken oder eingetragene Marken ihrer jeweiligen Eigentümerund werden hiermit als solche anerkannt.Bitte bewahren Sie Bedienungsanleitung und Verpackung für spätere Verwendung auf.Achtung:Dieses Produkt ist mit diesem Symbol gekennzeichnet. Es bedeutet, dass die ausgedientenelektrischen und elektronischen Produkte nicht mit dem allgemeinen Haushaltsmüll entsorgt werdendürfen. Für diese Produkte stehen gesonderte Sammelsysteme zur Verfügung.5
FRANÇAISEMPLACEMENT DES COMMANDES1. Marche/Auto/Arrêt2. Régler l’heure3. Régler/désactiver l’alarme4. Veille automatique5. Touche Snooze (Rappel d’alarme)6. Heure7. Minute8. Contrôle volume/ Avertisseur9. Commutateur de bande10. Bouton de réglage de la syntonisation11. Indicateur AUTOLe dessous : Compartiment pour une pile 9 volts (6F22) (non incluse) pour la sauvegarde de l’heure.UTILISATION DE L’HORLOGE1.2.3.Branchez le cordon d’alimentation dans une prise secteur 230VL’appareil s’allume et l’heure clignote à l’écran.Pour régler l’heure, appuyez simultanément sur la touche TIME SET (2) et sur la touche HOUR (6) etrelâchez lorsque l’heure correcte est affichée. Appuyez simultanément sur la touche TIME SET (2) et surla touche MINUTE (7) pour régler l’heure correcte.Utilisation de la radio1.2.3.4.5.Mettez l’interrupteur ON/OFF/AUTO (1) (Marche/arrêt/Auto) sur la position “ON”.Mettez le commutateur de bande (9) sur FM ou AM.Tournez le bouton volume (8) sur le niveau souhaité.Tournez le bouton de syntonisation TUNING (10) pour sélectionner la station souhaitée.AntenneLa réception des signaux AM se fait par le biais d’une antenne en ferrite intégrée.La réception des signaux FM se fait par le biais d’une antenne FM externe. Déployez l’antenne aumaximum pour la meilleure performance.REVEIL A LA RADIOAprès avoir syntonisé la station et réglé le volume, continuez comme suit :1. Mettez l’interrupteur ON/OFF/AUTO (1) (Marche/arrêt/Auto) sur la position “AUTO”.2. Maintenez enfoncée la touche ALARM SET (3) et appuyez sur la touche HOUR (6) puis sur MINUTE (7)jusqu’à régler l’heure de réveil souhaitée. Pour vérifier l’heure de réveil, appuyez sur la touche ALARMSET (régler l’alarme) (3). L’heure de réveil reste mémorisée et la radio s’allume automatiquement à cetteheure le jour suivant. Pour éteindre la radio, appuyez sur la touche ALARM OFF (désactiver l’alarme) (3).3. Lorsque l’alarme se déclenche et que vous souhaitez écouter la radio, appuyez sur la touche SLEEP (4)pour allumer la radio et appuyez sur la touche SNOOZE (5) pour éteindre la radio.REVEIL A LA SONNERIEEffectuez le même réglage que dans “REVEIL A LA RADIO” mais mettez le bouton volume (8) sur la positionBUZZER. La sonnerie peut être désactivée en appuyant sur la touche ALARM OFF (désactiver l’alarme) (3)ou passer en mode radio en positionnant le commutateur ON/OFF/AUTO (1) sur “ON”.S’ENDORMIR AU SON DE LA RADIOLa radio peut être réglée pour s’activer ou pour s’éteindre automatiquement après 1 minute jusqu’à 1 heure et59 minutes : Avec toutes les touches dans la position “Réveil à la radio”, appuyez sur la touche SLEEP (4) etsur la touche MINUTE (7) pour régler la durée de mise en veille automatique. Pour éteindre la radio avant lamise en veille automatique, appuyez sur la touche SNOOZE (5).6
TOUCHE SNOOZELa touche SNOOZE (5) éteint l’alarme/radio pendant 9 minutes. Après ces 9 minutes l’alarme/radio serontrallumées.PILE DE SECOURS(Uniquement pour une réserve de courant de courte durée)Connectez une pile 9 Volts (6F22) (non incluse) dans le compartiment pour piles. Dans le cas de panneélectrique, l’horloge continue à fonctionner. L’afficheur de l’horloge sera allumé. Ceci vous permet égalementde déplacer l’appareil d’un endroit à l’autre sans avoir à régler l’heure à chaque fois. La pile de secours nepeut servir que pendant une courte coupure de courant. Si une coupure de courant se prolonge, la pile seraépuisée et il y aura une certaine déviation dans l’heure. Si la pile est épuisée, elle doit être retirée de l’appareilpour éviter toute fuite. L’appareil peut fonctionner normalement sans pile de secours, mais les réglages serontperdus en cas de coupure de courant. Cependant, si l’appareil est débranché du courant, l’afficheur se mettraà clignoter après ré-branchement et vous devez régler l’heure comme décrit au chapitre “UTILISATION DEL’HORLOGE”.ENTRETIENLes surfaces extérieures peuvent être nettoyées à l’aide d’un chiffon humidifié (vérifiez que l’appareil estdébranché du secteur avant de le nettoyer).Evitez de laisser le Radio-réveil exposé directement au soleil ou dans des endroits chauds, humides oupoussiéreux.Eloignez votre appareil des appareils de chauffage et des sources de bruit électrique telles que les lampesfluorescentes ou les moteurs.SPECIFICATIONSAlimentationPileGamme de fréquenceConsommation d’énergieConsignes de sécurité :ATTENTIONRISQUE DE CHOC ELECTRIQUENE PAS OUVRIR: 230V 50Hz: 9V (1 x 9V 6F22 non incluse): AM 530-1600kHz: FM 88-108MHz: 3WPour réduire le risque de choc électrique, ce produit ne doit être ouvert que par untechnicien qualifié si une réparation s’impose. Débranchez l’appareil et les autreséquipements du secteur s’il y a un problème. Ne pas exposer l’appareil à l’eau nià l’humidité.Entretien :Ne nettoyez l’appareil qu’avec un chiffon sec. N’utilisez pas de solvants ou de produits abrasifs.Garantie :Aucune garantie ou responsabilité ne sera acceptée en cas de modification et/ou de transformation du produitou en cas de dommages provoqués par une utilisation incorrecte de l’appareil.Généralités :Le design et les caractéristiques techniques sont sujets à modification sans notification préalable.Tous les logos de marques et noms de produits sont des marques déposées ou immatriculées dont leursdétenteurs sont les propriétaires et sont donc reconnues comme telles dans ce documents.Conservez ce manuel et l’emballage pour toute référence ultérieure.Attention :Ce symbole figure sur l’appareil. Il signifie que les produits électriques et électroniques ne doiventpas être jetés avec les déchets domestiques. Le système de collecte est différent pour ce genre deproduits.7
NEDERLANDSLOCATIE VAN BEDIENINGEN1. Aan/Uit/Auto2. Tijdinstelling3. Alarminstelling/Uit4. Slaap5. Snoozetoets6. Uur7. Minuut8. Volumeregeling/Zoemer9. Bandschakelaar10. Afstemregeling11. AUTO indicatorONDERZIJDE: Batterijhouder voor 9-Volt (6F22) batterij (niet inbegrepen) voor back-up vermogen.KLOKBEDIENING1.2.3.Sluit de voedingskabel aan op een 230 V AC stopcontact.Het apparaat is nu ingeschakeld; de tijd knippert op het display.Om de correcte tijd in te stellen, dient u gelijktijdig op de TIJDINSTELLING toets (2) en UUR toets (6) tedrukken en de toetsen weer los te laten wanneer de juiste uren worden weergegeven. Druk vervolgensgelijktijdig op de MINUUT toets (7) en TIJDINSTELLING toets (2) om de juiste tijd in te stellen.RADIOBEDIENING1.2.3.4.5.Schuif de AAN/UIT/AUTO schakelaar (1) naar AAN.Schuif de BAND schakelaar (9) naar FM of AM.Draai de volumeregeling (8) om het gewenste volume in te stellen.Draai de AFSTEMREGELING (10) om op uw favoriete station af te stemmen.AntenneDeze radio is voor AM ontvangst voorzien van een ingebouwde, hooggevoelige ferrietantenne.Deze set is voor FM ontvangst uitgerust met een externe FM draadantenne. Wikkel deze volledig uit vooroptimale prestatie.WAKKER WORDEN DOOR DE RADIOSelecteer uw station, stel het volume naar wens in en ga vervolgens als volgt te werk:1. Schuif de AAN/UIT/AUTO schakelaar (1) naar AUTO.2. Houd de ALARMINSTELLING toets (3) ingedrukt en druk op de UUR toets (6) en vervolgens de MINUUTtoets (7) totdat de correcte alarmtijd is ingesteld. U kunt de alarmtijd controleren door slechts op deALARMINSTELLING toets (3) te drukken. De vooringestelde alarmtijd blijft in het geheugen opgeslagenen de radio zal de volgende dag op dezelfde tijd inschakelen. Schakel de radio uit door op de ALARM UITtoets (3) te drukken.3. Wanneer het alarm is ingesteld maar u wilt graag naar de radio luisteren vóór de ingestelde alarmtijd, dankunt u eenmaal op de SLAAP toets (4) drukken om de radio in te schakelen en weer op de SNOOZE toets(5) drukken om de radio uit te schakelen.WAKKER WORDEN DOOR DE ZOEMERStel de bedieningen in zoals beschreven voor “Wakker worden door de Radio”, maar dan met devolumeregeling (8) op de stand ZOEMER. U kunt de zoemer uitschakelen door op de ALARM UIT toets (3) tedrukken of door de AAN/UIT/AUTO schakelaar (1) naar stand AAN te schuiven om de radio in te schakelen.IN SLAAP VALLEN MET DE RADIOU kunt de radio zodanig instellen dat deze na 1 minuut tot 1 uur en 59 minuten automatisch uitschakelt:Controleer of alle bedieningen vooringesteld zijn in de stand “Wakker worden door de Radio” en druk op deSLAAP toets (4) en MINUUT toets (7) om de gewenste slaaptijd af te laten tellen. U kunt op de SNOOZE toets(5) drukken om de radio vóór de opgeslagen slaaptijd uit te schakelen.8
SNOOZE BEDIENINGDe SNOOZE toets (5) schakelt het alarm of de radio voor ca. 9 minuten uit. Na deze 9 minuten zal de radio ofhet alarm weer klinken.BACK-UP BATTERIJ(Alleen voor tijdelijk back-up voeding)Plaats een 9-Volt (6F22) batterij (niet inbegrepen) in de batterijhouder. In het geval van stroomuitval, zullenalle instellingen in de klok opgeslagen blijven en de klokdisplay zal oplichten. Hierdoor kunt u bovendien de setvan de ene naar de andere plek verplaatsen zonder de klok telkens opnieuw te moeten instellen. Het back-upbatterijsysteem wordt alleen gebruikt voor tijdelijke stroomonderbrekingen. Als er voor langere tijd geen stroomis, zal de batterij uitgeput raken of kan de nauwkeurigheid van de klok minder worden. Zodra de batterij isuitgeput, dient u het te verwijderen om lekkage te voorkomen. U hoeft natuurlijk geen gebruik te maken vandit back-up batterijsysteem, want uw radio werkt ook prima zonder batterij. Als u echter de stekker uit hetstopcontact haalt, zal de klokdisplay weer knipperen nadat u het apparaat opnieuw aansluit en dient u de klokwederom in te stellen zoals beschreven in de paragraaf “Klokbediening”.ZORG E
Spannungsversorgung : 230 V 50 Hz Batterie : 9 V (1 x 9 V 6F22 nicht mitgeliefert) Radio Frequenzbereich : MW 530-1600 kHz: UKW 88-108 MHz Leistungsaufnahme : 3 W Sicherheitsvorkehrungen: Um das Risiko eines elektrischen Schlags zu verringern, sollte dieses Produkt AUSSCHLIESSLI