Transcription
BOSSRESELLER AUTOMATED ACCESSPROCEDURAL MANUALRevised 1/2021spok.com1
Table of ContentsHOW TO SIGN ON . 3HOW TO RESET PASSWORD/RE-ENABLE LOGIN . 5TWO-FACTOR AUTHENTICATION. 6RESELLER PAGER MAINTENANCE SCREEN . 11HOW TO ACTIVATE A PAGER . 14HOW TO MODIFY A PAGER . 15HOW TO EXCHANGE/SWAP A PAGER . 16HOW TO RECONNECT A PAGER . 16HOW TO VIEW A PAGER . 16HOW TO TEMPORARILY DISCONNECT A PAGER . 17HOW TO CANCEL A PAGER . 17HOW TO SEND A TEST PAGE . 17HOW TO USE THE INQUIRY SECTION . 17HOW TO ADD EQUIPMENT TO YOUR ACCOUNT . 21HOW TO SUBMIT THE PAGER REPROGRAM . 22HOW TO EXIT SPOK MODEM ACCESS . 22Confidential and Proprietary to Spok.Use or Disclosure Outside Spok without Spok Permission is prohibited.Revised 1/2021spok.com2
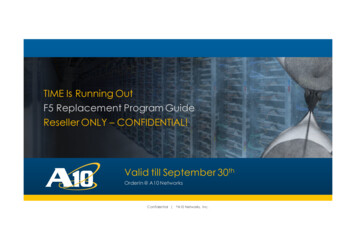
ACCESSING SPOK’S BOSS ONLINE SYSTEMUse the following to access the BOSS Online System: https://gw.spok.comUpon accessing the BOSS ONLINE SYSTEM, The Spok On-line Login screen will appear as seen in the belowillustration.HOW TO SIGN ONSTEP 1Enter your customer specific Login IDSTEP 2Enter your customer specific password and click Login.STEP 3A Map screen will appear.STEP 4Click on the appropriate state in which your account is located.STEP 5If there are any pertinent messages related to your account the Indirect Messagescreen will display. If there are not any messages then you will be directed to theReseller Maintenance screen.From the Indirect Message Screen press Enter to go into the Reseller Maintenance screen.NOTE: If the information you entered within the initial On-line Login screen is incorrect, you will receive an errormessage. Please confirm your LOGIN ID / PASSWORD and retry. You will have two more opportunities to LOGON. After the third unsuccessful attempt, the system will disable the login and sends a message to the systemoperator that an illegal entry into the system was attempted. You may re-enable the login using the resetpassword function on the login screen or contact Spok support personnel for assistanceRevised 1/2021spok.com3
NOTE: For First Time users: On the webpage, https://gw.spok.com enter your “specific” UserID in the Login fieldand enter your UserID again in the Password field – using this process, your specific Password has been reset tomirror your UserID.After selecting the appropriate state on the LoginID map, you will be routed to BOSS Online and will beprompted to change your password. In the Current Password field, enter the Password that matches yourUserID, followed by a new password of your choice. Passwords must be between 6 and 10 characters andbegin with a letter (A-Z). Every 60-days your password will expire and you will be prompted to change it usingthe same procedure.You may also be prompted to set up an email address to be used to reset your password as shown below. Youmay add up to 10 email addresses. This process may be skipped up to a maximum of 3 times (prompt only occursonce per day or until an address is added). The Login Reset Email Maintenance option can be accessed from the(I) Inquiry menu – Option 91Revised 1/2021spok.com4
HOW TO RESET PASSWORD/RE-ENABLE LOGINSTEP 1Click the link at bottom of login page Click here to request resetSTEP 2Enter your customer specific password and one of the login reset email addressesadded during setup.STEP 3Click SUBMITSTEP 4Confirmation message will appear indicating that password reset has beenrequested. Retrieve the reset password email sent to the address indicated in step2.STEP 5There will be TWO options indicated on the email. The first option will re-enableyour login WITHOUT changing your existing password. The second option will reenable your login AND reset your password, allowing you to select a new password.STEP 6Click SUBMITSTEP 7Confirmation message will appear indicating that reset is complete. Click GATEWAYMAIN MENU link to continue log in.Revised 1/2021spok.com5
TWO-FACTOR AUTHENTICATIONTwo-Factor Authentication will help ensure that your login to Spok Gateway is safe and secure. Uponsuccessful login to Spok Gateway, users will be required to register for Two-Factor Authentication. Onceregistered, a randomly generated access code will be sent to your preferred delivery method, this access codewill be necessary to complete the login process.The following screen will display for users that have not registered for Two-Factor Authentication.Enter E to Exit, to Skip Two-Factor Registration. The Skip Two-Factor Registration warning will display, pressenter to return to the log in screen.To Register for Two-Factor Authentication, Enter R to Register. The Register for Gateway Two-FactorAuthentication screen will display.Revised 1/2021spok.com6
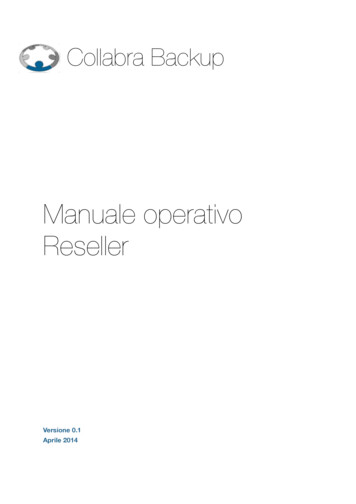
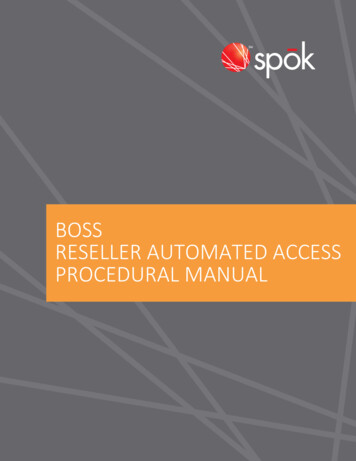
Step 1: Enter the email and or cell phone number you want to receive the access code.Step 2: If an email address and cell phone number were provided in step 1, designate a preferred deliverymethod by entering E for Email or C for Cell Phone Number.Step 3: Enter S to Send Access Code. The Access Code Sent window will display as shown below.Both Email Address and Cell Phone Number:Revised 1/2021spok.com7
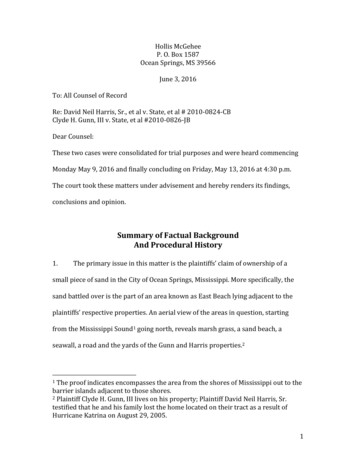
Email Address Only:Cell Phone Number Only:Press Enter, to return to the Register for Two-Factor Authentication screen.A randomly generated access code will be sent to each delivery method listed in step 1. Upon successfulregistration, the access code will be sent to the Preferred delivery method only.Email:Cell:Revised 1/2021spok.com8
Note: Changes made to the registration information after selecting Send Access Code, will void theprevious access code and require the user to select S to Send/Resend Access Code to receive a newaccess code.Step 4: Retrieve the access code from your email or cell phone, enter the code in the Access Code field. EnterS to Save and complete the registration.The Two-Factor Registration completed window will display. Press Enter to exit and continue.Upon successful registration for Two-Factor, subsequent login attempts will require Two-FactorAuthentication. A randomly generated access code will be sent to your preferred delivery method enteredduring the registration process. Users will be required to enter this access code to complete the login process.If both an Email Address and Cell Phone Number were entered during Two-Factor registration, the screenbelow will display.Revised 1/2021spok.com9
If you did not receive the Access Code, Enter C to Resend Access Code to My Cell or M to Resend Access Codeto My Email to have a new access code sent. The previously sent access code will become obsolete onceResend Access Code is requested.If only one delivery method was entered during Two-Factor registration, the screen below will display.Revised 1/2021spok.com10
If you did not receive the Access Code, Enter S to Resend Access Code. The previously sent access code willbecome obsolete once Resend Access Code is requested. The Access Code Sent window will display as shownbelow.Press Enter to return to the Authenticaiton Window. Retrieve the access code from your Email or Cell, inputthe Access Code, press Enter to continue.RESELLER PAGER MAINTENANCE SCREENThis screen as seen in the sample below allows you to process paging/programming functions by selecting thecorresponding Transaction Code for the type of transaction you wish to process. You DO NOT need to press theENTER key after the Transaction Code is entered.Revised 1/2021spok.com11
Helpful Hints on the Use of Keys:TAB:Moves the cursor forward one validated field at a time without changing thatfield.FIELD EXIT:(Press the far right Plus ( ) key. Only available on a Desk Top PC) Moves thecursor to the next validated field as follows: If the cursor were located in a blankspace following the data, it will right justify that data. If the cursor were locatedat the beginning of a field that already contains data, it will delete all data inthat field.RESET:(Press the CTRL key AND the R key) Releases system lock errors due to incorrectkeystrokes or data entry.ALL NATIONWIDE TRANSACTIONS MUST BE PROCESSED BY SPOK. Also, if you need the “Timing” changed fora unit, please call your Spok Support personnel.Below are the following options and corresponding codes that are available in this screen along with a briefdescription.Revised 1/2021spok.com12
A - ActivateThis is to “turn on” a new capcode and assign a phone number. Addedfeatures, such as voice mail can be keyed at this time as well as upgradedcoverage.M - ModifyThis is to make changes or add features to a current record in service. You canchange the telephone number, holder field, add voice mail, or upgradecoverage with this option.X - ExchangeThis is to exchange/swap one unit with another. The capcode of the old andnew unit is needed.R - ReconnectThis is to turn on a unit that was in temporary disconnect status or canceled(end dated).V - ViewThis allows you to view a record that is active or a record that has been outof service. You can enter the phone number or capcode. You are able to seeall the information pertaining to this record such as frequency, baud, unittype, coverage, and features.T - TermsUsed to determine if you have multiple “contracts”. Most resellers will notneed this.D - TemporarilyDisconnectThis allows you to temporarily interrupt a unit. The unit will remain on billinguntil you CANCEL the unit or 90 days from the date you place it in DIS status.The system will automatically CANCEL all units in DIS status after 90 days.C - CancelThis allows you to cancel (end date) a unit off of billing. A unit in DIS(temporary disconnect) can be canceled by using this transaction code. Thereis no need to reconnect the unit to active status prior to canceling.P - PageThis allows you to send a test page to a unit in service.I - InquiryThis allows you to view available capcodes assigned to you, review overcallhistory and see your balance owed to Spok.S – Submit PagerReprogramThis allows you to reprogram the device to the specified paging terminal.E - ExitThis allows you to exit the BOSS system.A Note about Domain Feature codes:The following domain feature codes are used to represent the four Spok company domains in which they willindicate the domain address when attached to a specified device.Revised 1/2021spok.com13
AIR - Airmessage.net,ARH - Archwireless.net,M2W - My2way.com,USA - Usamobility.netAt this time the Domain address feature will only apply to Two-way devices and under certain circumstancesprior to the WME Collapse (August 13th, 2006), one-way devices that had an existing ALI, MCC or WGL feature.When adding ALI, MCC or WGL features to one-way devices after the WME collapse the user will be requiredto select the applicable domain feature code.The domain feature can be changed by using the Transaction code of ‘M’ – Modify. If a ‘Like Exchange’ isperformed the cursor is protected from the features section so that no changes can be made.HOW TO ACTIVATE A PAGERSTEP 1TRANSACTION CODE: Enter A in the transaction field.STEP 2CAPCODE FIELD: Enter the 7-Digit capcode.STEP 3HOLDER FIELD: The holder field is an informational field ONLY and is to beused at your discretion. You may put your customer name or account numberin this field. You may enter 20 characters. TAB to the S Field.STEP 4S FIELD: Enter X in the field to the left of the telephone to free pool (autoselect) a number. If you already have the complete phone number of yourchoice, leave this field blank.STEP 5TELEPHONE FIELD: Enter the AREA CODE or AREA CODE AND PREFIX of thelocal number to be requested. If you have a specific phone number, enter theArea Code and Phone number. Press the TAB key to proceed to theCOVERAGE field.Revised 1/2021spok.com14
STEP 6COVERAGE FIELD: Enter the 3 CHARACTER Coverage Code. Please refer to theBOSS CODE BOOK.STEP 7VOICE MAIL FIELD: Enter the 3 CHARACTER Voice Mail Code (if applicable).Please refer to the BOSS CODE BOOK.STEP 8FEATURES FIELD: Enter the 3 CHARACTER Feature Code (if applicable). Pleaserefer to the BOSS CODE BOOK.STEP 9PRESS ENTER. The system will automatically free pool (auto-select) anavailable phone number at this time. If the specific phone number youselected is unavailable, you will receive and error message. You must select anew telephone number or auto-select a telephone number. If all is correct,press ENTER again. (The cursor will be flashing at Save Information.) Themessage “Record Added” will appear. If your information is incorrect, pleasecorrect the appropriate field(s) and continue the process.This pager will now be in “SER” status.HOW TO MODIFY A PAGERSTEP 1TRANSACTION CODE: Enter M in the transaction field.STEP 2Enter either the CAPCODE or the TELEPHONE NUMBER in the appropriate field.Then press the ENTER key. The system will automatically display the detail forthis pager record.STEP 3Press the TAB key to move the cursor to the field(s) you wish to change. Enteryour updated information and press ENTER. If all is correct, press ENTER again.(The cursor will be flashing at Save Information.) The message “RecordUpdated” will appear. If your information is incorrect, please correct theappropriate field(s) and continue the process.YOU CAN CHANGE THE HOLDER FIELD, TELEPHONE NUMBER, COVERAGEFIELD, VOICE MAIL FIELD, AND FEATURE FIELD IN THIS TRANSACTION MODE.Revised 1/2021spok.com15
HOW TO EXCHANGE/SWAP A PAGERSTEP 1TRANSACTION CODE: Enter X in the transaction field.STEP 2Enter the CAPCODE of the existing pager in the CAPCODE FIELD. The cursorwill automatically move to the Exchange Pager Info Capcode field.STEP 3Enter the new CAPCODE in the CAPCODE FIELD.STEP 4Press ENTER.STEP 5If all is correct, press ENTER again. (The cursor will be flashing at SaveInformation.) The message “Record Swapped” will appear. If your informationis incorrect, please correct the appropriate field(s) and continue the process.If the “in service” capcode is unknown, you must VIEW the record viatelephone number to obtain the capcode. The new capcode must be in AVLstatus. At this time you may proceed with the above procedures to processyour exchange.HOW TO RECONNECT A PAGERSTEP 1TRANSACTION CODE: Enter R in the transaction field.STEP 2Enter either the CAPCODE or the TELEPHONE NUMBER of the unit you wish toreconnect, in the appropriate field.STEP 3Press ENTER.STEP 4If all is correct, press ENTER again. (The cursor will be flashing at SaveInformation.) The message “Record Updated” will appear. If your informationis incorrect, please correct the appropriate field(s) and continue the process.This option will automatically change the status of a DIS unit (temporarilydisconnected record) or an END unit (end-dated) to SER status (In-Service).HOW TO VIEW A PAGERSTEP 1TRANSACTION CODE: Enter V in the transaction field.STEP 2Enter either the CAPCODE or TELEPHONE NUMBER in the appropriate field.(You can not use the telephone number to view an END (canceled) unit, youmust use the capcode.)STEP 3Press ENTER. The record will appear with all relative information.Revised 1/2021spok.com16
HOW TO TEMPORARILY DISCONNECT A PAGERSTEP 1TRANSACTION CODE: Enter D in the transaction field.STEP 2Enter either the CAPCODE or TELEPHONE number in the appropriate field.STEP 3Press ENTER. If all is correct, press ENTER again. (The cursor will be flashing atSave Information.) The message “Record Updated” will appear. If yourinformation is incorrect, please correct the appropriate field(s) and continuethe process.This option will change the status of the record from SER (In-Service) to DIS(Temporarily Disconnect) when the transaction is completed.The unit is still ON BILLING, and you will be responsible for related charges.If you wish to delete the record, please see “How to Cancel”.HOW TO CANCEL A PAGERSTEP 1TRANSACTION FIELD: Enter C in the transaction field.STEP 2Enter either the CAPCODE or TELEPHONE NUMBER in the appropriate field.STEP 3Press ENTER. The pager information will be displayed.STEP 4If the information is correct, press ENTER again. (The cursor will be flashing atSave Information.) The message “Record Deleted” will appear. If yourinformation is incorrect, please correct the appropriate field(s) and continuethe process.This option will change the status of the record from SER (In-Service) or DIS(temporary disconnect) to END (End-Dated) when the transaction is keyed.HOW TO SEND A TEST PAGESTEP 1TRANSACTION CODE: Enter P in the transaction field.STEP 2Enter either the CAPCODE or TELEPHONE NUMBER in the appropriate field.STEP 3Press ENTER. A page will be sent. The message “Test Page is Sent” will appear.HOW TO USE THE INQUIRY SECTIONThis section will allow you to view information pertaining to your account.Revised 1/2021spok.com17
To access this section, enter I in the Transaction Field. Once I is entered the screen will change to INQUIRYOPTION. Below are your options once you are in this section.01 - Inventory Inquiry02 - Overcall Inquiry03 - Overcall History Inquiry04 - Contract Inquiry by Holder05 - Account Balance Information06 - Reseller Equipment Entry07 - Total In Service Units Inquiry91 - Login Reset Email Maintenance99 - ExitINVENTORY INQUIRYThis section is best utilized to search for capcodes that are assigned to your account. You will be able to viewcapcode, telephone number (if in service) frequency, type of service, status of unit, model and baud rate,channel, coverage and paging terminal. You will be able to view all units in your account, both in service andavailable.You can inquire via capcode, frequency, service type and status. For frequency, enter the 7-Digit frequency withno decimal point. If the frequency is only 6-Digits, add a “0” at the end. You may search for units in SER and AVLstatus only. Please note that units in END status will list as AVL on this screen. To scroll through the informationyou will need to enter F to scroll forward or B to scroll backward. Entering E will exit you out of this option.OVERCALL INQUIRY AND HISTORYThis section will allow you to view total call count per unit and any associated overcall charges on a monthlybasis. The total is updated once a month and does not list a “running total” of calls.Re
Revised 1/2021 spok.com 7 Step 1: Enter the email and or cell phone number you want to receive the access code. Step 2: If an email address and cell phone number were provided in step 1, designate a preferred delivery method by entering E for Email or C for Cell Phone Number. Step 3: Enter S to Send Access Code