Transcription
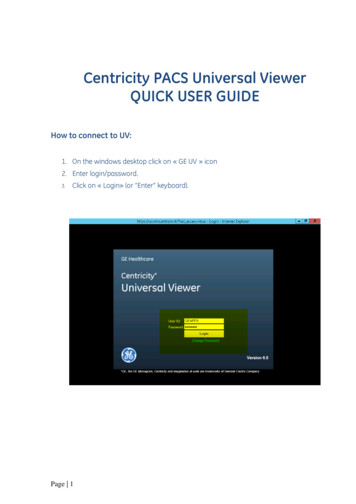
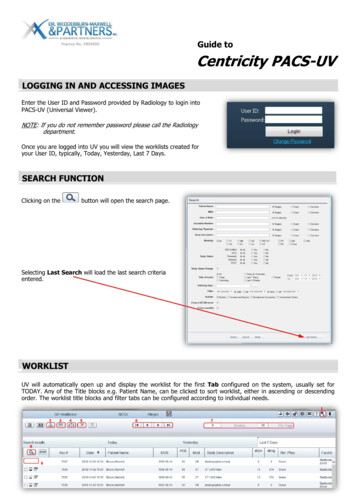
Guide toCentricity PACS-UVLOGGING IN AND ACCESSING IMAGESEnter the User ID and Password provided by Radiology to login intoPACS-UV (Universal Viewer).NOTE: If you do not remember password please call the Radiologydepartment.Once you are logged into UV you will view the worklists created foryour User ID, typically, Today, Yesterday, Last 7 Days.SEARCH FUNCTIONClicking on thebutton will open the search page.Selecting Last Search will load the last search criteriaentered.WORKLISTUV will automatically open up and display the worklist for the first Tab configured on the system, usually set forTODAY. Any of the Title blocks e.g. Patient Name, can be clicked to sort worklist, either in ascending or descendingorder. The worklist title blocks and filter tabs can be configured according to individual needs.128934567
Guide toCentricity PACS-UVWORKLIST BUTTONS1Lights on/off mode. Allows the user to select a light or dark colourscheme for the application depending on lighting conditions.2This button will expand your selected study into series view.3View thumbnails of selected studies.4Clicking on the Compare button will open selected studies in comparemode.5Select or deselect ALL studies.6Use these buttons to page through the worklist pages – first page,back, forward and last page.7Page information indicator, the second block can be set to any value i.e.20 case per page.8Search button.9Use tick box to select or deselect case; Click on the Monitor to viewselected study; Notepad is to view or enter note/report.WORKLIST IN SERIES VIEWOnce you have selected a case and wish to see the series list expanded click on theappear in an expanded view – showing all the series information applicable.button and that case willA single click on the series you wish to view will open that series only or you can select multiple series and then usethe monitor (arrow) on the top left to view selected series.A selected series can be expanded into individual images using the same process as above.Use thebutton to go back to full study list.Page 2 of 8
Guide toCentricity PACS-UVVIEWING A STUDYA single left click on a study will open all the images in either a user defined hanging protocol or a default hangingprotocol if no matching criteria is identified.The system will automatically determine the monitor configuration of the system and hang images accordingly – theexample below is a dual colour monitor configuration.The default compressionfactorisLosslessWavelet, when loggingon remotely, rememberto select Lossy Waveletto increase downloadspeeds (found next tothe maximise/minimisebutton when one opensthe images for viewing).NAVIGATORThe navigator can be hidden or activated from the toolbar with thebutton.The navigator is normally docked on the left of the images, but can be draggedaround the image if it is in the way.In the example below the navigator is configured to show whether or not a serieshas been viewed completely – the red squares indicate not viewed; the green circleindicates completely viewed and the yellow triangle means half viewed.Loading a Series from the NavigatorTo load a series into a viewport, drag and drop the series from the navigator or asillustrated below use the navigator screen map to drop the series where you want it.Left click and hold on the series in the navigator and move the mouse slightly to activatethe screen map – the dark red square will be the new position of the series on the screenwhen you release the mouse button.Page 3 of 8
Guide toCentricity PACS-UVMOUSE CONTROLSLeft mouse button:This defaults to the paging/scrolling function. This can be changed by selecting the variousfunctions from the toolbar or from the screen – click on zoom (bottom left) to change tozoom function, window level (bottom right) for windowing or go back to scrolling by clickingon the image number (top left).Right mouse button:This defaults to windowing image centre and width.Roll mouse wheel:This enables one to scroll through images. When in zoom mode clicking and holding mousewheel activates pan function.TOOLBAR MENUPage Scroll – allows scrolling throughimages using the mouse wheel.Save images, series or study as imagefiles (JPEG, Bitmap, GIF or DICOM).Hanging protocol - changes the viewportarrangement. Click on the arrow to see alist of available hanging protocols.Point to point measurement.Timeline – allows the user to see thepatient’s history in timeline format.Angle measurement.Window Level/contrast.Cardio Thoracic Measurement – click onthe icon and then on the Chest x -rayimage to activate the automatedmeasurement.Magnification glass.Central Elliptical ROI.Zoom.Rectangular ROI.Pan.Freehand ROI.Select images.Delete measurements and annotations.Closes and opens the Navigator.Opens the Labels icons – text,arrows, etc.Annotations.Exits the study.Global stack – scrolls through all imagesand series consecutively.Slab Scroll – loads selected CT series intoMIP view. Drop down list allows choiceof thickness of reconstructed image.Page 4 of 8
Guide toCentricity PACS-UVCOMPARING CURRENT AND PREVIOUS IMAGESTo compare previous images one must make sure that the images are referred to oneself first. If the patient is notreferred to you, radiology should be contacted to allow you to view the images.The user can view the previous cases by using the Timelineicon. The chronological timeline represents a tilefor each study, grouped by dates associated with the patient selected.To add a study from the Timeline as athumbnail in the Navigator, click anywhereabove the date in the study tile.Images from the study are added asthumbnails in the Navigator and one is ableto use these images to compare to thecurrent study.It is also possible to check if the patient has had previous images and who referred thepatient by looking at the Patient Folder. In the view study window, click FOLDER in themain menu.This opens the PATIENT FOLDER window which shows a list of the patient’s previousimages.Click in the tick box next to the required images to view and click on Display.The current image will be opened on the left side of the screen and thecomparison (prior) image will be opened on the right side of the screen.RIGHT CLICK MENU OPTIONSRight clicking on an image will open the menu options.Choose Preset Window to select preset window levels – e.g. bone, lung window.To Flip, Mirror or Rotate an image select the appropriate option from the list.Upgrade to full fidelity gives you the option load an uncompressed image if youare in Lossy Wavelet compression.Page 5 of 8
Guide toCentricity PACS-UVVIEWING A REPORT WITHOUT OPENING THE STUDYAn easy option to view whether the patient has a report, is to look at the worklist – a greennotepad indicates that this patient has a report.One can open the report by clicking once on the green notepad.SHORTCUT KEYS6Undo zoomRResets windowing to RecommendedVInverts the imageSpace barGoes through the preset windows for CT/MRITRIANGULATIONMarking an image with the triangulation buttonother series that are open.will automatically localise that position with a marker on theimage markedlocation not foundPage 6 of 8
Guide toCentricity PACS-UVMPR FUNCTIONIf you have thin slices available in a study they can be loaded into the MPR function. Select the appropriate series andclick on the MPR button.The target image is loaded into bottom right hand screen – this can be changedto Axial, Sagittal or Coronal view by selecting one of the buttons below.REFERRING A PATIENT TO ANOTHER REFERRING DOCTORIf a patient needs to be referred to another specialist doctor one needs to select Refer from the Patient Folderwindow.Click on Find to select the referring doctor you want togrant temporary access to.Select the worklist to place the images in by click on theWorklist icon. Select the name of the worklist andclick on OK . Once completed click onPage 7 of 8
Guide toCentricity PACS-UVSAVING IMAGESIt is best to hide all patient information if you are saving the images for presentationpurposes. With the patient’s images open, select the arrow next to the annotation icon andselect Overlay Off (arrow head).Right click on the image you wish to save and select Save Image.Select the folder you would like to save the image(s) to, by selectingBrowse.The patient’s name automatically becomes the Subfolderand File Name Header. This can be edited by typing in thefields indicated with an arrow.Select the appropriate action under Apply to Images.Active refers to the image currently selected; Entire Seriesis a single image in CR or a series in CT, MR, etc. and EntireStudy will save all images in all series.Note: one should be aware that CTs and MRIs containhundreds of images, so saving them may result in a largeamount of individual images.Click on the Annotation icon and select the first option on the list (in this case, for CR,usually CR AN 1) to unhide the patient information.CLOSING A STUDYTo close a study click on theany changes to the images.icon in the toolbar menu; this will close the study and not change status or savePage 8 of 8
Centricity PACS-UV LOGGING IN AND ACCESSING IMAGES Enter the User ID and Password provided by Radiology to login into PACS-UV (Universal Viewer). NOTE: If you do not remember password please call the Radiology department. Once you are logged into UV you will view the worklists created fo