Transcription
User Manual Warranty Info
table of contentsAccessories4Mounts5HD HERO2 Features6Firmware Update8Basics8Join the GoPro party at facebook.com/goprocameraCamera Modes11to see what other GoPro owners are capturing withAdvanced Menu Settings17Additional Menu Settings24Storage/SD Cards30System Requirements31Transferring Files32Battery Life34Important Warning Messages36Camera Assembly37FCC Statement43Warranty44Customer Support45their GoPros. Share some of your own footage andcontribute to the GoPro movement!23
WEAR it. mount it. love it.PremiumACcessoriesMore at gopro.comCoreACcessoriesMountsFloaty BackdoorRechargeable Li-Ion Battery3D HERO SystemHelmet FrontMountChest MountHarnessHandlebar SeatpostMountSurf HEROMounting KitHD Wrist HousingHead StrapSuction Cup MountVented HelmetStrapRoll Bar MountTripod MountMilitary HelmetMountGrab Bag ofMountsCurved AdhesiveMountsFlat AdhesiveMountsAnti-Fog InsertsLens Replacement KitReplacement HD HousingLCD BacPac HD Skeleton Housing16GB SD Memory Card32GB SD Memory CardBattery BacPac 45
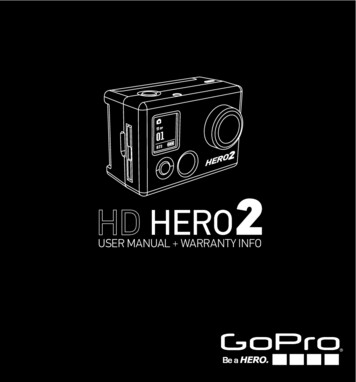
HD HERO2 Features1. LED Recording Lights2. SHUTTER/SELECT Button3. LCD Status ScreenHD HERO2 Features4. HDMI Port(cable not included)7. 2.5mm Composite Port(cable not included)5. SD Card Slot8. Microphone12. Buzzer(located on camera bottom)6. POWER/MODE Button9. HERO Port13. 3.5mm External Mic Input11. Battery Door10. USB Port (file transfer/charging)67
Firmware UpdateGoPro releases new camera features through firmware updates.Visit gopro.com/firmware to download the latest updates.USING YOUR HD HERO2: BasicsUSING YOUR HD HERO2: BASICSDEFAULT SETTINGs SNAPSHOTOut of the box, your HD HERO2 camera is configured with the following featureddefault settings:Camera Mode:VideoGetting startedVideo Resolution:960p-30fpsBefore using the HD HERO2 for first time:Field of View:170º WideStill Photo Resolution:11 MegapixelsTime Lapse Interval:1 secondPower Up Mode:Video1. Insert a SD memory card into the SD card slot.Your HD HERO2 is compatible with SD SDHC memory cards (Class 4 orhigher rated cards are recommended).‣ See STORAGE/SD CARDS for more information.2. Install the battery into your HD HERO2 camera.3. Charge the battery.The lithium-ion battery included with your HD HERO2 ships only partiallycharged. For a full charge, use the USB cable to plug the camera into a powersource such as a computer or USB charging device. No damage will occur toyour battery if you are not able to charge it before using your camera.‣ See SETTINGS MENU for more information on the camera’s default settingsand instructions on how to change them.‣ See BATTERY LIFE for more information.89
USING YOUR HD HERO2: BasicsUSING YOUR HD HERO2: camera modesPowering ON and OFFoverviewOnce the HD HERO2 is powered on, each press of will cycle through the camera’srecording modes and settings menu in the following order:To power ON the HD HERO2:Press and release . The LED Recording Light on the front of the camera willflash three times and the Buzzer will emit three short beeps.To power OFF the HD HERO2:Press and hold for two seconds. The LED Recording Lighttimes and the Buzzer will emit seven quick beeps.PROTIP:videoRecord videophotoTake single photosburstTake 10 photos in 1 secondtime lapseTake a photo every 0.5, 1, 2, 5, 10, 30, and 60 secondsself timerTake a single photo after a 10-second countdownSettingsChange the camera’s configurationwill flash sevenYou can change the HD HERO2 default settings to start inOne Button Mode, which sets the camera to immediatelybegin recording once it is powered on.Each camera mode can be changed in the Settings menu.‣ See ENTERING THE SETTINGS MENU for more information.‣ See ONE BUTTON MODE for more information.1011
USING YOUR HD HERO2: camera modesUSING YOUR HD HERO2: camera modesRecording VideoTaking Single PhotosVerify that the camera is in Video Mode, indicated byon the LCD. If not, pressrepeatedly until the camera displays the Video Mode icon.Verify that the camera is in Photo Mode, indicated byon the LCD. If not, pressrepeatedly until the camera displays the Photo Mode icon. To begin recording video:Press and release . The camera will emit one beep and the LEDRecording Light will flash while recording continues.To take a photo:Press and release . The camera will beep once and the LEDRecording Light will flash once to indicate a photo has been taken. To stop recording:Press and release . The LED Recording Light will flash three times andthe camera will emit three beeps to indicate recording has stopped.In Photo mode:The LCD screen will display your currently selected photoresolution (11MP, 8MP or 5MP), the number of photos stored onyour SD card, and the number of photos that can be taken beforethe card is full.HD HERO2 will automatically stop recording when either the SD card is full or thebattery runs out of power. Your video will be saved before the camera powers off.While recording video, the LCD will display the currently selectedvideo resolution, lens field of view (FOV), the elapsed time of thecurrent recording, and the remaining recording time determinedby the free space on your SD card.When recording is stopped, the LCD shows the number of videofiles stored on the SD card in place of the elapsed recording time.PROTIP:PROTIP:If you think your SD card will fill up before you are able totransfer your files, select the 5MP option under the Photosettings menu. 5MP files are smaller than 11MP files,allowing your SD card to store more photos.‣ See PHOTO RESOLUTION MODES for more information.When the camera is set to One Button Mode, hold fortwo seconds to enter the Settings screen, where you canquickly turn OFF One Button Mode.‣ See One Button Mode for more information.1213
USING YOUR HD HERO2: camera modesUSING YOUR HD HERO2: camera modesPhoto Burst ModeTime Lapse Photo ModeIn Photo Burst Mode, the camera will take 10 photos in 1 second.Time Lapse Photo Mode is used to take a series of photos at 0.5, 1, 2, 5, 10,30 or 60 second intervals (when using 0.5 seconds, it is recommended to use aclass 10 or higher SD card). Verify the camera is in Burst Mode, indicated byon the LCD screen.If not, press repeatedly until the camera displays the Burst Mode icon. Press and release once to take a photo burst of ten photos over onesecond. The LED Recording Light will flash and the camera will beep 10times to indicate the photos have been taken.As in Photo Mode, the LCD screen will display your currentlyselected photo resolution (11MP, 8MP or 5MP), the number ofphotos stored on your SD card, and the number of photos thatcan be taken before the card is full.PROTIP:Compared to single Photo Mode, Burst Mode gives you 10times as many chances to capture that “can’t miss” moment.‣ See TIME LAPSE PHOTO MODE in advanced settings for instructions on howto change the interval setting. Verify the camera is in Time Lapse Mode, indicated byon the LCDscreen. If not, press repeatedly until the camera displays the TimeLapse Mode icon. Press the button once to begin taking Time Lapse photos. The LEDRecording Light will flash each time a photo is taken. Press once to stop taking Time Lapse photos. The LED Recording Lightwill flash three times and the camera will emit three beeps to indicate TimeLapse has stopped.As in Photo Mode, the LCD screen will display your currentlyselected photo resolution (11MP, 8MP or 5MP), the number ofphotos stored on your SD card, and the number of photos thatcan be taken before the card is full.1415
USING YOUR HD HERO2: camera modesenterING the settings menuSelf-Timer MODEIn Self-Timer Mode, the HD HERO2 will take a single photo at the end of a10-second countdown. Verify that the camera is in Self-Timer Mode, indicated byon the LCD. Ifnot, press repeatedly until the camera displays the Self-Timer Mode icon. To take a photo, press and release . The camera will beep and the LEDRecording Light will flash during the countdown, ending with a series ofrapid beeps and flashes just before the photo is taken. To stop the countdown timer, pressADVANCED Menu SETTINGS.As in Photo Mode, the LCD screen will display your currentlyselected photo resolution (11MP, 8MP or 5MP), the number ofphotos stored on your SD card, and the number of photos thatcan be taken before the card is full.Using the Settings Menu, many of the functions of the HD HERO2 canbe customized based on your shooting needs.To access your HD HERO2 settings:1. Make sure your camera is powered ON.2. Cycle through camera modes usingthe SETTINGSicon.3. To enter into the Settings Menu, press4. Useuntil the LCD Status Screen shows.to toggle through each camera setting mode.5. Every settings mode has a list of options. Press to enter into a specificmode. The option which is currently active will be highlighted. Press totoggle through the list. Press to select highlighted option and exit list.6. Press to cycle to the next camera setting mode or presscurrent option list again.16to display17
ADVANCED Menu SETTINGSADVANCED Menu SETTINGSVideo Resolution Modes : Cont’dDefault Mode at Power UpSelect which camera mode is active (or default) when you power on your camera.video (Default)photobursttime LapseVideo Resolution ModesResolution/FPSField of View ScreenResolutionBest Use720-60170wide angle1280x720For mounting on vehicles or gearwhen a max side-to-side wide angle isdesired but vertical viewing area is notas important. Great for slow motion.720-30170ºwide angle1280x720For mounting on vehicles or gearwhen a max side-to-side wide angle isdesired but vertical viewing area is notas important.WVGA-120170ºwide angle848x480For smaller data files. This is standarddefinition resolution. Great for superslow motion.WVGA-60170ºwide angle848x480For smaller data files. This isstandard definition resolution.Great for slow motion.º(Slow motion)Your HD HERO2 camera shoots the following video resolutions:Resolution/FPSField of View ScreenResolutionBest Use1080-30170º / 127º1920x1080Highest resolution.960-48170ºwide angle1280x960This resolution provides the widesttop-to-bottom and side-to-side viewingarea. Great for slow motion.960-30170ºwide angle1280x960This resolution provides the widesttop-to-bottom and side-to-sideviewing area.(Slow motion)(Default)(Super slowmotion)(Super slowmotion)When you are using the camera in Video Mode, the currentlyselected video resolution appears on the LCD Status Screenbeneath the Video mode icon.PROTIP:18Consider using 960-48 when wearing camera on a helmet ora chest harness to see your handlebars when biking, or kneesand skis when skiing.19
ADVANCED Menu SETTINGSADVANCED Menu SETTINGSField of View ModesWhen recording video in 1080p, you can set the camera to shoot in the defaultwide-angle (170º) or a medium-wide angle (127º) field of view.‣ See VIDEO RESOLUTION MODES for more information.WIDE170º (Default)MEDIUM127ºPhoto Resolution ModesThe HD HERO2 can take photos in either 11MP, 8MP or 5MP resolutions.Changing this setting effects photos taken in Photo, Burst, Self Timer and TimeLapse Modes.11MPTime Lapse ModesYou can select a wide range of time intervals for your Time Lapse Mode photos.Choose between 0.5, 1 (Default), 2, 5, 10, 30 and 60 seconds.Upside Down Video/Image ModeIf you need to mount your camera upside down, you can set the camera to savethe photo or video upside down so that it appears right side up when you reviewit on your computer or TV. This eliminates the need to “flip” the photo or videolater on your computer.(Default) Camera right side upCamera upside down(Default)8MPSpot Meter Settings5MPWhen you are using the camera in one of the photo modes, thecurrently selected photo resolution appears on the LCD beneaththe Photo Mode icon.Turn on the Spot Meter when you are filming from a dark space into a brightersetting, like when filming outdside a windshield from inside a car.OFF(Default)ONNote: T he Spot Meter iconis displayed in the upper-right corner of the LCDwhen Spot Metering is on.2021
ADVANCED Menu SETTINGSADVANCED Menu SETTINGSOne Button ModeOne Button Mode (Cont’d):One Button Mode forces the camera to automatically begin recording in itsdefault power up mode once the camera is ON. When One Button Mode is ON,is disabled. To stop recording, you must turn your camera OFF.OFF(Default)ON1. Access the Settings Menumore information.)22(‣ See ENTERING THE SETTINGS MENU forto cycle through the settings menus until the One Button Modemenu appears.3. Pressto access the One Button Mode menu.4. Pressonce to select ON and press5. Pressto cycle through settings menu. Select and press EXIT.PROTIP:1. While the camera is ON and recording, press and holduntil the settings icon appears.2. Enter the settings menu by pressingTo turn One Button Mode ON:2. UseTo turn One Button Mode OFF:for two seconds.3. Use to cycle through the settings menu untilenter One Button Mode menu.appears. Press4. Pressonce to select OFF and press5. Pressto cycle through the settings menu. Select and press EXIT.toto confirm selection.once to confirm selection.In One Button Mode, the camera is either “on and recording” orpowered OFF. This simplifies camera operation when loaningthe camera to a friend or when you know you only want to shootin one mode.23
ADditional Menu SETTINGSADditional Menu SETTINGSMore Menu Settingsdelete (Cont’d):To access additional settings, enter MOREsettings are found in this subsection:menu. The following LAST: To delete the last file saved, Press to select menu option. TheLCD will display a confirmation menu. Within this menu you can togglethrough the menu options using .deleteThe menu options are:Delete last file or delete all files and reformat SD card.cancelNO: Press(Default)YES: Presslastto cancel and return to the main settings menu.to select yes. The last file saved will be deleted.all/ReformatTo delete the last file saved:1. With the Deletethe delete list.settings menu screen displayed, pressto enter into2. W ithin the delete menu you can toggle through the list by usingchoose one of the following options: CANCEL: To cancel out of delete, Presssettings menu.24toand return to the main ALL/Format SD Card: To delete all files on the SD Card, press to selectmenu. The LCD will display a confirmation menu. Within this menu you cantoggle through the menu options using .The menu options are:No: Pressto cancel and return to the main settings menuYES: Press to select yes. All files will be deleted. Duringthe delete all process, the LED lights will continue to blinkuntil formatting is complete.25
ADditional Menu SETTINGSADditional Menu SETTINGSntsc / palThis setting controls both the video recording frame rate and playback ofvideo from the camera when viewing on a TV. Select NTSC if viewing on aTV in North America. Choose PAL if viewing on a PAL TV (most televisionsoutside of North America) or if viewing on a PAL TV in any region.NTSC(Default)PALOn Screen Display (OSD)Camera SoundYou can change volume level of the camera’s beep to be softer than thedefault or silent for stealth mode.100%(Default)70%OFFAuto Power OffSelect if you would like to display or hide the recording icons and informationon your video screen (when displaying live video on a TV screen or using theLCD BacPac ). OFF will hide icons and ON will display icons.Program the camera to automatically turn OFF after a specific period ofinactivity (when no videos or photos are being taken and no buttons have beenpressed). If you set the camera to MANUAL, you will need to manually turn yourcamera OFF.OFFMANUAL(Default)ON(Default)60 sec120secLED Lights300 secYou can choose between having all 4 LED lights active, only 2 LED lightsactive (front and back) or turn OFF all the LED lights.4(Default)2OFF2627
ADditional Menu SETTINGSADditional Menu SETTINGSExit Settings MenuDate / Time / MonthYou can set the camera’s internal clock to ensure that your video and photofiles are saved with the correct date/time information. You will need to adjustthe date/time information if the battery is removed from the camera for anextended period of time.Month / Day / Year1. Pressrepeatedly until Date/Time/Month2. Pressto begin setting the date and time.From the EXIT screen, pressto return to the camera’s default camera mode.Hour / Minuteappears on the LCD.3. The LCD will show the Date/Time/Month setting menu with the Month fieldhighlighted. Press to access the list of months (1 to 12).4. Use5. Pressto cycle through the list until the correct month is highlighted.to select the highlighted month.6. The Date/Time/Month setting menu will appear on the LCD. Press once tohighlight the Day field and press to access the list of days (1 to 31).7. Again useto highlight the correct day andto select it.8. Repeat this process for the Year, Hour and Minute.PROTIP:28The Date/Time/Month fields are abbreviated. For example, themonth is MM, day is DD, Year is YY, hour is HH, minute is MM.29
STORAGE/SD CARDSSystem RequirementsThe HD HERO2 camera is compatible with 2GB, 4GB, 8GB, 16GB and 32GBcapacity SD and SDHC memory cards. While all speed cards will work in thecamera, GoPro recommends higher speed cards (labeled as Class 4 or higher)when shooting HD video. GoPro recommends using name brand SDHC cards formaximum reliability in high vibration activities.To insert a SD card:To remove a SD card:The HD HERO2 camera is compatible with Microsoft Vista, 7 or later and MacOS X 10.5 or later.System Requirements for full High Definition 1080p and 720p 60fps playback:WindowsMacMicrosoft Windows Vista 7 Mac OS X 10.4.11 or later3.2GHz Pentium 4 or faster2.0GHz Intel Core Duo or fasterDirectX 9.0c or laterAt least 2GB of system RAMVideo card with at least 128MB of RAMVideo card with at least 128MB of RAMAt least 2GB of system RAM1. Insert SD card into the SD card slotwith the SD card label facing thefront of the camera.1. Place your fingernail against theedge of the SD card and lightlypress it further into the camera.2. The SD card will click into placeonce it is fully inserted.2. The card will spring out from thecamera far enough for you topull it out.30PROTIP:If you are having problems achieving smooth playback on yourcomputer, the HD HERO2 camera can also plug directly into aHigh Definition TV with an HDMI port using a mini-HDMI cable orvia composite cable (not included). The HD HERO2 camera itselfprovides very smooth playback on an HDTV.31
transferring filestransferring filesTo transfer video and photo files to a computerto view Photos and Video on a TV or HDTVOn a PC:1. Connect the camera to a computer with the included USB cable.Using an HDMI cable (not included), plug your HD HERO2 camera into your TV. Youcan also use the composite port and a composite cable (not included).2. Turn on the camera by pressing3. On your PC, double click My Computer and locate the “Removable Disk”icon. If you do not see it, close the My Computer folder and then reopen it.The “Removable Disk” icon should appear.4. Double click the “Removable Disk” icon.5. Double click the “DCIM” folder icon.With the camera powered ON, navigate to the Playback Settingusing . Press to enter the Playback menu.Within the playback menu, use to toggle through the menu list. Useselect each item. The menu list options are:to6. Double click the “100GOPRO” icon.Video: D isplays all video files on the SD card. During playback, volumeadjustment can be made via the TV. Playback will begin automatically.7. Your photo and video files will be in the “100GOPRO” folder.Photo: Displays all photo files on the SD card.8. Copy/Move files to the computers hard drive and then select video/photofor playback from desktop/hard drive.All (Default): Displays all photo and video files on the SD card.On a Mac:1. Plug the camera into your Mac with the included USB cable.Exit: Exits the playback menu.PRO TIP:To Forward, pressTo Fast Forward, hold down3. T he Mac will recognize the camera as an external hard drive. Double clickthe icon for the external drive to a
pRo tip: Consider using 960-48 when wearing camera on a helmet or a chest harness to see your handlebars when biking, or knees and skis when skiing. aDVanceD MenU settInGs aDVanceD MenU