Transcription
Security AnalyticsConfiguration Guide for SA-S500 Series4 Jun 2019
Copyright 2019 Symantec Corp. All rights reserved. Symantec, the Symantec Logo, the Checkmark Logo, Blue Coat, and the Blue Coat logo aretrademarks or registered trademarks of Symantec Corp. or its affiliates in the U.S. and other countries. Other names may be trademarks of theirrespective owners. This document is provided for informational purposes only and is not intended as advertising. All warranties relating to theinformation in this document, either express or implied, are disclaimed to the maximum extent allowed by law. The information in this documentis subject to change without notice.THE DOCUMENTATION IS PROVIDED "AS IS" AND ALL EXPRESS OR IMPLIED CONDITIONS, REPRESENTATIONS AND WARRANTIES, INCLUDING ANYIMPLIED WARRANTY OF MERCHANTABILITY, FITNESS FOR A PARTICULAR PURPOSE OR NON-INFRINGEMENT, ARE DISCLAIMED, EXCEPT TO THEEXTENT THAT SUCH DISCLAIMERS ARE HELD TO BE LEGALLY INVALID. SYMANTEC CORPORATION SHALL NOT BE LIABLE FOR INCIDENTAL ORCONSEQUENTIAL DAMAGES IN CONNECTION WITH THE FURNISHING, PERFORMANCE, OR USE OF THIS DOCUMENTATION. THE INFORMATIONCONTAINED IN THIS DOCUMENTATION IS SUBJECT TO CHANGE WITHOUT NOTICE. SYMANTEC CORPORATION PRODUCTS, TECHNICAL SERVICES,AND ANY OTHER TECHNICAL DATA REFERENCED IN THIS DOCUMENT ARE SUBJECT TO U.S. EXPORT CONTROL AND SANCTIONS LAWS,REGULATIONS AND REQUIREMENTS, AND MAY BE SUBJECT TO EXPORT OR IMPORT REGULATIONS IN OTHER COUNTRIES. YOU AGREE TOCOMPLY STRICTLY WITH THESE LAWS, REGULATIONS AND REQUIREMENTS, AND ACKNOWLEDGE THAT YOU HAVE THE RESPONSIBILITY TOOBTAIN ANY LICENSES, PERMITS OR OTHER APPROVALS THAT MAY BE REQUIRED IN ORDER TO EXPORT, RE-EXPORT, TRANSFER IN COUNTRY ORIMPORT AFTER DELIVERY TO YOU.Americas:Symantec Corporation350 Ellis StreetMountain View, CA 94043 2019 Symantec Corp.Rest of the World:Symantec LimitedBallycoolin Business ParkBlanchardstown, Dublin 15, Ireland2 of 25SA-S500 Configuration GuideDocument Version 1.4Updated 4 Jun 2019
About This DocumentThis document contains instructions to configure a Security Analytics SA-S500-20-FA or SA-S50040-FA Forensic Appliance as a head unit that is attached to one or more Symantec J5300 40TDirect-Attached Storage modules or Dell PowerVault MD1400 Direct Attached Storage modules.To connect an SA-S500-30-FA to storage arrays over Fibre Channel connections, consult SecurityAnalytics Configuration Guide for E5660 300T Intelligent Storage Arrays.For the quick-start guides for each hardware unit, select Getting Started Guide for thedocument type.For assistance with system configuration: Symantec Support: support.symantec.com/en US/contact-support.html Security Analytics web/en US/Documentation.1145515.html 2019 Symantec Corp.3 of 25SA-S500 Configuration GuideDocument Version 1.4Updated 4 Jun 2019
Table of Contents1. Requirements . 53. Run the carve-s500 Script . 151.1. Terminology . 54. Next Steps. 171.2. Server I/O Configuration . 6Appendix A: RAID Array Configurations . 18SA-S500-20-FA.6SA-S500-40-FA.6SA-S500-20-FA Setups . 181.3. Storage Module I/O Configuration . 6SA-S500-20-FA Standalone .18Symantec J5300 Direct Attached Storage .6SA-S500-20-FA plus 1 J5300 or 1 MD1400 .18Dell PowerVault MD1400 Attached Storage .7SA-S500-40-FA Setups . 192. Cable the Storage Modules . 8SA-S500-40-FA Standalone .19SA-S500-40-FA plus 1 J5300 or 1 MD1400 .202.1. Cable Orientation . 8SA-S500-40-FA plus 2 J5300s or MD1400s.212.2. One RAID-Controller Setups. 8SA-S500-40-FA plus 3 J5300s or MD1400s .212.3. Two RAID-Controller Setups . 10SA-S500-40-FA plus 4 J5300s or MD1400s .222.4. Initial Configuration . 11SA-S500-40-FA plus 5 J5300s or MD1400s.232.5. Establish a Connection to the Head Unit . 11SA-S500-40-FA plus 6 J5300s or MD1400s .242.6. Configure Initial Settings . 12Appendix B: carve-s500 Help. 252.7. View the Default File-System Allocation . 122.8. Verify System Health . 13Updates to This DocumentDatePage4 Jun 20198, 1921 May 201915Add a reboot before running the carve-s500 script15 Mar 2019—Update doc links17 May 201811Add serial connection settings16 May 201819Remove SA-S500-20-FA setups with 2 and 3 JBODs 2019 Symantec Corp.UpdateReturn the second JBOD to the SA-S500-20-FA setup4 of 25SA-S500 Configuration GuideDocument Version 1.4Updated 4 Jun 2019
Requirements1.RequirementsThis installation requires the following: One head unit:oSecurity Analytics SA-S500-20-FA Forensic ApplianceoSecurity Analytics SA-S500-40-FA Forensic ApplianceOne or more storage modules:oSymantec J5300 40T Direct Attached Storage (SA-J5300-DAS-40T)oDell PowerVault MD1400 Attached Storage (SA-SM-48T-G6)Workstation with Ethernet port and terminal-emulation softwareAdding storage modules to an existing system is a destructive process, because all of the capture andindexing drive arrays must be reconfigured. Do not begin to add new storage to an existing systemuntil after you have backed up all capture, indexing, and system data. (Consult the Reference sectionof the Help Files for instructions on backing up system data using dsmigratedata, scm migrator, orsolera-backup.sh.)1.1. TerminologyThe following usage appears in this document: Head Unit—An SA-S500-[20 40]-FA that has one or more connected storage modules Server—An SA-S500-[20 40]-FA, either a head unit or a standalone unit Storage Module—A J5300 Direct Attached Storage or MD1400 Attached Storage module Array—A logical set of virtual disk groups; Security Analytics requires three arrays: system,indexing, and capture. 2019 Symantec Corp.5 of 25SA-S500 Configuration GuideDocument Version 1.4Updated 4 Jun 2019
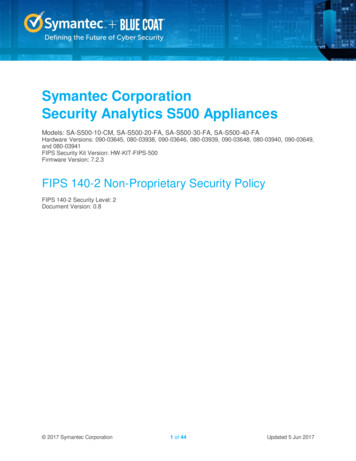
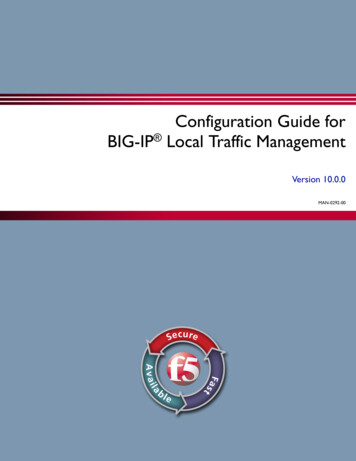
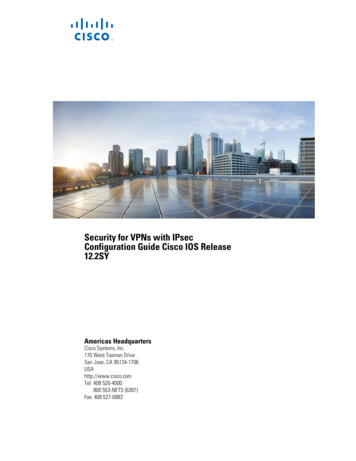
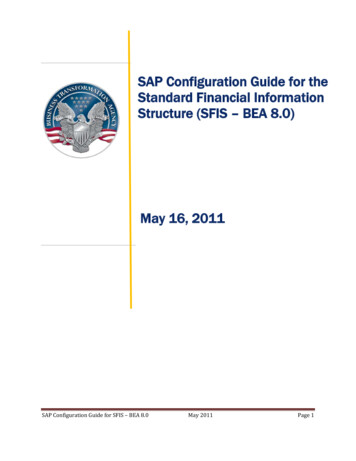
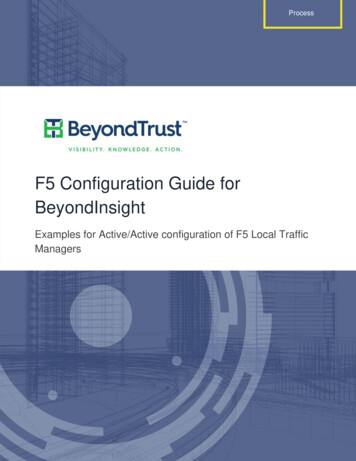
Requirements1.2. Server I/O ConfigurationSA-S500-20-FASA-S500-40-FA1.3. Storage Module I/O ConfigurationSymantec J5300 Direct Attached Storage 2019 Symantec Corp.6 of 25SA-S500 Configuration GuideDocument Version 1.4Updated 4 Jun 2019
RequirementsDell PowerVault MD1400 Attached StorageThe rightmost two SAS ports (3, 4) on each I/O controller are used only in a twonode failover or dual-homed configuration, which Symantec does not support forSecurity Analytics. 2019 Symantec Corp.7 of 25SA-S500 Configuration GuideDocument Version 1.4Updated 4 Jun 2019
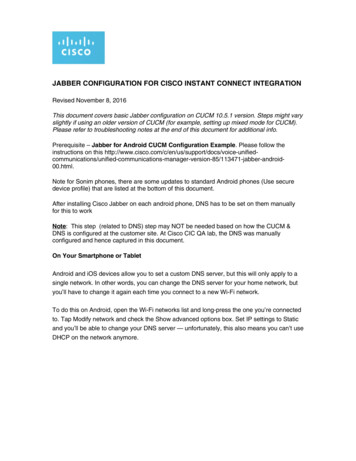
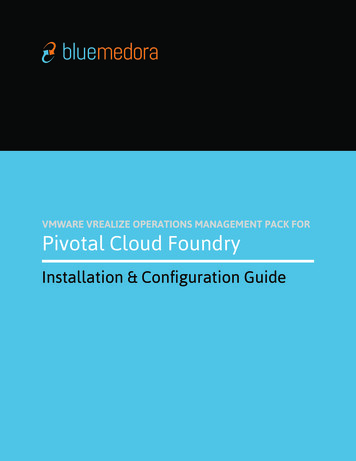
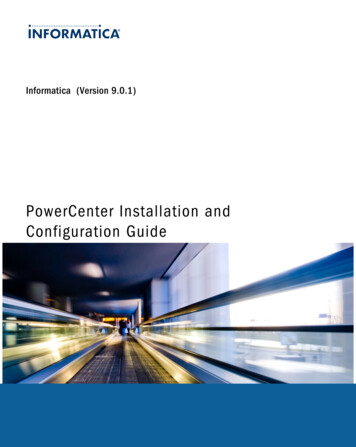
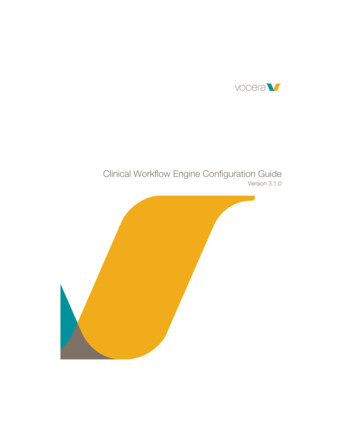
Cable the Storage Modules2.Cable the Storage ModulesCable all of the units together as shown.You must connect the storage modules to the head unit BEFORE continuing to the next step.2.1. Cable OrientationWhen inserting the SAS-3 cables into the SA-S500 and J5300 plugs, the release tab on theconnectors should be on the bottom, as shown.For the MD1400, the release tab should be on the top.A properly inserted cable will "click" into place.2.2. One RAID-Controller SetupsUse this cabling schema for the SA-S500-20-FA, or if you will be connecting one or two storagemodules to the SA-S500-40-FA. 2019 Symantec Corp.8 of 25SA-S500 Configuration GuideDocument Version 1.4Updated 4 Jun 2019
Cable the Storage ModulesIf you are connecting only one storage module to an SA-S500-40-FA, DO NOT connect the module toboth RAID controllers. 2019 Symantec Corp.9 of 25SA-S500 Configuration GuideDocument Version 1.4Updated 4 Jun 2019
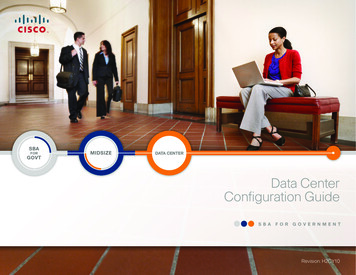
Cable the Storage Modules2.3. Two RAID-Controller SetupsUse this cabling schema for the SA-S500-40-FA, where you have two or more storage modules. 2019 Symantec Corp.10 of 25SA-S500 Configuration GuideDocument Version 1.4Updated 4 Jun 2019
Cable the Storage Modules2.4. Initial ConfigurationPower on the storage modules first, then power on the head unit. Have you already configured anIP address for eth0 (SYS MGMT 0:0)?Yes—Have you licensed the head unit?Yes—Go to Step 2.7: View theDefault File-System Allocation.No—Continue theprocedure.No—Go to Step 2.6: ConfigureInitial Settings.2.5. Establish a Connection to the Head UnitOn a newly purchased SA-S500-[20 40]-FA, the management interface (eth0, SYS MGMT 0:0) is setto 192.168.20.20. Do one of the following: Using an Ethernet cable, connect the SYS MGMT 0:0 port to a management workstation. Themanagement workstation should have an IP address in the 192.168.20.0/24 network. Launch aweb browser, navigate to 192.168.20.20, and go to Step 2.6.1. Using a null-modem serial cable, connect the serial port to a serial terminal or to a workstationwith terminal-emulation software. Configure the serial connection as follows: Baud rate: 9600 bpsParity: noneFlow control: none Data bits: 8Stop bits: 1Follow Steps 2.5.1 through 2.5.3 to assign a temporary IP address.2.5.1.Log in to the CLI via SSH using the following credentials: admin Solera 2019 Symantec Corp.11 of 25SA-S500 Configuration GuideDocument Version 1.4Updated 4 Jun 2019
Cable the Storage Modules2.5.2.Use ifconfig to temporarily assign an IP address to the management interface (eth0) thatis accessible by your management workstation. This IP address will be valid until theappliance reboots:sudo ifconfig eth0 ip address netmask subnet mask ;sudo route adddefault gw default gateway ip 2.5.3.Launch a web browser and navigate to the IP address for eth0. Continue to the nextsection.2.6. Configure Initial Settings2.6.1.At the Login page, enter the default username and password, both of which are casesensitive: admin Solera2.6.2.Consult the Initial Settings page of the Help Files for instructions on initial applianceconfiguration, password setting, and licensing. The Help Files are available on support.symantec.com/en US/Documentation.html. EnterSecurity Analytics for Product Name and then select Administration Guide for DocumentType.Setting the root and admin passwords on the Initial Settings page is required. When you click Save,the default passwords for those accounts are destroyed.Symantec Support does not have a master password for root or admin access, and there is nobackup mechanism for your new passwords.Follow best key-maintenance practices by manually recording your passwords and by keeping acopy in a secure location that is separate from the appliance.2.6.3.When the head unit reboots after licensing, continue the procedure.2.7. View the Default File-System Allocation2.7.1.Access the console by one of these two methods: Using an Ethernet cable, connect the SYS MGMT 0:0 port (eth0) to a management workstationwith an IP address in the same network as eth0. Establish an SSH session. Using a null-modem serial cable, connect the serial port to a serial terminal or to a workstationwith terminal-emulation software.2.7.2.On the console, log in as root. Display the current file-system allocation.[root@hostname ]# df -hFilesystem/dev/sda4devtmpfstmpfs 2019 Symantec Corp.Size4.9G64G64GUsed Avail Use% Mounted on2.9G 1.8G 62% /064G0% /dev11M64G1% /dev/shm12 of 25SA-S500 Configuration GuideDocument Version 1.4Updated 4 Jun 2019
Cable the Storage 064M506M197M2.1G138M9.1T90M9.1T0063G1% /run64G0% /sys/fs/cgroup1.4G5% /boot1.4G 28% /gui3.4T1% /home62G4% /var4.5G3% /ds0 100% /pfs3.5T1% /var/lib/solera/meta0 100% /etc/solera/flows13G0% /run/user/013G0% /run/user/48Notice the size of /pfs (capture). It should be 9TB for the -20-FA and 25TB forthe -40-FA.2.8. Verify System Health2.8.1.View the RAID controllers, current volumes, and disk health.[root@hostname ]# lsi-showController InformationIdSerial NoFirmwarea0SV409173153.410.35-3698Enclosure InformationIdDrives47120 107 101 100 102 109 115 103 99Encl LD132.8.2.UpUpUpUpUpUpUpUpUpUpUpUpProduct NameLSI MegaRAID SAS 9271-8i104 111 119Logical Drive InformationIdSizeStatusStripeRaid Level03.637 TBOptimal64 KBPrimary-5by id: 120,107,101by es: 47:8,47:9,47:1013.637 TBOptimal256 KBPrimary-5by id: 100,102,109by es: 47:11,47:12,47:1329.093 TBOptimal256 KBPrimary-5by id: 115,103,99,104,111,119by es: 47:14,47:15,47:16,47:17,47:18,47:19Physical Drive InformationIdE:SStatus120 47:8Online, Spun107 47:9Online, Spun101 47:10Online, Spun100 47:11Online, Spun102 47:12Online, Spun109 47:13Online, Spun115 47:14Online, Spun103 47:15Online, Spun9947:16Online, Spun104 47:17Online, Spun111 47:18Online, Spun119 47:19Online, NoneNoneCacheWriteBack, ReadAhead, Direct, Write Cache OK if Bad BBUWriteBack, ReadAhead, Direct, Write Cache OK if Bad BBUWriteBack, ReadAhead, Direct, Write Cache OK if Bad S460N5SJEF04S460CW47The first part of the output shows that the internal RAID controller (a0) controls the disksin the head unit (12 for the -20-FA and 24 for the -40-FA) and that three volumes (0, 1, 2)are configured by default. This example shows the default configuration for a -20-FA. 2019 Symantec Corp.13 of 25SA-S500 Configuration GuideDocument Version 1.4Updated 4 Jun 2019
Cable the Storage ModulesController InformationIdSerial NoFirmwarea1SV552639404.230.20-3532Enclosure InformationIdDrives810 11 13 15 2091416Physical Drive gured(good),Encl SpunUpUpUpUpUpUpUpUpUpUpUpUp1219PD12Product NameLSI MegaRAID SAS TSD7J0N8G8EN5SD7J0N8G8E8MS2.8.3.For each external RAID controller (a1, a2), you should see 12 physical drives per storagemodule.2.8.4.For ALL physical disks, is the status Online, Spun Up or Unconfigured (good), Spun Up?Yes—Continuethe procedure.No—STOP.You cannot "work around" damaged disks: SecurityAnalytics requires that the number of disks be identicalacross all disk groups (virtual drives). Repair or replace the damaged disks. When all disks are in good condition, you can continue theprocedure. 2019 Symantec Corp.14 of 25SA-S500 Configuration GuideDocument Version 1.4Updated 4 Jun 2019
Run the carve-s500 Script3.Run the carve-s500 ScriptFollow these steps to run the carve-s500 script, which detects all attached devices and creates thesystem, indexing, and capture drives.3.1.1.Optional—Consult Appendix B: carve-s500 Help on page 25 to see the options for thecommand.3.1.2.Delete the existing non-system disk volumes, and then reboot.[root@hostname ]# carve-s500 --delete-all [-v][root@hostname ]# reboot3.1.3.Run carve-s500. Verbose mode is recommended.[root@hostname ]# carve-s500 -vWhen successful, the script automatically reboots the head unit.3.1.4.After the head unit has finished rebooting, display the new file-system allocation:[root@hostname ]# df G1.5G3.6T68G4.9G2.0G81T15T81T13G13GUsed Avail Use% Mounted on2.9G 1.8G 62% /064G0% /dev11M64G1% /dev/shm18M64G1% /run064G0% /sys/fs/cgroup64M 1.4G5% /boot197M 3.4T1% /home2.2G62G4% /var138M 4.5G3% /ds506M 1.4G 28% /gui81T0 100% /pfs20M14T1% /var/lib/solera/meta81T0 100% /etc/solera/flows013G0% /run/user/0013G0% /run/user/48The entry for /pfs should display the total amount of space across all capture drives. Thisexample shows two storage modules with 40TB each for a total of 80TB. 2019 Symantec Corp.15 of 25SA-S500 Configuration GuideDocument Version 1.4Updated 4 Jun 2019
Run the carve-s500 Script3.1.6.Display the disk groups again.[root@hostname ]# lsi-showController InformationIdSerial NoFirmwarea0SV409173153.410.35-3698Encl LD12Enclosure InformationIdDrives47120 107 101 100 102 109 115 103 99PD12Product NameLSI MegaRAID SAS 9271-8i104 111 119Logical Drive InformationIdSizeStatusStripeRaid LevelCache03.637 TBOptimal64 KBPrimary-5WriteBack, ReadAhead, Direct, Write Cache OK if Bad BBUby id: 120,107,101by es: 47:8,47:9,47:10114.550 TBOptimal256 KBPrimary-5WriteBack, ReadAdaptive, Direct, Write Cache OK if Bad BBUby id: 100,102,109,115,103,99,104,111,119by es: :193.1.7.The head unit should have only two disk volumes now: system and indexing.Controller InformationIdSerial NoFirmwarea1SV552639404.230.20-3532Enclosure InformationIdDrives810 11 13 15 2091416Encl LD11171219PD12Product NameLSI MegaRAID SAS 9380-8e18Logical Drive InformationIdSizeStatusStripeRaid LevelCache040.019 TBOptimal256 KBPrimary-5WriteBack, ReadAdaptive, Direct, Write Cache OK if Bad BBUby id: 10,11,13,15,20,9,14,16,17,12,19,18by es: Physical Drive InformationIdE:SStatus108:1Online, Spun118:2Online, Spun138:3Online, Spun158:4Online, Spun208:5Online, Spun98:6Online, Spun148:7Online, Spun168:8Online, Spun178:9Online, Spun128:10Online, Spun198:11Online, Spun188:12Online, SEvery storage module should have one logical drive, and all of the disks should be Online,Spun Up. 2019 Symantec Corp.16 of 25SA-S500 Configuration GuideDocument Version 1.4Updated 4 Jun 2019
Next Steps4.Next StepsWith your Security Analytics appliance set up with its storage modules, use the web interface tostart capturing network traffic. For instructions, select Settings Help [language] and thenselect Data Capture in the left pane of the Help Files.For assistance with your appliance, contact: Symantec Support: support.symantec.com/en US/contact-s
Jun 04, 2019 · This document contains instructions to configure a Security Analytics SA-S500-20-FA or SA-S500-40-FA Forensic Appliance as a head unit that is attached to one or more Symantec J5300 40T Direct-Attached Storage modules or