Transcription
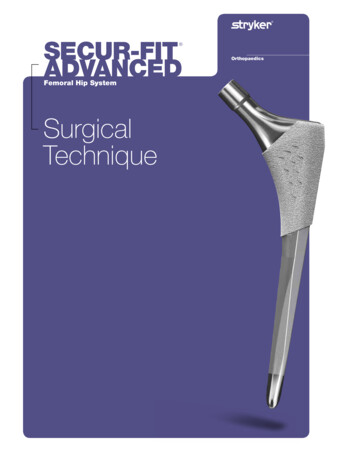
Secur-FitADVANCED Femoral Hip SystemSurgicalTechniqueOrthopaedics
TABLE OF CONTENTSPre-Operative Planning. . . . . . . . . . . . . . . . . . . . . . . . . . . . . . . . . 2Femoral Neck Resection. . . . . . . . . . . . . . . . . . . . . . . . . . . . . . . . 3Preparing the Femoral Canal . . . . . . . . . . . . . . . . . . . . . . . . . . . . 4Trochanteric Reaming. . . . . . . . . . . . . . . . . . . . . . . . . . . . . . . . . . 6Broaching. . . . . . . . . . . . . . . . . . . . . . . . . . . . . . . . . . . . . . . . . . . 8Trial Reduction. . . . . . . . . . . . . . . . . . . . . . . . . . . . . . . . . . . . . . 10Implanting the Stem. . . . . . . . . . . . . . . . . . . . . . . . . . . . . . . . . . 12Final Reduction. . . . . . . . . . . . . . . . . . . . . . . . . . . . . . . . . . . . . . 14Extraction. . . . . . . . . . . . . . . . . . . . . . . . . . . . . . . . . . . . . . . . . . 15Implant and Instrument Information. . . . . . . . . . . . . . . . . . . . . . .16IndicationsIndications for use include: Noninflammatory degenerative joint disease includingosteoarthritis and avascular necrosis; Rheumatoid arthritis; Correction of functional deformity; Revision procedures where other treatments or devices havefailed; and, Nonunions, femoral neck and trochanteric fractures of theproximal femur with head involvement that are unmanageableusing other techniques.Contraindications active infection or suspected latent infection in or about thehip joint; bone stock that is inadequate for support or fixation of theprosthesis; skeletal immaturity patients; and, any mental or neuromuscular disorder that would create anunacceptable risk of instability, prosthesis fixation failure orcomplications in postoperative care.Additional indication specific to use of Secur-Fit Advanced HipStems with compatible Howmedica Osteonics Constrained Liners: When the stem is to be used with compatible HowmedicaOsteonics Constrained Liners, the device is intended for use inprimary or revision patients at high risk of hip dislocation dueto a history of prior dislocation, bone loss, soft tissue laxity,neuromuscular disease, or intra-operative instability.Warnings and PrecautionsSee package insert for warnings, precautions, adverse effectsand other essential product information. Before using Secur-FitAdvanced Stem instrumentation, verify: Instruments have been properly disassembled prior to cleaningand sterilization; Instruments have been properly assembled post-sterilization; Instruments have maintained design integrity; and,Secur-Fit Advanced Hip Stems are intended for cementless useonly and are intended for total and hemiarthroplasty procedures. Proper size configurations are available.For Instructions for Cleaning, Sterilization, Inspection and Maintenance of Orthopaedic Medical Devices, refer to LSTPI B.
Secur-FitADVANCED Femoral Hip SystemThe Secur-Fit Advanced Hip Stem is intended for cementless,press-fit application. The proximal region of the stem is coatedwith PureFix HA over a commercially pure titanium plasma spraysubstrate. The Secur-Fit Advanced Hip Stem is suitable for varioussurgical approaches.The total system includes: 16 Implants Size 4 and 5 in 132 offset only Sizes 6-12, two anatomic offset angles of 132 and 127 The stem is designed for use with Stryker V40 femoral heads andtheir compatible acetabular components.This publication sets forth detailed recommended proceduresfor using Stryker Orthopaedics devices and instruments. It offersguidance that you should need, but, as with any such technicalguide, each surgeon must consider the particular needs of eachpatient and make appropriate adjustments when and as required.
Step 1-Pre-operative PlanningFigure 1Figure 2Figure 3Pre-operative planning aids in thedetermination of probable implantstyle and size. The pre-operativeplanning process should takequalitative and quantitative factors(including patient bone quality,density, and morphology) intoconsideration in order to evaluateand select the appropriateinstrument/implant system forthe patient.Optimal femoral stem fit, prostheticneck length, angle and versioncan be more closely evaluatedwith the use of pre-operative X-rayanalysis. The following parametersshould be determined using an A/Pradiograph: Stem Size, FemoralOffset, Leg Length, Neck Angle,and Center of Rotation.marking is superior to the center ofrotation marking of the acetabularcomponent, leg lengthening ispredicted. The desired change inleg length is determined by theradiographic leg length inequalitythat was previously determined withan A/P bilateral film. If 8mm of leglengthening is required in order toequalize the leg lengths, the centerof rotation marking of the femoralcomponent should be positioned8mm superior to the center ofrotation marking on the acetabularcomponent. The stem size andhead offset that most closely meetsthis goal is chosen. The predictedchange in offset is also consideredby comparing the relative medial/lateral position of the center ofrotation markings of the femoraland acetabular components.The templates should be used toestimate the final components thatmost closely restore the normaloffset of the patient’s hip.Place an acetabulum templateover the area on the X-ray. Be surethat the cup is well centered withinthe acetabulum and the size fillsbetween the tear drop and thesuperior rim. After templating theacetabulum for size, mark the centerof rotation (represented by the greendot (Figure 1)).TemplatesSecur-Fit AdvancedAcetate TemplatesLit# LTEM106Acetate templates include 20% magnification.2 secur-fit Advanced Surgical TechniqueThe Secur-Fit Advanced has twooffset options: the standard offset132 neck angle and the highoffset 127 neck angle (Sizes 4 and5 are available in the 132 neckangle only). Choose the Secur-FitAdvanced template for which thestem size achieves medio-lateralcortical engagement at the proximaltwo-thirds of the stem and recreatesthe desired leg length and offset(Figure 2). For both the 132 and127 offset options, the templatehas markings that indicate thecenter of the femoral head for arange of head offset options.The predicted change in leg lengthand offset is determined by therelative positioning of the center ofrotation markings on the femoraland acetabular components.For example, if a given femoralcomponent center of rotationOnce the final estimated stem sizeand position is determined, the neckresection level should be noted(Figure 3). This will be used as areference during intra-operative neckresection.
Step 2Femoral Neck ResectionA proper neck resection leveldirectly affects the final placementand fit of the femoral stem. Byusing the anatomic landmarksreferenced during pre-operativeX-ray templating, the pre-plannedneck resection is made with anoscillating saw and with the aidof the Neck Resection guide.Lay the Neck Resection Guideon the femur, using the lessertrochanter and the trochantericfossa as landmarks when makingthe final cut. Care should be takento align the axis line of the NeckResection Guide to the center axisof the femoral shaft; the scaleson the lateral flange or medialradius of the guide can be usedto reference the greater or lessertrochanter respectively whenmaking the final cut.Scale onResection Guidecorresponds toscale on thetemplates39 Use the ResectionGuide to determineresection pointbased on lessertrochanter39 Neck resection angleFigure 4InstrumentSecur-Fit Advanced Neck Resection Guide1601-13003
Step 3Preparing the Femoral CanalTo help ensure proper finalorientation of the stem, lateralbias during preparation for theimplant is preferred. Retraction ofthe gluteus medius and removal ofa portion of the lateral neck and/or piriformis fossa will permit trueaxial introduction of the instrumentsand implant. A Box Osteotome isuseful in removing bone from thisarea. Connect the Box Osteotomeattachment to the Modular Handle.Use a mallet to strike the end ofthe Modular Handle with carefulcontrolled blows to remove remnantsof the superior femoral neck andopen the medullary canal.TipA clear-out hole has beenplaced on the back of theBox Osteotome that allowsbone chips to be removedusing a curette or other ORinstruments in an action thatdoes not require a force tobe directed at the cuttingsurface.Figure 5InstrumentsModular Box Osteotome1601-12104 secur-fit Advanced Surgical TechniqueOrthonomic Modular Handle1020-2900Orthonomic T-Handle1101-2200
Distal ReamingThe Starter Reamer can be usedto enter the femoral canal throughthe trochanteric fossa. The StarterReamer has a point to facilitate entryand graduated markings along theshaft that correspond to onPoint54Figure 6Enter the canal with the StarterReamer attached to either a T-handleor powered instrument. Place theStarter Reamer on the exposedtrochanteric fossa and proceeddown into the shaft along its axisto the appropriate depth and alignto the center of the knee. TheStarter Reamer should be insertedsuch that the appropriate markingcorresponding to the pre-operativelyselected stem size correlates to thedepth of the medial resection point.TipDepth markings on the StarterReamer, which correspond to theTapered Reamer depth for eachstem, should be aligned with themedial aspect of the resectionplane.Secur-Fit Advanced Starter Reamer1601-15045
Step 3ContinuedTrochanteric ReamingFigure 7MedialResectionPointSelect and use the appropriateTrochanteric Reamer to removelateral proximal cortical bone. Thiswill further assist in establishingproper axial alignment. TheTrochanteric Reamer is availablein standard and large sizes. TheReamer should be inserted to adepth such that the distal end of thecutting flutes aligns with the medialresection point. Each TrochantericReamer is designed to prepare forthree stem sizes. See Table 1.OptionFor Sizes 4-6, the standardTrochanteric Reamer is optional andto be used according to surgeon’sdiscretion.Broach Only OptionTable 1: RecommendedTrochanteric Reamer Sizesstemsizetaperedreamer7-9Standard Trochanteric Reamer10-12Large Trochanteric ReamerThe fully toothed Broaches mayfacilitate preparation of the femoralcanal without the use of TaperedReamers. However, a narrow/tightdiaphyseal shaft (e.g. champagneflute femur) may result in broachresistance in the distal canal. Ifresistance is encountered, taperedreaming is recommended to minimizepotential for distal femoral fractures.If the Broach does not seat at thedesired height, ream upward until theBroach seats at the desired height.The option to skip any reaming stepis at the discretion of the surgeon.InstrumentsOrthonomic T-Handle1101-2200Secur-Fit AdvancedStandard TrochantericReamer 1601-15316 secur-fit Advanced Surgical TechniqueSecur-Fit AdvancedLarge Trochanteric Reamer1601-1532Secur-Fit Advanced 2 For 1Tapered Reamer Size 5-61601-1556
Tapered ReamingSize 7Size 8Figure 8Reamers are used to prepare thecanal distally where dense corticalbone exists, thereby aiding inbroaching. The Tapered Reamershould be inserted such that theappropriate marking correspondingto the stem size correlates to thedepth of the medial resection point.See Table 2 for a list ofrecommended reamer sizes for eachstem.Table 2: Recommended TaperedReamer Sizesstemsizetaperedreamer4*Starter reamer may be -Fit Advanced 2 For 1Tapered Reamer Size 7-81601-1578TipIf pre-operative templating resultsin an in-between size, ream to asmaller size.TipDue to the aggressive cuttingnature of the reamer, distalreaming should not exceed thetemplated size.Secur-Fit Advanced 2 For 1Tapered Reamer Size 9-101601-1590Secur-Fit Advanced 2 For 1Tapered Reamer Size 11-121601-15127
Step 4BroachingQuickReleaseButtonLockingArmFigure 9LockingHookBroachAlignmentTabAssemble the Broach to the BroachHandle by inserting the alignmenttab on the distal end of the BroachHandle onto the Broach. Closing thelocking arm until an audible click isheard secures the Broach onto theBroach Handle.Using a mallet with short, controlledstrokes, begin broaching andsequentially broach up until thedesired size is reached. Throughoutbroaching, continue to ensure neutralalignment of the broach to the longaxis of the femur.Correct fit will be denoted by achange in pitch, tactile resistance, orwhen the broach ceases to advance.Verify a secure fit and ensure thatthe broach has axial and rotationalstability. With proper cortical contact,the broach should not twist ormove relative to the femur. If there ismovement, a larger size broach maybe needed.Generally, if a broach sinks below thelevel of the neck resection, advanceto the next larger broach. If the neckresection is deemed higher thandesired, remove the broach andperform a new neck resection at alower level.Upon reaching the final size anddepth of the broach, detach thebroach handle from the broach,leaving the broach fully seated in thefemoral canal.InstrumentsSecur-Fit Advanced Broach Handle1601-11008 secur-fit Advanced Surgical TechniqueSecur-Fit Advanced Low ProfileBroach Handle 1601-3100Secur-Fit Advanced Broach Size 4-121601-10XXA
Optional Step: Calcar PlaningFigure 10CautionProper insertion depth ofthe broach in the canal isachieved when it seats tightlywithin the canal based onvisual and auditory clues. Thesurgeon’s clues to confirmimplant fixation includeincreased pitch of soundwith blows to broach handleand increased resistance toadvancement. Reliance onlyon the neck cut may lead toimproper sizing, inadequatecomponent fixation, andfemoral fracture.Secur-Fit Advanced Calcar Planer,Standard1601-1400Calcar planing creates a final resectionplane and angle to optimize stem fit.There are two calcar planers in the set(standard, large). Select the size thatfits the cut surface of the neck. Eachcalcar planer includes a spring-loadedalignment tab that provides controlledalignment and engagement with thebroach.Initiate power prior to contacting thefemur and slowly advance the CalcarPlaner toward the broach. Align thetab within the broach body and pressdown to plane the calcar to desiredlevel. Failure to operate the CalcarPlaner in accordance with theseinstructions may result in damageto the femur.Secur-Fit Advanced Calcar Planer,Large1601-14209
Step 5Trial ReductionSelect a neck trial which has thesame stem size and angle as theplanned implant size. This can bedetermined in three ways.1. Match the stem size indicated onthe face of the neck trial trunnionwith the inserted broach2. Match the neck angle withdesired stem angle based on the127 trials being gold, and the132 trials being silverFigure 1130MM132 NeckAngle3. Match the neck angle indicatedon the distal portion of neck withthe desired stem angleNeckLengthSizeThe table below indicates thecorrect neck length for each sizestem. The size of the broach directlycorresponds to the size of theimplant.Figure 12WarningTable 3: Secur-Fit Advanced NeckTrials and Neck Lengths (mm)Image depictsimproper useof the Secur-FitAdvanced neck trial.It is important to ensurethe neck trial is placedproperly onto the broachto avoid improper ROM andjoint stability assessment.InstrumentsSecur-Fit Advanced MonolithicNeck Trial, 132 Degree(Silver) 1601-XX13210 secur-fit Advanced Surgical TechniqueSecur-Fit Advanced MonolithicNeck Trial, 127 Degree(Gold) 1601-XX127stemsizenecklength(mm)127 (GOLD)necklength(mm)132 38124038
Selection of V40 Head Trial on Trial NeckFigure 13Assemble the Neck Trial ontothe broach by hand. Ensurethat the engraving on the superioredge of the neck is visible, andthe flat lateral edge of the necktrial is aligned with the flat lateraledge of the broach. Next, assemblea V40 Head Trial onto the Neck Trialby hand.Femoral heads come in multipleoffsets and are different for eachfemoral head implant material (seeTable 4). For this reason, final headmaterial should be chosen priorto trial reduction. Offsets add orsubtract from the base neck lengthof the implant and help to achievethe desired leg length and offset.NoteEnsure that the broach cavity and V40trunnion are clear of debris prior toassembling the neck and head trials.Table 4: Head CompatibilityHeadHead SizeCoCr V40Warning 5mm heads are the maximum headoffset allowed for the size 4. 12mm heads are the maximumhead offset allowed forthe size 5-12 stem.InstrumentV40 Head Trial6264-x-xxxR22 0, 3, 826-3, 0, 4, 8, 1228-4, 0, 4, 8, 1232-4, 0, 4, 8, 1236-5, 0, 5, 1040-4, 0, 4, 8, 1244-4, 0, 4, 8, 1228-2.7, 0, 432-4, 0, 436-5, 0, 5Alumina C-Taper28-2.5, 0, 5(when used with C-Taper Sleeve –catalog # 17-0000E)32-2.5, 0, 5Alumina V40Perform a trial reduction of the hip.Upon confirmation of the selectedcomponents, remove the trial headand trial neck, and reassemblethe broach handle to the broach.Remove the broach from thefemoral canal. The final broach sizedetermines the correct implant size.Head Offsetsdelta BIOLOX V40delta BIOLOX C-Taper(when used with C-Taper Sleeve –catalog # 17-0000E)delta BIOLOX Universal Taper (whenused with Universal Taper Sleevecatalog #6519-T-XXXX)36-5, 0, 528-4, -2.7, 0, 432-4, 0, 436-5, -2.5, 0, 2.5, 5, 7.528-2.5, 0, 2.5, 532-2.5, 0, 2.5, 536-5, -2.5, 0, 2.5, 5, 7.528-2.5, 0, 432-2.5, 0, 436-2.5, 0, 440-2.5, 0, 444-2.5, 0, 4NoteHead Trials with an “R” suffix aremade from a radiopaque material,making them visible on an X-ray.11* For additional Acetabular and Head Compatibility information please see page 17.
Step 6Implanting the stemOption 1Option 2The Secur-Fit Advanced Stemcan be inserted by hand and thenimpacted into the bone using theModular Stem Impactor (Figure 14).The Modular Stem Impactor has aspherical tip, which is placed ontothe drive hole of the stem. Thisinstrument allows for off-axis impaction of the stem. The Modular StemImpactor does not connect to thestem, and, therefore, can only beused for final impaction of the stem.The Secur-Fit Advanced Stem canalso be inserted using the ModularOffset Quick Connect Stem inserter.Place tip of the inserter into thedrive hole of the stem taking care toalign the version tab on the inserterwith the slot in the stem (Figure 15).The quick connect design providesthe inserter with a stable springconnection, but it does not providea mechanical lock. Therefore,this assembly should be handledwith care, as excessive shakingor motion may result in the stemdis-associating from the inserter.Figure 14Option 3Thread the Modular Threaded StemInserter into the drive hole on theproximal face of the stem (Figure 16).The inserter should be fully threadedand secured to the stem prior toimpaction to prevent damage to thethreads on the implant or the instrument. Using the inserter, the stemshould be inserted into the femoralcanal until it stops.InstrumentsInstrumentsOrthonomic ModularHandle1020-2900Modular Threaded Stem Inserter1020-180012 secur-fit Advanced Surgical TechniqueModular Offset Quick ConnectInserter1020-1860Modular Stem Impactor1020-1870
A mallet is then used to seat thestem into the canal with short,controlled strokes.Figure 15NotePrior to implanting the final stemand femoral head, check theimplants for potential damage.Ensure that the final stem matchesthe last broach used. Use themarkings on the face of the stemtrunnion to verify the stem size andtaper type.The surgeon should NOT attemptto continue impacting the femoralcomponent if visual and auditoryclues indicate that the stem is firmlyseated in the canal. These clues,rather than the broach seating level,should be used to determine thefinal seating height of the implant.Continued aggressive impactioncould lead to femoral fracture.In the event that dense bone isencountered intra-operatively andcompounding anatomical factors arepresent, the seating of the implantmay not be consistent with the levelof the broach due to the viscoelasticnature of the femoral bone. If thefinal seating height is undesirable,the implant can
The Secur-Fit Advanced Hip Stem is intended for cementless, press-fit application. The proximal region of the stem is coated with PureFix HA over a commercially pure titanium plasma spray substrate. The Secur-Fit Advanced Hip Stem is suitable for various surgical approaches. The total system includes: File Size: 1MB
