Transcription
User Manual
Table of ContentsEnglish -------------------------1German --------29Spanish ------------------------43Turkish -------------------------57Japanese ----------------------71Chinese ------------------------85
User ManualDisclaimerInformation in this document has been carefully checked; however, no guarantee is given to thecorrectness of the contents. No responsibility is assumed for its use or for any infringement ofpatents or rights of third parties that may result from its use. No license is granted byimplication or otherwise under the patent rights. The information in this document is subject tochange without notice.CopyrightALL RIGHTS RESERVED.This document contains proprietary information protected by copyright. No part of this manualmay be reproduced by any mechanical, electronic or other means, in any form, without priorwritten permission.TrademarksWindows is a trademark of Microsoft Corporation in the US and other countries, used underlicense. All other trademarks are the property of their respective owners.ConventionsThe following conventions are followed throughout this manual:Note: Text displayed in this manner indicates a note.Prepare your working environmentWork Area: Make sure you have a stable, clean working environment with appropriate lightingcondition. Keep unused small components in containers to avoid lost.Tools: The procedures that follow require several tools, including: A cross-slot (Phillips) screwdriver A grounding strap or an anti-static padElectrical and mechanical connections can be disconnected with your fingers. It isrecommended that not to use needle-nosed pliers when disconnecting connectors, sinceneedle nosed pliers may damage the soft parts of the connectors.PrecautionsComponents and electronic circuit boards may be damaged by discharges of static electricity.Working on a system that is connected to a power supply can be extremely dangerous. Followthe guidelines below to avoid damage to the product or injury to yourself. Always disconnect the unit from the power outlet before the operation. If available, wear a grounded wrist strap. Or alternatively, discharge any staticelectricity by touching the bare metal chassis of the unit case, or touch bare metalbody of any other grounded appliance. Hold electronic circuit boards by the edges only. Do not touch the components onthe board unless it is necessary. Do not try to flex or stress circuit boards. Keep all components inside the static-proof package which come with the productbefore installation. After installation is done, ensure that no screws or other small parts left inside thecase. Small metal parts can cause short circuits which may damage theequipment.1ENGLISHPreface
User ManualCongratulations on your purchase of the GeForce Series graphics acceleratorcards. With the GeForce series GPU, this product offers the best display cardperformance available today.Read this manual carefully before you start to install the hardware and software.The GeForce Series display card is a delicate piece of technology that must behandled correctly and installed properly.1.1 Features High-Speed GDDR1/GDDR2/GDDR3/GDDR4 Memory Interface Supports DVI-I/D-Sub connector Supports AV/S-Video/HDTV/VIVO connector Supports Shader Mode 3.0/4.0 Supports floating point High Dynamic-Range (HDR) Lighting DirectX 9.0c/10 and OpenGL 2.0 support NVIDIA CineFX 4.0/Lumenex Engine NVIDIA UltraShadow II Technology NVIDIA Intellisample 4.0 Technology NVIDIA PureVideo Technology NVIDIA nView Multi-Display Technology NVIDIA SLI (Scalable Link Interface) Technology NVIDIA Digital Vibrance Control (DVC) 3.0 Technology.Note: Based on the model you purchase, feature of the GeForce graphics cardin your hand may be different. The features listed above are for reference only.2ENGLISHENGLISHChapter 1: Introduction
User ManualTo install your new display card, please check your card interface first. If your display card conforms fully to the PCI-Express standard, youmust have an empty PCI-Express slot on your motherboard. If your display card conforms to the AGP standard, you must have anempty AGP slot on your motherboard.The following operating systems are supported: Windows XP/Vista** Windows 2000**Note: The NVIDIA SLI technology currently supports Windows XP/Vistaoperating system only.If your display card supports SLI function, please check the followingrequirements before SLI configuration. Two PCI-Express x16 slots on your motherboard. Two identical SLI-ready graphics cards that are NVIDIA certified. The graphics card driver should support NVIDIA SLI technology. The power supply unit must provide at least the minimum powerrequired by the system, or the system will be unstable. A SLI Bridge connector and a retention bracket are required to bridgeand fasten the two boards. (With the latest driver, SLI-ready graphics cardsare able to use SLI mode without a SLI Bridge connector. For more*information, please check NVIDIA website http://www.nvidia.com .)For detailed information about the hardware setup of SLI system, pleaserefer to your motherboard manual.* The SLI Bridge connector and retention bracket should be included in motherboard package. If not,please contact with your motherboard manufacturer.3ENGLISH1.2 System Requirements
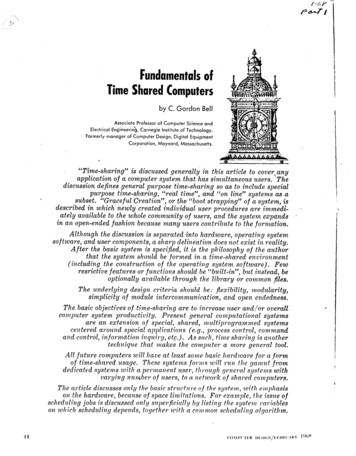
User ManualENGLISHChapter2: Hardware Installation2.1 Display Card Installation StepsPlease follow to the steps below to install your new display card.Note: If your motherboard has any on-board VGA function or there are otherVGA devices installed in your system, you may have to remove or disable thembefore installing your new display card.1.2.3.Shut down the computer and removethe case cover.Remove any existing graphics card.Remove the blanking plate from thePCI-Express or AGP slot4.Press the PCI-Express 16X interfacecard firmly into the PCI-Express slot,making sure it is properly seated. (Ifyour new display card is AGP interface,press it firmly into the AGP slot.)5.6.Secure the card in place with a screw.Replace the computer case cover.Note: If provided with one or two sparepower supply cable(s), plug the powersupply cable(s) in to provide supplementarypower to the card. If supplementary power isnot provided, there may be a drop in thecard's performance.7.8.Connect a monitor to the newly installed card and ensure that it iscorrectly configured.Turn on the computer and install the driver (Please refer to the SoftwareInstallation in this manual).4
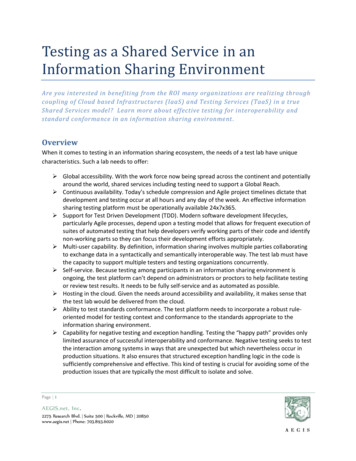
User ManualDepend on the model you purchase, your VGA card may come with theconnectors below. Connect your monitor to one of the following outputs on thedisplay card and ensure that your monitor is correctly configured. See themonitor installation instructions for more details.Note: Based on special features integrated into each graphics card, the S-Video/HDTV/VIVOconnector on your graphics card may be different from the picture below.S-VideoThe S-Video connector is used to send video signals to S-Videocompatible display devices.DVI-IThe DVI-I (Digital Video Interface – Integrated) connector uses DVI-Itechnology to provide high-speed digital video signals for digital displaydevices.VGA(D-Sub)This analog VGA (D-Sub) connector is used to connect via 15 pinsconnector of CRT or LCD monitor.2.3 Video Signal CablesNote: The picture below is for reference only. The cable in your package may be slightly differentfrom the picture.HDTV CableHDTV Cable is able to transmit High Definition video signals to your display viathe specially designed S-Video connector on the VGA Card.Type 1(AV-Out / S-Out &HDTV AV-Out x 3)Type 2(S-Out & HDTV AV-Out x 3)Video Input & Video Output (VIVO Cable)VGA card modules with video-in function is able to send and receive videosignals via the specially designed S-Video connector on the VGA card. UseVIVO Cable to transfer inbound and outbound video signals simultaneouslyConnector eY OUTPr OUTPb/COMP OUTCOMP INS-VID OUTS-VID INHDTV AV-OutHDTV AV-OutHDTV AV-Out / Video-out (AV)Video-In (AV)S-Video OutS-Video In5ENGLISH2.2 Card Connectors
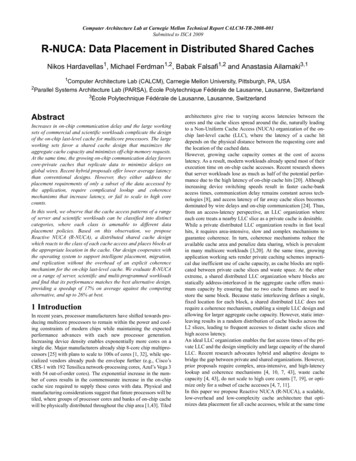
User ManualENGLISHChapter3: Software ConfigurationNote: The screenshots in this manual are for reference only. Based on thedisplay card version, actual screenshots may vary but the responses should besimilar.Follow the instructions in this section to install the drivers and software for yournew display card.Insert the CD-ROM into the CD-ROM drive in your system. The CD-ROMshould boot automatically and display the following screen.If the screen does not show up automatically, open Windows Explorer anddouble-click on VGA.exe in the root folder of the CD-ROM.3.1 Driver InstallationClick the NVIDIA GeForce Driver button and follow the onscreen instructionsto install the VGA card driver. (Based on different display card, the model namewill be also shown on the button.)3.2 DirectX 9.0 InstallationClick the Install Microsoft DirectX Button and follow the on-screeninstructions to install the DirectX software.After the system rebooted, you will see the nVidia icon in the taskbar. RightClick on the nVidia Icon to setup advanced options of the display card.Nvidia Icon6
User ManualThe following options are available from the nVidia controls:Color CorrectionThe color correction function enables youto make changes to the colors on screen.Changes can be made to either thedesktop or to overlay/VMR (Video MixingRenderer). Color correction profiles caneither be created or imported.Rotation SettingsThe rotation settings command enablesyou to change the display orientation asrequired.Custom Color SettingsThe custom color settings command enables you to select a set ofpreviously saved custom color settings.Performance and Quality SettingsThe performance and quality settingsenable you to set image handlingproperties, antialiasing, and anisotropicfiltering properties. Images can be set forhigh quality or high performance (or twointermediate settings). Anti-aliasing andanisotropic properties can be set either tobe controlled by the application or topredefined settings.7ENGLISH3.3 Configuring the Display
User ManualENGLISHColor QualityThe color quality can be set to 8, 16, or32-bit. The highest color quality uses themost system resources.Screen Refresh RateThe screen refresh rate can be set to 60,72, 75, 80, or 85Hz. Set this valuecorrespond to your monitor refresh rate.For LCD monitors the recommend refreshrate is 60HzScreen ResolutionThe screen resolution option enables youto set the screen resolution. Please adjustthis value according to your monitor’sresolution setting. Refer to the manual ofyour monitor for the recommend resolution.nView ToolbarMake the nView Toolbar active by right-clicking on the NVIDIA SETTINGSicon in the system tray, selecting nView Desktop Manager from thepop-up menu and clicking on the Show nView Toolbar option.The nView Toolbar will be displayed.Use the nView Toolbar to accessfrequently used display management functions quickly.8
User ManualThe nView desktop manager is a convenient tool for managing desktop displayproperties. To display the nView Desktop Manager, right click on the NVIDIAsettings icon in the system tray, select, nView Desktop Manager from thepop-up menu, and nView Properties from the submenu.Desktop ManagementUse the Desktop Management tab to enable or disable the nView DesktopManager features, start the nView Desktop Manager wizard, and modify orview the display properties of your system.ProfilesUse the Profiles tab to manage and create different display profiles and switchbetween them.WindowsUse the Windows tab to control how windows behave.ApplicationsUse the Applications tab to define specific applications that use custom nViewDesktop Manager settings.DesktopsUse the Desktops tab to manage desktop settings.User InterfaceUse the User Interface tab to manage user interface settingsEffectsUse the User Effects tab to enable specific effects such as transparentwindows dragging, and transparent task bar.ZoomUse the Zoom tab to set the zoom functions for your display.Hot KeysUse the Hot Keys tab to define hot keys for specific display functions.MouseUse the Mouse tab to enable or disable specific mouse functions.ToolsUse the Tools tab to use the keystone correction tools, calibrate the screen, ormove Windows elements to a specific display.9ENGLISHnView Desktop Manager
User ManualENGLISH3.4 Enabling Dual View Function in WindowsThis function helps to the system’s view into two separate monitors. Followthe steps below to setup Dual View function.Step 1:Right click on the desktop and select “Properties”.Go to “settings” tab and click on “Advanced” formore setting items.Step 2:Select the “GeForce Graphic Serial” tab and clickon the “nView Display mode” item. Then choosethe desired display mode.There are 4 Display modes available:Clone:Display the same view on the primary and secondary monitor.Horizontal span:The view can be enlargedhorizontally from the primary tothe secondary monitor.Vertical span:The view can be enlarged vertically from the primary to thesecondary monitor. In addition, just like the “HorizontalSpan,” this functionality also allows you to work twodifferent tasks on two monitors (primary and secondary)simultaneously.10
User ManualThis functionality allows you to work two different tasks on two monitors(primary and secondary) simultaneously.For Dual View, you have to distinguish the primary and the secondary monitor:a.Connect the monitor cables to VGA ports.b.Enter OS.c.Enter “Display Properties”.d.Press “Identify” and the screen will appear “1 & 2” to distinguish theprimary and the secondary monitor.Note:1. Please check on “Extend my Windows desktop onto this monitor” to show“1 & 2.” Otherwise, both screens will show “1.”2. Please uncheck “Extend my Windows desktop onto this monitor” to use theStandard, Clone, Horizontal Span, or Vertical Span functions.Note: Your graphics card supports either Dual View Function or SLI Multi-GPUFeature. Please refer section 3.5 Enabling SLI Multi-GPU in Windows fordetailed setup information if your graphics card supports SLI Technology.11ENGLISHDual View:
User ManualENGLISH3.5 Enabling SLI Multi-GPU Feature in WindowsAfter the two graphics cards are installed, enable the SLI Multi-GPU feature inNVIDIA nView properties.Step 1:Click NVIDIA Settings icon on the Windowstaskbar.and Select “nView Properties” innView Desktop Manager pop-up menuStep 2:Select “NVIDIA GeForce” tab, and then click on“Multi-GPU” item on the left dialog box.Step 3:Check before “Enable SLI multi-GPU” item,and click on OK to complete the setting.12
User ManualGraphics card not installed correctly message appears. Ensure that the item “Assign IRQ to VGA” in the BIOS of your motherboardis enabled (refer to your computer/mainboard manual for information)Ensure that no drivers from other graphics cards are installed. Differentdrivers may conflict and prevent the NVIDIA drivers from correctly install.Remove any drivers from previous graphics cards before installing theNVIDIA-based graphics card.OpenGL games don’t run in Multi-Monitor mode Because OpenGL API can only accelerate one hardware graphics card at atime, some OpenGL games do not operate under Windows XP/Vista/2000when using a dual monitor setup. Disable the second monitor to playOpenGL 3D games.The system keeps crashing. Make sure that the system meets the minimum requirements for the card(see System Requirements).Ensure that the mainboard meets the PCI-Express 16X specification; if itdoesn’t; the system may become unstable when running 3D applications(refer to your mainboard manual for information).Ensure that the system has at least a 300-watt power supply (350-wattabove is preferred.)Update the mainboard BIOS to the latest version. You can locate the latestBIOS from your mainboard company’s Web site or from the Web site of thecompany that assembled your PC, along with instructions for updating theBIOS.Ensure that the PCI-Express 16X controller drivers for your mainboard arethe latest version.Check the chipset of your PC and download the latest chipset drivers fromthe PC or mainboard manufacturer’s Web site.Before installing the graphics card, ensure that any driver from the previousgraphics card has been uninstalled. Refer to the user’s manual of theprevious graphics card for information on properly uninstalling the drivers.Ensure that programs running in the background are not causing theinstability. Virus protection programs, peer-to-peer software, and crashguard utilities can affect the stability of your system when playing3D-intensive applications. Disable these utilities and any other programsbefore you run any 3D applications or games.13ENGLISHChapter4: Troubleshooting
User Manual ENGLISHEnsure that the graphics card is not sharing an IRQ with any other deviceexcept for “IRQ holder for PCI steering.” For information on checking IRQs,refer to Windows help. If a PCI card device is sharing an IRQ with thegraphics card, move it to another PCI slot.The graphics card only allows me to enable a 60 Hz refresh rate. Ensure that your monitor can support higher refresh rates. Refer to yourmonitor’s user manual.Ensure that your monitor’s drivers, if required, are installed. Refer to yourmonitor’s user manual. You may be able to download updated drivers fromthe manufacturer’s Web site.How do I optimize the graphics card for faster gaming performance? Change the Direct 3D and OpenGL settings of your NVIDIA display drivers.When playing games, the monitor turns off, but the game is still running. Ensure that the graphics card is running at a refresh rate which the monitorsupports. Refer to your monitor’s user manual.Set the refresh rate to the adapter default value and try playing the gameagain.Game playing performance is poor. Download and install the latest NVIDIA display drivers. Drivers areavailable from: http://www.nvidia.com/view.asp?PAGE driversUpdate the PCI-Express 16X drivers for the PC’s mainboard.Update the chipset drivers. Refer to the mainboard manufacturer’s Website for chipset information.Before installing the graphics card, ensure the drivers from any previousgraphics cards are properly uninstalled. Refer to the user’s manual of theprevious graphics card for information on properly uninstalling the drivers.Be sure that there are no programs running in the background.When installing the latest drivers for the graphics card, a “This is not avalid Win32 application” error appears. Check if you are using a download utility in the background, whichsometimes corrupts the drivers.Disable any download utilities prior to downloading the drivers from theNVIDIA Web site, then download the drivers again. After you havedownloaded the drivers, you may re-enable your download utility.14
User ManualVorwortHaftungsausschlussDie Informationen in diesem Dokument wurden sorgfältig überprüft. Dennoch gibt es keineGewähr für die Richtigkeit des Inhalts. Wir übernehmen keine Verantwortung hinsichtlich derVerwendung oder Verletzung der Patente Dritter, die u.U. durch die Verwendung entsteht. Eswird weder implizit noch anderweitig eine Lizenz gemäß den Patentrechten eingeräumt. DieInformationen in diesem Dokument können ohne Ankündigung geändert werden.ALLE RECHTE VORBEHALTEN.Dieses Dokument enthält proprietäre Informationen, die urheberrechtlich geschützt sind. KeinTeil dieses Handbuchs darf ohne vorherige schriftliche Genehmigung mit irgendwelchen Mitteln,in irgendeiner Form, mechanisch, elektronisch oder anderweitig reprod
4. Press the PCI-Express 16X interface card firmly into the PCI-Express slot, making sure it is properly seated. (If your new display card is AGP interface, press it firmly into the AGP slot.) 5. Secure the card in place with a screw. 6. Replace the computer case cover. Note: If provided wi