Transcription
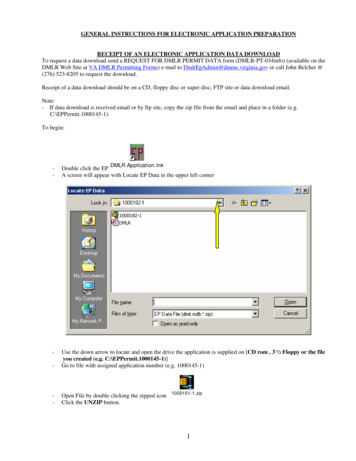
GENERAL INSTRUCTIONS FOR ELECTRONIC APPLICATION PREPARATIONRECEIPT OF AN ELECTRONIC APPLICATION DATA DOWNLOADTo request a data download send a REQUEST FOR DMLR PERMIT DATA form (DMLR-PT-034info) (available on theDMLR Web Site at VA DMLR Permitting Forms) e-mail to DmlrEpAdmin@dmme.virginia.gov or call John Belcher @(276) 523-8205 to request the download.Receipt of a data download should be on a CD, floppy disc or super disc, FTP site or data download email.Note:- If data download is received email or by ftp site, copy the zip file from the email and place in a folder (e.g.C:\EPPermit.1000145-1).To begin:--DMLR Application.lnkDouble click the EPA screen will appear with Locate EP Data in the upper left corner-Use the down arrow to locate and open the drive the application is supplied on [CD rom , 3 ½ Floppy or the fileyou created (e.g. C:\EPPermit.1000145-1)]Go to file with assigned application number (e.g. 1000145-1)-Open File by double clicking the zipped icon 1000151-1.zipClick the UNZIP button.1
-A screen will appear Indicate Where To Unzip The Data in the upper left hand corner.2
-Using the drop down menu go to the file location you wish to open the application in (e.g. Local Disc(C:)\EPPermit).You should create a subfolder under the EPPermit folder, using the application number.HOW TO CREATE A FOLDER: Click on the folder that is located in the upper right hand corner of the screen thathas an asterisk on the corner. When the folder appears in will say new folder change the name to the applicationnumber.3
-Double click the folder you created and click SAVE.-You should receive a message “Operation Completed Successfully”4
-EXIT-When EP program opens go to bottom left of screen click ATTACHMENTSIf attachments exist follow directions below. This will also apply on further reviews (TR-2, etc.)If attachments do not exist then exit and proceed.5
-Check the box- Change all referencesClick the SELECT ALL buttonClick the MOVE buttonUnder the status bar all items should show ODTM, with all letters capitalized and/or check the file path changed tomatch where your folder exists (example C:\EPPermits.1100033.name of document)EXIT and you should now be ready to begin work on the appropriate portion of the application.6
HOW TO REVIEW ATTACHMENTSTo review attachments click inside the box that has the file path, click the down arrow, a dialog box will appear, click YES toview.YES will take you to the viewer version of the document and/or mapNO will take you to the original version of the document (word or wordperfect).NOTE: Corrections can be made to documents by choosing NO, going to the original document, make needed changes andsave the document while still in the EP program.7
The following screen begins the total EP application form.To begin work on the P1 form for Permittee Information click the plus sign to the right of the folder.Note: The sections of the form are described as follows:P1 Permittee InformationE1 Electronic Application (detailed plans)O1 Operator Information8
Click on folder 1.1 to begin, the Next button can be used to move from one item to the next throughout the program.SAVING INFORMATIONUse the SAVE button on each area where provided. However, to ensure each item in each section is saved go to the nextsection prior to exiting the program. (e.g. If working in P1 go to E1 prior to exiting, if working in E1 section I GeneralInformation go to section II Administrative Information prior to exiting).9
APPLICATION P1The application number given in the data download will appear in the gray box. The company/consultant project number (ifany) can be typed into the box titled Project #-Not for DMLR use.NOTE: Basic instructions for what is requested in each box is available in the area indicated by the yellow arrow. This typeof instruction is located on each page of the form.10
Double click in the upper box under this section. This will provide a drop down menu to choose the type of applicationdesired. (See next page)Under DESCRIPTION type directly into the box a brief description of the application being submitted.11
Double click the in the area (as indicated by the yellow arrow) for the appropriate type of application and the information willbe added to the box.Enter the appropriate information requested. Under the “Preferred Order of Contact” click the down arrow to choose thepreferred number order in which you would prefer to be contacted.NOTE: The grayed boxes cannot be changed.12
Enter the appropriate information requested. Under the “Preferred Order of Contact” click the down arrow to choose thepreferred number order in which you would prefer to be contacted.NOTE: The grayed boxes cannot be changed.13
Type the appropriate response in the box given.14
To add additional information click the add button and a details screen will appear (SEE BELOW). To change informationhighlight the appropriate field and click the details button for the details screen.Type in the appropriate information, SAVE and CLOSE. If you have an attachment to further explain this information clickthe ATTACHMENT button and an additional screen (See the following page) will appear for an area to add an attachment.15
To add an attachment: Click the ADD button, type the brief description in the box provided. Click inside the File Name/Pathbox and a down arrow should appear. Click the down arrow and follow the path to where you have saved the attachment.Double click the appropriate file and the file path will be placed in the File Name/Path box.Click the ADD button and type the appropriate information in the box provided. To add additional lines click the ADDbutton again.16
Click in the area indicated by the yellow arrow for the appropriate yes or no response for each category. If an attachment isneeded for further information attach as previously described on page 19.17
Add the required attachment as described on page 19. Note this item should be scanned with the appropriate signature andthen attach.HOW TO SAVE INFORMATIONOpen a E1 or O1 form in the application to be sure the information added in the last section is saved before exiting. Use savebuttons where they are available.ZIPPING AND PRINTING APPLICATIONSee pages 73-77 for instructions on zipping and printing the application.18
APPLICATION E1Click the plus ( ) button as previously described to open the appropriate section to be added, changed or modified.19
I GENERAL INFORMATIONIf the application is for an existing permit the existing permit number will be located in the box. If the application is for anew permit the box will be blank and should be left blank until the permit is approved.20
Include the appropriate information as instructed.21
No information is required for this section. If the permit is existing information will already exist.22
The application number given in the data download will appear in the gray box. The company/consultant project number (ifany) can be typed into the box titled Project #-Not for DMLR use.23
This box can be typed directly into. The type information is for example, Mine No. 1.24
Double click in the upper box under this section. This will provide a drop down menu to choose from for the type ofapplication desired. (See below)Under DESCRIPTION type directly into the box a brief description of the application being submitted.25
Double click the in the area (as indicated by the yellow arrow) for the appropriate type of application and the information willbe added to the box.26
To add the TYPE OF OPERATION click the ADD button, click once inside the description box, click the down arrow.Double click in the space adjacent to the type of operation to be added which will add the type of operation in the descriptionbox. To add additional types follow the same procedure.27
This information will be transferred from the P1 form or be existing if the application is for an existing permit. If a commentis needed type directly into the comment box. Indicate the preferred order of contact using the down arrow and choosing theappropriate number.SECTION 1.9 Information will be existing or added from a P1 form change.SECTION 1.10 Information will be existing or added from the O1 for change.SECTION 1.11 Type appropriate information in the boxes provided.28
Click in the area indicated by the yellow arrow for the appropriate Y or N response. If other is Y, include the appropriateinformation.29
Is the application is the result of enforcement action? Click under the Y/N to add the appropriate response. If yes, click theADD button, type the NOV, RON, etc. number in the Enf# box, type a brief description in the Description box. Scan theNOV, RON, etc. and click in the Path box, click the down arrow and follow the path to the scanned item, double click the fileand the path will be added in the path box.30
If remining acres exist on the area to be permitted or the existing permit, place a Y in the Y/N box. In the Acres box placethe number of remining acres existing on the permit, plus the any remining acres being proposed. If the application is for anew permit list any remining acres being proposed.SECTION 1.15 This information (if any) will be provided in the data download.31
Click the ADD button, type the number of the section(s) being modified in the Section box and the description of the sectionin the Description box. Follow the same procedure for each section being modified. If a new permit type ALL in the Sectionbox.SECTION 1.17 Place the appropriate response in the Y/N box and provide the appropriate attachments if needed.32
To provide information in this section begin by clicking the ADD button. Place the appropriate item number from the list inthe instructions in the Item No. box.33
To add the code click inside the Code box, click the down arrow and choose the appropriate item from the drop down box bydouble clicking in the area as indicated by the yellow arrow. Type in a brief description in the Description box. Click in theFile Name/Path box, click the down arrow and follow the path to the appropriate attachment and double click the file to beadded as an attachment. To add additional information follow the same procedure.SECTION 1.19 This information can be added in the same manner as in Section 1.18.34
Place the appropriate Y or N in the Y/N box. If Yes, click the ADD button, click inside the Name box, click the down arrowand a drop down box will appear, choose the appropriate contact by double clicking on the contact as previously explained.If an attachment is needed, add as previously described. If additional or contacts are required repeat the process for each itemneeding to be added.SECTION 1.21 Add the appropriate Y or N in the Y/N box and add an attachment if needed.SECTION 1.22 Add the appropriate Y or N in the Y/N box and add an attachment if needed.35
II Administrative InformationEnter the requested permit term in the box provided. If more than 5 years is requested add the appropriate attachments.SECTION 2.2 To add information click the ADD button and type the appropriate information in the boxes provided.SECTION 2.3 Add appropriate information as requested.SECTION 2.4 Add the appropriate P or C for the type bond being provided.36
If the permit is existing the expiration date and whether the insurance is continuous will be filled in. If a copy of the liabilityinsurance is required it should be scanned, click the ADD button and attach the scanned document.37
To add the Public Office Code and Newspaper Code, double click inside the box for each one, a drop down box will appear.Choose the appropriate public office and newspaper by double clicking in the box to the left of the code as described earlier.The add the sample public notice, click the ADD button and follow the attachment procedures described earlier.NOTE: Only one public office code and one newspaper code can be selected. If more than one needs to be used choose theone serving the largest portion of the permit. Further information can be included as an attachment in this section.SECTION 2.7 Provide the scanned copy of the proof of publication as an attachment as described in earlier sections.38
III SITE INFORMATIONTo add information in this section click the ADD button and an additional screen will appear for the information to be added.Click on A under the action, when the information is added, click save and close, the information will then appear as shownabove. To change or delete information click the box with the right pointing arrow and click the DETAILS button, place a Cor D in the action box, change the appropriate information, save and close. Note, the information in the Action box isprovided in a drop down menu.SECTION 3.2 Adding the information in this section requires the same actions as Section 3.1SECTION 3.3 Adding the information in this section requires the same actions as Section 3.1 with the exception of placinga Y or N in the Y/N box.SECTION 3.4 Adding the information in this section requires the same actions as Section 3.1 with the exception of placinga Y or N in the Y/N box.SECTION 3.5 Adding the information in this section requires the same actions as Section 3.1SECTION 3.6 Adding the information in this section requires the same actions as Section 3.1SECTION 3.7 Place the appropriate Y or N in the Y/N box.39
To add information click the ADD button and type the information in the box provided.NOTE: The box in Document Type is limited to 15 characters and the box in Applicable Tract is limited to 30 characters.Add any additional information as an attachment.To add documents as an attachment, do so as described in the earlier sections.SECTION 3.9 Adding the information in this section requires the same actions as previously described for addingattachments, with the exception of placing a Y or N in the Y/N box.SECTION 3.10 Adding the information in this section requires the same actions as previously described for addingattachments, with the exception of placing a Y or N in the Y/N box.40
Add the appropriate information in the boxes provided. To add a USGS Quadrangle, click the ADD button, then click thedown arrow and choose the appropriate quadrangle from the drop down menu.41
To add information in this section click the ADD button, click inside the Action box, click the down arrow and choose fromthe list for action. Click inside the County box, click the down arrow and choose from the county list provided. Theappropriate acreage can be added in the boxes provided. The result will automatically be totaled in the Result box as youprogress.SECTION 3.13 Adding the information in this section requires the same actions as previously described for addingattachments, with the exception of placing a Y or N in the Y/N box.SECTION 3.14 Adding the information in this section requires the same actions as previously described for addingattachments, with the exception of placing a Y or N in the Y/N box.42
IV GEOLOGYTo add information in this section, click the add button, click inside the Local Name box and click the drop down arrow,choose the appropriate local name from the list provided. Click inside the Geologic box and click the down arrow, choosethe appropriate geologic name from the list provided. Enter the elevation of the seam in the Elevation box and the seamthickness in the Thickness box (in inches).43
To add information in this section click the ADD button, click inside the Action box and click on the down arrow and clickon the appropriate action. The next five boxes can be typed directly into. Click in the AttOrigPath box and click the downarrow to add the appropriate attachment for this section. The additional attachments can be added as previously described.SECTION 4.3 Adding the information in this section requires the same actions as previously described for addingattachments.SECTION 4.4 Adding the information in this section requires the same actions as previously described for addingattachments.SECTION 4.5 Adding the information in this section requires the same actions as previously described for addingattachments.44
V HYDROLOGYTo add information to this section, click the ADD button, click inside the Receiving Stream box and click the down arrow fora list of streams. (See below).45
When you click on the stream, the above Down Stream screen will appear showing the downstream waters that will receivethe discharges. If the appropriate stream is shown choose SELECT, if not exit this screen and choose another stream in thelist in the same manner. To add additional streams follow the same procedure.Add any additional attachments in the lower section as previously described.SECTION 5.2 Adding the information in this section requires the same actions as previously described for addingattachments.To add information to this section click the ADD button, a separate screen will appear for the information to be added. (Seebelow). Additional attachments can be added as previously described.46
Action, Type, Quad/Section and Status can be chosen from the drop down menu. All other information can be typed directlyinto the boxes provided. NOTE: The MPID No. will be issued by DMLR once the point is approved. When finished clickSAVE and CLOSE. To add additional points follow the same procedure.SECTION 5.4 Adding the information in this section requires the same actions as previously described for addingattachments.SECTION 5.5 Adding the information in this section requires the same actions as previously described for addingattachments.SECTION 5.6 Adding the information in this section requires the same actions as previously described for addingattachments.47
To add information to this section click the ADD button, a separate screen will appear for the information to be added. (Seebelow). Additional attachments can be added as previously described.Action, Type, Receiving Stream (double click inside box) and Quad/Section can be chosen from the drop down menu. Allother information can be typed directly into the boxes provided. NOTE: The MPID No. will be issued by DMLR once thepoint is approved. When finished click SAVE and CLOSE. To add additional points follow the same procedure.48
SECTION 5.8 Adding the information in this section requires the same actions as previously described for addingattachments.SECTION 5.9 Adding the information in this section requires the same actions as previously described for addingattachments.To add information in this section, click the down arrow and choose an approved lab by double clicking on the lab name.Click the ADD button and type the person(s) name signing the DMRs in the box provided. To add additional persons followthe same procedure. If an attachment is needed follow the procedure previously described.SECTION 5.11 Adding the information in this section requires the same actions as previously described for addingattachments.SECTION 5.12 Adding the information in this section requires the same actions as previously described in Section 5.7.SECTION 5.13 Adding the information in this section requires the same actions as previously described for addingattachments.SECTION 5.14 Adding the information in this section requires the same actions as previously described for addingattachments.SECTION 5.15 Adding the information in this section requires the same actions as previously described in Section 5.7.SECTION 5.16 Adding the information in this section requires the same actions as previously described for addingattachments.49
VI PHC/HRPSECTION 6.1 Adding the information in this section requires the same actions as previously described for addingattachments.SECTION 6.2 Adding the information in this section requires the same actions as previously described for addingattachments.VII LAND USETo add information in this s
Title: Microsoft Word - Electronic_Permitting_Guide