Transcription
Broadband ADSL2 ModemDM111PSPv2User Manual350 East Plumeria DriveSan Jose, CA 95134USAAugust 2011202-10913-01v1.0
Broadband ADSL2 Modem DM111PSPv2 2011 NETGEAR, Inc. All rights reservedNo part of this publication may be reproduced, transmitted, transcribed, stored in a retrieval system, or translatedinto any language in any form or by any means without the written permission of NETGEAR, Inc.Technical SupportThank you for choosing NETGEAR. To register your product, get the latest product updates, get support online, orfor more information about the topics covered in this manual, visit the Support website athttp://support.netgear.com.Phone (US & Canada only): 1-888-NETGEARPhone (Other Countries): Check the list of phone numbers athttp://support.netgear.com/app/answers/detail/a id/984.TrademarksNETGEAR, the NETGEAR logo, and Connect with Innovation are trademarks and/or registered trademarks ofNETGEAR, Inc. and/or its subsidiaries in the United States and/or other countries. Information is subject to changewithout notice. Other brand and product names are registered trademarks or trademarks of their respectiveholders. 2011 NETGEAR, Inc. All rights reserved.Statement of ConditionsTo improve internal design, operational function, and/or reliability, NETGEAR reserves the right to make changesto the products described in this document without notice. NETGEAR does not assume any liability that may occurdue to the use, or application of, the product(s) or circuit layout(s) described herein.2
ContentsChapter 1 Hardware SetupUnpack Your New Modem. . . . . . . . . . . . . . . . . . . . . . . . . . . . . . . . . . . . . . 7Hardware Features . . . . . . . . . . . . . . . . . . . . . . . . . . . . . . . . . . . . . . . . . . . 8Label . . . . . . . . . . . . . . . . . . . . . . . . . . . . . . . . . . . . . . . . . . . . . . . . . . . . 8Back Panel. . . . . . . . . . . . . . . . . . . . . . . . . . . . . . . . . . . . . . . . . . . . . . . . 8Front Panel . . . . . . . . . . . . . . . . . . . . . . . . . . . . . . . . . . . . . . . . . . . . . . . 9ADSL Microfilters . . . . . . . . . . . . . . . . . . . . . . . . . . . . . . . . . . . . . . . . . . . . 10One-Line ADSL Microfilter . . . . . . . . . . . . . . . . . . . . . . . . . . . . . . . . . . . 10Two-Line ADSL Microfilter . . . . . . . . . . . . . . . . . . . . . . . . . . . . . . . . . . . 10Summary . . . . . . . . . . . . . . . . . . . . . . . . . . . . . . . . . . . . . . . . . . . . . . . . 11Cable Your Broadband ADSL2 Modem to a Computer. . . . . . . . . . . . . . 11Cable Your Modem to a Router . . . . . . . . . . . . . . . . . . . . . . . . . . . . . . . . . 13Chapter 2 Modem Internet SetupModem Setup Preparation. . . . . . . . . . . . . . . . . . . . . . . . . . . . . . . . . . . . .Gather ISP Information . . . . . . . . . . . . . . . . . . . . . . . . . . . . . . . . . . . . .NETGEAR Genie CD Setup . . . . . . . . . . . . . . . . . . . . . . . . . . . . . . . . . . .View or Change Settings . . . . . . . . . . . . . . . . . . . . . . . . . . . . . . . . . . . .Settings Description. . . . . . . . . . . . . . . . . . . . . . . . . . . . . . . . . . . . . . . .Log In to the Modem . . . . . . . . . . . . . . . . . . . . . . . . . . . . . . . . . . . . . . . . .Upgrade Modem Firmware . . . . . . . . . . . . . . . . . . . . . . . . . . . . . . . . . . . .Modem Interface . . . . . . . . . . . . . . . . . . . . . . . . . . . . . . . . . . . . . . . . . . . .Setup Wizard . . . . . . . . . . . . . . . . . . . . . . . . . . . . . . . . . . . . . . . . . . . . . . .Manual Setup (Basic Settings) . . . . . . . . . . . . . . . . . . . . . . . . . . . . . . . . .ADSL Settings . . . . . . . . . . . . . . . . . . . . . . . . . . . . . . . . . . . . . . . . . . . . . .Unsuccessful Internet Connection . . . . . . . . . . . . . . . . . . . . . . . . . . . . . . .Change Password and Login Time-Out . . . . . . . . . . . . . . . . . . . . . . . . . .Log Out Manually . . . . . . . . . . . . . . . . . . . . . . . . . . . . . . . . . . . . . . . . . . .Types of Logins . . . . . . . . . . . . . . . . . . . . . . . . . . . . . . . . . . . . . . . . . . . . .151515161617181920212425252626Chapter 3 Security SettingsKeyword Blocking of HTTP Traffic. . . . . . . . . . . . . . . . . . . . . . . . . . . . . . .Delete a Keyword or Domain. . . . . . . . . . . . . . . . . . . . . . . . . . . . . . . . .Specify a Trusted Computer . . . . . . . . . . . . . . . . . . . . . . . . . . . . . . . . .Firewall Rules to Control Network Access. . . . . . . . . . . . . . . . . . . . . . . . .Remote Computer Access Basics . . . . . . . . . . . . . . . . . . . . . . . . . . . . .Open Inbound Ports (Port Forwarding) . . . . . . . . . . . . . . . . . . . . . . . . .Inbound Rules to Permit External Host Communications . . . . . . . . . . .Contents 328282929293032
Broadband ADSL2 Modem DM111PSPv2How Inbound Rules Differ from Outbound Rules . . . . . . . . . . . . . . . . . . 33Configure Firewall Rules . . . . . . . . . . . . . . . . . . . . . . . . . . . . . . . . . . . . 33Inbound Rules (Port Forwarding) . . . . . . . . . . . . . . . . . . . . . . . . . . . . . . 34Outbound Rules (Service Blocking) . . . . . . . . . . . . . . . . . . . . . . . . . . . . 36Configure Services . . . . . . . . . . . . . . . . . . . . . . . . . . . . . . . . . . . . . . . . . . . 38Set the Time Zone . . . . . . . . . . . . . . . . . . . . . . . . . . . . . . . . . . . . . . . . . . . 39Schedule Firewall Services . . . . . . . . . . . . . . . . . . . . . . . . . . . . . . . . . . . . 40Enable Security Event Email Notification . . . . . . . . . . . . . . . . . . . . . . . . . . 41Chapter 4 Network MaintenanceUpgrade the Modem Firmware. . . . . . . . . . . . . . . . . . . . . . . . . . . . . . . . . . 44Turn Off Automatic Firmware Checking . . . . . . . . . . . . . . . . . . . . . . . . . 44Automatic Firmware Checking On . . . . . . . . . . . . . . . . . . . . . . . . . . . . . 45Manually Check for Firmware Upgrades . . . . . . . . . . . . . . . . . . . . . . . . . . 46Manage the Configuration File . . . . . . . . . . . . . . . . . . . . . . . . . . . . . . . . . . 47Back Up . . . . . . . . . . . . . . . . . . . . . . . . . . . . . . . . . . . . . . . . . . . . . . . . . 47Restore . . . . . . . . . . . . . . . . . . . . . . . . . . . . . . . . . . . . . . . . . . . . . . . . . . 47Erase . . . . . . . . . . . . . . . . . . . . . . . . . . . . . . . . . . . . . . . . . . . . . . . . . . . 48View Modem Status . . . . . . . . . . . . . . . . . . . . . . . . . . . . . . . . . . . . . . . . . . 48View Attached Devices. . . . . . . . . . . . . . . . . . . . . . . . . . . . . . . . . . . . . . . . 51Run Diagnostic Utilities . . . . . . . . . . . . . . . . . . . . . . . . . . . . . . . . . . . . . . . 52Chapter 5 Advanced SettingsWAN Setup. . . . . . . . . . . . . . . . . . . . . . . . . . . . . . . . . . . . . . . . . . . . . . . . . 54Dynamic DNS. . . . . . . . . . . . . . . . . . . . . . . . . . . . . . . . . . . . . . . . . . . . . . . 56LAN Setup . . . . . . . . . . . . . . . . . . . . . . . . . . . . . . . . . . . . . . . . . . . . . . . . . 57Access Modem Interface on Additional Port. . . . . . . . . . . . . . . . . . . . . . 58Use Modem as DHCP Server. . . . . . . . . . . . . . . . . . . . . . . . . . . . . . . . . 58Reserved IP Address Setup . . . . . . . . . . . . . . . . . . . . . . . . . . . . . . . . . . 59Remote Management. . . . . . . . . . . . . . . . . . . . . . . . . . . . . . . . . . . . . . . . . 59Static Routes . . . . . . . . . . . . . . . . . . . . . . . . . . . . . . . . . . . . . . . . . . . . . . . 61Static Route Example . . . . . . . . . . . . . . . . . . . . . . . . . . . . . . . . . . . . . . . 61Configure Static Routes . . . . . . . . . . . . . . . . . . . . . . . . . . . . . . . . . . . . . 62Universal Plug and Play . . . . . . . . . . . . . . . . . . . . . . . . . . . . . . . . . . . . . . . 63Change the Device Mode. . . . . . . . . . . . . . . . . . . . . . . . . . . . . . . . . . . . . . 64Chapter 6 TroubleshootingModem Is Off . . . . . . . . . . . . . . . . . . . . . . . . . . . . . . . . . . . . . . . . . . . . . . . 66Power LED Is Off . . . . . . . . . . . . . . . . . . . . . . . . . . . . . . . . . . . . . . . . . . 66Power LED Is Red . . . . . . . . . . . . . . . . . . . . . . . . . . . . . . . . . . . . . . . . . 67Ethernet LED Is Off . . . . . . . . . . . . . . . . . . . . . . . . . . . . . . . . . . . . . . . . 67No Internet Connection . . . . . . . . . . . . . . . . . . . . . . . . . . . . . . . . . . . . . . . 67DSL Link . . . . . . . . . . . . . . . . . . . . . . . . . . . . . . . . . . . . . . . . . . . . . . . . . 67Internet LED Is Red . . . . . . . . . . . . . . . . . . . . . . . . . . . . . . . . . . . . . . . . 68Cannot Obtain an Internet IP Address . . . . . . . . . . . . . . . . . . . . . . . . . . 68Debug PPPoE or PPPoA . . . . . . . . . . . . . . . . . . . . . . . . . . . . . . . . . . . . 694
Broadband ADSL2 Modem DM111PSPv2Cannot Load an Internet Web Page . . . . . . . . . . . . . . . . . . . . . . . . . . . .70TCP/IP Network Not Responding . . . . . . . . . . . . . . . . . . . . . . . . . . . . . . . .70Test the LAN Path to Your Modem. . . . . . . . . . . . . . . . . . . . . . . . . . . . .70Test the Path from Your Computer to a Remote Device . . . . . . . . . . . .71Cannot Log in . . . . . . . . . . . . . . . . . . . . . . . . . . . . . . . . . . . . . . . . . . . . . . . 71Changes Not Saved . . . . . . . . . . . . . . . . . . . . . . . . . . . . . . . . . . . . . . . . . .72Firmware Needs to Be Reloaded . . . . . . . . . . . . . . . . . . . . . . . . . . . . . . . .72Incorrect Date or Time . . . . . . . . . . . . . . . . . . . . . . . . . . . . . . . . . . . . . . . .73Appendix ATechnical SpecificationsFactory Settings . . . . . . . . . . . . . . . . . . . . . . . . . . . . . . . . . . . . . . . . . . . . . 75Technical Specifications . . . . . . . . . . . . . . . . . . . . . . . . . . . . . . . . . . . . . . .76Appendix BNotification of ComplianceIndex5
1.Hardware SetupGetting to know your modem1The Broadband ADSL2 Modem DM111PSPv2 provides you with an easy and secure way to setup a wireless home network with fast access to the Internet over a high-speed digital subscriberline (DSL). It has a built-in DSL modem, is compatible with all major DSL Internet serviceproviders, lets you block unsafe Internet content and applications, and can protect the devices(PCs, gaming consoles, and so on) that you connect to your home network.If you have not already set up your new modem using the installation guide that comes in thebox, this chapter walks you through the hardware setup. Chapter 2, Modem Internet Setup,explains how to set up your Internet connection.For more information about the topics covered in this manual, visit the support website athttp://support.netgear.com. If you want instructions about how to wall-mount your modem, seeWall-Mount Your Router at http://support.netgear.com/app/answers/detail/a id/18725.This chapter contains the following sections: Unpack Your New Modem Hardware Features ADSL Microfilters Cable Your Broadband ADSL2 Modem to a Computer Cable Your Modem to a Router6
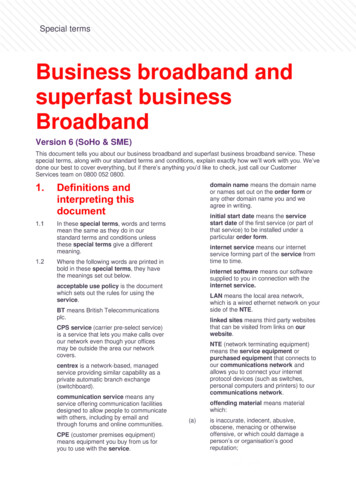
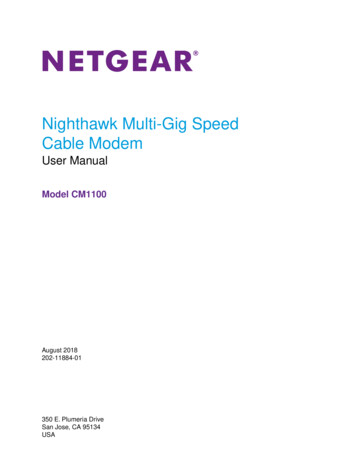
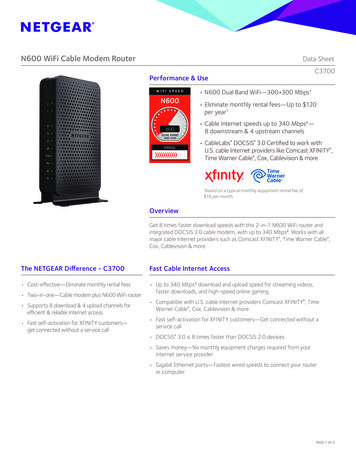
Broadband ADSL2 Modem DM111PSPv2Unpack Your New ModemYour box should contain the following items: Broadband ADSL2 Modem DM111PSPv2 AC power adapter (plug varies by region) Category 5 (Cat 5) Ethernet cable Telephone cable with RJ-11 connector Microfilter/splitter Installation guide with cabling and modem setup instructions Resource CD with NETGEAR Genie setupIf any of the parts are incorrect, missing, or damaged, contact your NETGEAR dealer. Keepthe carton, including the original packing materials, in case you need to return the product forrepair. See ADSL Microfilters on page 10 for information about where to place and how toposition your modem.Resource CDADSL2 modemFilter/splitterModem standTelephone cableEthernet cableFigure 1. Review the box contentsHardware Setup7Power adapter
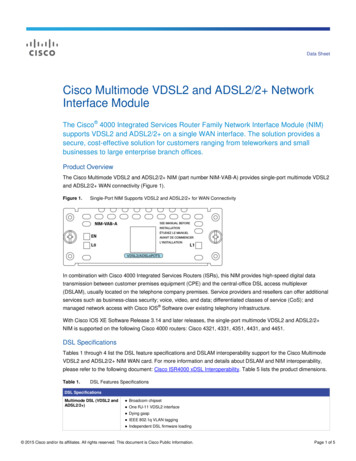
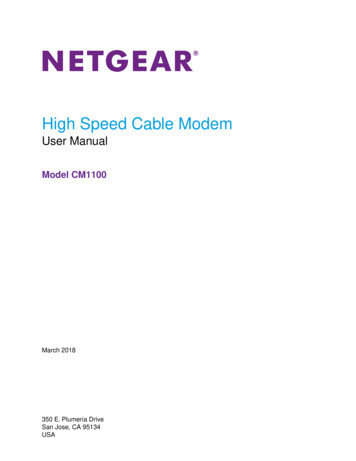
Broadband ADSL2 Modem DM111PSPv2Hardware FeaturesBefore you cable your modem, take a moment to become familiar with the label and the frontand back panels. Pay particular attention to the LEDs on the front panel.LabelThe label on the bottom of the modem shows the MAC address and serial number.Back PanelThe back panel has the On/Off button and port connections as shown in the figure.1234Figure 2. Back panel port connectionsViewed from left to right, the rear panel contains the following elements:1. RJ-11 asynchronous DSL (ADSL) port for connecting the modem to a DSL lineNote: An ADSL port is capable of sending data over a DSL line at onespeed and receiving it at another speed.2. Restore Factory Settings button3. One Ethernet RJ-45 Ethernet port for cabling the modem to a computer4. AC power adapter inputHardware Setup8
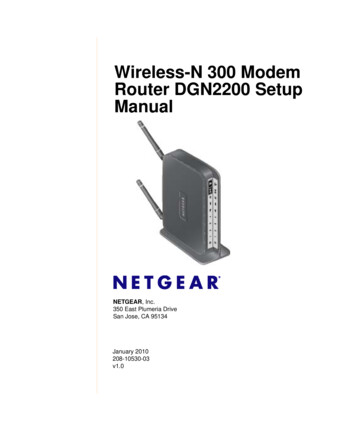
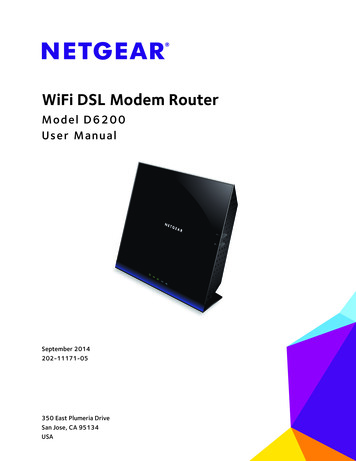
Broadband ADSL2 Modem DM111PSPv2Front PanelThe modem front panel has the status LEDs and icons shown in the following figure.PowerEthernetDSLInternetFigure 3. Front panel LED IconsThe following table describes the LEDs and icons on the front panel from left to right.Table 1. LEDsLEDDescriptionPower Ethernet Solid green. The port has detected an Ethernet link with a device. Blinking green. Data is being transmitted or received. Off. No link is detected on the port.DSL Solid green. You have a DSL connection. In technical terms, the DSL port issynchronized with an ISP’s network-access device. Blinking green. Indicates that the broadband ADSL2 modem is negotiating the bestpossible speed on the DSL line. Off. The unit is off or there is no DSL connection.Internet Solid green. You have an Internet connection. If this connection is dropped due to anidle time-out but the DSL connection is still present, the light stays green. If the Internetconnection is dropped for any other reason, the light turns off. Blinking green. Data is being transmitted over the DSL port. Solid red. The Internet (IP) connection failed. See No Internet Connection on page 67for troubleshooting information. Off. No Internet connection is detected or the device is in bridge mode (an externaldevice handles the ISP connection).Solid green. Power is supplied to the modem.Solid red. POST (power-on self-test) failure or a device malfunction has occurred.Off. Power is not supplied to the modem.Restore factory settings. The LED blinks momentarily when the Restore FactorySettings button on the bottom of the unit is pressed for 6 seconds. The Power LED thenblinks red three times when the Restore Factory Settings button is released and thenturns green as the gateway resets to the factory defaults.Hardware Setup9
Broadband ADSL2 Modem DM111PSPv2ADSL MicrofiltersIf this is the first time you have cabled a wireless modem between a DSL phone line and yourcomputer or laptop, you might not be familiar with ADSL microfilters. If you are, you can skipthis section and proceed to Cable Your Broadband ADSL2 Modem to a Computer onpage 11.An ADSL microfilter is a small in-line device that filters DSL interference out of standardphone equipment that shares the same line with your DSL service. Every telephone devicethat connects to a telephone line that provides DSL service needs an ADSL microfilter to filterout the DSL interference. Example devices are telephones, fax machines, answeringmachines, and caller ID displays. Note that not every phone line in your home necessarilycarries DSL service. That depends on the DSL service setup in your home.Note: Often the ADSL microfilter is included in the box with the modem. Ifyou purchased the broadband ADSL2 modem in a country where amicrofilter is not included, you have to acquire the ADSL microfilterseparately.One-Line ADSL MicrofilterPlug the ADSL microfilter into the wall outlet and plug your phone equipment into the jacklabeled Phone. The modem plugs directly into a separate DSL line. Plugging the wirelessmodem modem into the phone jack blocks the Internet connection. If you do not have aseparate DSL line for the modem, the best thing to do is to use an ADSL microfilter with abuilt-in splitter (see the next paragraph).Plugs into DSL lineFigure 4. One-line ADSL microfilterSecond best when you do not have a separate DSL line for the modem is to get a separatesplitter. To use a one-line filter with a separate splitter, insert the splitter into the phone outlet,connect the one-line filter to the splitter, and connect the phone to the filter.Two-Line ADSL MicrofilterUse an ADSL microfilter with a built-in splitter when there is a single wall outlet that providesconnectivity for both the broadband ADSL2 modem and your telephone equipment. Plug theHardware Setup10
Broadband ADSL2 Modem DM111PSPv2ADSL microfilter into the wall outlet, plug your phone equipment into the jack labeled Phone,and plug the wireless modem modem into the jack labeled ADSL.Plugs into the DSL lineFigure 5. Two-line ADSL microfilter with built-in splitterSummary One-line ADSL microfilter: Use with a phone or fax machine. Splitter: Use with a one-line ADSL microfilter to share an outlet with a phone and themodem. Two-line ADSL microfilter with built-in splitter: Use to share an outlet with a phone and themodem.Cable Your Broadband ADSL2 Modem to a ComputerThe installation guide that came in the box has a cabling diagram on the first page. Thissection walks you through the cabling procedure with detailed illustrations. To cable your modem:1. Put an ADSL microfilter between the phone line and the phone as shown here. Theillustration shows a two-line ADSL microfilter with built-in splitter. The phone plugs intothe phone jack as shown.AB2. Use the included phone cable with RJ-11 jacks to connect the ADSL port (A) of thebroadband ADSL2 modem to the ADSL port (B) of the two-line ADSL microfilter.Hardware Setup11
Broadband ADSL2 Modem DM111PSPv2CAUTION:Incorrectly connecting a filter to your broadband ADSL2 modem blocksyour DSL connection.3. Connect the power adapter cord that came in the package to your modem, and plug it intoan electrical outlet.DC4. Connect the Ethernet cable (C) from the modem Ethernet port to the Ethernet adapter (D) inyour computer.CD5. Verify that your modem is cabled correctly by checking the LEDs.The Power LED is green. The Ethernet LED is green. The DSL LED is green when you have a DSL connection. The Internet LED is red when there is no Internet connection.Hardware Setup12
Broadband ADSL2 Modem DM111PSPv2Cable Your Modem to a RouterThe modem includes a built-in router, but you can connect it to a router if you want. To use the broadband ADSL2 modem with a router:1. Install the modem with the standard PC connection in Router mode.The installation guide that shipped in the package shows how to do this. It is alsoexplained in Cable Your Broadband ADSL2 Modem to a Computer on page 11.2. Set up the modem to work with your Internet connection.See Chapter 2, Modem Internet Setup.3. If you are an advanced user who wants to set up the modem to run in “pure bridge” orModem mode, you need to log in to the modem and change the Device Mode setting toModem mode.See Change the Device Mode on page 64.4. Follow the instructions that came with your router to install the router to work with themodem.Hardware Setup13
2.Modem Internet Setup2Connecting to the InternetThis chapter explains how to set up your Internet connection using one of these methods: usethe Installation Guide with NETGEAR Genie CD (recommended), log in to the modem and useits Setup Wizard, or manual set up. If you have already set up your modem using one of thesemethods, the initial modem setup is complete. Refer to this chapter if you want to becomefamiliar with the modem menus, view or adjust the initial settings, or change the modempassword and login time-out.This chapter contains the following sections: Modem Setup Preparation NETGEAR Genie CD Setup Log In to the Modem Upgrade Modem Firmware Mod
6. 1. Hardware Setup. 1. Getting to know your modem. The Broadband ADSL2 Modem DM111PSPv2 provides you with an easy and secure way to set up a wireless home network with fast ac