Transcription
Emergency Department IntegrationSoftwareVersion 1.0User GuideSeptember 2010Department of Veterans AffairsHealth Systems Design and DevelopmentVA Health Information Technology
EDISUser GuideiiiSeptember 2010
Revision HistoryNote:DateEDISUser GuideThe revision-history cycle begins after the initial version of the user guide hasbeen completed and approved .modePatch r 2010
Table of Contents1.2.3.4.5.6.Emergency Department Integration Software . 11.1. About this Guide . 11.2. Section 508 of the Rehabilitation Act of 1973 . 21.2.1. Recommendations for JAWS Users . 21.3. Role-based Access to Views . 21.4. Document Conventions . 31.5. Workstation Requirements . 31.5.1. Flash Player: Minimum Requirements for Microsoft Windows . 31.5.2. Flash Player: Minimum Requirements for Apple Mac OS . 41.5.3. JAWS Workstation Requirements . 41.6. Application Timeouts . 51.7. Preventing Accidental Application Sign-Outs . 5Getting Started . 72.1. Launch EDIS. 72.2. Log In . 72.2.1. Changing Your Verify Code . 72.3. EDIS Views . 82.3.1. Select a View . 92.4. Work with Data Grids . 92.4.1. Arrange Columns . 92.4.2. Resize Columns . 92.4.3. Sort Information within Columns . 102.5. Access Help Files . 102.6. Understanding EDIS and CPRS Interactions . 102.7. Using EDIS with Appointment Management . 112.7.1. Benefits of this Method . 112.7.2. Drawbacks of this Method . 112.7.3. Best Practice for Using EDIS with Appointment Management . 112.7.4. Processes with Unscheduled Appointments (in Appointment Management) that Lead toErrors 112.8. Using EDIS with PCE . 122.8.1. Benefits of this Method . 122.8.2. Drawbacks of this Method . 122.8.3. Best Practice for Using EDIS with PCE . 122.8.4. Why this Is Best Practice . 132.8.5. Processes with PCE that Lead to Errors . 13Notifications .153.1.Patient-Selection Messages . 15Sign In View .174.1. Add Patients to EDIS from the Sign In View . 174.1.1. Adding Patients Using the Search for Patient in VistA Selection . 184.1.2. Adding Patients Using the Enter Name Selection . 184.1.3. Adding Patients Using the Ambulance Is Arriving Selection . 194.1.4. Add Information to the Patient Information Pane . 194.1.5. Definitions for Nationally Released Source Selections . 20Identify Patients.215.1.Identifying Patients . 22Triage View .236.1. Add Patients to EDIS from the Triage View . 246.1.1. Adding Patients Using the Search for Patient in VistA Selection . 246.1.2. Adding Patients Using the Enter Name Selection . 25EDISUser GuideiiiSeptember 2010
7.8.9.10.11.12.13.6.1.3. Adding Patients Using the Ambulance Is Arriving Selection . 266.2. Add Triage Information . 286.2.1. Definitions for Status Selections . 296.3. Create a Visit in CPRS . 29Update View .317.1. Add or Update Information in the Patient Information Pane . 317.2. Create a Visit . 327.2.1. Setting a Primary Provider for Your Patient’s Visit . 32Disposition View.338.1. Select a Disposition . 348.1.1. Definitions for National Dispositions . 348.2. Select a Reason for Delay . 358.2.1. Definitions for National Reason-for-Delay Selections . 358.3. Enter ICD-9-CM Diagnoses . 388.4. Enter Free-Text Diagnoses . 388.5. Remove Patients . 398.6. Remove Patients Entered in Error . 40Edit Closed View .41Display Board View .4310.1. Viewing the Display Board. 43Assign Staff View .4511.1. Add Providers, Residents, and Nurses . 4511.2. Remove Providers, Residents, and Nurses . 4611.3. Configure Colors for Providers, Residents, and Nurses . 46Reports View .4712.1. Eleven Standard Reports . 4712.1.1. Column Headings. 4712.1.2. Standard Reports . 4812.1.3. Cross Reference and Provider Reports . 5712.2. Run and View Reports . 5912.2.1. Print Reports . 6012.2.2. Export Reports . 60Configure View .6213.1. Room and Area Configurations . 6213.1.1. Add, Configure, and Edit Rooms and Areas . 6213.2. Display Board Configurations . 6513.2.1. Add a New Display Board . 6513.2.2. Add Display Board Columns . 6613.2.3. Configure or Edit Display Board Columns . 6813.2.4. Specify the Order of Display Board Columns . 6813.2.5. Resize Display Board Columns . 6913.2.6. Remove Display Board Columns . 6913.2.7. Save Display Board Configuration Changes . 6913.3. Configure Colors . 7013.3.1. Configure Colors (General Instructions) . 7013.3.2. Configure Colors for Status and Acuity Values . 7113.3.3. Configure Colors for Urgency – Lab Values . 7213.3.4. Configure Colors for Urgency – Radiology Values . 7313.3.5. Configure Colors for Total Elapsed Minutes . 7413.3.6. Configure Colors for Minutes at Location . 7513.3.7. Configure Colors for Minutes for Lab Order . 7613.3.8. Configure Colors for Minutes for Imaging Order . 7713.3.9. Configure Colors for Minutes for Unverified Orders . 7813.4. Configure Parameters . 7913.4.1. Include Residents on Entry Form. 80EDISUser GuideivSeptember 2010
14.13.4.2. Require a Diagnosis . 8013.4.3. Require ICD-9-CM or Free Text Diagnoses . 8013.4.4. Require Disposition to Remove Patients . 8013.4.5. Require a Reason for Delay . 8113.4.6. Configure Shift Parameters . 8113.4.7. Set a Default Room or Area for Patients Arriving by Ambulance . 8113.4.8. Set a Default Room or Area . 8113.4.9. Save Parameter Selections . 8113.5. Add Choices to Selection Lists . 8213.5.1. Add Status, Disposition, Delay Reason, and Source Selections . 83Index.85EDISUser GuidevSeptember 2010
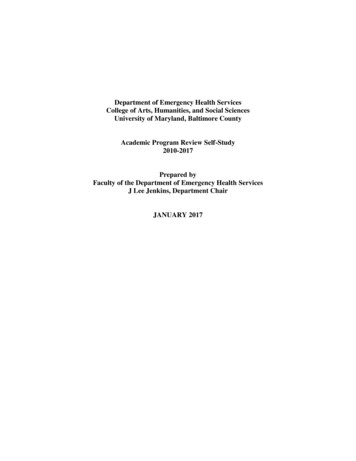
1.Emergency Department Integration SoftwareEmergency Department Integration Software (EDIS) incorporates several Web-based views thatextend the current Computerized Patient Record System (CPRS) to help healthcare professionalstrack and manage the flow of patient care in the emergency-department setting. EDIS views arebased on a class-three application developed by the Upstate New York Veterans Health CareNetwork—or Veterans Integrated Services Network (VISN) 2. Most views are site configurable.EDIS enables you to: Add emergency-department patients to the application’s display boardView information about patients on the display boardEdit patient informationRemove patients from the display boardCreate administrative reportsThe application also includes views for entering patients’ dispositions, removing patients from thedisplay board, and configuring the display board.1.1. About this GuideThis guide steps you through the process of performing the following tasks: EDISUser GuideLaunch Emergency Department Integration Software (EDIS)Sign in patients to the emergency department (when you use the VistA Scheduling package (alsoknown as Appointment Manager) to make appointments for—or check patients into—theemergency department, EDIS automatically adds the patients to its Active Patients list)Enter Emergency Severity Index (ESI) values for triaged patientsCreate emergency-department visits in the CPRS Patient Care Encounters (PCE) package (if notusing Appointment Manager)Update patient information as patients progress through the emergency-care processView the display boardEnter patients’ dispositions in EDISEnter patients’ discharge diagnoses in EDIS and CPRSRemove patients from the display board (this task incorporates disposing patients, which supportsdischarge and admit processes)Make site- and shift-relevant staff assignmentsEdit visit-related informationCreate reportsConfigure the application using its graphical user interface (GUI) tools1September 2010
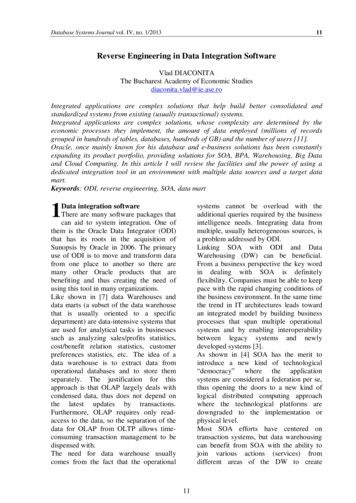
Figure 1: EDIS user interface.1.2. Section 508 of the Rehabilitation Act of 1973The Portable Document File (PDF) version of this guide supports assistive reading devicessuch as Job Access with Speech (JAWS). Because the views that comprise EDIS providegraphical user interface (GUI) access to underlying functionality, the guide includes steps foraccessing application functionality via mouse devices and keyboard actions (when keyboardactions are available).1.2.1.Recommendations for JAWS UsersTo effectively use EDIS with JAWS, the EDIS project team offers the followingrecommendations:1.2.3.4.Use JAWS 10.Use JAWS forms mode; most functions work best in Forms mode.In JAWS 10, use JAWS Verbosity settings to turn off Autoforms mode.Make sure the latest Flex scripts are installed on your machine. (You can downloadJAWS scripts for Flex 3—an executable ts/flex/jaws.html.)Flex applications behave a bit differently than do regular Web applications—a result ofthe way Flash and Flex interact with browsers and JAWS screen readers. JAWS, Flex,and EDIS work together best with IE 6.0. (Testers experienced a few problems with IE7.0 and Firefox.) Regardless of which browser you use, you can expect a slight learningcurve.1.3. Role-based Access to ViewsEDIS provides role-based access to the specific functionality sets that are available throughits views. If the application does not display in its left-hand menu pane, one or more of theviews this guide describes, your current role may not be compatible with functionality thatEDISUser Guide2September 2010
the views include. Please contact your information resource management (IRM) or clinicalapplication coordinator (CAC) staff if you have questions about your role. Please seeEmergency Department Integration Software Technical Manual—M Server for informationabout configuring role-based access to application functionality.1.4. Document Conventions Bold type indicates application elements (views, panes, links, buttons, and text boxes, for example)and key names.Key names appear in angle brackets .Italicized text indicates special emphasis. The warning icon () indicates items of particular importance.Within the confines of this user guide, the terms visit and encounter are synonymous. 1.5. Workstation RequirementsEDIS runs in Adobe Flash Player, which in turn runs in a Web browser. If you do not haveFlash Player 9.0 or above installed on your computer, ED
Emergency Department Integration Software (EDIS) incorporates several Web-based views that extend the current Computerized Patient Record System (CPRS) to help healthcare professionals track and manage the