Transcription
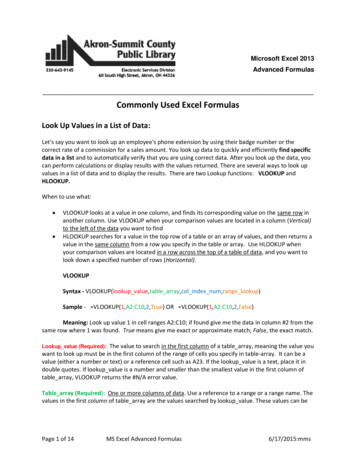
Payroll Imports from ExcelInfinite Visions Enterprise Edition: PayrollCLASS DESCRIPTIONDo you do any of the following: Add multiple positions or supplemental pays every school year that you manually create andassign employees to? Have you ever had the District offer a new deduction or benefit that had to be added to severalemployees prior to the next payroll? Is entering leave for your Distributed Accountability Center (DAC) becoming a chore each payroll? Have you have had to create year to date adjustments for multiple employees at once?If you answered yes to any of these questions, this is the class for you! Join us as we explore Excelimports within Payroll.IMPORTING POSITIONS AND SUPPLEMENTAL PAYSPayroll Employees Employee Positions and PayUse the Import from Excel utility to import information from an Excel spreadsheet to create newpositions or supplemental pays. There are two file formats you can use when importing positioninformation – Advanced or Basic.Advanced Spreadsheet Layout
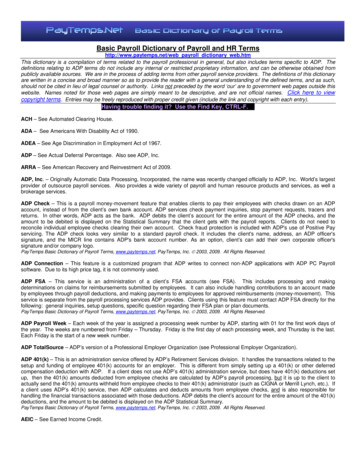
Basic Spreadsheet LayoutImport Positions and PayPerform the following:1. From the Employee Positions and Pay grid, select a position, supplemental, or supplementaltemplate record and open in Edit mode.NOTE Any fields not included in the imported spreadsheet populate using the values from therecord used in this step. The deduction/leave control settings on the newly created recordsmirror those of this open record. Tyler recommends importing against a Supplemental –Template. This Pay Type is unique, in that once open in Edit mode, go to Actions Deduction/Leave Control and every deduction and leave plan in the system is available. Use theavailable checkboxes to select which deductions/leave plans are active (or not active) prior torunning the import.2. Select Import from Excel from the Actions menu. A message displays as a reminder that thisprocess locks fields in HR and Payroll.3. Click Yes to proceed, or No to cancel.4. Another message displays asking if you want to create a single, split-funded position for recordswhere the Employee, Description, Position Type, Pay Type, Pay Basis and DAC are the same. ClickYes or No, as applicable.5. Browse to the Excel spreadsheet, highlight it and click Open.6. If there are any errors in the spreadsheet, an Import from Excel Errors report displays. Print thereport, and then close the Report Viewer.7. A message displays asking if records are to import anyway. If you click Yes, the import continues,if you click No, the import is cancelled and the spreadsheet errors can be fixed before importingagain.2
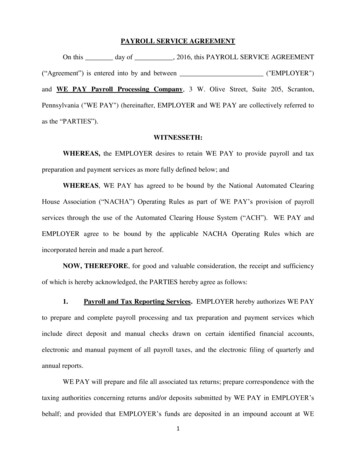
8. If there are no errors or you choose to continue importing with the errors, the system begins theimport process and displays a progress bar.NOTE Regardless of which format you use, this process locks menu items frequently used byPayroll and Human Resources until the import is complete. Depending on the number of recordscontained in the spreadsheet, the process could take a significant amount of time to complete. Itis suggested that this process be run before or after hours, if possible.If you are creating positions and have your Position Control area set to check Budgeted full-timeequivalents (FTEs), the system provides a report of any positions that exceed the Budgeted FTEsbut does not prevent you from creating the additional positions.UPDATE DEDUCTIONSPayroll Employees Employee Deductions and Benefits Shortcuts Update Deductions from ExcelThe Update the Deductions from Excel is an easy way to add a deduction to multiple employees. Itallows the user to add an amount or percentage using the report code from the master deduction whileat the same time activating the deduction or benefit for the employee.Spreadsheet LayoutImport a Single Deduction/BenefitPerform the following:1. From the Shortcuts menu, select Update Deductions From Excel.2. From the Deduction Description dropdown, select the deduction description.3
3. From the Start Period dropdown, select the start period number. This is the defined pay periodsin the system and dot periods are not allowed.4. In the Excel File Location field, browse to the location using the ellipsis.5. Mark the Use Employee Maintenance User Defined ID checkbox, if applicable.6. Click OK. The report displays in the Report Viewer.Import Multiple Deductions/BenefitsPerform the following:1. If necessary, add a new deduction or benefit record in Deductions and Benefits Maintenance.2. Type a Report Code on the deduction or benefit record that will be used for import.3. In Payroll Employees Employee Deductions and Benefits, click Shortcuts from the toolbarand select Update Deductions From Excel.4. In the Deduction Description, leave the field blank.5. From the Start Period dropdown, select the start period number. This is the defined Pay Periodsin the system and dot periods are not allowed.6. In the Excel File Location, browse to the location using the ellipsis.7. Mark the Use Report Code From the Excel File checkbox. The Report Code is from Payroll Deduction/Beneftis Deductions/Benefits Maintenance.NOTE The Assign Deductions to Employees and Activate Deductions During Update checkboxesbecome available when the Use Report Code box is checked.8. Mark the Use Employee Maintenance User Defined ID checkbox, if applicable.9. Mark the Assign Deductions to Employees checkbox, if needed.NOTE If the Supplemental Default checkbox is clear in Payroll Deductions/Benefits Deductions, then Benefits Maintenance on the assigned deduction and the Assign Deduction toEmployees checkbox is marked, the deduction added is marked Active in the Employee’s Positionwhere Pay Type is Position. The deduction appears in Deduction/Leave Control on theemployee’s position where Pay Type is Supplemental, but it is marked Active to calculate thatdeduction on the Supplemental position.10. Mark the Activate Deductions During Update checkbox, as applicable.11. Click OK. The report displays in the Report Viewer and a Change Log entry displays on theemployee deduction Change Log tab.4
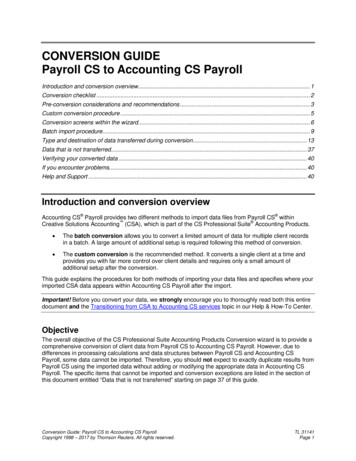
IMPORTING LEAVE IN FAST LEAVE ENTRYPayroll Attendance Fast Leave EntryIf your District doesn’t use a Time Card Interface, there is an easy way to pull leave records from yourDistributed Accountability Center (DAC) without the District Office doing all the data entry.Spreadsheet LayoutNOTE To have IVEE create a Leave Template, go to Payroll Employees Employee Leave Plans. Filter thegrid accordingly (ex. By DAC) and then go to Actions Create Fast Leave Entry Import Template.Import Leave TransactionsPerform the following:1. In the Fast Leave Entry window, select Import Leave from Excel option from Actions menu. Thesystem displays a window to browse to the file you want to import.2. Select the file and click Open. This following message displays, “Do you want to skip any errorsthat are found and import the records without errors anyway?”3. If you click Yes, the system imports any record that doesn’t contain errors. If you click No, thenno records are imported.NOTE A report is generated during the import that lists any line in which a matching employeecannot be found for the SSN gave or if a leave plan cannot be found for the leave plan code andthe employee.4. Once the records are imported, they will display in the Fast Leave Entry grid. You can reviewthem, edit them, or delete them as needed.5. If needed, you can use the Update Granted Dates option on the Actions menu to change thegranted date of the records.5
6. When ready to post the records, select the Post Transactions option from the Actions menu.The system displays a message verifying that you want to post the transactions.7. Click Yes to proceed.IMPORTING YTD WAGE ADUSTMENT OR YTD DEDUCTION ADJUSTMENTSPayroll Employees Employee Year-to-Date AccumulationsIVEE offers an Excel Import utility for adjusting multiple employee’s YTD Accumulations. There are 2 typesof adjustments: Wage Deduction.Each adjustment type has its own specific file format.Wage Adjustment File LayoutDeduction Adjustment File LayoutImport YTD AdjustmentsPerform the following:1. Click on Actions from the Employee Year-to-Date Accumulations grid. Select the Import YTDWage Adjustments or the Import YTD Deduction Adjustments option, as appropriate. Thesystem displays a message asking for confirmation that you want to import an Excel file.2. Click Yes. The system displays the Select Excel file screen.3. Browse to location and file name and click Open. The system imports the file.6
Deduction/Leave Control and every deduction and leave plan in the system is available. Use the available check