Transcription
Use and Care ManualDowndraft Raised VentModels: RV30, RV36, RV46Style varies. Model RV30 shown.Ta b l e o f C o n t e n t sImportant Safety Instructions. 1-2Operating Your Raised Vent.3Care and Cleaning. 4-5Before You Call for Service.5Warranty and Service.6Notes. 7-8Part No. 85516 Rev. G
2007 Dacor, all rights reserved.
Important Safety InstructionsInstaller: Leave these instructions with theappliance.dangerCustomer: Read this manual and the range use andcare manual completely before using either appliance.Save THEM for future reference. THEY contain important use and care information. KEEP ALL receiptS orcanceled checkS FOR FUTURE REFERENCE. Proof of original purchase date is required for warranty service.IMPORTANT: To avoid the possibility of explosion orfire, do not store or use combustible, flammable orexplosive vapors and liquids (such as gasoline) inside orin the vicinity of this or any other appliance. Keep itemsthat could explode, such as aerosol cans away from theburners and oven. Do not store flammable or explosivematerials in adjacent cabinets or areas.For service and warranty information, see page 6.If you have any questions (other than warranty questions), call:warningDacor Customer Service(800) 793-0093 (U.S.A. and Canada)Monday — Friday 6:00 a.m. to 5:00 p.m. Pacific TimeWARNING - TO REDUCE THE RISK OF FIRE,ELECTRIC SHOCK, OR INJURY TO PERSONS,OBSERVE THE FOLLOWING:Web site: www.Dacor.coma) Use this unit only in the manner intended by themanufacturer. If you have questions, contact themanufacturer.Have the complete model and serial number for yourappliance available. The model and serial number areprinted on the appliance data label on the front of theunit. Write these numbers below for future reference.b) Before servicing or cleaning unit, switch power offat service panel and lock the service disconnectingmeans to prevent power from being switched onaccidentally. When the service disconnecting meanscannot be locked, securely fasten a prominentwarning device, such as a tag, to the service panel.Model NumberSerial NumberDate of PurchaseSince Dacor continuously improves the quality and performance of our products, we may need to make changes tothe appliance without updating this manual.warningTo reduce the risk of a range top grease fire:Important Information AboutSafety Instructionsa) Never leave surface units unattended at highsettings. Boil-overs cause smoking and greasy spillovers that may ignite. Heat oils slowly on low ormedium settings.The Important Safety Instructions and warnings inthis manual can’t cover all possible problems and conditions that can occur. Use common sense and caution wheninstalling, maintaining or operating this appliance.b) Always turn hood ON when cooking at high heat orwhen flambéing food (i.e. Crepes Suzette, CherriesJubilee, Peppercorn Beef Flambe’).c) Clean ventilating fans frequently. Grease should notbe allowed to accumulate on fan or filter.Always contact the Dacor Customer Service Team aboutproblems or conditions that you don’t understand.d) Use proper pan size. Always use cookwareappropriate for the size of the surface element.Safety Symbols and LabelsdangerwarningImmediate hazards that WILL result in severe personalinjury or death.Never allow the filters or vent openings to becomeblocked or clogged. Do not allow foreign objects, such ascigarettes or napkins, to be sucked into the vent holes.warningHazards or unsafe actions that COULD result in severepersonal injury or death.cautionREAD AND SAVE THESEINSTRUCTIONSHazards or unsafe actions that COULD result in minorpersonal injury or property damage.1
Important Safety InstructionsGeneral Safety PrecautionsTo reduce the risk of fire, electric shock, serious injury or death when using your appliance, follow basic safety precautions, including the following:warning If you receive a damaged product, immediatelycontact your dealer or builder. Do not install oroperate this unit if it has been damaged, dropped,has damaged electrical wiring or is not workingproperly. Use this raised vent only as outlined in this manual.Do not use this unit to vent hazardous or explosivematerials or vapors. This unit is not intended forcommercial use. This raised vent must be installed by a qualifiedinstaller according to the accompanying installationinstructions. All installation work must be performedin accordance with all applicable codes andstandards, including fire-rated construction. warningDo not install, repair or replace any part of this unitunless specifically recommended in the literatureaccompanying it. A qualified service technicianshould perform all other service. Contact the DacorCustomer Service Team for examination, repair oradjustment. Before operating the raised vent, verify that pothandles or other objects will not interfere with theraising and lowering of the vent intake. To preventspillage and damage to the vent system, turncookware handles to the side so that they will notbe hit when the vent moves to the “up” position. Clean liquid spills immediately. If liquid enters thevent intake, then turn off the blower, disconnect thepower supply and carefully wipe up all liquid. Seethe Care and Cleaning section of this manual. Never operate the vent without the filters in place. Do not operate the blower if a flame or flare-updevelops. In the event of a flame, immediatelyturn off the blower. Smother the flame or use anappropriate class dry chemical or foam-type fireextinguisher. Do not set or rest any objects, including cookware,on top of the vent top cap. Do not interfere with themovement of the vent intake in any way. If the vent intake becomes jammed while beingraised or lowered, immediately press the Up/Down switch once to stop the intake motion,then disconnect the power supply. Remove theobstruction, then restore power and press the Up/Down switch to continue raising or lowering theintake. Do not leave children or pets alone or unattended inthe area around the range when it is in use. Neverallow children to sit or stand on an appliance. Donot let children play with a range or the raised vent. Do not store items of interest to children above oraround the range. Make sure individuals who use the range or cooktopand raised vent are able to operate it properly.TO REDUCE THE RISK OF INJURY TO PERSONS INTHE EVENT OF A RANGE TOP GREASE FIRE: Never leave a cooktop unattended during use. Do not tamper with the controls. Clean the filters and all grease-laden surfaces oftenaccording to the cleaning instructions in this manualto prevent grease fires and maintain performance.SMOTHER FLAMES with a close-fitting lid, cookiesheet or metal tray, then turn off the burner. BECAREFUL TO PREVENT BURNS. If the flames do notgo out immediately, EVACUATE AND CALL THE FIREDEPARTMENT. DO NOT TOUCH THE SURFACES OF THE RAISEDVENT OR RANGE DURING OR IMMEDIATELY AFTERUSE. NEVER PICK UP A FLAMING PAN - you may beburned. DO NOT USE WATER, including wet dish clothes ortowels - a violent steam explosion may result. Use a fire extinguisher ONLY if: Do not allow acids (citrus juices, tomato sauces,etc.) to remain on the unit’s surfaces. The finishmay stain. Do not try to remove heavy spills with a sharpobject such as a knife or metal spatula. Sharpobjects may scratch the appliance’s surfaces. Clean this appliance only as instructed in thismanual. Use only the cleaners specified.2 You have a Class ABC extinguisher, and youalready know how to operate it. The fire is small and contained in the areawhere it started. The fire department is being called. You can fight the fire with your back to an exit.
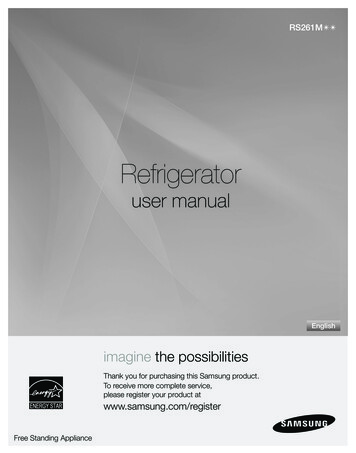
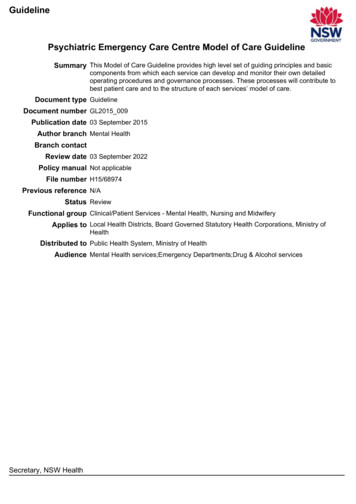
Operating Your Raised VentOperating Tips:OperationwarningIf the vent intake becomes jammed while being raisedor lowered, immediately press the UP/DOWN key onceto stop the intake motion, then turn off power at thecircuit breaker or fuse box. Remove the obstruction,turn on the power and press the UP/DOWN key tocontinue raising or lowering the intake.importantThe direction of travel of the vent intake cannot bereversed while it is moving. The intake must complete afull up or down cycle before changing directions.To operate the RV raised vent system when the ventintake is in its lowered position, press and release theUP/DOWN key on the control panel. The intake will takeapproximately ten seconds to reach its uppermost position, where it will stop.OFFMEDIUMLOWHIGH Adjust the fan speed according to the volume andweight of the cooking exhaust. Reduce the fan speed if the flame on a gas cooktop isbeing drawn by the vent system. Flame drawing is anormal occurrence with powerful vent systems, especially when installed with short duct runs. Always raise the vent intake and activate the blowerwhenever using the cooktop or range. Eliminate air currents in the vent vicinity by shutting nearby windows and doors, turning off ceilingfans and closing adjacent heating and air conditioningoutlets. Place your largest frying pans, skillets and stock potson the rear burners whenever possible, as the draft isstrongest closest to the vent intake.When the cooking process is complete, use the Delay Offfeature to remove any residual smoke and fumes. Turnthe Delay Off function by pressing the DELAY OFF keywhile the raised vent is on. The blower will continue to runat the selected fan speed for five minutes, then automatically turn off. The vent intake will remain in the fullyraised position after the blower shuts off. The intake maybe lowered by pressing and releasing the UP/DOWN keyat your convenience.Turn off the blower in one of two ways: Press and releasethe OFF key or lower the vent by pressing and releasingthe UP/DOWN key.DELAYOFFActivate the blower a few minutes before starting tocook to establish an airflow pattern in the room.Using Delay OffThe blower will turn on automatically and run on thehigh speed setting. Adjust the blower speed by pressingand releasing either the MEDIUM or LOW keys. The fanspeed may be changed whenever desired, as long as thevent intake is in the fully raised position. The blower willnot operate if the intake is in any other position.CLEANFILTER While the blower is operating in Delay Off mode, theblower speed may be adjusted to a different speed bypressing the HIGH, MEDIUM or LOW keys.UP /DOWNTo manually cancel the Delay Off function, press andrelease the OFF key or the UP/DOWN key. The blowerwill shut off and if pressing the UP/DOWN key, the ventwill retract.Securing the Electronic KeypadControl panelTop capTo prevent accidental raising or lowering of the vent,secure the electronic keypad so that the keys (buttons) donot function. This feature is especially helpful when youngchildren are present or when cleaning the vent and surrounding areas.IntakegrillParts the of Raised Vent - Shown RaisedAppearance varies with model number3 While the vent is in the fully lowered or fully raisedposition, press and the HIGH and LOW keys at thesame time for one second. The electronic controlswill secure and the keys will become inoperative. TheHIGH and LOW key indicator lights will illuminate atthe same time when the controls are secured. To reactivate the controls, press the HIGH and LOWkeys at the same time for one second. The HIGH andLOW key indicator lights will go out, indicating thatthe control panel is active again.
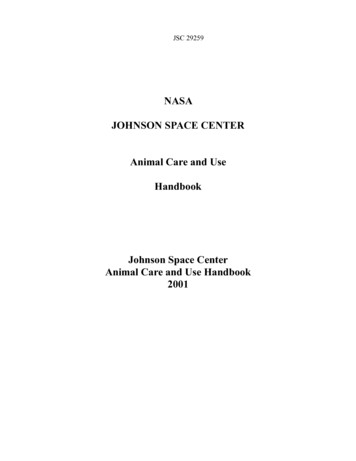
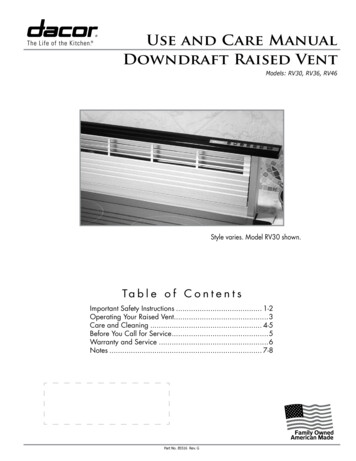
Care and Cleaningwarning Clean the vent only in the manner specified. To avoid dangerous fumes or damage to your vent’s surfaces, use only the types of cleaning solutions specified inthis manual. To avoid personal injury, turn off the range and vent and make sure all surrounding surfaces are cool beforecleaning. Always wipe stainless steel (silver colored) surfaces with the grain. To prevent scratching, do not use abrasivecleaners or scrubbers on stainless steel surfaces. To avoid damage to the fan, do not reinstall damaged filters. To avoid damage, do not clean the filters in a dishwasher.Grill CleaningCleaning the Filters Secure the keypad (see facing page). Remove the grill with the vent in the raised position.Gently grasp the grill on both ends. Lift it up, thenrotate the bottom of the grill out of the lower groove.Clean it regularly. Hand wash it in hot water with amild detergent solution. Set the grill on a flat surfaceand wipe only in the direction of the grill grain.Clean the filters and surrounding areas regularly to prevent grease build-up. Do not use any cleaners containing ammonia as thiswill damage the anodized aluminum finish. A softtoothbrush or nylon bristle dish brush may be used toclean the grill grooves.Lift hereSlide bottom outThe CLEAN FILTER key indicator light willilluminate after 40 hours of blower use toremind you to clean the filters (push theCLEAN FILTER key to reset). The filtersmay need to be cleaned more often basedupon the type and amount of cooking.Check the filters regularly.To clean the filters:Lift here Raise the vent to the “up” position to clean the filters. Remove the grill as described in the Grill Cleaningsection. The filters are positioned side by side inside the ventintake. When properly installed, the tops of the filterslean against the rear intake panel and the filter bottoms rest in a slot attached to the front intake panel.Remove one filter at a time by gently grasping the topcenter of the filter and lifting it up and out.Top capRemoving the Grill CLEANFILTERAfter cleaning, reinstall the grill. Align the left andright edges of the grill with the vertical grill guidesand insert the upper edge of the grill into the slot inthe top cap. Pivot and drop the bottom of the grill intothe lower locating slot.Rear intake panelGrasp filter and liftRaised ventside viewFront intake panelVertical grill guide(left shown)Grill mount grooveLocation of Mounting Groove4 Clean the filters by hand washing them in hot waterwith a mild detergent solution. Clean the intake panelalso (see following page). Make sure the filters are dry before carefully reinstalling them. Reinstall the intake grill.
Care and CleaningCleaning the Intake PanelCleaning the Top CapThe intake panels accumulate grease over time andshould be cleaned whenever the filters are washed.Clean the top cap only when the intake vent is in the lowered position. The top cap and end caps may have painted finishes(depending on the model) that will scratch or stain ifcleaned with abrasive materials or harsh chemicals. After removing the grill and filters, wipe all externaland internal aluminum surfaces with a sponge or clothmoistened with a mild detergent. Rinse off with water.Remove all moisture by wiping with a soft, dry polishing cloth. Always wipe in the direction of the grain. Donot use any abrasive substances on the intake panels,as this may permanently mar the finish. Dry and reinstall all components prior to operating thevent system.Gently wipe them with a sponge or soft cloth moistened in a mild detergent solution whenever theybecomes soiled. Avoid introduction of moisture intothe electronic keypad area.Cleaning the Electronic KeypadDo not use any abrasive materials to clean the keypad. The keypad and surrounding the plastic bezel shouldbe gently wiped with a lightly dampened sponge orcloth. Any material that becomes lodged between thebuttons and the surrounding bezel may be removedby carefully dabbing with a cotton swab or the edge ofa cloth. Use the above method to prevent the buttonsfrom sticking. After cleaning, immediately dry the keypad area witha soft cloth.Before You Call for ServiceProblem Solution GuideproblemNothing works.may be caused bywhat to DORaised vent not connected to electrical power.Turn on power at circuit breaker or fuse box.Check for tripped breaker or blown fuse.Power outage.Contact power company.Keypad is deactivated.Reactivate control panel: press HIGH andLOW keys at the same time. Hold down forone second.Vent intake raises or lowerspartially then stops.An obstruction is interfering withthe vent intake movement.Immediately press UP/DOWN key, then disconnect the power plug. Remove the obstruction. Reconnect the vent power plug and pressUp/Down key to raise or lower intake.Gas flame is being pulled bydraw of vent.Short duct run or high output ofsystem make ventilating force verystrong.Reduce blower speed to a lower setting.Clean filter symbol is lit.Blower has operated for over 40hours.Inspect and clean filters. See Care andCleaning section.5
Warranty and ServiceGetting HelpOUTSIDE THE FIFTY STATES OF THE U.S.A., THEDISTRICT OF COLUMBIA, AND CANADA:Before you request service, please review the BeforeYou Call for Service section of this manual starting onpage 5. If you have performed the checks in the ProblemSolution Guide and the problem has not been remedied,please contact us at one of the numbers below. Prior torequesting service, it is helpful to be familiar with the warranty terms and conditions listed in the Warranty sectionon this page.LIMITED FIRST YEAR WARRANTYIf your DACOR product fails to function within one year ofthe original date of purchase, due to a defect in materialor workmanship, DACOR will furnish a new part, F.O.B.factory, to replace the defective part. All delivery, installation, and labor costs are the responsibility of the purchaser. The owner must provide proof of purchase, uponrequest, and have the appliance accessible for service.For warranty repairs, call:What Is Not CoveredDacor Distinctive Service Service calls to educate the customer in the properuse and care of the product. Failure of the product when used for commercial,business, rental or any application other than for residential consumer use.Phone: (800) 793-0093 (U.S.A. and Canada)Business Hours: 6:00 a.m. - 5:00 p.m. Pacific Time Replacement of house fuses or fuse boxes, or resetting of circuit breakers.Contact us through our web site at: Damage to the product caused by accident, fire, floodor other acts of God. Breakage, discoloration or damage to glass, metalsurfaces, plastic components, trim, paint or other cosmetic finish, caused by improper usage or care, abuseor neglect.Phone: (877) 337-3226 (U.S.A. and Canada)Monday — Friday 6:00 a.m. to 4:00 p.m. Pacific TimeFor non-warranty repairs, call:Dacor Customer ServiceWeb site: www.Dacor.comAt Dacor, we believe that our quality of service equalsthat of our product. Should your experience with our service network or product be different, please contact ourCustomer Service Team and share your encounter withus. We will do our utmost to resolve the situation for youand deliver on our Dacor promise.THE REMEDIES PROVIDED FOR IN THE ABOVE EXPRESS WARRANTIES ARE THE SOLE AND EXCLUSIVE REMEDIES. THEREFORE, NO OTHER EXPRESS WARRANTIES ARE MADE, ANDOUTSIDE THE FIFTY STATES OF THE UNITED STATES, THE DISTRICT OF COLUMBIA, AND CANADA, ALL IMPLIED WARRANTIES,INCLUDING BUT NOT LIMITED TO, ANY IMPLIED WARRANTY OFMERCHANTABILITY OR FITNESS FOR A PARTICULAR USE ORPURPOSE, ARE LIMITED IN DURATION TO ONE YEAR FROM THEDATE OF ORIGINAL PURCHASE. IN NO EVENT SHALL DACOR BELIABLE FOR INCIDENTAL EXPENSE OR CONSEQUENTIAL DAMAGES. NO WARRANTIES, EXPRESS OR IMPLIED, ARE MADE TOANY BUYER FOR RESALE.If you need anything clarified, just let us know.WarrantyWhat Is CoveredCERTIFICATE OF WARRANTIES: DACOR RAISED VENTSWITHIN THE FIFTY STATES OF THE U.S.A., THE DISTRICT OF COLUMBIA, AND CANADA*:Some states do not allow limitations on how long animplied warranty lasts, or do not allow the exclusion orlimitation of inconsequential damages, so the above limitations or exclusions may not apply to you. This warrantygives you specific legal rights, and you may also haveother rights that vary from state to state.FULL ONE-YEAR WARRANTYIf your DACOR product fails to function within one year ofthe original date of p
naL purchase Date is requireD for warranty service. For service and warranty information, see page 6. if you have any questions (other than warranty ques-tions), call: Dacor customer service (800) 793-0093 (u.s.a. and canada) monday — friday 6:00 a.m. to 5:00 p.m. Pacific Time web site: www.Dacor.com have the complete model and serial number .