Transcription
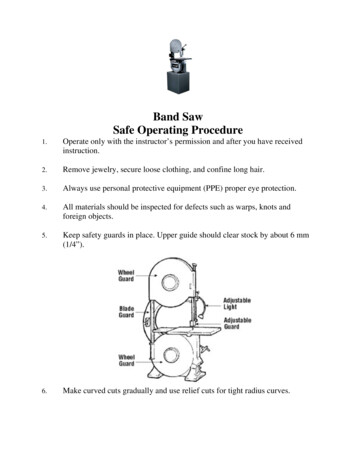
Band SawSafe Operating Procedure1.Operate only with the instructor’s permission and after you have receivedinstruction.2.Remove jewelry, secure loose clothing, and confine long hair.3.Always use personal protective equipment (PPE) proper eye protection.4.All materials should be inspected for defects such as warps, knots andforeign objects.5.Keep safety guards in place. Upper guide should clear stock by about 6 mm(1/4”).6.Make curved cuts gradually and use relief cuts for tight radius curves.
7.Never back out of curved cuts while machine is still running as this willresult in the blade coming off. (You must wait until blade comes to acomplete stop).8.Make all cuts on the waste-side of the line.9.Always keep your hands on the sides of the blade while operating. never infront of blade!10.Maintain a well-balanced position and feed work into blade firmly, butwithout pushing too hard.11.Never start the machine with stock touching blade, never reach under thetable, and never perform layout or setup on the table.12.Turn machine off and disconnect from power source before installing orremoving accessories, when finished cutting, before adjusting or changingset-ups, or when making repairs.13.If blade breaks during operation immediately stop the saw, leave the stockwhere it is, unplug the saw and report the incident to the teacher.
Band SawSafety TestName:Date:Instructions: Circle the letter next to the most correct answer1.When is personal protective equipment (PPE)required to operate the band saw?a.b.c.d.2.Which of the following are safe operatingprocedures for a band saw?a.b.c.d.3.13 mm (1/2”)19 mm (3/4”)6 mm (1/4”)25 mm (1”)What should you always use when making tight cuts on curves?a.b.c.d.5.ask for permissionkeep guard in placekeep well-balancedall of the aboveHow far should the safety guard be above the stock?a.b.c.d.4.neversometimesalwaysmost of the timerelief cutsreverse cutscircular cutsradius cutsWhich side of the line should you always make cuts on?a.b.c.d.rightleftwastenone of the above
6.Where should your hands be placed when using the band saw?a.b.c.d.7.What should you do if the blade breaks while operating the band saw?a.b.c.d.8.receive instructional demonstration.pass the safety test with 100% grade.follow proper safety procedures ( eye protection, confine long hair, etc .)all of the aboveWhich of the following are common safe practices for operating a band saw?a.b.c.d.10.remove your piece of stock from the machine.complete your cutstop the machine, don’t remove your stock, and report to the teacher.remove the blade.What should you do before operating the band saw?a.b.c.d.9.in front of the bladebehind the bladeon the sides of the bladetouching the bladehold work piece with one hand.leave the machine running when not in use.unplug the saw when finished.perform layout operations or setup work on the table /work area when machine isrunning.When operating a band saw which of the following is a safe practice?a.b.c.d.start the machine with the stock against the blade.start the machine before clearing the table of all objects.reach under the table while the machine is running.turn the saw off before backing out of a cut.
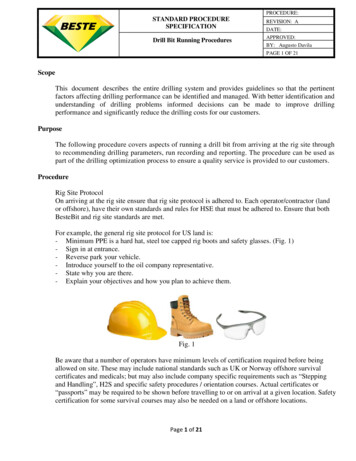
Bench GrinderSafe Operating ProcedureSpark DeflectorTool Rest1.Operate only with the instructor's permission and after you have receivedinstruction.2.Remove jewelry, eliminate loose clothing, and confine long hair.3.Make sure all guards are in place and operating properly.4.Work area should be prepared for safe operation. (Flammables, etc)5.Always use proper personal protective equipment (face shield should beused).6.All materials should be inspected for defects such as warps, knots andforeign objects.7.Make all adjustments with the power off and machine unplugged.8.Tool rests must be adjusted to within 3 mm (1/8”) of the grinding wheel.9.Spark deflectors must be adjusted to within 3 mm (1/8”) of the grindingwheels.10.Do not grind on the side of the grinding wheels. Only the face of the wheelmust be used.11.Stand to one side when starting the machine.
12.Immediately report to instructor when grinding wheels are excessively smallor have become cracked.13.Small work pieces should be held with locking pliers.14.Do not leave the machine until the grinding wheels have come to a full stop.15.Grinding materials generate a lot of heat, be careful as it may cause a burn.16.Clean up workspace.
Bench Top GrinderSafety TestName:Date:Instructions: Circle the letter next to the most correct answer1. During use of a bench top grinder, when must Personal Protective Equipment (PPE's) beworn?a. only when working with metalb. neverc. alwaysd. only when working with plastic2. What checks are required for the grinding wheels on a bench top grinder?a.b.c.d.To make sure they are suitable for the speed of the machine.That they have a bore exactly equal to the arbors of the machine.That they do no vibrate.All of the above.3. The grinding wheel must be inspected regularly for unusual wear. What do you do ifdefects are noticed?a.b.c.d.ignore themclean around the edgesreplace themuse at reduced speed4. What should be done with the tool rests on the grinder?a.b.c.d.loosened before usemove till they are touching the grinding wheelsplaced 3 mm (1/8 “) from grinding wheel and tightened securelyignored, they are of no use
5. What should the user do when starting a job on the grinder? Circle all that apply.a.b.c.d.stand to one side before turning the machine “ON”complete a visual inspection to ensure safe operationkeep the workpiece away from the grinding wheelinspect material for defects6. What must have occurred before operating the bench top grinder?a.b.c.d.instruction receivedpassed a tool safety test with 100% gradepermission receivedall of the above7. What must be used when grinding small pieces of material?a.b.c.d.locking pliersc-clamphammerchisel8. After grinding is completed, what must you ensure is true about the material beforehandling?a.b.c.d.That it is cool to the touch.That it is too hot to handle.That it is left touching the grinding wheel.That the grinding wheel is left on.9. Which part of the grinding wheel should be used to ensure the safe operation of a benchgrinder?a.b.c.d.left sideright sidethe face (front)does not matter10. What must the user ensure upon completion of the grinding job?a. That the machine is turned off and the grinding wheel has come to a completestop.b. That they have their ground material secured.c. That the tool rests are loosened.d. All of the above.
Biscuit JoinerSafe Operating Procedures1. Always obtain the teachers permission prior to using the joiner.2. Always wear appropriate Personal Protective Equipment (PPE).3. Confine any long hair, secure loose clothing and remove jewelry.4. Avoid accidental starting. Be sure switch is off before plugging in.5. Do not carry tool with your finger on the trigger.6. Remove the power cord when changing the blade or performing regular maintenance.7. Remove any adjusting keys or wrenches before turning power on.8. A joiner ejects dust and wood chips at a high rate of speed, keep your face away fromthe chute and wear safety glasses. If equipped, ensure dust collection bag is in place.9. Do not overreach. Keep proper footing and balance at all times.10. Use clamps or other practical ways to secure the work piece.11. Make sure the blades are sharp.12. Check the operation of the guards before using the tool.13. Do not disable any anti-kickback points on the faceplate. Make sure they are engagedin the work piece.14. Keep hands away from blade when cutting.15. Never hold the work piece in your hand.16. After cut, retract the blade fully and wait for it to stop.
Biscuit Joiner Safety TestName:Date:Instructions: Circle the letter next to the most correct answer1.When should eye and ear protection be worn while using the biscuit joiner?a.b.c.d.2.What must you do before using the biscuit joiner?a.b.c.d.3.carry tool with finger on triggermake all adjustments with tool plugged in.switch if in the OFF position before plugging in.all of the aboveWhat must be in place when using the biscuit joiner? Circle all that apply.a.b.c.d.5.check the tool for defectshave received safety instructionhave the instructor’s permissionall of the aboveWhich of the following is correct when using the biscuit joiner?a.b.c.d.4.alwaysmost of the timesome of the timeneverdust bagfencehandlepersonal protective equipmentWhat should be done with the stock when using a biscuit joiner?a.b.c.d.must be at least 18” longmust be held in your handmust be clamped in a suitable mannerall of the above
Circular SawSafe Operation Procedures
1.Operate only with the instructor’s permission and after you have receivedinstruction.2.Remove jewelry, secure loose clothing, and confine long hair.3.Make sure all guards are in place and operating properly.4.Always use proper eye protection.5.All materials should be inspected for defects such as warps, knots andforeign objects.6.Avoid accidental starting. Be sure switch is off before plugging in.7.Do not carry tool with your finger on the trigger.8.Remove the power cord when changing the blade or performing regularmaintenance.9.Remove any adjusting keys or wrenches before turning power on.10.Keep your body to the left side of the blade, never in line with the saw bladejust in case of kickback. Maintain a firm grip with both hands on the saw toallow you to resist kickback forces.11.Keep you hands away from the cutting area and blade.12.Always cut in a straight line.13.Never reach underneath the piece of work.14.Never operate a circular saw over your head.15.Start a circular saw with the shoe in contact with the stock, but the bladeclear of the stock.16.Check the lower guard for proper closing before each use.17.Always clamp the work piece to a bench or saw horse. Never hold the piecebeing cut with your hands or across you legs.
18.When blade binds, or when interrupting a cut for any reason, release thetrigger and hold the saw motionless in the material until the blade comes to acomplete stop. Never attempt to remove the saw from the material or pull itback while the blade is in motion.19.Always work with a sharp blade. Never use dull or damaged blades.20.Always ensure you know where your power cord is in relation to your saw.21.The weight of your saw should always be on the clamped side of your stock.
Circular SawSafety TestNameDate:Instructions: Circle the letter next to the most correct answer1.What should you do before using the circular saw? Circle all that applya.b.c.d.2.What should you look for when inspecting stock?a.b.c.d.3.loose knotsscratchespencil marksall of the aboveWhy should you stand on the left side of the circular saw and not in line with theblade when cutting?a.b.c.d.4.pass the safety test with a 100% gradefollow all safety proceduresreceive teacher demonstrationreceive teacher permissionso you can cut along the grain of the woodto avoid kickback of the stockso the blade stays sharpnone of the aboveWhat should you do before using the circular saw?a.b.c.d.remove jewelryconfine long hairsecure loose clothingall of the above
5.When cutting with the circular saw where should you place your hands?a.b.c.d.6.Which of the following describes a correct circular saw operating procedure?Circle all that applya.b.c.d.7.using it to make curved cutsusing it to make straight cutsusing it for overhead cutsusing it to cut materials that are not properly clamped or securedWhat should you do when using the circular saw?a.b.c.d.9.ensuring cuts are not made overheadensuring that the saw is not started above the stockensuring that power is disconnected before changing bladeensuring that the guard is out of the way when you startWhich of the following describes a proper use for the circular saw?a.b.c.d.8.on the cutting linebelow the piece of stockholding the piece of stockholding the saw firmly with both handshold down the stock with your hand while cuttinglay the stock across your leg while cuttingclamp your stock before cuttingnone of the aboveWhat do you do if the saw blade binds while making a cut?a. release the trigger and wait until the blade comes to a complete stop beforeremoving it from the materialb. remove the saw immediately to help avoid kick backc. back saw out of cutd. shake stock vigorously until blade comes free10.What should you ensure before starting a cut?a.b.c.d.that the saw blade is dull and may be missing teeththat the guard is up and out of the waythat your stock is not secured or clampedthat you know where your power cord is in relation to your saw
Compound Miter SawSafe Operating Procedures1.Operate only with instructor’s permission and after you havereceived instruction.2.Remove any jewelry, secure loose clothing, and confine long hair.3.Make sure all guards are in place and operating correctly.4.Always use personal protective equipment (PPE).5.All materials should be inspected for defects such as warps, knots andforeign objects.6.Make certain the blade rotates in the correct direction and that the teeth atthe bottom of the blade are pointing to the rear of the miter saw.7.Install a new table kerf plate if the current one is damaged orexcessively cut.8.Hold the stock firmly against the fence and the table keepingyour fingers at least 150 mm (6”) away from the blade.9.Do not perform any operation freehand and ensure small piecesare properly secured.
10. Never hold work piece on the right side of the blade with left hand or viceversa. This is called cross-armed cutting and exposes the user to seriousinjury.11. Allow the blade to reach full operating speed before letting the blade enterinto the stock. Be aware that the saw moves up or down slightly upon startup and stopping.12. Ensure that the saw is in the full upright position when starting and in thefull down position when stopping.13. If the blade begins to bind while cutting stop immediately.14. When finished turn off the compound miter saw and wait for the blade tocome to a complete stop before retracting from the work piece.15. Disconnect the compound miter saw from the power source beforebeginning clean-up procedures.16. Make all blade changes and angle adjustments with the power supply to thecompound miter saw disconnected.17. Only install clean, sharp, cross-cut type blades in the compound miter saw.18. After changing a blade you should ensure the saw is turned off, the blademoves freely, and the guard is functioning properly before plugging in thesaw.
19. Do not reach around, behind or underneath the saw unless it is turned offand unplugged.20. Do not cut ferrous metals or any masonry.
Compound Miter SawSafety TestNameDateInstructions: Circle the letter next to the most correct answer1.When should permission be obtained from your instructor to operate the compound mitersaw?a.b.c.d.2.What is proper dress when operating a compound miter?a.b.c.d.3.sometimesneveralwaysall of the aboveWhat should you do before changing the blade or performing any other maintenance onthe compound miter saw?a.b.c.d.5.remove any jewelrysecure loose clothingconfine long hairall of the aboveWhen must personal protective equipment (PPE) be worn tooperate the compound miter saw?a.b.c.d.4.alwaysneversometimesnone of the aboveturn off the machineturn off the machine and disconnect the machine from the power sourceensure the saw arm is in the down, locked positionkeep the safety guard in placeWhat checks should be made after changing the blade on the compound miter saw?Circle all that applya.b.c.d.rotate the blade completely by hand before plugging in the machinebe sure the switch is in the off position before inserting the plug into the outletensure that the safety guard is in place and operating correctlyensure that the teeth at the bottom of the blade are pointing away from the fence
6.What should you do before cutting stock on the compound miter saw? Circle all thatapplya.b.c.d.7.Where should your hands be placed when operating a compound miter saw?a.b.c.d.8.ensure that the safety guard is in place and operating correctlyensure that the stock is free from defectsmake sure the stock is held tightly against the fencelet the motor reach full operating speed before allowing the blade to touch the stockon the right side with your left hand holding the stock (cross-armed)such that your fingers are at least 150 mm (6”) from the bladeaway from the saw, you don’t need to hold the stock in placeas close as possible to the bladeWhen finished cutting stock on the compound miter, what should be the next step?a. turn off the saw and wait until the machine has come to a complete stop beforeunpluggingb. leave your debris and off cuts lying aroundc. leave the saw immediatelyd. all of the above9.What is the correct type of blade for the compound miter saw?a.b.c.d.10.a cross cut bladeany diameter bladea dull and dirty bladea blade missing teethWhile cutting, when can you safely start and stop a compound miter saw?a.b.c.d.in the full up positionin the full down positionstarting in the full up position and stopping in the full down positionin the half way position
Compressor/Pneumatic Nailer Safety RulesSafe Operating Procedures1.Always use safety glasses to prevent eye injuries. The tool operator and allpersons in the work area must wear safety glasses.2.Always operate the compressor in a well ventilated area free of combustiblematerials or vapors.3.Maintenance should only be done with the power disconnected.4.Never operate without safety guard in place.5.Operate compressor at least 12 inches from a wall or obstruction6.Always obtain the teachers permission prior to using the Compressor.7.All materials should be inspected for defects such as warps, knots and foreignobjects.8.Connect the air tool to air supply hose with a coupling that removes all pressurefrom the tool when the coupling is disconnected.9.Disconnect tool from air supply hose before doing tool maintenance, clearing ajammed fastener, leaving work area, moving tool to another location or handingtool to another person.10.Remove finger from trigger when not driving fasteners. Never carry tool withfinger on trigger. tool may fire if safety is bumped while trigger is depressed.
11.Do not fire fasteners close to the edge of the work piece. The work piece couldsplit & the fastener could fly free or ricochet causing personal injury.12.Do not drive fastener on top of another fastener or with tool on too steep anangle.13.Do not restrict ventilation openings as it will cause serious overheating andcould cause fire14.The air tank must be drained daily.15.Never touch any exposed metal parts on a compressor during or immediatelyafter operation. Compressors will remain hot for a period of time after use.16.Before use, ensure that tank is at correct/recommended operating pressure.17.Do no blow compressed air at anyone as the air stream can cause soft tissuedamage to exposed skin and can propel dirt, chips, loose particles at high speed.
Compressor / Pneumatic NailerSafety TestNameDate:Instructions: Circle the letter next to the most correct answer1.Which piece of safety equipment must be worn when using the air compressor unit?a.b.c.d.2.steel toe bootshard hateye protectionapronWhen using the compressor, which are considered safe practices?a. Disconnect tool from air supply hose before doing tool maintenance.b. Disconnect tool from air supply before loading fasteners.c. Connect air tool) to air supply hose with a coupling that removes all pressure fromthe tool when the coupling is connected.d. All of the above.3.Which is the minimum distance the compressor should be from a wall or obstructionwhen in use?a.b.c.d.4.When should the air tank should be drained?a.b.c.d.5.1 inch12 inches12 feetnone of the abovehourlydailyweeklyneverWhat could happen if the ventilation openings are covered or restricted?a.b.c.d.The compressor could overheat and possibly catch fire.The compressor wi
a. That it is cool to the touch. b. That it is too hot to handle. c. That it is left touching the grinding wheel. d. That the grinding wheel is left on. 9. Which part of the grinding wheel should be used to ensure the safe operation of a bench grinder? a. left side b. right side c. the face (front) d. does not matter 10.
