Transcription
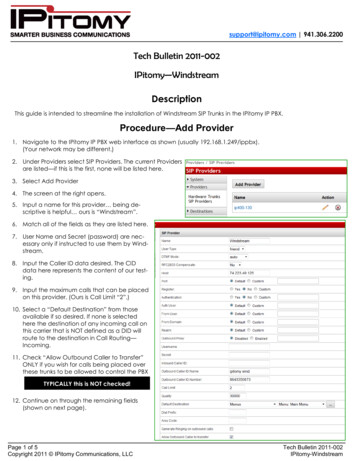
support@ipitomy.com 941.306.2200Tech Bulletin 2011-002IPitomy—WindstreamDescriptionThis guide is intended to streamline the installation of Windstream SIP Trunks in the IPitomy IP PBX.Procedure—Add Provider1. Navigate to the IPitomy IP PBX web interface as shown (usually 192.168.1.249/ippbx).(Your network may be different.)2. Under Providers select SIP Providers. The current Providersare listed—if this is the first, none will be listed here.3. Select Add Provider4. The screen at the right opens.5. Input a name for this provider being descriptive is helpful ours is “Windstream”.6. Match all of the fields as they are listed here.7. User Name and Secret (password) are necessary only if instructed to use them by Windstream.8. Input the Caller ID data desired. The CIDdata here represents the content of our testing.9. Input the maximum calls that can be placedon this provider. (Ours is Call Limit “2”.)10. Select a “Default Destination” from thoseavailable if so desired. If none is selectedhere the destination of any incoming call onthis carrier that is NOT defined as a DID willroute to the destination in Call Routing—Incoming.11. Check “Allow Outbound Caller to Transfer”ONLY if you wish for calls being placed overthese trunks to be allowed to control the PBXTYPICALLY this is NOT checked!12. Continue on through the remaining fields(shown on next page).Page 1 of 5Copyright 2011 IPitomy Communications, LLCTech Bulletin 2011-002IPitomy-Windstream
support@ipitomy.com 941.306.2200Tech Bulletin 2011-002IPitomy—Windstream13. Allow Call Recording is also optional.14. Choose from the available CODECs and click to “Add” them.15. If there is a preferred order, select each added CODEC and use theUp and Down buttons to position them hierarchically to select themost desired first (top).Note: “Insecure” is a Protocol matchingparameter and has nothing to do with thiscarriers security. (Set it to “Very”)16. If there are DID (Direct Inward Dial) numbers to be assigned. Add these one at a time in the Phone Numbers fieldat the bottom.- Enter the number andthen press thebutton.-Once added, select thatnumber and assign adestination using thatdrop-down.Note: It is not necessaryto define the destinationof the prime number(lead number) as this willfollow the Default Destination OR Call Routing—Incoming destination ifnone is assigned here.17. Don’t forget to clickif not saved, all the information on this page mustbe entered again.Page 2 of 5Copyright 2011 IPitomy Communications, LLCTech Bulletin 2011-002IPitomy-Windstream
support@ipitomy.com 941.306.2200Tech Bulletin 2011-002IPitomy—WindstreamProcedure—SIP (Global)1. Navigate to the PBX Setup/SIP Setup page.Note:This is where “Global” settings are established. These settings are referenced whenever they are not specificallyset in the SIP Provider definition—some are unique to this page and hence general to all SIP Providers.2. The only item that we needed to change in this area of system programming was the RTP Timeout. (In Advanced)We discovered that Windstream very efficiently suppresses silence and hence the IPitomy PBX may concludethat the connection has gone idle. If this happens the PBX disconnects the call.Windstream has requested that this timer be set to 1800s to match their Safeguard parameter which periodically(30minutes) checks for an active connection. If an active call is not confirmed the connection session is ended.3. Don’t forget to clickif not saved, the information on this page must be entered again.RTP Timeout : 1800Page 3 of 5Copyright 2011 IPitomy Communications, LLCTech Bulletin 2011-002IPitomy-Windstream
support@ipitomy.com 941.306.2200Tech Bulletin 2011-002IPitomy—WindstreamProcedure—Call Routing-Outgoing1. Navigate to the Call Routing/Outgoing page.Note:This is where user dialing strings are associated to trunks for use with what was dialed.2. This may be an existing Outbound Route or something specific for the trunk being added.3. In this example the digits to be routed are those expected when calling international numbers.-The dialed number will begin with “011” and then any digits Exact Length is set to “No”.4. Refer to the IPitomy 1100 Manual for details on routing dialed digits.5. Notice that the SIP Trunk is now available for selection in the drop-down list. (At the bottom)6. We selected Windstream andclicked7. You must also clickbeforeother changes to this trunkcan be applied to the routingcharacteristics.8. Notice that we placed thistrunk at the top of the list forthis dialing string. That meansit will be selected first for callsplaced with this digit string.(The trunks in “Houston” will beselected second.)9. Here again reference the IPitomy 1100 Manual for detailson programming parameters.10. When you’re done, don’t forget to click.if not saved, the informationon this page must be enteredagain.Page 4 of 5Copyright 2011 IPitomy Communications, LLCTech Bulletin 2011-002IPitomy-Windstream
support@ipitomy.com 941.306.2200Tech Bulletin 2011-002IPitomy—WindstreamProcedure—Class Of Service1. Navigate to the Call Routing/Class Of Service page.Note:This is where trunks are assigned as those allowed to be used by the various classes of service.2. ONLY if a NEW Outgoing Route was created is this step necessary. .generally there are only a few Classes OfService. In the picture below the System Default COS is shown. Notice that the newly created Outbound Route“Windstream” is listed here.3. ClickNote:to add this route to this COS.This page does not have abutton.Click HereProcedure—Finalize1. When all changes are complete youMUST clickto make thechanges operational in the PBX.Procedure—Test the Trunks1. At a telephone that is registered tothe PBX, and a member of the ClassOf Service programmed above, diala number that matches the string input into Call Routing—Outgoing.2. This call should be connected usingthe SIP Provider you have just installed.Congratulations! Your Windstream Trunksare now functional!Page 5 of 5Copyright 2011 IPitomy Communications, LLCTech Bulletin 2011-002IPitomy-Windstream
5. Notice that the SIP Trunk is now available for selection in the drop-down list. (At the bottom) 6. We selected Windstream and clicked 7. You must also click before other changes to this trunk can be applied to the routing characteristics. 8. Notice that we placed this trunk a