
Transcription
Web Dynpro Tutorial: Hello WorldWeb Dynpro Tutorial: Hello WorldSummaryThis is the Web Dynpro Java version of a "Hello World" tutorial. Typically used to enable the developer to dothe first steps within a programming language or development environment.Author: Chris WhealyCompany: SAP AGCreated on: 13 September 2007Author BioChris Whealy has more than 20 years experience on Computer Science. He has workedwith SAP software since 1993 and specifically with web based interfaces since 1996. Inlate 2002, Chris turned his attention to Web Dynpro and by October 2003, was able toput his knowledge into practice when he started work as the lead technical consultant fora large Web Dynpro based project.Chris is the author of the SAP Press book "Inside Web Dynpro for Java" published inNovember 2004 and both the SAP training courses on Web Dynpro for Java (JA310 andJA312)SAP DEVELOPER NETWORK sdn.sap.com 2006 SAP AGBUSINESS PROCESS EXPERT COMMUNITY bpx.sap.com1
Web Dynpro Tutorial: Hello WorldTable of ContentsApplies to:. Fehler! Textmarke nicht definiert.Summary . 1Author Bio. 1Development Objectives . 3Graphics and screen shots. 3Result . 3Prerequisites. 3Development Steps. 3Building, Deploying, and Running. 18Copyright . 20SAP DEVELOPER NETWORK sdn.sap.com 2006 SAP AGBUSINESS PROCESS EXPERT COMMUNITY bpx.sap.com2
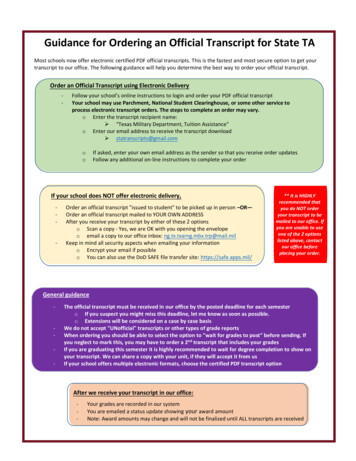
Web Dynpro Tutorial: Hello WorldDevelopment ObjectivesThe first exercise is a version of the popular “Hello World” program.You will write a very simple Web Dynpro application that places the text “Welcome to Web Dynpro” on theuser’s browser.At this early stage, the application will simply place some text on the screen and not be interactive.Graphics and screen shotsCertain screen shots shown in this document may have been cropped in order to reduce the amount ofempty image space and the overall document size. Only those areas of the screen that carry relevantinformation have been included in screen shots.Therefore, it is entirely possible that the image you see on the printed page is different in size from thecorresponding screen seen in the NetWeaver Developer Studio.ResultAfter this exercise is complete, you should seethe result shown on the left.PrerequisitesYou have the SAP NetWeaver 7.0 Java Server installed and runningYou have the SAP NetWeaver Developer Studio (NWDS) installed and running.Within the NWDS, you have selected the Web Dynpro Perspective (WindowWeb Dynpro).Open PerspectiveOtherDevelopment StepsCreate a new Local Development Component of type Web Dynpro.SAP DEVELOPER NETWORK sdn.sap.com 2006 SAP AGBUSINESS PROCESS EXPERT COMMUNITY bpx.sap.com3
Web Dynpro Tutorial: Hello WorldFigure 1: Create a new Development ComponentAccording to the principles of SAP’s Component Model hierarchy, whenever you create a DevelopmentComponent, it must be assigned to one (and only one) Software Component. Since it is very possible thatany given installation of the SAP Java Server has not had its NetWeaver Development Infrastructureconfigured, SAP has supplied a dummy Software Component to which your Development Component canbe assigned. This is always called “MyComponents”.Figure 2: Select the dummy Software Component “MyComponents”In the next screen, you need to enter the following values:The name of your Development Component. The name can be divided into different sections separated witha forward slash character. This is not the same as the Java package name, but should be structured in asimilar manner.The Caption is optional, but useful when looking at long lists of Development ComponentsSAP DEVELOPER NETWORK sdn.sap.com 2006 SAP AGBUSINESS PROCESS EXPERT COMMUNITY bpx.sap.com4
Web Dynpro Tutorial: Hello WorldMost importantly, you must decide which type of Development Component you want to create. In this case,it is a Web Dynpro Development Component.Figure 3: Create the Development Component of type Web DynproAfter you have pressed Next and then Finish, you will be returned to the Web Dynpro perspective of NWDS.Expand the Development Component hierarchy to reveal the items under the “Web Dynpro” branch.SAP DEVELOPER NETWORK sdn.sap.com 2006 SAP AGBUSINESS PROCESS EXPERT COMMUNITY bpx.sap.com5
Web Dynpro Tutorial: Hello WorldFigure 4: Expand the Web Dynpro branch of the Development ComponentAll Web Dynpro development is based on the unit of software known as the “Web Dynpro Component”. It isunfortunate that the word “Component” is being reused here, but do not confuse a “Development Componentof type Web Dynpro”, with a “Web Dynpro Component”. These are two different software entities!The next thing you need to do is to create a Web Dynpro Component. In Web Dynpro development, thecomponent is your unit of development and your unit of reuse. Therefore, if you want to create a functionalWeb Dynpro program, you must create at least one Web Dynpro Component.Right mouse click on the tree item “Web Dynpro Components” and select “Create Web Dynpro Component”.Figure 5: Select “Create Web Dynpro Component”You will now see a pop-up window into which you must supply at the details of your new component. Thesevalue are:The name of the component. In this case, this will be “Ex1Comp”.The naming convention here is to use the desired component name, followed by the suffix “Comp”. If thisnaming convention is followed, then you will make life easier for yourself when you come to read thegenerated Java coding.Notice that as soon as you enter a component name (outlined at the top in red), the window and thecomponent names are constructed automatically.The Java package name. In this case com.sap.tutorial although you could use any package name youlike here.The Window name. By default, the name here will be the same as the component name. For purposes ofclarity though, it is a good idea to replace the “Comp” suffix in the window name with the word “Window”.That way, you will not confuse the component with its window.Renaming the window is not a necessity, but does prove to be helpful when doing more advanced coding.Also, the View name defaults to the component name followed by the word “View”. Again, for reasons ofclarity, it is often useful to remove the word “Comp” leaving just “Ex1View”.SAP DEVELOPER NETWORK sdn.sap.com 2006 SAP AGBUSINESS PROCESS EXPERT COMMUNITY bpx.sap.com6
Web Dynpro Tutorial: Hello WorldFigure 6: Create a new Web Dynpro ComponentPress FinishAs soon as you create a new component, various files are created by the NWDS. Some of these are XMLfiles that contain general declarative information about the Web Dynpro component, and other files are Javasource code files. Either way, the principle here is that as a result of declarations you make (I.E. the creationof a Web Dynpro component), the NWDS then generates the relevant source code for you.This is a fundamental principle in Web Dynpro development.You will notice that two diagram views have opened in the top right of your screen. If you just accepted thedefault name for your Window back in step 0, then the two tab strips at the top of the diagram view will bothcontain “Ex1Comp” because the Web Dynpro component and its window both share the same name. This isnot illegal, but can be confusing if you’re new to Web Dynpro.SAP DEVELOPER NETWORK sdn.sap.com 2006 SAP AGBUSINESS PROCESS EXPERT COMMUNITY bpx.sap.com7
Web Dynpro Tutorial: Hello WorldFigure 7: Changing the window name is helpful when using the Diagram ViewSince the exercise we are performing here is a very simple one, we can close the diagram view by clickingon the X in the top right corner of the Diagram View window.Expand the “Web Dynpro Components” branch of the hierarchy, then expand the component name“Ex1Comp” and finally expand the “Views” branch.Figure 8: Locate view EX1Comp in your new componentDouble click on the view name and you will see the View Editor open.SAP DEVELOPER NETWORK sdn.sap.com 2006 SAP AGBUSINESS PROCESS EXPERT COMMUNITY bpx.sap.com8
Web Dynpro Tutorial: Hello WorldFigure 9: The view editorIn the bottom left of the screen, you will see the Outline View. This is the view in which all the UI elementsbelonging to a particular view are represented as a hierarchy. The top level UI element in any view layout isalways called “RootUIElementContainer” and it is always of type “TransparentContainer”. You willnotice that there is already a TextView UI element underneath the root UI element that displays the name ofthe view.Right mouse click on the RootUIElementContainer and select “Insert Child” from the pop-up menu.SAP DEVELOPER NETWORK sdn.sap.com 2006 SAP AGBUSINESS PROCESS EXPERT COMMUNITY bpx.sap.com9
Web Dynpro Tutorial: Hello WorldFigure 10: Insert a new child UI elementNow scroll down the list of UI elements and select TextView.Figure 11: Add a new TextView UI elementNow notice two things that have happened:The UI element tree shows that a TextView UI element has been added:SAP DEVELOPER NETWORK sdn.sap.com 2006 SAP AGBUSINESS PROCESS EXPERT COMMUNITY bpx.sap.com10
Web Dynpro Tutorial: Hello WorldFigure 12: The new UI element in the hierarchyThe layout view does not look any different. So you might be thinking “Why can’t I see the UI element I’vejust added?”Figure 13: Where’s the new UI element gonSAP DEVELOPER NETWORK sdn.sap.com 2006 SAP AGBUSINESS PROCESS EXPERT COMMUNITY bpx.sap.com11
Web Dynpro Tutorial: Hello WorldThe reason why you can’t see the UI element you’ve just added is that before a TextView UI can becomevisible on the screen, you have to give it some text to display.1Make sure the new TextView UI element is selected in the Outline View, and then select the Properties tabfrom the tabstrip the bottom right of the screen. on1Doh!SAP DEVELOPER NETWORK sdn.sap.com 2006 SAP AGBUSINESS PROCESS EXPERT COMMUNITY bpx.sap.com12
Web Dynpro Tutorial: Hello WorldFigure 14: The TextView UI element will remain invisible until you give the “text” property a valueClick on the “text” property field highlighted above and enter the text “Welcome to Web Dynpro” and pressenter. Now the TextView UI element becomes visible.Figure 15: The TextView is now visible – at the wrong location!SAP DEVELOPER NETWORK sdn.sap.com 2006 SAP AGBUSINESS PROCESS EXPERT COMMUNITY bpx.sap.com13
Web Dynpro Tutorial: Hello WorldThe only problem now is that the text “Welcome to Web Dynpro” appears on the same line as the text“Ex1View”. We would like to put this down on the line below. To do this, we need to change the way all theUI elements are arranged in this particular view.Select the RootUIElementContainer in the Outline view and locate its “layout” property. By default, thiswill be set to “FlowLayout”. Select the value MatrixLayout from the drop down list. Now that you havechanged layout manager for the entire view, all the UI elements in the hierarchy will now inherit a set ofproperties that relate to your choice of layout manager.Figure 16If you now select the TextView UI element you just added, you will see that there are a new group of extraproperties. These have appeared because we changed the layout manager of the parent container UIelement.Select the new TextView UI element again and change its “LayoutData” property to MatrixHeadData. Thisdoes two things:It forces the UI element to occupy the first column of a new row.A new set of properties will appear that are specific to the MatrixHeadData setting. We do not need tomake any changes to these new properties.SAP DEVELOPER NETWORK sdn.sap.com 2006 SAP AGBUSINESS PROCESS EXPERT COMMUNITY bpx.sap.com14
Web Dynpro Tutorial: Hello WorldFigure 17: Change the “layoutdata” property to MatrixHeadDataIf we left our development at this point, we would have a perfectly functional Web Dynpro component – butwith one vital thing missing! We have no way of invoking its functionality. This is where the last step comesin – creating an Application.Right mouse click on the “Applications” branch under the “Web Dynpro” menu, and select “CreateApplication”. The purpose of an application is to provide a browser with an entry point into the functionalitycontained within your Web Dynpro Component.SAP DEVELOPER NETWORK sdn.sap.com 2006 SAP AGBUSINESS PROCESS EXPERT COMMUNITY bpx.sap.com15
Web Dynpro Tutorial: Hello WorldFigure 18: Create an applicationIn the pop-up window, enter the following:The name of the application. The naming convention here is to add the suffix “App” to your desiredapplication name. In this case, this is “Ex1App”.Enter the Java package name. In this case com.sap.tutorial.SAP DEVELOPER NETWORK sdn.sap.com 2006 SAP AGBUSINESS PROCESS EXPERT COMMUNITY bpx.sap.com16
Web Dynpro Tutorial: Hello WorldFigure 19: Enter the application’s name and packagePress next.In this case we have wrote the Web Dy
Author Bio Chris Whealy has more than 20 years experience on Computer Science. He has worked with SAP software since 1993 and specifically with web based interfaces since 1996. In late 2002, Chris turned his attention to Web Dynpro and by October 2003, was able to put his knowledge into practice when he started work as the lead technical .


![Unreal Engine 4 Tutorial Blueprint Tutorial [1] Basic .](/img/5/ue4-blueprints-tutorial-2018.jpg)
