Transcription
You may register your product athttp://www.sandisk.com/registrationand receive e-mail alerts about new firmware versions that enhance the functionality ofyour SanDisk Photo Album!Failure to register your product will NOT diminish the rights you have under the product warranty.ContentsPackage Contents. . . 1Product Specification. . . 2Minimum Requirements. . . 2Installing SanDisk Photo Album. . 2Using SanDisk Photo Album. . 2Displaying Photos & Video Clips. . 3Storing and Deleting Photos & Video Clips. . 4Playing Photos with Music. . 4Playing Music. 5Files Mode. . 5Settings & Options. . 5USB Card Reader/Writer Mode. . 6Troubleshooting. . 7Warranty. . 8CongratulationsCongratulations on your purchase of the SanDisk Photo Album. Now you can easily view and shareyour digital photos and more on TV in the comfort of your living room. This user guide tells you howto install and use your SanDisk Photo Album.Package Contents SanDisk Photo AlbumPower SupplyAudio/Video CableRemote Control with BatteriesUser GuideCD-ROM (for use as an 8-in-1 card reader/writer)USB Cable (for use as an 8-in-1 card reader/writer)ENGLISHSanDisk Photo AlbumUser Guide
ENGLISHProduct Specification Content Format Support: JPEG (Baseline, up to 16 Megapixel) Motion JPEG MPEG-1 (QVGA resolution / up to 8 frames per second) MP3 (up to 320 Kbps) Connections: Video (Composite) and Audio (Stereo) Two USB 1.1 connectors (to PC & USB Flash Drive) Power Compatible Flash Memory Card Formats: CompactFlash Type I / II SD / MultiMediaCard Memory Stick / Memory Stick PRO SmartMedia / xDMinimum RequirementsFor storing and playback: TV with RCA video (NTSC or PAL) and RCA audio connection (left right)For use as an 8-in-1 reader/writer: Windows: Pentium-class PC with USB support, CD-ROM Drive and Windows 98SE, ME, 2000 orXP. Macintosh: Computer with USB support, CD-ROM Drive and Mac OS 10.1.2 Installing SanDisk Photo Album1.2.3.4.5.6.Plug the Power Supply into the back of the SanDisk Photo Album and plug the power supplyinto a power outlet.Connect the audio/video cable to the TV and/or audio system. On the TV, the yellow plugshould connect to Video In, the red plug should connect to Audio In (R), and the white plugshould connect to Audio In (L).Connect the audio/video cable to the back of the SanDisk Photo Album.Insert the batteries into the remote control.Press the power button on the remote and the SanDisk Photo Album will start up (the SanDisklogo lights up).Turn on the TV and change the input source on the TV. Depending on the TV, the input sourcemay be called TV/Video, Input, or Source (consult the TV manual for more information). Whenthe correct source is selected,you will see a message to inserta memory card. The SanDiskPhoto Album is now ready foruse.Using SanDisk Photo AlbumInsert a flash memory card or USB Flash Drive (UFD) into the corresponding slot (for SmartMedia,insert with gold-plated side facing down). When a card is inserted correctly, the green LED left of theslot turns on and the SanDisk Photo Album will begin reading the card. If you have photos (JPEG) orvideo clips (Motion JPEG or MPEG-1) stored on the card, you will automatically be taken to the2
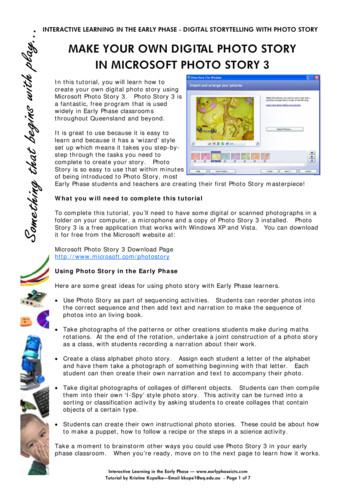
Displaying Photos & Video Clips Press the PHOTO/VIDEO button to display the thumbnails of photos and video clips stored on theselected memory card or UFD. Photos and video clips can be inside an album (folder). Use the arrow buttons to select an albumand press OK to enter the album. Press play while the album is pre-selected to play thephotos/video clips as a slide show.12346571.2.3.4.5.6.7.Album with photos/video clips stored in original resolutionsAlbum with photos stored in print resolutionAlbum with sub albums and photos/video clipsAlbum that is empty or without compatible contentThumbnail of photoAlbum with photos. The thumbnail is the first photo/video clip in the albumThumbnail of video clip Use the arrow buttons to select a thumbnail representing a photo or video and use PREVIOUSand NEXT buttons to switch between pages. Press OK to display (photo) or play (video) full screen size. Press PLAY/PAUSE to start playingphotos and videos according to the SLIDE SHOW settings (see Settings & Options). Press PREVIOUS to go to the previous photo or video clip. Press NEXT to go to the next photo or video clip.3ENGLISHPHOTO & VIDEO menu. If you have music (MP3) on the card, but not one of the supported photo orvideo file formats, you will be taken to the MUSIC menu.The SanDisk Photo Album is operated with the included remote control. If you have more than onememory card inserted, you can press SELECT CARD. Choose which card (or UFD) to use with theup and down arrows buttons and then press OK to confirm your choice.
ENGLISH Use ZOOM and ZOOM - buttons to zoom in/out on a photo or to expand the video to fit theentire screen. When zoomed in on a photo, you can use the arrow buttons to move up, down, leftor right. Press the ROTATE button once to rotate the photo 90 degrees clockwise. Press again to rotate 90degrees further. To stop and return to the PHOTO/VIDEO menu, press STOP or EXIT. Press the INFO button to view more information about the selected file or to display/hide theprogress bar during video playback.Storing and Deleting Photos & Video Clips The SanDisk Photo Album has an extra CompactFlash Type I slot on the back side. When aCompactFlash Type I card (not included) is inserted, you can store photos and video clips fromthe UFD or from cards inserted in the front slots. To store a photo, press the STORE button when the photo is displayed full screen. From the menuthat appears, you can choose to store the photo in its original quality (resolution) or in TV(640x480 pixels) quality. In TV quality, the photo looks the same on the TV screen as its original(higher) resolution version but the storage size is only a fraction of its original size. For instance,when using a 128 MB CompactFlash card in the back slot, you can store up to 2000 photos in TVquality (based on average storage size of 60 KB per photo).WARNINGStore photos ONLY in TV quality/resolution for TV playback purposes. Photos stored in TVquality are NOT suitable for making quality prints. A photo stored in TV quality CANNOTbe changed back to its original quality/resolution.The original photo is not affected. Photos that are stored in original resolution are automatically stored in an album called ORIGINAL Photos that are stored in print resolution (postcard size) are automatically stored in an albumcalled PRINT Photos that are stored in TV resolution can be stored in an album depending on the storingsettings. Press the SETTINGS & OPTIONS button and select STORING and then ALBUM /GROUPING. If the option “Group Photos per Day” is selected, then all photos made on the sameday are stored in one album. This happens at the moment that those photos are being stored onthe CompactFlash card in the back. The other options are storing per month (all photos of thesame month are stored in one album) and per year (all photos of the same year are stored in onealbum). Photos that are already stored and albums that are already created are not affected whenchanging the storing settings. The storing settings only apply to photos that are stored afterchanging the settings. Video clips are stored in a similar fashion but can be stored only in their original size. Video clipsare automatically stored in an album called ORIGINAL. Be aware that the file size of a video clip isoften much bigger than a photo and can fill up your memory card quickly. To delete a photo, video clip or complete album, press the DELETE button when the item is preselected. Then follow the on-screen instructions. You can also delete a photo or video clip when itis displayed full screen.Playing Photos with Music You can display photos with (background) music. The photos need to be stored in TV quality onthe CompactFlash card inserted in the back. When an MP3 file (128 Kb per second or less) isstored on the same card, the SanDisk Photo Album will play the photos with the music accordingto the slide show settings. When one or more MP3 files are present in an album, the music willplay with the photos in that album. To enable or disable playing photos with music, press OPTIONS & SETTINGS, select SLIDESHOW and then MUSIC WITH SLIDE SHOW. Select YES (for music) or NO (no music) and pressOK. See USB Card Reader/Writer Mode for instructions about how to add MP3 files See Settings & Options for how to change slide show settings.4
Press the MUSIC button to display the list of songs stored on the selected memory card or UFD. Use the arrow buttons to select a song and use PREVIOUS and NEXT buttons to switch betweenpages. Press OK to play the highlighted song or press PLAY/PAUSE to start playing a series of songsaccording to the MUSIC settings (see Settings & Options). During playback, you can pressPLAY/PAUSE to pause playback. Press it again to resume. Pressing PREVIOUS one time will skip to the beginning of the song. Press multiple times to go toprevious songs. Press and hold to go fast-backward. Pressing NEXT will skip to the next song. Press and hold to go fast-forward. Adjust the audio volume with the VOLUME /- buttons. The maximum volume is the volume set onthe TV or connected audio system. To stop and return to the MUSIC menu, press STOP or EXIT. Press the INFO button to view more information about the selected file. You can also play music without a TV. Connect the A/V cable to the Left and Right Audio Inconnection of an audio system. Select the input source on the audio system (if necessary). Inserta card or UFD with ONLY MP3 files into the SanDisk Photo Album, turn it on and wait until theLED stops blinking. Now press play and the first music file will start playing. At the end, the nextmusic file will start according to the music settings.Files Mode Press the FILES button to see all supported files on the selected memory card or UFD. Use the arrow buttons to select different files and albums (folders), and press PREVIOUS andNEXT to switch between pages. Use the OK or PLAY/PAUSE buttons to enter albums and to start playing files. Press STORE tostore files and INFO to view Once (dis)playing files from Files Mode, the other buttons operate the same way as inPHOTO/VIDEO mode and MUSIC mode.Settings & Options You can change various settings of the SanDisk Photo Album. Press the SETTINGS & OPTIONSbutton on the remote control to access the Settings & Options menu. Use the arrow buttons andOK button to enter sub-menus and to select options. The activated option is highlighted when youenter the menu. Press EXIT to return to a previous menu or to leave the Settings & Options menuwithout changing any settings. Select STORING to view or change the following settings: RESOLUTION – Choose the resolution for storing photos. ALBUM/GROUPING – Choose how photos should be organized when stored. Select SLIDE SHOW to view or change the following settings: PLAY ORDER – Choose whether to show photos and video clips in alphabetical order orrandomly. SLIDE INTERVAL – Choose how long each slide stays on the screen before changing to thenext one (actual interval times can be longer than setting due to longer file loading times). SHOW LENGTH – Choose whether to show every photo/video once and then stop, to loopplayback of photos/videos or to show photos until the music stops. TRANSITION EFFECT – Choose which effect to use when changing slides, to randomlychoose an effect each time or to use no effects at all. MUSIC WITH SLIDE SHOW – Choose whether music files should be played while showingslides. This is only functional if the CompactFlash card in the back slot contains MP3 files(see Playing Photos with Music). Select MUSIC to view or change the following settings: PLAY ORDER – Choose whether to play songs in alphabetical order or randomly. PLAY LENGTH – Choose whether to play every song once and then stop or to loopplayback of songs. Select PRINT SETTINGS to view or change the following settings:5ENGLISHPlaying Music
ENGLISH MARK FOR PRINTING – When selecting YES, the photo is marked for printing. If the cardwith marked photos is inserted in a printer or photo kiosk that is DPOF compatible, theprinter/kiosk is automatically instructed which photos to print. NUMBER OF PRINTS – Select from 1 to 5 for the amount of prints of the marked photo. Thedefault selection is 1 print. SIZE – Select from the following sizes to specify the print size: 100 x 150 mm (4 x 6"), 130 x180 mm (5 x 7") and 200 x 300 mm (8 x 10"). 100 x 150 mm is the default selection. Select FIRMWARE to view the version number of the software that is installed. Visitwww.sandisk.com/registration to sign up for new firmware alerts by e-mail and to download newfirmware versions.USB Card Reader/Writer ModeThe SanDisk Photo Album can also function as an 8-in-1 USB Card Reader/Writer when connectedto a computer.NOTE: you can only use ONE USB port on the SanDisk Photo Album at a time; the small USBconnector to connect to the computer OR the large USB connector to connect USB Flash Drives. DoNOT attempt to use both USB connectors simultaneously.Windows ME, 2000 and XP: Simply connect the small end of the USB cable to the back of theSanDisk Photo Album and then connect the other end to the PC. The necessary drivers will loadautomatically. Now, the four slots on the front of the SanDisk Photo Album will automatically showup as four different removable drives in My Computer. You can access files on the memory card as ifit was another drive in the computer.Windows 98SE:1. Connect the small end of the USB cable to the back of the SanDisk Photo Album and thenconnect the other end to the PC.2. The New Hardware Wizard window appears. Click the NEXT button.3. On the next screen, select “Search for the best driver for your device” and click the NEXT button.4. On the next screen, select only the “CD-ROM drive” option. Insert the SanDisk CD in the CDROM drive and click the NEXT button.5. Click FINISH when Windows has finished installing the software.6. Restart the PC. Go to My Computer. The four slots on the front of the SanDisk Photo Albumshould now show up as four different removable drives in. You can access files on the memorycard as if it was another drive in the computer.Macintosh OS 10.1.2 : Connect the small end of the USB cable to the back of the SanDisk PhotoAlbum and then connect the other end into the USB port on the Mac (do not connect to monitor orkeyboard). A new drive will appear on the desktop when a card is placed into one of the front slotsof the SanDisk Photo Album (you can use only one slot at a time). Drag and drop files to and fromthe new drive as you would with any other disk or folder.6
Removing Cards/UFD (Macintosh)Drag the ‘untitled’ removable disk icon to the desktop Trash icon and pull the card/UFD out of theslot.To avoid losing data or corrupting the card/UFD, NEVER remove the card/UFD or disconnect theSanDisk Photo Album when the ACTIVITY LED is FLASHING or BLINKINGHow to add music files to a slide show (Windows)1. Connect the SanDisk Photo Album to the USB port on the PC.2. Double click on the icon "My Computer" and browse to the folder where the music files arestored.3. Select the music files by holding down the Ctrl key and clicking on the music files that you wantto copy.4. Release the Ctrl key, click once with the RIGHT mouse button and select COPY.5. Take the CompactFlash card with photos in TV resolution out of the back slot and put it in thefront slot. Double click on the removable disk drive (for the CompactFlash slot on the front of theSanDisk Photo Album), i.e. F: or G: or maybe E. Now you should see the contents stored onthis card.6. Go up to the menu bar where it says EDIT and click on PASTE. Now the music files are beingcopied to the CompactFlash card.7. To determine the order of the music playback, rename the music files by putting numbers infront of the names. To rename a file, click once with the RIGHT mouse button on the file, movethe mouse pointer over RENAME, click the LEFT mouse button to select RENAME, put themouse pointer at the beginning of the file name and click on the left mouse button. Now enter anumber and press the ENTER key on the keyboard. Now the file name is saved.8. After the files have been copied, go back to My Computer, right-click on the drive icon for thefront CompactFlash slot and select Eject.9. Remove the CompactFlash card and insert it in the back slot. Connect the SanDisk PhotoAlbum to the TV and you are ready to play a multimedia slide show!How to add music files to a slide show (Macintosh)1. Connect the SanDisk Photo Album to the USB port on the Mac (do not connect to monitor orkeyboard).2. Take the CompactFlash card with photos in TV resolution out of the back slot and put it in thefront slot. A new drive will appear on the desktop called “untitled”.3. Browse to the folder where the music files are stored.4. Drag and drop the music files to the new drive as you would normally do with any other disk orfolder.TroubleshootingFor Frequently Asked Questions and other SanDisk Photo Album support information, please go toour website at http://www.sandisk.com/retail/support.aspFor assistance by phone please call toll free 866-SANDISK (866-726-3475) M-F 7AM till 4 PM PST.When the drive(s) do not appear in reader mode (see instructions in USB CARD READER/WRITERMODE), the USB connection of your computer might not provide enough power. Use the SanDiskPhoto Album with its power supply and restart your computer.7ENGLISHRemoving Cards/UFD (Windows)1. Open My Computer2. Right-click on the corresponding drive icon3. Select Eject (this is not applicable for Windows 98SE)4. Pull the card/UFD out of the slot
ENGLISHLimited WarrantySanDisk warrants that this product will be free from material defects in design and manufacture and will substantiallyconform to the published specifications under normal use for two years from your date of purchase, subject to theconditions below. This warranty is provided to the original end user purchasing from SanDisk or an authorizedreseller, and is not transferable. Proof of purchase may be required. This product must be used with memory cardsthat are compliant with the specifications of the CompactFlash Card Association, the SD Card Association, theMultiMediaCard Association, or Memory Stick, Memory Stick PRO, SmartMedia and xD-Picture Card requirements asapplicable; use with any other product voids this warranty. SanDisk is not responsible for any failure or defect causedby any third party product or component, whether authorized or not. This warranty does not apply to any third partysoftware provided with the product and you are responsible for all service and repair needed for such software. Thiswarranty is void if the memory card is not used in accordance with the product instructions, or if it is damaged as aresult of improper installation, misuse, unauthorized repair, modification or accident.To obtain warranty service contact SanDisk at 1-866-SanDisk or send an email to: support@SanDisk.com. You mustreturn the product in tamper resistant packaging, freight prepaid, as instructed by SanDisk. You must obtain atracking confirmation number, which you may be required to provide to SanDisk. SanDisk will, at its option, repair orreplace the product with new or refurbished product of equal or greater capacity and functionality, or refund thepurchase price. The warranty duration on replaced product will be that time period remaining on the original product.THIS CONSTITUTES SANDISK’S ENTIRE LIABILITY AND YOUR EXCLUSIVE REMEDY FOR BREACH OF THISWARRANTY.SanDisk does not warrant, and shall not be responsible for, any lost data or images contained in any product(including in any returned product), regardless of the cause of the loss. SanDisk’s products are not warranted tooperate without failure. SanDisk products should not be used in life support systems or other applications wherefailure could threaten injury or life. This warranty gives you specific legal rights, and you may also have other rightswhich vary by jurisdiction.THE FOREGOING IS SANDISK’S SOLE WARRANTY. SANDISK DISCLAIMS ALL OTHER EXPRESS ANDIMPLIED WARRANTIES TO THE FULLEST EXTENT PERMITTED BY APPLICABLE LAW. THE IMPLIEDWARRANTIES OF MERCHANTABILITY AND FITNESS FOR A PARTICULAR PURPOSE ARE LIMITED TO THEDURATION OF THE EXPRESS WARRANTY. SOME JURIDSICTIONS DO NOT ALLOW LIMITATION ON HOWLONG AN IMPLIED WARRANTY LASTS, SO THE ABOVE LIMITATION MAY NOT APPLY TO YOU. IN NO EVENTSHALL SANDISK OR ANY AFFILIATED OR SUBSIDIARY COMPANY BE LIABLE UNDER ANY CIRCUMSTANCESFOR ANY DIRECT, INDIRECT, OR CONSEQUENTIAL DAMAGES, ANY FINANCIAL LOSS OR ANY LOST DATAOR IMAGE, EVEN IF SANDISK HAS BEEN ADVISED OF THE POSSIBILITY OF SUCH DAMAGE. SOMEJURISDICTIONS DO NOT ALLOW THE EXCLUSION OR LIMITATION OF INCIDENTAL OR CONSEQUENTIALDAMAGES, SO THE ABOVE LIMITATION OR EXCLUSION MAY NOT APPLY TO YOU. IN NO EVENT WILLSANDISK’S LIABILITY EXCEED THE AMOUNT PAID BY YOU FOR THE PRODUCT.The information in this manual is subject to change without notice. SanDisk shall not be liable for technical oreditorial errors or omissions contained herein, nor for incidental or consequential damages resulting from thefurnishing, performance or use of this material. This documentation may not be copied, reproduced, translated orreduced to any electronic medium, in whole or in part, without prior written permission from SanDisk.SanDisk, the SanDisk logo and CompactFlash are trademarks of SanDisk Corporation, registered in the UnitedStates and other countries. Store Your World in Ours is a trademark of SanDisk Corporation. SanDisk is anauthorized licensee of the SD, and MultiMediaCard trademarks. SmartMedia is a trademark of Toshiba Corporation.Memory Stick and Memory Stick PRO are trademarks of Sony Corporation. Other brand names mentioned herein arefor identification purposes only and may be trademarks of their respective holder(s). 2004 SanDisk Corporation. All rights reserved.8
FRANÇAISSanDisk Photo AlbumGuide d’utilisationEnregistrez votre produit àhttp://www.sandisk.com/registrationpour recevoir des messages électroniques sur les nouvelles versions micrologiciellesqui améliorent la fonctionnalité de votre SanDisk Photo Album !Le non enregistrement de votre produit ne limite PAS les droits qui vous sont accordés aux termes de sa garantie.Table des matièresContenu de l’emballage. . 09Spécifications du produit. 10Configuration système minimale. 10Installation du SanDisk Photo Album. 10Utilisation du SanDisk Photo Album. . 10Affichage des photos et des clips vidéo. 11Stockage et suppression des photos et clips vidéo. . 12Affichage des photos avec musique. . 12Lecture de la musique. 13Mode Fichiers. . 13Paramètres et options. 13Mode Lecteur-graveur de cartes USB. . 14Dépannage. . 16Garantie. . 16Félicitations !Nous vous remercions d’avoir acheté le SanDisk Photo Album. Vous pouvez désormais visionner etpartager facilement vos photos numériques, entre autres, sur votre téléviseur dans le confort devotre salon. Ce guide explique comment installer et utiliser le SanDisk Photo Album.Contenu de l’emballage SanDisk Photo AlbumCâble d’alimentationCâble audio/vidéoTélécommande et pilesGuide d’utilisationCD-ROM (pour utiliser l’appareil comme un lecteur-graveur de cartes 8-en-1)Câble USB (pour utiliser l’appareil comme un lecteur-graveur de cartes 8-en-1)9
FRANÇAISSpécifications du produit Formats de fichier pris en charge: JPEG (ligne de base, jusqu’à 16 mégapixels) MJPEG MPEG-1 (résolution QVGA / jusqu’à 8 images par seconde) MP3 (jusqu’à 320 Kbps) Connexions: Vidéo (composite) et audio (stéréo) Deux connecteurs USB 1.1 (vers l’ordinateur et le lecteur flash USB) Alimentation Formats de carte mémoire flash compatibles: CompactFlash Type I / II SD / MultiMediaCard Memory Stick / Memory Stick PRO SmartMedia / xDConfiguration système minimalePour le stockage et la lecture: Téléviseur avec ports RCA vidéo (NTSC ou PAL) et RCA audio (gauche droit)Pour l’utilisation comme lecteur-graveur 8-en-1: Ordinateur de bureau de classe Pentium avec prise en charge de USB, lecteur de CD-ROM etWindows 98SE, ME, 2000 ou XP. Macintosh: Ordinateur avec prise en charge de USB, lecteur de CD-ROM et Mac OS 10.1.2 Installation du SanDisk Photo Album1.2.3.4.5.6.Branchez le câble d’alimentation à l’arrière du SanDisk Photo Album et à une prise murale.Raccordez le câble audio/vidéo au téléviseur ou à la chaîne stéréo. Sur le téléviseur, la fichejaune doit être branchée dans l’entrée vidéo (Video In), la fiche rouge dans l’entrée audio droite(Audio In - R) et la fiche blanche dans l’entrée audio gauche (Audio In - L).Connectez le câble audio/vidéo à l’arrière du SanDisk Photo Album.Insérez les piles dans la télécommande.Appuyez sur le bouton POWER de la télécommande pour démarrer le SanDisk Photo Album (lelogo SanDisk s’allume).Allumez le téléviseur et changez sa source d’entrée. Selon le modèle de téléviseur, la sourced’entrée peut être TV/Vidéo, Entrée (Input) ou Source (consultez le manuel de votre téléviseurpour de plus amples renseignements). Une fois la source sélectionnée, un message apparaîtpour vous inviter à insérerune carte mémoire. LeSanDisk Photo Album estmaintenant prêt à l’emploi.Utilisation du SanDisk Photo AlbumInsérez une carte mémoire flash ou un lecteur flash USB dans le logementcorrespondant (si vous avez une carte SmartMedia, veillez à ce que la facedorée soit tournée vers le bas). Lorsque la carte est correctement insérée,le voyant vert, à gauche du logement, s’allume et le SanDisk Photo Albumcommence à lire la carte. Si celle-ci contient des photos (JPEG) ou desclips vidéo (MJPEG ou MPEG-1), le menu PHOTO & VIDEO s’afficheautomatiquement. Si la carte contient des morceaux de musique (MP3) et10
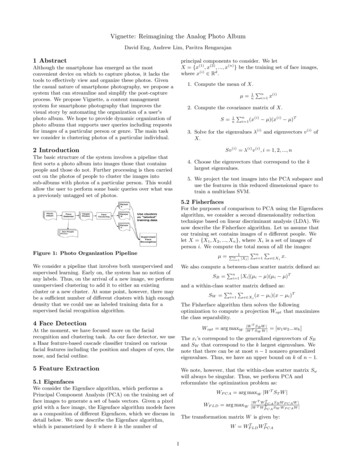
aucun des formats de fichiers photo ou vidéo pris en charge, le menu MUSIC s’affiche.Le SanDisk Photo Album fonctionne avec la télécommande fournie. Si vous avez inséré plus d’unecarte mémoire, vous pouvez appuyer sur SELECT CARD. Sélectionnez la carte ou le lecteur quevous désirez utiliser à l'aide des touches fléchées haut et bas puis appuyez sur OK pour confirmervotre choix. Appuyez sur le bouton PHOTO/VIDEO pour afficher les miniatures des photos et des clips vidéostockés sur la carte mémoire ou le lecteur flash USB sélectionné. Les photos et clips vidéo peuvent se trouver à l'intérieur d'un album (dossier). Utilisez les touchesfléchées pour sélectionner un album et appuyez sur OK pour l’ouvrir. Appuyez sur PLAY quandl'album est présélectionné pour afficher les photos ou clips vidéo en diaporama.12346571.2.3.4.5.6.Album avec photos/clips vidéo stockés dans leurs résolutions d’origineAlbum avec photos stockées dans la résolution d’impressionAlbum avec sous-albums et photos/clips vidéoAlbum vide ou sans contenu compatibleMiniature de photoAlbum avec photos. La miniature est la première photo ou le premier clip vidéo del’album7. Miniature de clip vidéo Utilisez les touches fléchées pour sélectionner une miniature représentant une photo ou un clipvidéo et appuyez sur les touches PREVIOUS (page précédente) et NEXT (page suivante) pourpasser d’une page à l’autre. Appuyez sur OK pour afficher (une photo) ou lire (une vidéo) en format plein écran. Appuyez surPLA
Press the PHOTO/VIDEO button to display the thumbnails of photos and video clips stored on the selected memory card or UFD. Photos and video clips can be inside an album (folder). Use the arrow buttons to select an album and press OK to enter the album. Press play while the album is pre-selected to play the