Transcription
WENJOY THIS SELECTION FROMBest WorkbenchesTo purchase your copy ofBest Workbenches, click here: BUY NOW!
Tune Up YourWorkbenchEven after 30 years as a cabinetmaker, I still vividly rememberthe painstaking effort it took tobuild my first professional workbench. Thefinished bench was a thing of beauty, and atfirst I was reluctant to use it, showing it offto anyone who walked into my shop. WhenI did start using it, the inevitable first dingmade me cringe.But damage to a workbench is impossibleto avoid. After years of hard use as a platformR ic h a R d L . h u m p h R e v i L L efor sawing, planing, chiseling, hammering,pounding, gluing, and finishing, any bench,no matter how elegant, will need some careful restoration.I’ve revived a number of war-scarred andbattle-weary benches over the years. Benchdesigns differ, but all benefit from a flat top,rigid base, and well-tuned vises. I’ll showyou how to bring back any kind of bench tothe perfect working condition that befits themost important tool in your shop.13019 203 Hum.indd 13010/7/11 2:02 PM
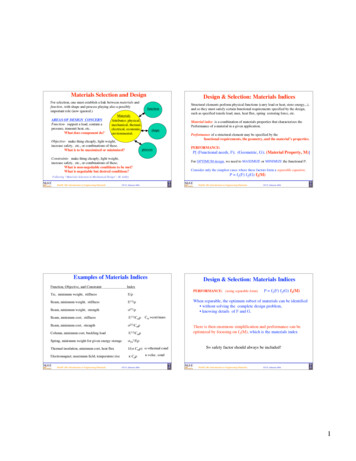
TLC for your workbenchYou can’t do good work on a worn-out bench, so flatten the top,tighten the base, and adjust the vises.2. Fix everything from dentsto gouges.1. Flatten the topof the bench with ahandplane.3. Ensure that thebase is both squareand stable.4. Clean and repair the vises.Prepare your benchtopfor flatteningUse a card scraper or cabinet scraper toremove any glue, paint, or other gunk that’sbuilt up on the top surface and edges. Afterthe top is clean, use a pair of winding sticksto check for twist in the benchtop, markingany high spots that will need to be removed.Then use a 4-ft. ruler or straightedge to seewhere the top has lost its flatness. Drag theruler’s edge lengthwise across the width anddiagonally over the entire top, highlightingall the high spots with a pencil.Next, take off the vises and put themaside to be tuned up later. If your benchhas stabilizing battens at each end, unboltthem and clean out any sawdust buildupon both halves of the joint. Put the battensaside, too.Smooth the bumps. Use ascraper to remove any dried glueor finish from the benchtop.Twist detective. A pair ofwinding sticks allows you tosee if the benchtop is twisted.Flag the high spots. Move theedge of a 4-ft. ruler across thebenchtop and use a pencil tomark the high areas.t u n e u p you r wor k benc h19 203 Hum.indd 13113110/7/11 2:03 PM
Remove the vises. You’ll tune up the vises after the top has been flattened. If your bench has them,unbolt the stabilizing battens (right) and clean out any sawdust that has worked its way down betweenthem and the benchtop.Handplane your benchtopEarly in my career, I used a belt sander toflatten my bench, but it only made mattersworse. Handplaning is the way to go.You’ll need a well-tuned No. 5, No. 6, orNo. 7 plane, depending on the size of theworkbench (see photo at left). A high-qualityplane from Lie-Nielsen or Veritas is a majorinvestment, but you can buy less expensiveplanes from Stanley or Anant. It is alsopossible to find used planes on eBay or atflea markets, or you can borrow one from afellow woodworker. Planing the benchtopwill be physically demanding and is not atask for those in poor shape. Traditionally,teenage apprentices were given the job on acool day.Adjust the plane to take thin shavings,which will minimize tearout and keep youfrom overexerting yourself. With the plane ata slight skew to the direction of travel, beginthe planing sequence (see “Flatten yourbenchtop in three steps” on the facing page)with passes across the width of the benchtop.Overlap the previous pass just enough toavoid leaving unplaned strips. Work the planeacross the entire surface in one direction andthen the other, being careful to avoid rounding over the front and rear edges of the benchsurface. Making this mistake prolongs theflattening process. Pick a number. To flatten the benchtop, you can use (from left)a No. 5 plane (bevel up or bevel down), a No. 6, or a No. 7. Theplane’s length should nearly equal the width of the benchtop(excluding any tool tray).Bevel the edge. To prevent tearout when handplaning across thebenchtop, use a block plane to create a small chamfer along theback edge.132 i m p r ov i n g a wo r k be n c h19 203 Hum.indd 13210/7/11 2:03 PM
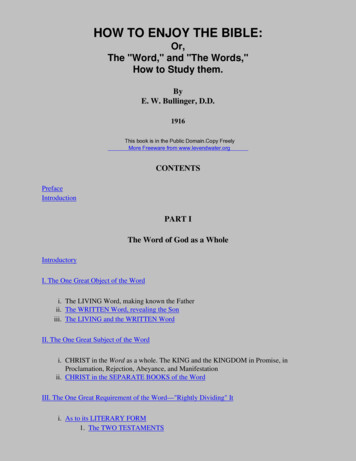
Flatten your benchtop in three stepsBegin by planing perpendicular to the benchtop, overlapping each stroke and slightly skewing the plane (1).Then work your way up and down the top, planing in adiagonal direction (2). Finally, plane along the length ofthe benchtop, altering direction to match the grain ofindividual boards (3).Plane across the top1Plane diagonally2Plane withthe grain3t u n e u p you r wor k benc h19 203 Hum.indd 13313310/7/11 2:04 PM
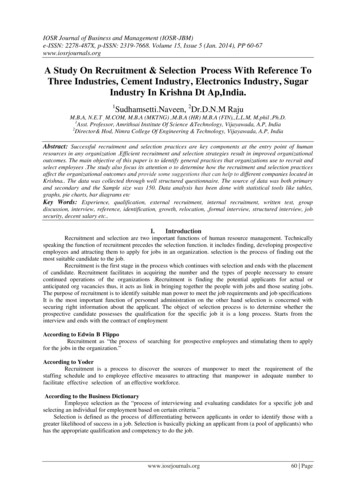
A Dutchman to the rescue.Lay a piece of wood (known asa “Dutchman”) over a damagedsection of the top and markaround it. Chisel out thissection (left). Apply glue to twosides of the patch and insertit into the benchtop (below).The dovetail shape givesmechanical strength whenpatching an edge.The next sequence is to plane the surfacediagonally from left to right and then rightto left. Again, this process is very deliberateand must be done with care to flatten thebench surface thoroughly. Last, plane thelength of the bench, switching directions ifnecessary to go with the grain of individualboards.Once this sequence of planing passesis complete, check your progress with thestraightedge. This time, mark the low spotswith a pencil. Usually, you’ll need to planethe surface several times using this sequencebefore it is flat, so keep the plane blade razorsharp and pace yourself.Repair any holes or dentsin the topSquare pegs in round holes.After cleaning up small holeswith a Forstner bit, cut a pegslightly larger than the hole.Taper two opposite sides ofthe peg, round its corners(above left), and tap it into thehole (above right). When theglue has dried, trim the plugflush (right).134After verifying that the benchtop is flat bysweeping the straightedge over the surfacein all directions, use a cabinet scraper toremove any ridges, or tracks, left by thehandplane.Even with a flat surface, there will begouges and holes too deep to be removedby planing. To patch deep gouges, I usea “Dutchman,” which is a piece of woodslightly deeper, wider, and longer than thegouge and of the same species and appearance as the benchtop. Lay the Dutchmanover the gouge with the grain aligned, thenuse a marking knife to scribe a line aroundit. Next use a router, laminate trimmer, orchisel to remove the wood from the benchtopwithin the scribe lines. A pressure fit withno gaps around the edges is your goal. Tomake it easier to fit the Dutchman, it helps tochamfer its leading edges lightly. After gluingthe Dutchman in place, use a plane to bringit flush with the benchtop.Smaller holes require a simpler approach.First, clean up the hole using a Forstner bit.Then cut a square peg slightly larger than thehole, taper two opposite sides at the tip, andi m p r ov i n g a wo r k be n c h19 203 Hum.indd 13410/7/11 2:04 PM
round over the corners using a block plane.Put some glue in the hole, align the untaperededges of the peg parallel to the direction ofthe bench grain to prevent the bench surfacefrom splitting, and tap in the peg. When dry,saw off the protruding part of the peg andchisel the surface flat.To fill shallow chipouts, mix epoxy withvery fine sawdust. A loose mix with a minimum amount of sawdust is best to enable theepoxy to sink thoroughly into the affectedareas. You also can add a little dye powder tohelp match the color of the filler to the bench.Any small, shallow dents can be steamedout with the tip of an iron. Put some waterin the dent, let it stand for a few minutes,and then place a wet cotton rag over the area.Apply the leading inch or two of a hot steamiron over the rag. Keep adding water to the ragas you go. Be persistent; hardwoods like mapleand beech are slow to swell when steamed.If you removed the stabilizing battens,now is the time to reattach them tightagainst the end grain of the benchtop andflush with the surface, scraping or planingthem if needed.Check for a sturdy andstable baseMy experience has shown that a wellconstructed bench retains its structuralintegrity. Nevertheless, a thorough checkshould be made, so remove the benchtopand see if the base has any joints that needregluing or bolts that need tightening.If the stretchers are bolted to the legs, tighten them. As you work, use a large T-squareand take diagonal measurements to checkfor square.On my bench, the legs must have beenmade while the lumber had a higher moisture level than the upper rails and the feet.As a result, the tenons shrank away from themortises. In a situation like this, scrape awayEpoxy does it. Medium-sizeholes can be filled with amixture of very fine sawdustand epoxy. Frame each holewith masking tape.A swell repair. Minor dentscan be repaired by applyinga hot iron to the damp wood,causing the wood to swell.Reglue loose joints. Epoxymixed with fine sawdust makesa good gap-filling glue if jointson the base have become loose.Check for square. Whenregluing and tightening thebase, make sure the structureremains square.t u n e u p you r wor k benc h19 203 Hum.indd 13513510/7/11 2:05 PM
Nonskid pads. Thin pieces of rubber carpet underlay glued to thebottom of the feet prevent the bench from sliding around in use.A clean and fresh metalvise. To prevent sticking, cleanand lubricate the guide barsand the threaded rod (left).Attach fresh hardwood cheeksto the jaws (below).136as much dry glue as possible, then carve somegrooves on the tenons with a chisel, whichgives the epoxy a better mechanical bondwith the wood. Because the epoxy will needto fill the gaps, mix in some sawdust (thesame mixture used to fill dents in the benchtop). Apply the epoxy and clamp the joints,checking for square as you go.If your bench has wooden feet that rest onthe shop floor, check them to see if they aresplit or worn down. If so, replace them. Afterremoving any nails or screws, remove the oldfeet with a handsaw or chisel and mallet. Before attaching new ones, remove the old glueand flatten the surface where they will be attached. Hot vinegar is excellent at looseningmost glues, but use a heat gun very carefullyto loosen epoxy.With the new feet glued and screwed(counterbore and bung the holes), I glueon 1 16 -in.- to 1 8-in.-thick rubber pads fromunderlay material available at carpet stores.These help balance the bench, reduce future wear, and keep the bench from slidingaround the floor.To level the benchtop, shim up the lowspots where the base is attached.Clean and repair the visesWith the rest of the bench finished, the nextstep is to clean and repair the vises. As thebench ages, the wood shrinks and expands,loosening both bolts and joints and shiftingvises out of alignment.Lubricate the guide bars and threaded rodswith a spray lubricant. When you reattach avise, alignment is critical, so use a straightedgeto check that the vise is level with the benchtop and a ruler to verify that the open jaw isparallel to the bench. Keep the attachmentbolts snugged up but still loose enough to tapthe vise into perfect alignment before thefinal tightening. Replace worn-out hardwoodcheeks on the inner jaws of a metal vise. Bei m p r ov i n g a wo r k be n c h19 203 Hum.indd 13610/7/11 2:05 PM
sure the upper edges of the cheeks touch first,by a fraction of an inch, when closing the jaws.If your tail vise has adjustment screws onthe guide bar, use them to align the vise flushwith the benchtop. You may also need toplane joints that have become exposed dueto wood shrinkage and now prevent the visefrom closing completely.Level a wood vise. If jointshave become proud (left),plane them smooth so that thetwo faces of the vise can meetseamlessly. Plane the top ofthe vise flush with that of thebenchtop (below).Sand and seal the benchtopWith the bench reassembled, very lightlysand the top smooth using P220-grit paper.To seal the benchtop, I use two coats ofZinsser’s Bull’s Eye amber shellac, thinnedwith three parts alcohol to one part shellac.I prefer shellac to a coat of oil because itseals the wood more thoroughly and reducesseasonal movement. Gently sand betweeneach coat with P320-grit paper, apply somepaste wax using 0000 steel wool, and buff thesurface with a cotton cloth.When the bench is back in use, frequentlight cleanups will keep any long-term wearin check. At the end of each day, when putting away tools and straightening up theshop, look over the bench for any glue orstain and clean it off. This step goes hand inhand with sharpening and maintaining allyour other tools. Seal with shellac.A couple of coats ofthinned shellac sealthe benchtop betterthan oil.t u n e u p you r wor k benc h19 203 Hum.indd 13713710/7/11 2:05 PM
WWe hope you’ve enjoyedthis free download.There’s so much more inthe complete book.Purchase it today!Order your copy here: BUY NOW! 2012 The Taunton Press
mixed with fine sawdust makes a good gap-filling glue if joints on the base have become loose. Check for square. When regluing and tightening the base, make sure the structure remains square. 19_203_Hum.indd 135 10/7/11 2:05 PM. 136 improving a workbench as much dry glue as possible, then carve some grooves on the tenons with a chisel, which gives the epoxy a better mechanical bond with