Transcription
.Inspecttheresultinggraph(“light- p1
sttime- ‐andlabor- lasswillneedtomakebrightnessmeasurementsonthe70- y4ImageLab–p2
efirstimageofQatar- ageLab–p3
ntoflightthatfellonthetelescope’slight- ymeasuringinstrument,thetelescope'slight- sofeverypixelisnotzero.Evidently,thelight- Oh- ‐- rlds/ExoLab/Activity4ImageLab–p4
uishbetweentheho- ,etc.(TheExoLabteamattheHarvard- TeacherGuidealsohasastep- ‐by- Lab/Activity4ImageLab–p5
tivity4ImageLab–p6
ghtcurvess udentsm orlds/ExoLab/Activity4ImageLab–p7
ourdata.RealData:ExamplesoftheC al- geLab–p8
urements: randthebackgroundskybrighter.) easescatter.) usethesignaltonoiseratiogoeswaydown.) nwiththerestofthedataset.) ’sKeplerspace- s.) maycomeupwithothersaswell: fthisguide.) sstudentstopullalltheirnew- worlds/ExoLab/Activity4ImageLab–p9
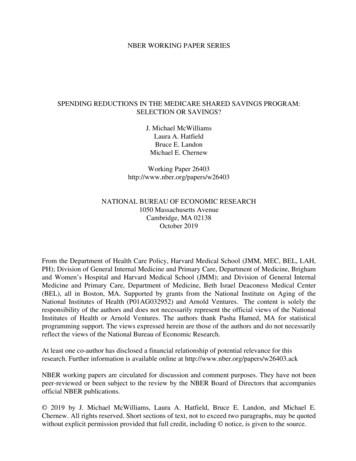
Image Lab Appendix ALaboratory for the Study of ExoplanetsMeasuring your Images: A Step by Step GuideStep 1:Click “show my list” to geta list of your availableimages.You can either select from“My Images” or “ClassImages.”Step 2:Select the dark image forthe set you’d like tomeasure. The file, startingwith Dark-C, will comedirectly after the image setyou’d like to measure.It will have a similarfilename as your images,signifying it was taken onthe same date.Step 3:Select “Subtract dark” toremove excess noise fromyour images.
Step 4:Click “show my list” tobring up the images youcan measure.Scroll up from your darkimage to select the firstimage in your set tomeasure.Step 5:Click “Locate Target Star”to bring up the target-staroverlay.The T indicates your targetstar, and the two Cs showthe two comparison stars.Drag the comparison chartover your measurementimage, and line up the starpatterns carefully until theymatch.
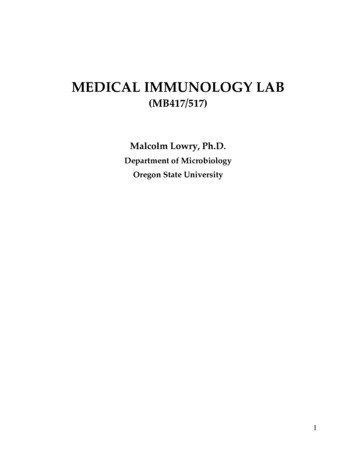
Step 6:Measure your target starby clicking on it, makingsure to get the entire starwithin the measurementcircle. Use the magnifiedview in the upper righthand corner to help.Step 7:Measure two comparisonstars by first clicking on acomparison star box, thenclicking the star.Be sure to click each boxbefore making yourmeasurement. If you clicktwice in a row, you’lloverwrite the previousdata.
Step 8:Measure two dark parts ofthe sky. Make sure thereare no stars in your darksky field. Use themagnified view on theupper right to help.Click on each dark skymeasurement box beforemaking the measurement.Step 9:Click the “Calculate &Record” button tocalculate the relativebrightness of your targetstar using yourmeasurements, andrecord the result. This willhappen automatically.Step 10:You can advance to thenext image and go back tothe previous image, byclicking on these arrows.You can also selectimages from the “Showmy list” menu.
Some background information:When you click the “calculate and record” button, a few things happen behind the scenes beforethe program can arrive at the “relative brightness” measurement. Here’s how the brightness iscalculated!1. The background sky in your images isn’t completely dark, and have pixel values of well above0. In order to get a more accurate reading of just how bright your stars are, we need to knowwhat our baseline for “dark” really is. So, find the average of your two background skymeasurements.2. Subtract the average background sky measurement from your three star measurements - thetarget star, and two comparison stars.3. Next, we’ll need a good baseline for the brightness of your comparison stars, so we cancompare the value to the brightness of the target star. Find the average brightness of the twodark-subtracted comparison stars to find one value.4. Finally, divide your brightness for the background-subtracted comparison star by the averageof the two background-subtracted comparison stars, and you have your relative brightness!
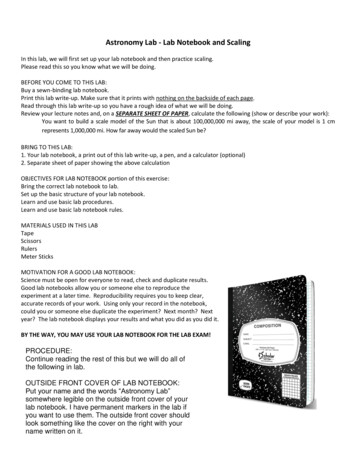
Image Lab Appendix BWhat’s Wrong with My Image?My image is hazy and white, but I can still seea few stars. Also there are a bunch ofdonut-shaped things in my image!Source of error: There were some clouds inthe sky that floated over your field of view.The donut-shaped rings are caused by tinyspecks of dust on the detector. They’realways there, but are much easier to seewhen it’s cloudy.What to do: Since you can still see the starsin this image, try taking a measurement. If itwas too cloudy to see your stars, skip theimage.My image is all black or all white! I can’t see athing!Source of error: An image that is all one colorhas most likely been overexposed - meaningthat the sky was brighter than anticipated.This usually happens when the sky is verycloudy, as clouds are very bright.What to do: Since it was too cloudy for you tosee any stars in your image, skip measuringthis one and move on to any non-cloudyimages in your set.There’s a bright streak running through myimage!Source of error: You’ve found a satellitepassing through your field of view duringexposure! Sometimes satellites, meteors,asteroids, planes and even birds passthrough a field of view during an exposure.What to do: If the streak passes through anyof your stars, you’ll have to skip the image. Ifhowever, the streak misses your target starand two comparison stars, make yourmeasurements as usual.
All I see are tiny white dots, but they don’t looklike stars.Source of error: The small white dots areactually “hot pixels,” or electronic noise that’sshowing up on your image. They are alwaysthere, but are much less noticeable whenthere are stars. If you only see the electronicnoise, the image was overexposed (mostlikely because of a cloudy night).What to do: Since you can’t see any stars,you can’t measure this image, and shouldskip it.My stars aren’t round, but are moreoval-shaped.Source of error: The telescope wasn’ttracking the sky properly, and so didn’t adjustperfectly along with the rotating Earth.What to do: If you can still fit the whole starinside your measurement circles, you can stilluse the image. If it’s too large to fit inside andcuts off some of the brightness, skipmeasuring that image.
w.cfa.harvard.edu/smgphp/otherworlds/ExoLab/ (((Activity(4(ImageLab( -p6! Calculate!Brightness!(Page!9).!