Transcription
SD-WAN Administrator’s Guide1.0paloaltonetworks.com/documentation
Contact InformationCorporate Headquarters:Palo Alto Networks3000 Tannery WaySanta Clara, CA ortAbout the Documentation For the most recent version of this guide or for access to related documentation, visit the TechnicalDocumentation portal www.paloaltonetworks.com/documentation. To search for a specific topic, go to our search page arch.html. Have feedback or questions for us? Leave a comment on any page in the portal, or write to us atdocumentation@paloaltonetworks.com.CopyrightPalo Alto Networks, Inc.www.paloaltonetworks.com 2019-2019 Palo Alto Networks, Inc. Palo Alto Networks is a registered trademark of PaloAlto Networks. A list of our trademarks can be found at www.paloaltonetworks.com/company/trademarks.html. All other marks mentioned herein may be trademarks of their respective companies.Last RevisedDecember 18, 20192 SD-WAN ADMINISTRATOR’S GUIDE
Table of ContentsSD-WAN Overview. 5About SD-WAN. 7SD-WAN Configuration Elements. 10Plan Your SD-WAN Configuration. 12Set Up SD-WAN. 15Install the SD-WAN Plugin.17Install the SD-WAN Plugin When Panorama is Internet-Connected. 17Install the SD-WAN Plugin When Panorama is not Internet-Connected. 17Set Up Panorama and Firewalls for SD-WAN.19Add Your SD-WAN Firewalls as Managed Devices. 19Create an SD-WAN Network Template.20Create the Predefined Zones in Panorama.21Create the SD-WAN Device Groups. 23Configure SD-WAN.25Create a Link Tag.27Configure an SD-WAN Interface Profile. 28Configure a Physical Ethernet Interface for SD-WAN. 30Configure a Virtual SD-WAN Interface.32Create a Default Route to the SD-WAN Interface. 35Create a Path Quality Profile.36SD-WAN Traffic Distribution Profiles. 38Create a Traffic Distribution Profile.43Configure an SD-WAN Policy Rule.45Distribute Unmatched Sessions. 49Add SD-WAN Devices to Panorama. 51Add an SD-WAN Device.51Bulk Import Multiple SD-WAN Devices.52Configure HA Devices for SD-WAN. 55Create a VPN Cluster. 56Create a Static Route for SD-WAN. 58Monitoring and Reporting. 59Monitor SD-WAN Application and Link Performance.61Troubleshoot App Performance. 63Troubleshoot Link Performance.68Generate an SD-WAN Report.72Use the CLI.75Use CLI Commands for SD-WAN Tasks.77TABLE OF CONTENTSiii
iv TABLE OF CONTENTS
SD-WAN OverviewLearn about SD-WAN and plan your configuration to ensure a successful deployment. About SD-WAN SD-WAN Configuration Elements Plan Your SD-WAN Configuration5
6 SD-WAN ADMINISTRATOR’S GUIDE SD-WAN Overview 2019 Palo Alto Networks, Inc.
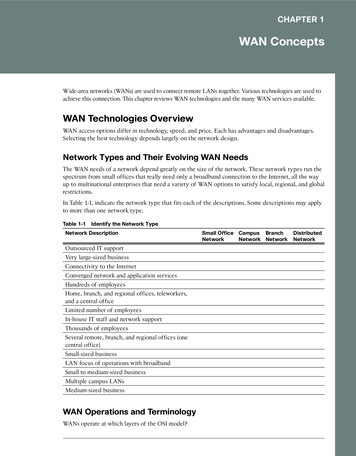
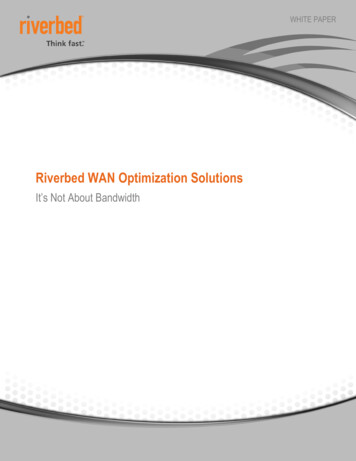
About SD-WANSoftware-Defined Wide Area Network (SD-WAN) is a technology that allows you to use multiple internetand private services to create an intelligent and dynamic WAN, which helps lower costs and maximize application quality and usability. Beginning with PAN-OS 9.1, Palo Alto Networks offers strong securitywith an SD-WAN overlay in a single management system. Instead of using costly and time-consuming MPLSwith components such as routers, firewalls, WAN path controllers, and WAN optimizers to connect yourWAN to the internet, SD-WAN on a Palo Alto Networks firewall allows you to use less expensive internetservices and fewer pieces of equipment. You don’t need to purchase and maintain other WAN components. PAN-OS Security with SD-WAN Functionality SD-WAN Link and Firewall Support Centralized ManagementPAN-OS Security with SD-WAN FunctionalityThe SD-WAN plugin is integrated with PAN-OS, so that you get the security features of a PAN-OS firewalland SD-WAN functionality from a single vendor. The SD-WAN overlay supports dynamic, intelligent pathselection based on applications and services and the conditions of links that each application or service isallowed to use. The path health monitoring for each link includes latency, jitter, and packet loss. Granularapplication and service controls allow you to prioritize applications based on whether the application ismission-critical, latency-sensitive, or meets certain health criteria, for example. Dynamic path selectionavoids brownout and node failure problems because sessions fail over to a better performing path in lessthan one second.The SD-WAN overlay works with all PAN-OS security features, such as User-ID and App-ID , to providecomplete security control to branch offices. The full suite of App-ID capabilities (App-ID decoder, AppID cache, and source/destination external dynamic list [EDL] IP address lists) identifies applications forapplication-based control of SD-WAN traffic. You can deploy the firewall with Zero Trust segmentationof traffic. You can configure and manage SD-WAN centrally from the Panorama web interface or thePanorama REST API.You may have cloud-based services and instead of having your internet traffic flow from branches to thehub to the cloud, you want the internet traffic to flow directly from branches to the cloud using a directlyconnected ISP. Such access from a branch to the internet is Direct Internet Access (DIA). You don’t needto spend your hub bandwidth and money on internet traffic. The branch firewall is already doing security,so you don’t need the hub firewall to enforce security on internet traffic. Use DIA on branches for SaaS,web browsing, or heavy-bandwidth applications that shouldn’t be backhauled to a hub. The following figureillustrates a DIA virtual interface consisting of three links from the branch to the cloud. The figure alsoillustrates a VPN tunnel virtual interface consisting of four links that connect the branch to the hub at theheadquarters.SD-WAN ADMINISTRATOR’S GUIDE SD-WAN Overview 72019 Palo Alto Networks, Inc.
SD-WAN Link and Firewall SupportLink bundling allows you to group multiple physical links (that different ISPs use to communicate with thesame destination) into a virtual SD-WAN interface. On the basis of applications and services, the firewallchooses from the links (path selection) for session load sharing and to provide failover protection in theevent of a brownout or blackout. Thus you are providing the application with the best quality performance.The firewall automatically performs session load sharing over the links in a virtual SD-WAN interface to useavailable bandwidth advantageously. An SD-WAN interface must have all of the same type of connection(either DIA or VPN). VPN links support the hub-and-spoke topology.SD-WAN supports the following types of WAN connections: ADSL/DSL, cable modem, Ethernet, fiber,LTE/3G/4G/5G, MPLS, microwave/radio, satellite, WiFi, and anything that terminates as Ethernet to thefirewall’s interface. You decide the appropriate strategy for how to use the links. You could use inexpensivebroadband connections before expensive MPLS or LTE connections. Alternatively, you could use specificVPN tunnels to reach specific hubs in a region.PA-220, PA-220R, PA-820, and PA-850 firewalls are supported as SD-WAN branch firewalls. PA-3200Series, PA-5200 Series, VM-300, VM-500, and VM-700 firewalls are supported as SD-WAN hub firewalls.Each firewall (branch or hub) requires an SD-WAN subscription. Each Panorama requires the SD-WANplugin.If you are a new customer purchasing a Palo Alto Networks next-generation firewall, you will use thedefault virtual router for SD-WAN. If you are an existing customer, you can choose to either let PAN-OSoverwrite any existing virtual routers or use a new virtual router and new zones for SD-WAN to keep SDWAN content separate from your pre-existing configuration.8 SD-WAN ADMINISTRATOR’S GUIDE SD-WAN Overview 2019 Palo Alto Networks, Inc.
Centralized ManagementPanorama provides the means to configure and manage SD-WAN, which makes configuring multipleoptions on many geographically-dispersed firewalls much faster and easier than configuring firewallsindividually. You can change network configurations from a single location rather than configuring eachfirewall individually. Auto VPN configuration allows Panorama to configure branches and hubs with secureIKE/IPSec connections. A VPN cluster defines the hubs and branches that communicate with each other ina geographic region. The firewall uses VPN tunnels for path health monitoring between a branch and a hubto provide subsecond detection of brownout conditions.The Panorama dashboard provides visibility into your SD-WAN links and performance so that you canadjust path quality thresholds and other aspects of SD-WAN to improve its performance. Centralizedstatistics and reporting include application and link performance statistics, path health measurements andtrend analysis, and focused views of application and link issues.Begin by understanding your SD-WAN use case, then review the SD-WAN configuration elements, trafficdistribution methods, and plan your SD-WAN configuration. To greatly accelerate the configuration, thebest practice is for you to export an empty SD-WAN device CSV and enter information such as branchoffice IP address, the virtual router to use, the firewall site name, zones to which the firewall belongs, andBGP route information. Panorama uses the CSV file to configure the SD-WAN hubs and branches and toautomatically provision VPN tunnels between hubs and branches. SD-WAN supports dynamic routingthrough eBGP and is configured using Panorama’s SD-WAN plugin to allow all branches to communicatewith the hub only or with the hub and other branches.SD-WAN ADMINISTRATOR’S GUIDE SD-WAN Overview 92019 Palo Alto Networks, Inc.
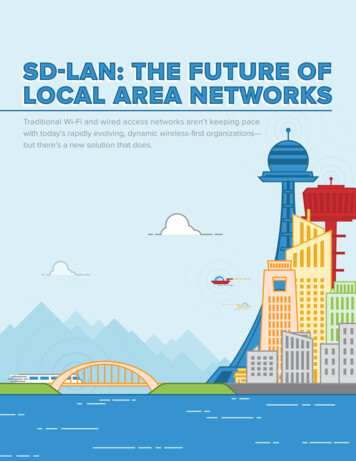
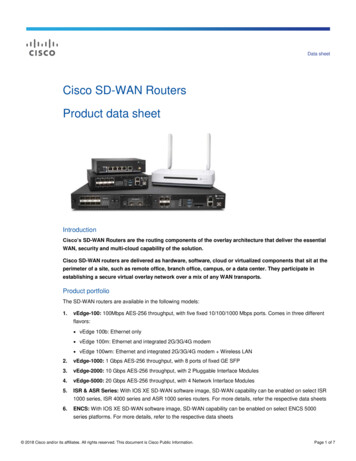
SD-WAN Configuration ElementsThe elements of an SD-WAN configuration work together, allowing you to: Group physical Ethernet interfaces that share a common destination into a logical SD-WAN interface. Specify link speeds. Specify the thresholds at which a deteriorating path (or brownout or blackout) to an SD-WAN warrantsselecting a new best path. Specify the method of selecting that new best path.This view indicates the relationships between elements at a glance.The goal of an SD-WAN configuration is to control which links your traffic takes by specifying the VPNtunnels or direct internet access (DIA) that certain applications or services take from a branch to a hub orfrom a branch to the internet. You group paths so that if one path deteriorates, the firewall selects a newbest path. A Tag name of your choice identifies a link; you apply the Tag to the link (interface) by applying anInterface Profile to the interface, as the red arrow indicates. A link can have only one Tag. The twoyellow arrows indicate that a Tag is referenced in the Interface Profile and the Traffic Distributionprofile. Tags allow you to control the order that interfaces are used for traffic distribution. Tags allowPanorama to systematically configure many firewall interfaces with SD-WAN functionality. An SD-WAN Interface Profile specifies the Tag that you apply to the physical interface, and alsospecifies the type of Link that interface is (ADSL/DSL, cable modem, Ethernet, fiber, LTE/3G/4G/5G,MPLS, microwave/radio, satellite, WiFi, or other). The Interface Profile is also where you specify themaximum upload and download speeds (in Mbps) of the ISP’s connection. You can also change whetherthe firewall monitors the path frequently or not; the firewall monitors link types appropriately by default. A Layer3 Ethernet Interface with an IPv4 address can support SD-WAN functionalities. You apply anSD-WAN Interface Profile to this interface (red arrow) to indicate the characteristics of the interface.10 SD-WAN ADMINISTRATOR’S GUIDE SD-WAN Overview 2019 Palo Alto Networks, Inc.
The blue arrow indicates that physical Interfaces are referenced and grouped in a virtual SD-WANInterface.A virtual SD-WAN Interface is a VPN tunnel or DIA group of one or more interfaces that constitute anumbered, virtual SD-WAN Interface to which you can route traffic. The paths belonging to an SD-WANInterface all go to the same destination WAN and are all the same type (either DIA or VPN tunnel). (TagA and Tag B indicate that physical interfaces for the virtual interface can have different tags.)A Path Quality Profile specifies maximum latency, jitter, and packet loss thresholds. Exceeding athreshold indicates that the path has deteriorated and the firewall needs to select a new path tothe target. A sensitivity setting of high, medium, or low lets you indicate to the firewall which pathmonitoring parameter is more important for the applications to which the profile applies. The greenarrow indicates that you reference a Path Quality Profile in one or more SD-WAN Policy Rules; thus,you can specify different thresholds for rules applied to packets having different applications, services,sources, destinations, zones, and users.A Traffic Distribution Profile specifies how the firewall determines a new best path if the currentpreferred path exceeds a path quality threshold. You specify which Tags the distribution method uses tonarrow its selection of a new path; hence, the yellow arrow points from Tags to the Traffic Distributionprofile. A Traffic Distribution profile specifies the distribution method for the rule.The preceding elements come together in SD-WAN Policy Rules. The purple arrow indicates thatyou reference a Path Qualify Profile and a Traffic Distribution profile in a rule, along with packetapplications/services, sources, destinations, and users to specifically indicate when and how the firewallperforms application-based SD-WAN path selection for a packet not belonging to a session.Now that you understand the relationship between the elements, review the traffic distribution methodsand then Plan Your SD-WAN Configuration.SD-WAN ADMINISTRATOR’S GUIDE SD-WAN Overview 112019 Palo Alto Networks, Inc.
Plan Your SD-WAN ConfigurationPlan the complete topology of your SD-WAN-enabled branch and hub firewall interfaces so that you cancreate Panorama templates with CSV files and then push the configurations to the firewalls.STEP 1 Plan the branch and hub locations, link requirements, and IP addresses. From Panorama youwill export an empty SD-WAN device CSV and populate it with branch and hub information.1. Decide the role of each firewall (branch or hub).2. Determine which branches will communicate with which hubs; each functional group of branch andhub firewalls that communicate with each other is a VPN cluster. For example, your VPN clustersmight be organized geographically or by function.3. Determine the ISP link types that each branch and hub support: ADSL/DSL, cable mode, Ethernet,fiber, LTE/3G/4G/5G, MPLS, microwave/radio, satellite, and WiFi.4. Determine the maximum download and upload bandwidth (Mbps) that the link types support andhow you want to apply these speed controls to links, as described in Step 2. Record the ISP link’smaximum download and upload bandwidth (Mbps). This information will serve as reference egressmaximums if you need to configure QoS to control the application bandwidth.5. Gather the public IP addresses of branch firewalls, whether they are static or dynamically assigned.The firewall must have an internet-routable, public IP address so it can initiate and terminate IPSectunnels and route application traffic to and from the internet.The ISP’s customer premise equipment must be directly connected to the Ethernetinterface on the firewall.If you have a device that performs NAT located between the branch firewall and thehub, the NAT device can prevent the firewall from bringing up IKE peering and IPSectunnels. If the tunnel fails, work with the administrator of the remote NAT device toresolve the issue.6. Gather the private network prefixes and serial numbers of branch and hub firewalls.7. Decide the link type of each firewall interface.Allocate the same link types on the same Ethernet interfaces across the branchfirewalls to make configuration easier. For example, Ethernet1/1 is always cablemodem.8. Decide on the naming conventions for your sites and SD-WAN devices.9. If you already have zones in place before configuring SD-WAN, decide how to map those zonesto the predefined zones that SD-WAN uses for path selection. You will map existing zones to thepredefined zones named zone-internal, To Hub, To Branch, and zone-internet.Information you will enter into a CSV (so that you can add multiple SD-WAN devicesat once) includes: serial number, type of device (branch or hub), names of zonesto map to predefined zones (pre-existing customers), loopback address, prefixes toredistribute, AS number, router ID, and virtual router name.STEP 2 Plan link bundles and VPN security for private links.A link bundle lets you combine multiple physical links into one virtual SD-WAN interface for purposes ofpath selection and failover protection. By having a bundle of more than one physical link, you maximizeapplication quality in case a physical link deteriorates. You create a bundle by applying the same link tagto multiple links (via an SD-WAN Interface Profile). The link tag identifies a bundle of links that have asimilar type of access and similar type of SD-WAN policy handling. For example, you can create a link tagnamed low cost broadband and include the cable modem and fiber broadband services.12 SD-WAN ADMINISTRATOR’S GUIDE SD-WAN Overview 2019 Palo Alto Networks, Inc.
STEP 3 Identify the applications that will use SD-WAN and QoS optimization.1. Identify the critical and the latency-sensitive business applications for which you will provide SDWAN control and policies. These are applications that require a good user experience, and are likelyto fail under poor link conditions.Start with the most critical and latency-sensitive applications; you can add applicationsafter SD-WAN is functioning smoothly.2. Identify the applications that require QoS policies so you can prioritize bandwidth. These should bethe same applications you identified as critical or latency-sensitive.Start with the most critical and latency-sensitive applications; you can add applicationsafter SD-WAN is functioning smoothly.STEP 4 Determine when and how you want links to fail over to a different link in the event the originallink degrades or fails.1. Decide on the path monitoring mode for a link, although the best practice is to retain the defaultsetting for the link type: Aggressive—The firewall sends probe packets to the opposite end of the SD-WAN link at aconstant frequency (five probes per second by default). Aggressive mode is appropriate for linkswhere monitoring path quality is critical; where you need fast detection and failover for brownoutand blackout conditions. Aggressive mode provides subsecond detection and failover. Relaxed—The firewall observes a configurable idle time between sending probe packets for sevenseconds (at the probe frequency you configure), which makes path monitoring less frequent thanaggressive mode. Relaxed mode is appropriate for links that have very low bandwidth, links thatare expensive to operate, such as satellite or LTE, or when fast detection isn’t as important aspreserving cost and bandwidth.2. Prioritize the order in which the firewall selects the first link for a new session and the order in whichlinks should be a candidate to replace a link that is failing over, if there is more than one candidate.For example, if you want an expensive backup LTE link to be the last link used (only when theinexpensive broadband links are oversubscribed or completely down), then use the Top DownPriority traffic distribution method and place the tag that is on the LTE link last in the list of tags forthe Traffic Distribution profile.3. For the applications and services, determine the path health thresholds at which you consider apath to have degraded enough in quality that you want the firewall to select a new path (fail over).The quality characteristics are latency (range is 10 to 2,000 ms), jitter (range is 10 to 1,000 ms), andpacket loss percentage.These thresholds constitute a Path Quality profile, which you reference in an SD-WAN policy rule.When any single threshold (for packet loss, jitter, or latency) is exceeded (and the remaining rulecriteria are met), the firewall chooses a new preferred path for the matching traffic. For example, youcan create Path Quality profile AAA with latency/jitter/packet loss thresholds of 1000/800/10 to usein Rule 1 when FTP packets come from source zone XYZ, and create Path Quality profile BBB (withthresholds of 50/200/5) to use in Rule 2 when FTP packets come from source IP address 10.1.2.3.Best practice is to start with high thresholds and test how the application tolerates them. If you setthe values too low, the application may switch paths too frequently.Consider whether the applications and services you are using are especially sensitive to latency, jitter,or packet loss. For example, a video application might have good buffering that mitigates latencyand jitter, but would be sensitive to packet loss, which impacts the user experience. You can setthe sensitivity of the path quality parameters in the profile to high, medium or low. If the sensitivitysettings for latency, jitter, and packet loss are the same, the firewall examines the parameters in theorder of packet loss, latency, jitter.4. Decide if there are links among which to load share new sessions for an application or service.SD-WAN ADMINISTRATOR’S GUIDE SD-WAN Overview 132019 Palo Alto Networks, Inc.
STEP 5 Plan the BGP configurations that Panorama will push to branches and hubs to dynamicallyroute traffic between them.1. Plan BGP route information, including a four-byte autonomous system number (ASN). Each firewallsite is in a separate AS and therefore must have a unique ASN. Each firewall must also have a uniqueRouter ID.2. If you don’t want to use BGP dynamic routing, plan to use Panorama’s network configuration featuresto push out other routing configurations. You can do static routing between the branch and hubs.Simply omit all of the BGP information in the Panorama plugin and use normal virtual router staticroutes to perform static routing.STEP 6 Consider the capacities of firewall models for virtual SD-WAN interfaces, SD-WAN policyrules, log size, IPSec tunnels (including proxy IDs), IKE peers, BGP and static route tables, BGProuting peers, and performance for your firewall mode (App-ID , threat, IPSec, decryption).Ensure the branch and hub firewall models you intend to use support the capacities yourequire.14 SD-WAN ADMINISTRATOR’S GUIDE SD-WAN Overview
Set Up SD-WANInstall the SD-WAN plugin on your Panorama management server. After you install theplugin, add your hub and branch firewalls as managed firewalls and create the device groups,templates, and template stacks needed to push configurations. Install the SD-WAN Plugin Set Up Panorama and Firewalls for SD-WAN15
16 SD-WAN ADMINISTRATOR’S GUIDE Set Up SD-WAN 2019 Palo Alto Networks, Inc.
Install the SD-WAN PluginYou can download and install the SD-WAN plugin on the Panorama management server from directly on Panorama when internet connected, or by downloading the plugin from the Palo Alto Networks CustomerSupport Portal when Panorama is not internet connected. Install the SD-WAN Plugin When Panorama is Internet-Connected Install the SD-WAN Plugin When Panorama is not Internet-ConnectedInstall the SD-WAN Plugin When Panorama is Internet-ConnectedSimplified management of multiple SD-WAN enabled firewalls is enabled by installing the SD-WAN pluginon your Panorama management server. When Panorama is connected to the internet, you can downloadand install the SD-WAN plugin directly from the Panorama web interface. The plugin needs to be installedonly on the Panorama managing your SD-WAN firewalls, and not on the individual hub and branch firewalls.STEP 1 Log in to the Panorama Web Interface.STEP 2 Select Panorama Plugins, search for the sd wan plugin and Check Now for the most recentversion of the plugin.STEP 3 Download and Install the SD-WAN plugin.STEP 4 Continue to Set Up Panorama and Firewalls for SD-WAN to begin configuring your SD-WANdeployment.Install the SD-WAN Plugin When Panorama is not InternetConnectedSimplified management of multiple SD-WAN enabled firewalls is enabled by installing the SD-WAN pluginon your Panorama management server. To install the SD-WAN plugin on Panorama when not internetconnected, you must download the plugin from the Palo Alto Networks Customer Support Portal andupload the plugin to Panorama. The plugin needs to be installed only on the Panorama managing your SDWAN firewalls, and not on the individual hub and branch firewalls.STEP 1 Log in to the Palo Alto Networks Customer Support Portal.STEP 2 Select Updates Software Updates, and in the Filter By drop-down select PanoramaIntegration Plug In.STEP 3 Locate and download the SD-WAN Plug-in.STEP 4 Log in to the Panorama Web Interface.STEP 5 Select Panorama Plugins and Upload the SD-WAN plugin.STEP 6 Browse and locate the SD-WAN plugin you downloaded from the Customer Support Portaland click OK.STEP 7 Install the SD-WAN plugin.SD-WAN ADMINISTRATOR’S GUIDE Set Up SD-WAN 172019 Palo Alto Networks, Inc.
STEP 8 Continue to Set Up Panorama and Firewalls for SD-WAN to begin configuring your SD-WANdeployment.18 SD-WAN ADMINISTRATOR’S GUIDE Set Up SD-WAN 2019 Palo Alto Networks, Inc.
Set Up Panorama and Firewalls for SD-WANBefore you can begin configuring your SD-WAN deployment, you must add your hub and branch firewallsas managed devices, and create the necessary templates and device group configurations to successfullypush your SD-WAN configuration to SD-WAN firewalls. Add Your SD-WAN Firewalls as Managed DevicesCreate an SD-WAN Network TemplateCreate the Predefined Zones in PanoramaCreate the SD-WAN Device GroupsAdd Your SD-WAN Firewalls as Managed DevicesBefore you can begin configuring your SD-WAN deployment, you must first Install the SD-WAN Pluginand add your hub and branch firewalls as managed devices to the Panorama management server. As partof adding your SD-WAN firewall as a managed device on the Panorama management server, you mustactivate the SD-WAN license to enable SD-WAN functionality for the firewall.As part of adding your SD-WAN firewalls as managed devices, you must configure your managed firewallsto forward logs to Panorama. Panorama collects information from multiple sources, such as configurationlogs, traffic logs, and link characteristic measurements, to generate the visibility for
Beginning with PAN-OS 9.1, Palo Alto Networks offers strong security with an SD-WAN overlay in a single management system. Instead of using costly and time-consuming MPLS