Transcription
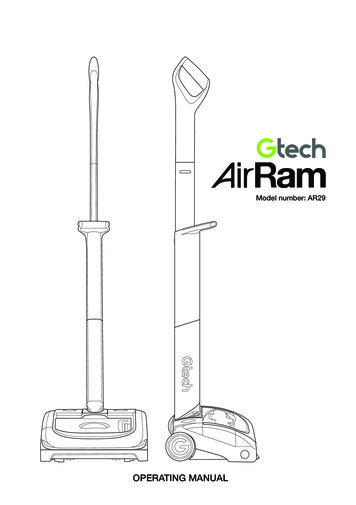
Model number: AR29OPERATING MANUAL
IMPORTANT SAFEGUARDS:IMPORTANT: READ ALL INSTRUCTIONS BEFORE USE.RETAIN INSTRUCTIONS FOR FUTURE REFERENCE.Do not use in rain or leave outdoors whilst raining.WARNING: Basic safety precautions should always be observed whenusing an electrical appliance, including the following to reduce the risk offire, electrical shock, or injury:Personal Safety: Store indoors in a dry place out of thereach of children. Always use responsibly. This appliancecan be used by children aged from8 years and above and persons withreduced physical, sensory or mentalcapabilities or lack of experience andknowledge if they have been givensupervision or instruction concerninguse of the appliance in a safe way andunderstand the hazards involved. Don’t let children play with theappliance; supervise children using ormaintaining the appliance. Use only manufacturer’s recommendedattachments as described in thismanual; misuse or use of anyaccessory or attachment other thanthose recommended, may present arisk of personal injury. Take extra care when cleaning stairs. Keep the appliance and accessoriesaway from hot surfaces. Do not block the appliances openingsor hinder air flow; keep openings free ofany objects including dust, lint, clothing,fingers (and all parts of the body). Particularly keep hair away fromopenings and moving parts.Electrical safety: Only use batteries and chargerssupplied by Gtech. Never modify the charger in any way. The charger has been designed fora specific voltage. Always check thatthe mains voltage is the same as that2stated on the rating plate.A charger that is suitable for one typeof battery pack may create a risk of firewhen used with another battery pack;never use the charger with anotherappliance or attempt to charge thisproduct with another charger. Before use, check the charger cord forsigns of damage or ageing. A damagedor entangled charger cord increases therisk of fire and electric shock. Do not abuse the charger cord. Never carry the charger by the cord. Do not pull the cord to disconnect froma socket; grasp the plug and pull todisconnect. Don’t wrap the cord around the chargerwhen storing. Keep the charger cord away from hotsurfaces and sharp edges. The supply cord cannot be replaced.If the cord is damaged the chargershould be discarded and replaced. Do not handle the charger or theappliance with wet hands. Do not store or charge the applianceoutdoors. The charger must be removed fromthe socket before removing the battery,cleaning or maintaining the appliance.Battery safety: This appliance includes Li-Ion batteries;do not incinerate batteries or exposeto high temperatures, as they mayexplode. Liquid ejected from the battery maycause irritation or burns.
In an emergency situation contactprofessional help immediately! Leaks from the battery cells can occurunder extreme conditions. Do nottouch any liquid that leaks from thebattery. If the liquid gets on the skinwash immediately with soap and water.If the liquid gets into the eyes, flushthem immediately with clean waterfor a minimum of 10 minutes andseek medical attention. Wear glovesto handle the battery and dispose ofimmediately in accordance with localregulations. Shorting the battery terminals maycause burns or fire. When the battery pack is not in use,keep it away from paper clips, coins,keys, nails, screws or other small metalobjects that could make a connectionfrom one terminal to another. When you dispose of the applianceremove the battery and dispose of thebattery safely in accordance with localregulations.Service: Do not pick up liquids or use on wetsurfaces. Do not pick up anything that isflammable, burning or smoking. Use only as described in this manual. Don’t use on concrete, tarmacadamor other rough surfaces. The brush bar may damage certainfloor surfaces. Before vacuumingflooring, rugs or carpets, check theflooring manufacturer’s recommendedcleaning instructions. May damage delicate fabrics orupholstery. Care should be taken onloose-weave carpets and coveringsor where there are loose threads. If indoubt please test on an inconspicuousarea first. The Gtech AirRam has been designedto clean a wide variety of floor surfaceswithout the need to change settings.However some surfaces such asdelicate loose-pile rugs or carpets,tasselled rug edges or damagedcarpets with exposed threads are notsuitable for cleaning with a rotary brush. The AirRam can still be used to cleansuch surfaces by removing the brushbar as shown on page 11 and 7 andusing the supplied plug in the brush barhole. This setting should also be usedto give the best performance on hardfloors with deep crevices The AirRam has a constantly rotatingbrush bar. Never leave the cleaninghead in one spot for an extendedperiod of time as this may damage thefloor surface. Before using the appliance and afterany impact, check for signs of wear ordamage and repair as necessary. Do not use the appliance if any partis damaged or defective. Repairs should be carried outby a service agent or a suitablyqualified person in accordance withrelevant safety regulations. Repairsby unqualified persons could bedangerous. Never modify the appliance in any wayWARNING:as this may increase the risk of personal Do not use water, solvents, or polishesinjury.to clean the outside of the appliance; Only use replacement parts orwipe clean with a dry cloth.accessories provided or recommended Never immerse the unit in water andby Gtech.do not clean in a dish washer. Never use the appliance without theIntended use:filter fitted. This appliance has been designed fordomestic dry vacuum cleaning only.3
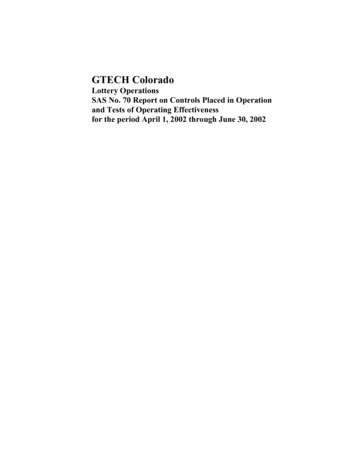
Thank you for choosing a Gtech AirRam“I started Gtech to create sensible, easy to use products, which do a great job.Your opinion is important to us. Please take the time to write a review of the AirRam atTrustpilot.co.uk. We will use your feedback to improve our products and services and letother people know what it’s like to be part of the Gtech family.”Nick Grey – Inventor, Owner of GtechWhat’s in the box1Head full assembly2Lower HandleX 2 components3Upper HandleX 2 components4Battery5Charger6Bin7Filter8Brush barhole plug3124(Filter, battery andbin are already inplace)5678PRODUCT SERIAL NUMBER:You can find this on the underside of your product4
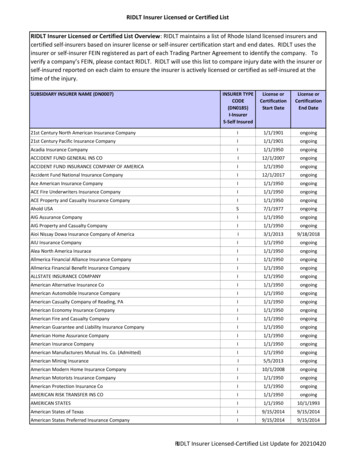
AssemblyFit the two components of the UpperHandle together in the orientation shown inthe image above. They will only fit togetherone way. The components will click intoplace and will remain permanently fixed.Fit the two components of the lower handletogether in the orientation shown in theimage above. They will only fit together oneway. The components will click into placeand will remain permanently fixed.To attach the lower handle to the headassembly, insert the metal pin on the lowerhandle into the hole located on the pivotyoke. Make sure the green locking clip isunlocked to allow the lower handle to fit.Ensure the lower handle is sitting completelyflush against the yoke. Then push the greenlocking clip into the back of the head.5
Assembly (continued)The green locking clip, when correctly fitted,will click and and hold the lower handle inplace. Should the handle assembly needto be removed the clip can be pulled out tounlock the lower handle.The green locking clip remains permanentlyattached to the head assembly.Insert the upper handle into the lowerhandle. You will need to press the buttonon the upper handle to fit it in.Once it slides down you will hear it clickinto place.StorageUpper ButtonLower ButtonTo stow or extend the upper handle simplypress the button on the lower handle tounlock the upper handle.The upper handle will now slide up or downdepending on required position.6The upper handle can be set in twopositions: Lowered for storage and raisedfor use. To lower the handle, release theupper button. To raise the handle from thestored position, release the lower button.
OperationWithout pressing the power button, placeyour foot on the left side of the AirRamhead and pull the handle back.The power button is located on the lefthand side of the AirRam head assembly.Press the power button with your foot toturn the AirRam on.To get the best performance on hard floorswith deep crevices remove the brush baras shown on page 11. Insert the suppliedbrush bar hole plug into the side of thehead assembly as shown in the imageabove.7
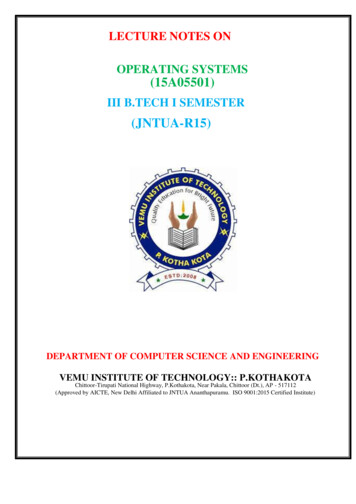
Battery chargingWhen the state of charge indicator starts toflash one green LED, recharge the battery.The battery can be charged whilst it’s in theAirRam, or when it’s off the product.To remove the battery, squeeze the latchunderneath and pull upwards.4hoursPlug the charger into the mains andconnect it to the battery. Switch on at themains.8The battery can be charged from flat in4 hours. The state of charge indicatorwill show 4 solid green lights when it ischarged. It is OK to charge for 1 hour for aburst of cleaning.Replace the battery by sliding it down intothe head assembly.It will click into place.
Emptying the binHolding onto the AirRam with one hand,pull the bin handle and lift the bin out ofthe AirRam.Release the latch with the green arrow,to pull open the bin lid.Hold the AirRam’s bin over a rubbish binand push the green lever towards the lid toempty the dirt.Pull the green lever back towards the bottomof the bin. Close the bin lid and reinsert thebin into the AirRam.9
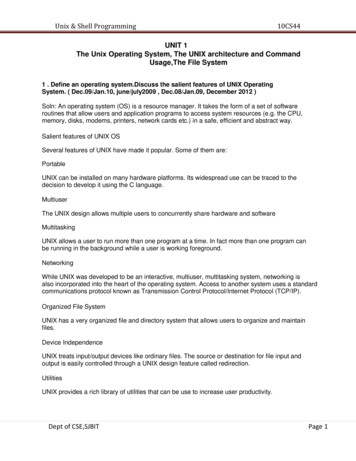
Cleaning the filters - do this once a month or more frequently depending on use.Holding onto the AirRam with one hand,pull the bin handle and lift the bin out ofthe AirRam.Pull the filter out of the filter housing.Tap the dirt from the filter and tip anydirt from the filter housing.Wash the filter if necessary.Remove the filter from the inner shroud,by twisting and pulling.Tap the inner shroud over a bin to removeany excess dirt.Wash the filter under a tap. Squeezeout any excess water then let it drycompletely before reinserting into theAirRam. Recommended water temp 40ºCdo not use detergent. Never put bin backwithout filter inside. You could damagethe motor.10
Replacing the filtersSlide the filter onto the inner shroud.Slide the filter and inner shroud into thefilter housing.Removing and cleaning the brush barIf the brush bar jams during use, theAirRam will stop and the LEDs will appearred. Before checking for a blockage,remove the battery.Rest the AirRam on its side and locatethe brush bar button on the right hand side.Press the button inwards and then pullthe brush bar out from the bottom ofthe AirRam.11
The brush bar can now be removed,starting at the button end.To remove hair from the brush bar, run anopen pair of scissors down the groove tocut the hair, then pull it out.Re-insert the brush bar, starting by the endfurthest away from the button. Then lineup and push the brush bar into the AirRamuntil it clicks into place.Replace the battery by sliding it down intothe head assembly.It will click into place.12
Clearing a jam / fault10secondsIf the brush bar jams during use, theAirRam will stop and the LEDs will appearred. You will need to remove and clean thebrush bar (see page 11).The AirRam will not re-start until the redlights go out. This will take ten seconds.If the problem persists, follow thetroubleshooting instructions below.TroubleshootingAirRam is not cleaning well1. Empty the bin2. Check bin is correctly fitted3. Check filter is correctly fitted4. Clean and/or replace filter5. Check brush bar fitmentAirRam has stopped or won’t work1. Charge battery2. Clear debris from brush barBattery will not charge1. Check the charger is correctlyconnected to the battery andmains supply2. Check wall socketIf this doesn’t solve your problem don’t worry, we will help.Go to www.gtech.co.uk/support or call 01905 345 89113
Product CareYour Gtech AirRam doesn’t need much maintenance: keep the filters clean, keep the brushbar tangle-free and charge the battery. Wipe it with a dry cloth if it gets dirty, including underthe bin.AIRRAM TECHNICAL SPECIFICATIONBattery modelBatteryCharging periodBattery charger outputWeight103A02222V 2000mAh Li-Ion4 hours27V DC 500mA3.2kgThesymbol indicates that this product iscovered by legislation for waste electrical andelectronic products (EN2002/96/EC)When the vacuum has reached the end of its life,it and the Li-Ion battery it contains should not bedisposed of with general household waste. Thebattery should be removed from the vacuum andboth should be disposed of properly at arecognised recycling facility.Call your local council, via amenity site, orrecycling centre for information on the disposaland recycling of electrical products.Alternatively visit www.recycle-more.co.ukfor advice on recycling and to find your nearestrecycling facilities.FOR HOUSEHOLD USE ONLY14
WARRANTY – TERMS AND CONDITIONSIf your Gtech AirRam breaks, don’t worry, we’re here to help.Go to www.gtech.co.uk or call 01905 345 891 for assistance.The warranty on your AirRam is 2 years from date of purchase.WHAT ISN’T COVEREDSUMMARYGtech does not guarantee the repair orreplacement of a product as a result of: The guarantee becomes effective at the date ofpurchase (or the date of delivery if this is later). You must provide proof of delivery/purchasebefore any work can be carried out on thevacuum cleaner. Without this proof, any workcarried out will be chargeable. Please keep yourreceipt or delivery note. All work will be carried out by Gtech or itsauthorised agents. Any parts which are replaced will become theproperty of Gtech. The repair or replacement of your vacuum cleaneris under guarantee and will not extend the periodof guarantee. Normal wear and tear (e.g. filters, brush bar) Accidental damage, faults caused by negligent useor care, misuse, neglect, careless operationor handling of the vacuum cleaner which is notin accordance with Gtech AirRam operating manual. Blockages - please refer to the Gtech AirRamoperating manual for details of how to unblock yourvacuum cleaner. Use of the vacuum cleaner for anything other thanthe normal domestic household purposes. Use of parts and accessories which are not Gtechgenuine components. Faulty installation (except where installed by Gtech) Repairs or alterations carried out by parties otherthan Gtech or its authorised agents. If you are in doubt as to what is covered by yourguarantee, please call the Gtech Customer CareHelpline on 01905 345 891.15
Grey Technology LimitedBrindley Road, Warndon, Worcester WR4 9FBCPN01430email: support@gtech.co.uktelephone: 01905 345891www.gtech.co.uk
They will only fit together one way. The components will click into place and will remain permanently fixed. To attach the lower handle to the head assembly, insert the metal pin on the lower handle into the hole located on the pivot yoke. Make sure the green locking clip is unlocked to allow the lower handle to fit. 6 To stow or extend the upper handle simply press the button on the lower .