Transcription
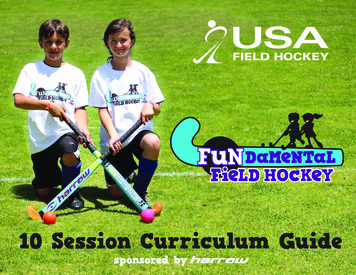
10 Session Curriculum Guidesponsored by
Fundamental Field Hockey is a youth development initiativeto expose the sport to thousands of children nationwide byproviding free equipment and emphasizing fun physicalactivity! Kids across the nation will have the opportunityto play and be exposed to field hockey in their physicaleducation class, at their local YMCA, or possibly in a parksand rec league. After their Fundamental Field Hockeyprogram is completed, the kids will have the option tocontinue to play with their local club. Our goal is to provide anavenue to play field hockey and more importantly, have fun!Fundamental Field Hockey coincides with USA FieldHockey’s long-term strategic plan and commitmentto enhance sport development by increasingplaying opportunities for boys and girls, ages7-11. The program will emphasize fun and willinvolve playing small-sided games on any flatsurface with a small or large group of children.1
Field Hockey You Fun2
The box contains:24 Sticks (34”), 24 Balls, 12 cones and a 10-session curriculum guide(Review prior to each session)COACHING THOUGHTS:YOU HAVE THE TOOLS, NOW WHAT? Itis important that you prepare your sessionaccording to the age-level, experienceand physical ability of your players. Thecurriculum is designed to be an effectiveguide, not a mandatory script. You mayfind things that work well and others thatdon’t. Feel free to pick and choose whatworks best for your program. Mix it up andkeep it fresh, new and fun. It’s up to you.Remember, each session is unique and youare the eyes and brains of the operationthat is trying to develop a program thataddresses hockey to a wide range of ages,maturation levels, physical abilities andability to understand such a techniquebased sport. If you are new to the game,study the core concepts as they are thebasic fundamentals of the sport and a greatguide for teaching points. Keep it simpleand safe, and you will be a huge successwith your young athletes. This is the firstgo ‘round. Over time, the curriculumwill be improved upon, by your feedback,interaction, and your athletes’ excitement .SUCCESS IS UP TO YOU: It is yourresponsibility to ‘bring’ this curriculum tolife, showing your personality, energy andenthusiasm for the sport. Your main jobis to get these kids to ‘want’ to continueto play. If you make the session fun andengaging, they will ‘fall in love’ with thesport and that’s what this program isaiming to do. Be prepared, know the drillsand how to explain them quickly! Yoursmooth and efficient transition betweenone drill to the next will be crucial in howsuccessful your session is. We understandthat there will be varying levels andnumbers of players you will be dealingwith. Every day will present a new setof challenges. Your ability to adapt tothe challenges smoothly is what makescoaching exciting. We invite you as thecoach to practice the skills yourself as youwill gain vital teaching experience as youparticipate in the FUN!NOTE: Further useful information will be on ourFUNdamental Field Hockey Website. It is imperativethat you access this site for further explanations,photo’s, videos and fun games. Field Hockey is atechnically challenging sport to teach, especially ifyou don’t have visual samples to watch and learnfrom. Once you understand the technique of anysport, teaching will be easier, as long as you keepyour feedback, simple!Please visit us at www.funfh@usafieldhockey.com/youth3
Safety is #1Preparing for your sessionn DO NOT allow swinging of sticks at any time! Stop the playwith your whistle and explain to everyone that when tacklingor battling for the ball, you must keep the stick in contactwith the ball. NO SWINGING! Show what is acceptable andwhat is not!n Warm-up with a fun game and make sure kids cool down andstretch after every session.n Always check the weather conditions prior to leavingfor the session!n Check the grounds upon arrival for potential hazards.n Outdoor Field: broken glass (remove carefully), holes in field(fill), any obstacles that players could run into (move), arethere other players playing close to your field (flying balls,obstacles) and weather (know what to do and where to go incase of lightning or torrential downpour)n Indoor Facility: make sure any obstacles (extra cones,water bottles and clothing are removed from playing area).Also, too many electrical cords in a nearby outlet could createa health hazard. If you have any extra requirements of yourfacilities, ensure they are catered for by asuitable professional.n Tennis court: if nets are removed, place cones near the polesand make sure drills are safely away from area. If a balltravels near the poles, be sure to have a method to stop theplay (“stop” or “whistle the play dead”)n Know where the first-aid kit is and how to get help if there isan emergency.n Record the medical history of your athletes. Make sure youknow which ones have a health issue or prior injury you needto be aware of. Ensure you have emergency contact details ofparents / caregivers / family.n If necessary, match the athletes’ physical skills and abilitiesto provide balanced competition.4
THE ART OF COACHINGSome Simple Coaching Philosophy, by Terry Walsh —USA Technical Director for USA Field Hockey“Coaching is about asking questions, and listening”n We are not trainers, we are teachers. Organize your sessionwith this in mind.n Create a “STOP” Signal for your players that is consistentthroughout each session. On your “STOP” signal, all playersstop what they are doing and make eye contact with you toawait further direction. Example, “1 2 3 and FREEZE!”n Create a “GO” Signal for your players that is also consistentthroughout each session. This establishes a routine to keeporder and allow for smooth transitions.Example, “READY AND GO!”n Show by your body language and voice inflection, that you areexcited, when someone tries something you’ve taught, and bespecific as to why. “Ask a question, “Excellent reception, Matt.Why do you think it was so successful?” A reply might be,“because I had my stick on the ground?” Teacher replies,“Yes, Now, let’s set a goal to get 3 in a row, okay?”n For 7-11 year olds, fun ‘hidden learning’ games that teach thebasics will be key. Feel free to think of fun games that can beused with stick and ball.n Develop Feedback Strategies. Feedback should be timely.You can be “corrective” but be specific.make it fun andenjoyable for the players to give and receive feedback. Gaintrust between you and each player.n Provide high rates of instructional and motivationalfeedback. Ensure positive student interactions outnumbercorrective ones.n Challenge them through competition (small games / skill rep’sunder time pressure and repetition (simple patterns)n Be prepared for every scenario. Brainstorm what couldhappen and sort out a calm solution. Examples: Environmental(weather), kids (late), someone gets injured and you are theonly coach at the site, etc.n Establish a system of helpers to set up andput away equipment.n Be line conscious! Be aware of how long children are having towait for their turn. Divide students into smaller groups, usemore equipment, set up activity / drill stations.5
CCOORReeCCooNNcepcepTTsareBasic Rules, Proper Grips & Posture,Ball & Stick Control, Tackling, Receiving/Trapping,Passing, and Fun Skills.The “CORE CONCEPTS” are the skillsyou will be teaching to the kids during the session.Not ALL technical feedback needs to be given in too much detail.You may pick and choose a couple of the points, after players have tried them.6
From Our Experiences I have gathered some helpful feedback from PE Teachers and coaches that haveexperienced working with the younger age group that we can all learn from.EXAMPLE: Sample Curriculum GOALS:Keep it simple.Make verbal corrections as they practice (players who aredoing it correctly, use as examples).Get the kids playing as quickly as possible!Keep the kids busy but on task with the skill.We must make it fun first and teach second. If done right you cando both at the same time.Practice a skill then put them in a drill/challenge with that skill.Use fun games that develop footwork and stick skillsCore Session Objectives:Introduce a skill and a rule or two each day and revisit thefollowing practice.I always finish the session with a real game.A Warning: The problem I am running into is the individualplayer’s skill levels are becoming more and more separated.Players who are younger or develop slower are intimidated by theplayers who are aggressive and catching on faster. This gets trickyif you don’t have a way to divide them or if you have a large agedifference in your group. We hold advanced and beginner classesto adjust. Having extra coaches can also help, but may not beaccessible at all sites.Split them up and play by the end of each session.Sessions are only an hour as time goes by quickly.Get them involved in a drill/competition & correct skills on the spot.Between drills, we address the class with a quick skill correctionsomething that you see most of them doing wrong. A quick demo ofthat correction and on to the next fun drill usually works best.Our #1 Curriculum Tip: The sooner they start playing the fasterthey get the hang of the sport. I am very relaxed on the rulesat first, but each week I start to call more and more fouls It isimportant to have the coaches participate if possible to keepingthe ball distributed more which speeds up the game and promotesplayer involvement. We must make it fun first and teach second.If done right you can do both at the same time.Be prepared and flexible to adjust your session according to themake-up/experience of your group.Session Breakdown: “The Ways of the Wise”Start the first class with the grip of the stick, turning the stickin your hand and the flat side rule. I feel this is the most neededskill and hardest for players to develop. We start with this at thebeginning of every practice.“Desired Outcome”: If done properly, kids will be begging to playtheir favorite game and that is when you blow their mind andintroduce them to a new and exciting challenge/drill.Show them a technique and let them immediately practice it.Too much feedback will kill the fun!7
Basic Rules The 6v6 GameThe rules are in place to keep the session SAFE!If in doubt blow the whistle. On the flip-side, beaware not to over-use the whistle early on withexcessive calls. Find the balance of stopping theplay to explain and keeping the game fun andflowing. Field Hockey is a non-contact, finesseand technical sport.BASIC FOULS Calls For Instant Whistles andLoss Of Possession Foot - the ball hitting a player’s foot Dangerous swing - Stick rising above their waistat anytime on Attack or Defense Hacking - hitting another player’s stick withyour own stick Obstruction (any body to body contact / cannotblock or hold a player or their stick from the ball) Wrong side of the stick (ball can only be playedthe with the flat side)THINGS TO WATCH OUT FOR: A rising ball in the air should be an instantwhistle if it presents DANGER to ANY player onthe field. Most aggressive play will occur when twokids are ‘going after’ the same ball, or whenplaying individual defense against an attacker.Prevention is key! Make sure you areemphasizing the correct way to approach andtackle. Stick must be on the ground! Initially, allow some fouls to “play-on”,by stopping the play less you encouragemovement and FUN!!!DURING THE FIELD OF PLAY If the ball runs over the side line, it is thenplaced on the spot where the ball rolled out. All players (including defenders) must be 5yards from any free hit after a whistle or outof bounds play. If a player self-starts and thedefender is less than 5 yards away, STOP theplay and set them up correctly. Be strict aboutthis rule. The “Self-Start Rule” - To keep the flow of theplay going and more exciting, the ‘self start’ rulecame into effect two years ago. During a deadball situation, that attacking player can startthe ball him or herself to begin play and attackaccordingly.1. Must first make sure the ball is stopped wherethe foul occurred2. Is then allowed to start the next play bydribbling into space and attack towards the goal.3. Has the option of passing first to a teammatethat is at least 5 yards from the ball.* Size of field will depend on the number of playersyou have available to play and their age / experience level. If the game is becoming too north /south, feel free to play a four-goal game. This willallow for more east-west play and the ability to addanother element to the game A goal is scored when the entire ball travels overthe goal line. If there is a ‘stand-in’ goalkeeper, keep that playersafe by making sure players are not ‘bunched up’ inthe circle! Be ready to stop the play!8
Hockey Grip/Athletic StanceHockey GripAthletic Stanceq Firm left hand grip at the top of the stickq Wide Base - Feet shoulder width apartq Turn Stick like opening a doorq Knees slightly bent, slight squatq Right hand well down the stickq Elbows comfortably away from your bodyq Forefinger and thumb form a “V”q Head on a ‘swivel’, not looking down!q Relaxed right hand acts as a guideq Used to dribble, trap the ball, and push passing9
Hockey Grip to Pull BallPull the ball from side to sideq Firm left hand grip at the top of the stickq Right hand well down the stickq Relaxed right hand acts as a guideq Turn Stick like opening a doorq Forefinger and thumb form a “V”q Get used to dribble, trap the ball, and pushpassingClose up of handsfore/back handweight over knees10
Grip & PostureDribble (Use Forehand)- No Side to Side Movementq Left hand at top - Firm grip(V grip off-set and center w/ back of stick)Hand Positionq Right hand - loose grip(two grip swivel from reverse to forehand)q Left Elbow Bent - Right Elbow Extendedq Dexterity of wristsBody Positionq Feet shoulder width apartq Knees bent, hips loweredq Weight on left foot/ball on left sideq Weight on right foot/ball on right sideBall Positionq Ball position is away from feet.q Elbows away from bodyq Shift WeightNOTE: The dribble is the hardest skill to learn and must be practiced. The proper lefthand grip is key to this skill. With new players encourage them to practice their dribbleevery session as much as they can. Remind them to look up as much as possible so theyare aware of their surroundings.11
Tackling SkillsINDIVIDUAL DEFENSESAFETY IS #1, when performing this skill!Mirroring, Channeling,or Guiding#1 RULE:q Pick up the correct Line: Attacker’s RightShoulder - Defender’s Right Shoulder - GoalTackle Distanceq Always with one foot forward in a balancedand strong position - usually left foot forward. NEVER cross legsq No hacking or back swing allowedq In freeze frame, the player should just beable to stretch forward and touch the ballwith an outstretched “jab” tackleq The players should jab and retreat at theball with a ‘snake strike’ actionq Create correct tackle distance and matchopponent’s speed to maintain this tackledistanceq Once speed and vision are reduced, closedown the space with quick and short footwork patterns to reduce control and spaceFlat Tackleq ONLY FLAT TACKLE when the opponentHAS NO SPEED!q This is when you put your entire stick onthe ground while in a crouched positionto block the ball from hitting your foot,or tackle an opponent who is comingtowards youThe Jabq “Snake strike” tackle, jab in and out, toreduce vision and speed of opponentq Can use two hands, starting point: stickpointing towards belly buttonq Once vision, space and / or control havebeen lost - TACKLEFlat Tackle12
Receiving & TrappingSkillsForehand ReceivingReceiving Hand Positionq Dribbling grip with a vertical stick and lefthand away from bodyq Handshake grip with hands split - righthand can be more than halfway down thestick, but not too lowq Left elbow should be as high as yourshoulder in front of your bodyq Your thumb is pointed down towards theground, angled stick, forming a trapBody Positionq Athletic Stanceq Line up right of center, in line with theincoming ballSkill Executionq Form a triangle between feet and stick head,flex the knees and create a ‘pocket’ intowhich the ball will be collectedq Your left foot slightly forward of your right.Angle stick forward (the left hand should befurther away from your body than the stickhead)q Pick up the line of the ballq “Soft Hands” as ball contacts stick13
Push Pass SkillsBody Positionq Athletic Stanceq The body position should be side on, towardthe intended targetHand and Stick PositionBall Positionq Ball position in line with back leg with rightarm extended and left elbow bentSkill Executionq Stepping action with left footq Hands apartq Open left foot toward targetq Hands and stick are away from the body andthe toe of the stick should follow throughlow and towards the targetq Transfer of weight to front leg - Keep yourfeet moving through the pass AND haveyour weight moving at the targetStick Positionq Stick on ball - no back swingq Follow through leading with left elbowq Push the ball using the flat side of the stick14
Fun SkillsAir DribblingFor Eye-Hand CoordinationThe Gripq Stick grip should be similar to dribbling positionbut in the airq Discourage players from rearranging grip forcomfort, many will reverse their regular gripq Reinforce right hand offering a touch on the ballq Stick guides ball back over the ball towards feetq Ball is ‘picked up’ off the ground and controlledTry someof these Tricks:1. Bounce the Ball on the Stick as many timesas possible2. Balance Ball on Stick for aslong as possible3. Try these tricks with motion:walking and running15
THE SESSIONS10 Sessions are included in this packet.nThe first 6 sessions cover all of the ‘core concepts’and contain “hidden learning” games.nSession 7-10 introduces more small game concepts,culminating in a ‘skill-circuit’ and ‘tournament-style’ competition.nEXAMPLE: If you are running a 6-week session, the first 4 can be chosenfrom sessions 1-6, the last two sessions can be from sessions 7-10,because they are more game / competition-based.REMEMBER: KIDS LOVE TO PLAY!NOTE: Further useful information will be on our FUNdamental Field Hockey Website. It isimperative that you access this site for further explanations, photo’s, videos and fun games.Field Hockey is a technically challenging sport to teach, especially if you don’t have visualsamples to watch and learn from. Once you understand the technique of any sport, teachingwill be easier, as long as you keep your feedback, simple!Please visit us at www.usafieldhockey.com/youth16
Introduction to Fun Field HockeyIntroduction3 Start jogging around with the ball - Keep in con-trol of your ball and body, encouraging a changeof direction, using footwork.Introduce yourself and your staff. Get them excited for the session/program. Tell them a littlebit about field hockey. Olympic sport for men andwomen. Check website for fun facts.4 On “whistle” - Girls, stop - Boys circle aroundWARM-UP5 Briefly show how they can push pass andSTATIONARY SKILLS1 The Grip - Show them how to hold the stick.Teach the Flat-side rule and how to turn thestick over properly for dribbling. Get them toimmediately practice!2 Practice stationary “Yard Stick” pulls left toright, right to left.3 Show them how to dribble. Get them to moveGirls - Boys, stop, circle around girls. (Alsouse color of shirt or hair color for differentprompts)receive. While dribbling around, on “whistle”,make eye contact with someone, call theirname and pass to partner. Exchange ballswith 5 different people.Teaching Reminders«To get them to dribble with vision becomingcomfortable with stick and moving.«Show them how they can stop the ball withstick almost covering the ballGAMESObjective: Running without the ball,dribbling with vision and controlRed-light, Green-lightEveryone on end-line. Back to players or covereyes, call out “red-light”, everyone must stopunder control (or you must go back to start,“green light”, everyone can start to dribble. 1stplayer to cover 20-25 yds. under control, wins.Dog and Bone20 kids, 19 balls in the middle - 1 kid will comeback empty-handed. Spacing of the balls important- Barrier in the middle, so they don’t run into eachother. Of course, you can adapt this game to thenumber of players you have. Put one less ball inthe middle.with the ball.Teaching Reminders«Get them used to holding the stick and adjusting their grip to move the ball left to right.«Correct any HAND GRIP ISSUES, remindstudents not to use the ROUND SIDE of thestick, and NO USE OF FEET.ACTIONSON THE MOVE - DRIBBLING SKILLSObjective: To get them to dribble with visionbecoming comfortable with stick and moving.1 Walk with the ball with vision - Keep it on yourforehand. If balls moves to left side of your body,use a drag to get it back to the right.2 “Indian” dribble while walkingSESSION 117
The 6v6 ExperienceGAMEThe 6v6 Experience1 6v6 - 4-goal game with no more than 6 players per team, so theycan experience the game (Depends on readiness of players)2 IF you have too many numbers and limited space, use extraplayers on the side line only. Sideline players can move (theirbody) 1 step in either direction along the sideline only andnot into the court of play.Teaching Reminders«Start Match with a Bully andafter a goal or point is scored«Encourage use of the shave and jab tackles«No feet«A point if they dribble the ball over the back-line or shoot into goalwithin 5 yards (your call).NOTE: Since it is their first ‘experience’ with playing, stop the play when you need to, in order toexplain the rules (do’s and don’t’s). SOON, they willstart to understand, and the game will start to flow.CLEAN-UP & REVIEWGet the kids excited for the next session!Total Session Time 60 minutesSESSION 1continued 18
WARM-UPStretch, partner pass andwork with you stickACTIONYard-stick/Dribbling with VisionTeaching Reminders«Make sure their right hand is not turning overwhen using reverse. Right hand stays in thehandshake grip with V’s at the top of the stick.«When changing speed, make sure ball is not tooclose. Can’t use their feet and can only use theflat side of the stick.GAMESpread 10-20 cones out over a 15 yd x 15 yd area10-15 players each with a stick and ball stand nextto a cone. Each player has 3 imaginary dollars(or whatever fun imagery) When the coach says“switch” the players have to dribble to a new cone.Extensions: Time limit to find a new cone or touchmultiple conesIE: Dribble to 4 cones in 12 seconds,“switch!!! 12, 11, 10 ”VariationsACTIONPush and Trap (Receiving)1 In 2’s, passing through cones - 2 stick lengthsapart - Pairs are 5 -7 yards apart and practicingfor technique only. The body position should beside on, toward the intended target.Teaching Reminders«Explain/ show how to trap on the reverse stickwhen the ball comes to the left side of the body.STOP 2 GIVE AND GOPRACTICE - Have pairsfind their own personal space to begin. 3-5 yardsapart. After the GIVE, GO into a new/ differentopen space.Always TRAP the ball before you give the nextpass. The player receiving the ball is always stationary. Try to LEAD, your partnerwith the pass. Or WEIGHT the pass,into the open space, for your partnerto run onto.GAMEDivide the players into2 groups of 6 and givethem a number. The ball is rolled out by the coachand a number is called.The black #’s must run through the goal on theright, and score into the goal on the left, while theyellow #s must score into the goal on the right.To score, the ball must be dribbled through youropponent’s goal under control. Play continuesuntil a goal is scored or the ball goes out of play.Another number is called and the game continues.The teams keep track of how many goals they havescored and after a set time limit the team with themost wins.Variations: Call more than one number; start calling two numbers, then three numbers!Players on the side can receive a pass then passback to their players but they can not score.More Experienced?Can you trap/pass on the reversestick? Increase passing distanceto 5-7 yards and then 7-10 yards Different styles of dribbling Spin around cones, lift, pull right or left Make farm animal noises at each cone, name adifferent fruit at each cone When teacher counts down to ZERO, whoeverhasn’t reached their cone owesteacher an imaginary dollar. Focus on vision and keepingpersonal space for safety.CLEAN-UP & REVIEWGet the kids excited for the next session!Total Session Time 60 minutesSESSION 219
WARM-UPACTIONS:Foxes & Rabbits GameDescription:Drags Left & Right Spins Little LiftsOne player is the FOX!Set up 1 - 3 cone drill for every 3 peopleMake a circle with 2 entrancesIn groups of 31 Drags LEFT AND RIGHT - Cone work - Drag rightor left - Continuous exercise 3-5 Minutes2 SPINS - Spin around cones - Left and rightSTOP. Show how to combine - Walk slowly topractice, then let them try it.Teaching Reminders« Bend your legs« See if you can see the next cone beforeyou get there”« They can use the reverse stick to slow the balldown, similar to “red-light, green-light”(how to stop)GAME3 v 3 (same teams, up to you)SIZE: 1/2 of a basketball court or 15 x 15Progression: 2 Passes 1 Point Dribble over end-line under control Always attacking the same goal! NO HACKING Encourage use of jab & shave / take-away tackleMatch 1Players score goals by running across their endline while controlling the ballMatch 2Players score goals by making 2 passes.Advance level — 3-4 passes for a pointAll players mustmove in counter-clockwisedirection around the circle dribbling their ball.All players can pass through the ‘free zone or tunnel’ and be safe – the fox can only go around theoutside of the circle in ‘either’ direction.The fox must tackle the rabbits (under control)and once tackled (and ball pushed out of area), therabbits go and stand in the cage.Give the fox 30 seconds-one minute to catch asmany rabbits as they can.The winner is the fox who catches the most rabbitsin the time frame decided.CLEAN-UP & REVIEWVariation: Have two foxes chasing the rabbits.If a fox tackles a player, make the player tackledthe ‘fox’.Get the kids excited for the next session!Total Session Time 60 minutesSESSION 320
WARM-UPGAME4 v 4 4 Goal GameFun Air Dribbling20 x 20 gridACTIONS4 v 4 Four Goal Game - Score through front or back of goalSet up 1 grid for every 4 players1 In 4’s grid - Knockout GameTeaching RemindersALL 4 WITH A BALL - Holding possession, dribblingand using Jab tackle - MUST keep control of your ball«NO HACKING«Encourage use of jab and shave / take-away tackle«Encourage them to keep the ball on the move, while looking to pass to a teammate.2 Sharks and Minnow’s Game Choose 1/4 without aball - One “Shark”, the other three are Minnow’s.CLEAN-UP & REVIEWGet the kids excited for the next session!Total Session Time 60 minutesSESSION 421
WARM-UPPull right / Dribbles in 3’s or 4’s - Shuttle lines - forehand dribble(change speed —walk to jog, walk to sprint), Pull right / left, little lift into dribble, etcACTIONPassing in 3’s on the move1 Stationary2 Moving Triangle3 Monkey in the middleTeaching Reminders«Getting the players used tomoving after they pass.«When a player moves, make sure stickis on the ground when they ask for theball back, for example.GAMEThe Chess Game(Can have 7-10 players / team)Objective: Varying numbers, Attack team verses Defense team, where bothteams choose how many players to attack or defend, 1-5.1. Team A starts with the ball. They decide how many players they can send out(between 1-5). Team B Defense team does the same.Example: Team A sends 4 players out, Team B sends 3 players to defend andtry to get the ball from Team A. (Coach makes sure both teams are ready to play.On the whistle, 1 player on Team A has a ball and starts to dribble or pass to ateammate). They play out the 4 v 3! Coach decides on fouls, goals. If Team B comesup with the ball, they can attack the goal, BUT, because they are down numbers, itmay not be wise to do this! Explain this. Teach them how to strategize.*After a goal, Team A gets the ball, BUT, must choosea different # of players to send out Can not repeat!CLEAN-UP & REVIEWGet the excited for the next session!Total Session Time 60 minutesSESSION 522
WARM-UP1. Aerial dribbling practice2. Aerial dribbling contest – Last threestanding win a prize. Champion getsone arm lifted over-head by coach!GAME Peaches & PeanutsACTIONPattern To Goal (end with shot)Set up multiple example patterns 3-4 kidsper exercise You can choose any pattern that willwork in the game You can park yourself in the circle and be a‘passive’ defender to show the forward howto move around the defense.GAME6v6(OR less numbers depending on your group)Show them set-up - Explain positionsOkay to switch positions with a teammateAvoid crowding into one anotherNo swinging the sticks. Remind them of how to usefootwork and stick to defend. 2 strikers/forwards,1 center midfielder, 2 backs — Encourage them tointerchange and make sure there is balance. Indoor basketball gym size playing area ACTIONSDivide players into 2 teams; Peanuts and Peachesline up on the centre line in the middle of a 20 yardsquared area.When the Coach calls “Peaches” they dribble theirball to their safety line, the Peanuts chase themand look to tackle cleanly before the player reachesthe safety area.If a player is tackled, they join the other team. Thegame is over when one group has caught all theother team.Variations:The coach can trick the players by saying otherP words to get a false start, or by saying PEA tokeep teams in anticipation for a few secondsCLEAN-UP & REVIEWOnce a player is tackled, they could become a‘floating tackler’ on either side of the centre lineGet the kids excited for the next session!Total Session Time 60 minutesSESSION 623
All Small Games Day Have FunWARM-UPGAMEACTIONUse the existing lines of a tennis or basketballcourt to play 3 v 3
The 6v6 Game The rules are in place to keep the session SAFE! If in doubt blow the whistle. On the flip-side, be aware not to over-use the whistle early on with excessive calls. Find the balance of stopping the play to explain and keeping the game fun and flowing. Field Hockey is a non-contact, finesse and technical sport. BASIC FOULS