Transcription
ALEXA & AMIRADailies using Resolve 15.2W O R K F L O WDate: 16 November 2018G U I D E L I N E
Version HistoryVersionAuthorChange Note2010-12-15MartinFirst document2012 03 03MartinUpdate for Resolve 8.2 and ALEXA SUP 6.0/DNxHD2012 09 28MartinUpdated for Resolve 92014 02 04MartinUpdated for Resolve 102016 06 08HeugelUpdate for Resolve 12.52018 11 16HübschUpdate for Resolve 15.2Table of ContentsVersion History . 2Table of Contents. 2Introduction . 2Workflow Overview . 3Graph . 3The ALEXA Reel-Name . 4Naming convention . 4Reel-Name. 4Applying 3D-LUTs to your timeline . 5Rendering your footage for editing. 7Resizing 2k ProRes files for a DCP finish . 8Re-format 2K 16:9 to 1.85:1 US Widescreen DCP (cropped) . 8Re-format 2K 16:9 (flat) to DCP 2.39 Widescreen . 9Creating EDLs to conform original footage . 12AVID Media Composer 5.0 or higher. 12Final Cut Pro X . 14Final Cut Pro 7 . 15Contact . 15IntroductionShooting QuickTime/ProRes or ARRIRAW files with the ARRI ALEXA or AMIRA camera usually requiresdailies processed in REC 709 video color space. Blackmagic’s Resolve for Mac can be an easy and fastsolution to create color corrected or just delogged dailies. The available workflows include the possibility touse 3D-LUTs on all shots or different LUTs on single shots, primary grading with the possibility to export aCDL plus a full DI secondary grading environment.Error! Use the Home tab to apply Titel to the text that you want to appear here. – Workflow GuidelinePage 2 of 16
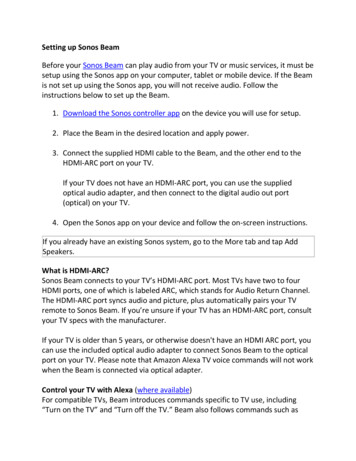
A basic knowledge and understanding of the software DaVinci Resolve is a must for the described workflowbelow. If you have never used Resolve before, please refer to the “Getting Started” section of the DaVinciResolve Manual.Workflow OverviewGraphError! Use the Home tab to apply Titel to the text that you want to appear here. – Workflow GuidelinePage 3 of 16
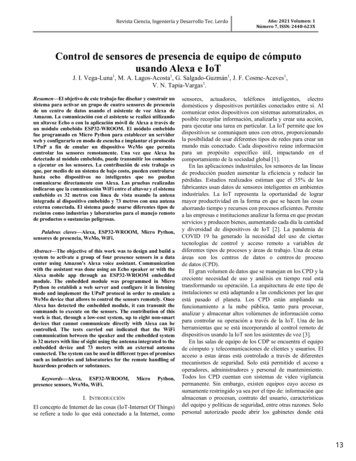
The ALEXA Reel-NameNaming conventionThe ALEXA camera records both ProRes and DNxHD files in the following naming-convention:A001C003 160611 R1K4– filenameA001C003 160611 R1K4- camera index/unitA001C003 160611 R1K4- reel counterA001C003 160611 R1K4- clip indexA001C003 160611 R1K4- clip counterA001C003 160611 R1K4- shooting date yymmddA001C003 160611 R1K4- eye index (L or R)A001C003 160611 R1K4- unique camera IDReel-NameThe file header holds the „Reel-Name“ of each shot. For our example file mentioned above this would be:A001R1K4– Reel-NameThe “Reel-Name” is generated from the camera index, reel counter and camera ID. To keep the “ReelName” in any render generated from Resolve we need to tell Resolve where to find the “Reel-Name”.Go to the Project Settings, choose General Options from the list on the left and activate the following optionin the Conform Options: Assist using reel numbers from the: Embedding in source clip fileError! Use the Home tab to apply Titel to the text that you want to appear here. – Workflow GuidelinePage 4 of 16
After this option has been selected, all camera original files (ARRIRAW, ProRes or DNxHD) will import withthe correct “Reel-Name”.Applying 3D-LUTs to your timelineTo convert all your shots from Log C to Video color space you need to apply a 3D-LUT. DaVinci Resolve 9and above already ship with the standard ALEXA Rec709 LUT named “Arri Alexa LogC to Rec709”. For allother LUTs regarding the ALEXA, ALEXA XT/SXT, AMIRA or ALEXA Mini camera, please go to our onlineLUT Generator using the following link:http://www.arri.com/camera/alexa/tools/lut generator/Note: We’re always working on improvements on all fields, so make sure you check for new changes in colorscience on our website (sub page of the respective camera).Please download 3D-LUTs in the „DaVinci Resolve“ format.While ARRIRAW, ProRes and DNxHD are legal range encoded, the LUTs are applied to RGB images in thesoftware and these are full range. So please download LUTs as following for Log C to Rec709 conversion:Source: Log C - Full RangeDestination: Video - Full RangeColorSpace – Rec 709Scaling – Photometric VideoThis will result in a 3D-LUT named:ALEXA K1S1 LogC2Video Rec709 EE davinci3d.cubePlace the LUT in Resolves LUT folder:/Library/Application Support/Blackmagic Design/DaVinci Resolve/LUT/ArriError! Use the Home tab to apply Titel to the text that you want to appear here. – Workflow GuidelinePage 5 of 16
To activate newly imported LUTs go to the Color Management page in your Project Settings and press theUpdate Lists button.If you want to grade your dailies in LogC color space you should load the LUT in the 3D Video MonitorLookup Table section. This will first apply your grading to the image and second the 3D-LUT.If you prefer to grade in video color space use the LUT in 3D Input Lookup Table. This will first apply the 3DLUT to your image and second your grading.Error! Use the Home tab to apply Titel to the text that you want to appear here. – Workflow GuidelinePage 6 of 16
Rendering your footage for editingOpen the DELIVER page and activate the following options:First, please choose your rendering format. A good balance between file size and image quality for editing isProRes LT for Final Cut Pro or DNxHD 36 for AVID Media Composer, which gives you very small files in fullHD resolution. Later in the project you can relink or conform to the original camera files and get the bestpossible image quality for grading.Next activate the following settings:Render as: Individual clipsFilename uses: Source NameThis will keep the naming of your render files consistent to the original files and will render each Reel into aseparate directory.Error! Use the Home tab to apply Titel to the text that you want to appear here. – Workflow GuidelinePage 7 of 16
If you are pursuing a complex workflow the option to Place clips in separate folders, might be handy:“[.] when the filenames of clips coming from the same source media file may cause them to overwrite oneanother. This option is also commonly used when rendering VFX shots for additional postproduction work,allowing the VFX department to identify clips quickly and distribute the work accordingly.“ (BlackmagicResolve 15.2 Manual, p. 2523).Resizing 2k ProRes files for a DCP finishRe-format 2K 16:9 to 1.85:1 US Widescreen DCP (cropped)Create a new timeline with a frame size of 1998 x 1080 pixels using the “2k DCI Flat 1.85” preset option. Onthe Image Scaling settings page, make sure that the Input Scaling Preset is set to Center crop with noresizing.All clips added to the sequence will automatically be center-cropped to the 1.85:1 aspect ratio with thecorrect field of view. The individual clips can be re-framed by moving them within the sequence frame.Error! Use the Home tab to apply Titel to the text that you want to appear here. – Workflow GuidelinePage 8 of 16
Re-format 2K 16:9 (flat) to DCP 2.39 WidescreenCreate a new timeline with a frame size of 2048 x 858 pixels using the “2K DCI Scope 2.39” preset option.On the Image Scaling settings page, make sure that the Input Scaling Preset is set to Center crop with noresizing (as above).All clips added to the sequence will automatically be center-cropped to the 2.39:1 aspect ratio with thecorrect field of view. The individual clips can be re-framed by moving them within the sequence frame.Re-format 2K 4:3 anamorphic to DCP 2.39 WidescreenCreate a new timeline with a frame size of 2048 x 858 pixels using the “2K DCI Scope 2.39” preset option.On the Image Scaling settings page, make sure that the Input Scaling Preset is set to Scale full frame withcrop.Set all imported clips to have a Cinemascope Pixel Aspect Ratio by right clicking on the selected media filesand choosing the clip attributes option and setting the appropriate option in the Video options page.All clips added to the sequence will automatically be center-cropped to the 2.39:1 aspect ratio with thecorrect field of view with more image content left and right. The individual clips can be re-framed by movingthem within the sequence frame.Error! Use the Home tab to apply Titel to the text that you want to appear here. – Workflow GuidelinePage 9 of 16
Re-format 2K 4:3 anamorphic for HD 2.39 Widescreen dailiesCreate a new timeline with a custom frame size of 1920 x 804 pixels.On the Image Scaling settings page set the following options:Set the Input Scaling Preset to Scale full frame with crop.Set the Output Scaling Preset to HD with 1920x1080 pixels by unchecking the Match Timeline settingsoption and choosing the HD preset option and setting the Center crop with no resizing option.Error! Use the Home tab to apply Titel to the text that you want to appear here. – Workflow GuidelinePage 10 of 16
Set all imported clips to have a Cinemascope Pixel Aspect Ratio by right clicking on the selected media filesand choosing the clip attributes option and setting the appropriate option in the Video options page.All clips added to the sequence will automatically be center-cropped to the 2.39:1 aspect ratio within the HDimage with more image content left and right and letterboxes top and bottom. The individual clips can be reframed by moving them within the sequence frame.Error! Use the Home tab to apply Titel to the text that you want to appear here. – Workflow GuidelinePage 11 of 16
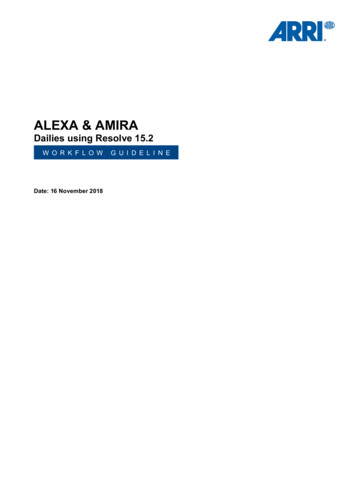
Creating EDLs to conform original footageWith Resolve you can conform Final Cut Pro XML or AVID AAF files. Most often EDLs are still used in anoffline/online workflow. Therefore we provide all necessary information regarding ALEXA files in this section.For conforming Final Cut Pro XML and AVID AAF please refer to the Resolve User Guide.AVID Media Composer 5.0 or higherEditing ProRes/DNxHD files in Avid Media Composer differs from editing in Final Cut Pro in terms ofQuicktime Header metadata. The “Reel-Name” is not imported from the ProRes/DNxHD files using AMA, butcan be easily added into any EDL using the method below:Open your sequences in the AVID EDL Manager (version 27.0.3.1 and higher) and use followingconfiguration in the options menu.EDL Type: CMX 3600In Master List menu Reel ID Type: Tape or File NameIn Options menu Tape name truncation: Remove MiddleIn Comment menu choose: Source File (original file name)Example:001A001R1K4 V* FROM CLIP NAME:C01:00:18:00 01:00:18:05 01:00:00:00 01:00:00:05SHOT 003* SOURCE FILE: A001C003 101111 R1K4The EDL example includes all necessary metadata of the original ProRes/DNxHD file to conform by:Tape NameSource Time CodeOriginal File NameError! Use the Home tab to apply Titel to the text that you want to appear here. – Workflow GuidelinePage 12 of 16
Error! Use the Home tab to apply Titel to the text that you want to appear here. – Workflow GuidelinePage 13 of 16
Final Cut Pro XExchanging Information between Final Cut and Resolve is an easy process. To export an XML (or * .fcpxml)with Resolve activate the timeline (CMD 2) and choose File Export XML.Error! Use the Home tab to apply Titel to the text that you want to appear here. – Workflow GuidelinePage 14 of 16
Final Cut Pro 7To export an EDL from your sequence in Final Cut Pro, please choose the Menu Item File Export EDL. Inthe dialog choose the following options:Example:TITLE: CUT01FCM: NON-DROP FRAME001 A001R1K4 VC01:00:18:00 01:00:18:05 01:00:00:00 01:00:00:05* FROM CLIP NAME: A001C003 101111 R1K4The EDL example includes all necessary metadata of the original ProRes/DNxHD file to conform by:Tape NameSource Time CodeOriginal File NameContactError! Use the Home tab to apply Titel to the text that you want to appear here. – Workflow GuidelinePage 15 of 16
In case you have questions or recommendations, please contact our Workflow Group via email at:digitalworkflow@arri.de.Error! Use the Home tab to apply Titel to the text that you want to appear here. – Workflow GuidelinePage 16 of 16
DaVinci Resolve 9 and above already ship with the standard ALEXA Rec709 LUT named "Arri Alexa LogC to Rec709". For all other LUTs regarding the ALEXA, ALEXA XT/SXT, AMIRA or ALEXA Mini camera, please go to our online . Resolve 15.2 Manual, p. 2523). Resizing 2k ProRes files for a DCP finish Re-format 2K 16:9 to 1.85:1 US Widescreen DCP .