Transcription
WORKING WITH P6 PROFESSIONAL15.1Adam Baker & Dan BeckMay 27, 2015DRM May 2015 Technical Webinar1
Thank you for joining today’s technicalwebinar Mute – all call in phones are automatically muted in order to preservethe quality of the audio for all attendees. Questions – during the session, questions can be submitted through theQuestions Box on the right side of the screen . We will try to addressyour questions at the end of the presentation, time permitting. Follow up – all registrants will receive an Excel file listing all questionsand responses along with a link to the recorded webinar.2
Safe Harbor The statements made in this technical presentation are based onour current knowledge of the tools. Our statements should not be construed to be an official “Oracleperspective”, but are intended to be the sharing of technical anduser knowledge gained as we explore new paths andtechnologies, usually in advance of our clients. Our statements should not be construed as in conflict with anyOracle statement, as the Oracle statement is likely made basedon more current knowledge than is available to us.3
Oracle Primavera Software,Authorized Reseller Oracle Primavera CertifiedImplementation Specialists Project Staffing and SupportResources Web Services Integration,Analytics and Dashboard Utilities Program ManagementInformation Systems – TurnkeyDeployments Global, dedicated environmenthosting servicesPrimavera OPPM, P6 EPPM, P6Pro, Primavera Unifier, ContractManagement, BI Publisher,UCM/Sharepoint, P6 Risk,AutoVue and AnalyticsHard Dollar, HCSS, AcumenFuse, Ecosys, Prism G2, US Cost,Microsoft Global Data Centers in USA,London, Singapore and Brisbane4
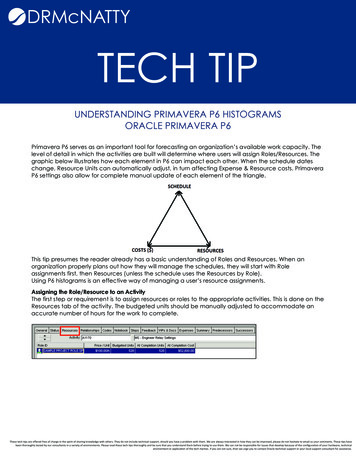
Agenda Downloading the Software from E-DeliveryWorking with DatabasesInstalling the SoftwareCreating a New Microsoft SQL DatabaseConnecting to a P6 DatabaseConnecting to an EPPM Database using Oracle Cloud ConnectUpcoming EventsQuestions5
Change in how version numbers are assigned6
Downloading the Software https://edelivery.oracle.com/7
Downloading the Software Sign in or Register for an Oracle Account8
Downloading the Software Agree to Terms &Conditions Accept Export Restrictions Click “Continue” 9
Downloading the Software Select a Product Pack –“Primavera Applications” Choose Platform –“Microsoft Windows x64(64-bit) Click “Go”10
Downloading the Software Select “Primavera P6Professional ProjectManagement 15.1”11
Downloading the Software For Local Installs: Documentation Database Setup Applications12
Downloading the SoftwareSave the Zip Files to your Downloads Folder(Here’s what’s in the Zip files )13
Working with Databases Decision time Do you want to run a single database? Do you need to run multiple local databases? Do you have local MS SQL databases to be upgraded? Do you have local IT support? Create an initial MS SQL Express database Do the Client Installation using MS SQL Express DB Do you want to be able to run local and connect to an EPPM(web) DB? You can connect to an EPPM Database using Oracle CloudConnect14
Working with Databases Supported local databases– Oracle SQLite– Oracle Express (P6 8.2, 8.3, 8.4). If you have previous version itwill run with 15.1– MS SQL Express (2005, 2008, 2012) Supported group (server) databases– Oracle 11, 12– MS SQL 2005, 2008, 2012 P6 Pro can also connect to P6 EPPM databases– Direct connection across a LAN or WAN– P6 Professional Cloud Connect15
Databases Support by P6 Professional 15.1Cloud ConnectOracleMS SQLEPPM Direct connect to EPPM- Administration and Global data removed for P6 Pro- Latency increases as users increaseCompressionServer Free Full function of P6 Pro- Can be difficult to install- Single eOracleSQLite Full function of P6 Professional Free Multiple databases- Manual, complex installation- Manually configure “Alias’s” Free Easy installation Multiple databases Share db: copy from Documents folder- No ClaimDigger*- No Check-In/Check-out*- No XML import*- No Update Baseline*- No Administration for multiple users* Additional functionality expected to bere-added through Service Packs.MS SQLExpressMS SQLExpress16
Working with MS-SQL DatabasesFive distinct steps are requiredDownloadMS-SQLInstall MSSQLConfigureMS-SQLCreate P6databaseConfigureP6 AliasP617
Installing the Software Open the Downloads Folders on yourcomputer, from the Files that weredownloaded from Oracle E-Delivery.Double Click “Setup” and click Run Click through various system and Javainstallation dialogs to get to the P6 Setup18
Installing the Software– Advanced – Do not go here unlessyou know why you might want theschema and administrativefunctionality on a local machine[Select Typical and Click Next] Choose Setup Type– Typical - This option is to install orupgrade only the P6 Professionalapplication for use with an existingEPPM or Professional Database. TheP6 Professional Standalone Databaseis included. Any existing standalonedatabase will be upgraded to the latestversion19
Installing the Software The Setup Wizard will now Install the Software Click Install20
Installing the Software Database Configuration and Complete Setup WizardClick Finish21
Setting up Databases Steps of Setting up a New Database1. You should have unzipped the P6 Pro download into folders onto your Hard Drive orServer.2. Go to folder Downloads\P6 R151 Database and look for the Command File“dbsetup”. Double Click this file to start the process of setting up a Database.22
Create a new MS-SQL Database1. Select “Install a new database2. Select Microsoft SQL Server3. The default SQL database administratorUser Name should be “sa”4. You will need to know the Password andthe name of the SQL database or just use“localhost”.5. Leave the port defaulted to “1433” andthen type in your database name.23
Create a new MS-SQL Database – Cont.6. Enter the name for the new Database PMDB Sample7.8.Leave the Database code page set atDefault (resist the temptation to selectLatin, Chinese, Russian or Japanese)Click “Next” to continue9. Use the Primavera default “privuser”password, under Privileged User or canuse “pubuser” under the Public User.(Which one that you choose to use willdictate which username and password willbe used when creating the alias24
Create a new MS-SQL Database – Cont.10. Enter a password (admin) for theAdministrative User Name11. Uncheck the Checkbox for “Sample Data”if you are creating a fresh database NOTE: If you decide to load sample data,it can take an additional 30-45 minutesfor the data to load12. Click “Install” to create the database NOTE: If the project is not tracked in USDollars, make sure to select theappropriate currency13. The Setup Wizard will now create thedatabase25
Create a new MS-SQL Database – Cont.14. The Setup Wizard has now completedcreation of the database. If all have greencheck marks next to them, it wassuccessful in creation NOTE: This process may takeseveral minutes or more dependingon the computer that it is beingloaded onto.15. Click “Next” to continue16. Click “Next” to repeat the process tocreate an additional database, or click“Finish” if you are complete with theinstallation26
Connecting to a P6 Database1.Click on the P6 Professional R15.1 Iconto open P62.Click on the box to the right of theDatabase field3.Click the “Configure” button to configurecurrent database (PMDB) NOTE: Click the “Add” button tocreate a new Database Alias(PMDB Sample)27
Connecting to a P6 Database – Cont.4.Enter a name for the Database Alias Example: PMDB Sample5.Select your Driver type, in this case“Microsoft SQL Server/SQL Express”6.Enter “localhost” for the default HostName7.Enter the Database Name PMDB Sample28
Connecting to a P6 Database – Cont.8.If you selected “privuser” when creatingthe database, use that for the Usernameand Password. If you used “pubuser”when creating the database, then use“pubuser” for the Username andPassword.9.Click “Next”10. Click “Next” again on the ValidateDatabase Connection Screen This will validate the setting for thedatabase alias29
Connecting to a P6 Database – Cont.8.Click “Finish” to complete Setup9.Your new database will now be listed forselection when logging into P6 Pro R15.130
Connecting to a P6 Database – Cont.10. You are now ready to Log In and use P6Professional R15.131
Connecting to an EPPM Database usingOracle Cloud Connect32
Create a new EPPM Database for Cloud Connect1. Select “Install a new database2. Select Oracle. Cloud Connect is not compatiblewith SQL or SQL Lite3. The default Oracle database administratorUser Name should be “system”4. You will need to know the Password andthe name of the Oracle database.5. Leave the port defaulted to “1521” andthen type in your database name.33
Create a new EPPM Database for Cloud Connect– Cont.6. Configure Oracle Tablespaces. TheTablespaces shown are the defaults forcreating a new EPPM Database7.Specify Oracle Tablespace Locations.The Tablespace Locations shown arethe defaults for creating a new EPPMDatabase8.Click “Next” to continue34
Create a new EPPM Database for Cloud Connect– Cont.9. The Database Setup Wizard will nowcreate all of the Tablespaces for the newEPPM Database10. Next you will establish the Oracle Users,these are the administrative usernamesnot production usernames. You cancreate unique user names and passwordshere.35
Create a new EPPM Database for Cloud Connect– Cont.11. Uncheck the Checkbox for “Sample Data”if you are creating a fresh database NOTE: If you decide to load sample data,it can take an additional 30-45 minutesfor the data to load12. In this screen you will establish yourAdministrative username and passwordyou can establish a unique username andpassword here.13. The Setup Wizard has now completedcreation of the database. NOTE: This process may takeseveral minutes or moredepending on the computer that itis being loaded onto.14. Click “Finish” to complete the EPPMDatabase setup.36
Connecting to a Cloud Connect Database1.Click on the P6 Professional R15.1 Iconto open P62.Click on the box to the right of theDatabase field3.Click the “Add” button to create a newDatabase Alias for P6 Cloud Connect37
Connecting to a Cloud Connect Database– Cont.4.Enter a name for the Database Alias Example: PMDB Cloud5.Select your Driver type, in this case“P6 Pro Cloud Connect”6.Enter the Database Name Example: PMDB DemoEnter the URL for the EPPM Database m/p6procloudconnect38
Connecting to a Cloud ConnectDatabase– Cont.8.If you entered everything correctly theconnection will be successful and you cannow use the P6 Cloud Connect Database39
Upcoming Webinars June 17, 2015 10:00am PacificWORKING WITH DATABASES IN P6 PROFESSIONAL 15.1 Abstract:As with the release of P6 8.4, release 15.1 sets SQLite as the defaultlocal database. SQLite has some limitations with P6 Pro. We'vealways been fans of using MS SQL Express for local installs forflexibility. MS SQL Express is free and supports multiple databases onlocal installations with no sacrifice in functionality.We will review the installation choices for working with bothdatabases choices and provide a downloadable tech tip on how toinstall MS SQL Express on your local computer. Presenter:Adam Baker Registration 916956004987571440
Questions All questions are gathered into a master sheet,answered and distributed to all registrants as wellas posted on our website. Answers are based on our own experiences usingthe various software products covered in thiswebinarThank you for participatingAdam Baker - abaker@drmcnatty.comDan Beck – dbeck@drmcnatty.com41
Upcoming Events42
DRMcNatty Monthly e-newsletterGet updates on the latest news,events and upcoming webinars.Sign up for our newsletter on our websitewww.drmcnatty.com/news43
WORKING WITH DATABASES IN P6 PROFESSIONAL 15.1 Abstract: As with the release of P6 8.4, release 15.1 sets SQLite as the default local database. SQLite has some limitations with P6 Pro. We've always been fans of using MS SQL Express for local installs for flexibility. MS SQL Express is free and supports multiple databases on