Transcription
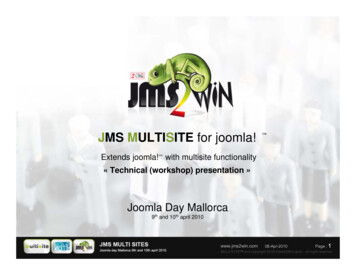
Joomla! User GuideModule 1 Introduction to Joomla!Beginners GuideJoomla! User GuideDraft Version 0.1. August 2008Module 1 – Introduction to Joomla!Program IT (UK) Ltd Copyright 20081
Table of ContentsTable of Contents.21 Module 1 Introduction to Joomla! .31.1 Module Objectives.31.2 Joomla! – First Time User .41.2.1 Logging on to the Administrator section .41.2.2 Viewing the Control Panel .51.2.3 Viewing the Menu Bar .61.2.4 Viewing the Layout .91.2.5 Selecting your Template.121.3 Adding Content to your web site.191.3.1. Creating an Article.191.3.2. Adding a Menu item and linking to an Article.241.3.3. Adding an Image to an Article .311.3.4. Editing the Article Parameters .341.3.5. Adding a Top Menu using a Module.381.3.6 Creating Sections and Categories.43Joomla! User GuideDraft Version 0.1. August 2008Module 1 – Introduction to Joomla!Program IT (UK) Ltd Copyright 20082
1 Module 1 Introduction to Joomla!1.1 Module ObjectivesBy the end of this module you will be able to:§#Manual ConventionsThe types of formatting have been kept to a minimum in this manual but thereare some conventions you should be aware of:ConventionThe Edit buttonThe Task Group drop down listSelect the Add new business unitdependency buttonType Help Menu in the Title fieldJoomla! User GuideDraft Version 0.1. August 2008DescriptionAny reference to a button on Joomla!will be displayed in bold font type andenclosed in chevronsAny reference to the name of anobject on Joomla! such as a text fieldor drop down list will be displayed inbold font typeAny action that requires the user touse their mouse or keyboard will bedisplayed in bold light blue font typeAny text that needs to be input by theuser will be displayed in bold italicfont typeModule 1 – Introduction to Joomla!Program IT (UK) Ltd Copyright 20083
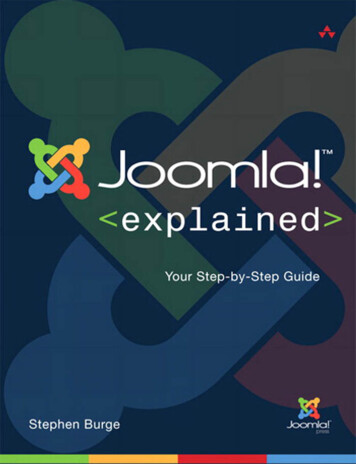
1.2 Joomla! – First Time UserHaving installed Joomla! the first thing you will want to do is login to theAdministrator area so that you can set up your content, images etc.1.2.1 Logging on to the Administrator sectionNavigate to your website where Joomla! has been installed. The websiteaddress might be: e Administration Login page will display. (If you are experiencingdifficulties in finding the administrator page contact your support)Type your Username and Password in the Username and Password fields.(These details will have been given to you by your support team) (Figure A).Figure AClick the Login button.Joomla! User GuideDraft Version 0.1. August 2008Module 1 – Introduction to Joomla!Program IT (UK) Ltd Copyright 20084
1.2.2 Viewing the Control PanelThe main Control Panel page will display (Figure B).Figure BThere are a number of options available to you on this page depending onyour level of access. Below is the list that a Super Admin would see withManagers and Admins having access to fewer options:··········Add New ArticleArticle ManagerFront Page ManagerSection ManagerCategory ManagerMedia ManagerMenu ManagerLanguage ManagerUser ManagerGlobal ConfigurationJoomla! User GuideDraft Version 0.1. August 2008Module 1 – Introduction to Joomla!Program IT (UK) Ltd Copyright 20085
1.2.3 Viewing the Menu BarThere is also a Menu Bar displayed along the top of the Control Panel page(Figure C).Figure CThis consists of:·Site Menu (Figure D)Figure DContains Menu options to the Control Panel, User Manager, MediaManager, Global Configuration and Logout pages·Menus Menu (Figure E)Figure EContains Menu options to the Menu Manager, Menu Trash andNavigation optionJoomla! User GuideDraft Version 0.1. August 2008Module 1 – Introduction to Joomla!Program IT (UK) Ltd Copyright 20086
·Content Menu (Figure F)Figure FContains Menu options to the Article Manager, Article Trash,Section Manager, Category Manager, Front Page Manager·Components Menu (Figure G)Figure GContains Menu options to the Banner, Contacts, News Feeds, Polls,Search, Web Links·Extensions Menu (Figure H)Figure H·Contains Menu options to the Install/Uninstall, Module Manager,Plugin Manager, Template Manager, Language ManagerJoomla! User GuideDraft Version 0.1. August 2008Module 1 – Introduction to Joomla!Program IT (UK) Ltd Copyright 20087
·Tools Menu (Figure I)Figure IContains Menu options to the Read Messages, Write Messages,Mass Mail, Global Check in, Clean Cache·Help Menu (Figure j)Figure JContains Menu options to the Joomla! Help, System Info···Preview HyperlinkUsers Logged in HyperlinkLogout HyperlinkNoteA description of each option will be described as we work our way through themodules.Joomla! User GuideDraft Version 0.1. August 2008Module 1 – Introduction to Joomla!Program IT (UK) Ltd Copyright 20088
1.2.4 Viewing the LayoutJoomla! uses terms such as Modules and Positions for describing thelayout. All Joomla! websites have Modules which can be thought of ascontainers that hold content. The Positions are where the content appears onthe website.Click Extensions Menu optionThe Extensions Menu will displayClick Template Manager (Figure K)Figure KThe Template Manager page will display (Figure L)Figure LThis page displays what templates you have installed that you can choosefrom. You will notice that there will be a small star displayed next to thetemplate you are currently using (Figure L)Joomla! User GuideDraft Version 0.1. August 2008Module 1 – Introduction to Joomla!Program IT (UK) Ltd Copyright 20089
Figure MClick the Template name. (This is a hyperlink)The Template Edit page will display (Figure N)Figure NJoomla! User GuideDraft Version 0.1. August 2008Module 1 – Introduction to Joomla!Program IT (UK) Ltd Copyright 200810
Click the Preview icon displayed at the top of the page (Figure O)Figure OThe Template Manager page will display (Figure P)Figure OYou will see your web site page with Positions that are named.NoteThis may be a good time to note down the Positions so that you know whereyou are going to put your content and imagesJoomla! User GuideDraft Version 0.1. August 2008Module 1 – Introduction to Joomla!Program IT (UK) Ltd Copyright 200811
1.2.5 Selecting your TemplateNow that you have logged on and had a few moments to look around at thefunctionality of Joomla!, you can now start to set up your web site. The firstthing to do is to make sure you have the correct template selected and thatyou are happy with the template settings.Click Extensions Menu optionThe Extensions Menu will displayClick Template Manager (Figure P)Figure PThe Template Manager page will display (Figure Q)Figure QThe Template Manager page displays a list of templates that you haveinstalled. There is a default star displayed next to the template you arecurrently using.Joomla! User GuideDraft Version 0.1. August 2008Module 1 – Introduction to Joomla!Program IT (UK) Ltd Copyright 200812
To view the design of each template position your mouse over the name ofeach template (Figure R).Figure RYou will notice that a small pop up window will display showing the templatedesign and the different colour palettes that are available.To select another template to use click the Template Name radio button nextto the template name (Figure S).Figure SClick the Default icon at the top of your screen (Figure S).You will notice that the Default icon will now be displayed next to the newtemplate.Joomla! User GuideDraft Version 0.1. August 2008Module 1 – Introduction to Joomla!Program IT (UK) Ltd Copyright 200813
You can now change the settings of the template to suit your design.Click the Template name.The Template Edit page will display.Figure TThe Template Edit page allows you to change some of the parameters suchas the template font size, the template width and styles.For this example we are going to change the way that the web page width isdisplayed and select a template style.Joomla! User GuideDraft Version 0.1. August 2008Module 1 – Introduction to Joomla!Program IT (UK) Ltd Copyright 200814
Select the Template Width drop down box (Figure U).Figure UJoomla! User GuideDraft Version 0.1. August 2008Module 1 – Introduction to Joomla!Program IT (UK) Ltd Copyright 200815
A number of options will display:·Auto Fluid: When selecting this option you will notice that when youresize your browser window, your website will automatically resize itselfwithin the window·Narrow Screen: When selecting this option you will notice that yourwebsite content will be arranged in the middle of the browser window·Wide Screen: When selecting this option you will notice that yourwebsite content will be arranged across the screen similar to watchinga wide screen TV·Specified in Percentage (Fluid Screen) : When selecting this optionyou will notice that when you resize your browser window, your websitewill automatically resize itself within the window (similar to the auto fluidoption) but only to the specified number of pixels you type in theSpecified width field·Specified in Pixels: When selecting this option you will have to type avalue in the Specified width field to set the width of your websiteSelect the Auto Fluid option for this example so that your website content willresize to whatever your viewer has selected.Next, we are going to change the template style. Currently in this example Ihave the style set to blue with a lighter background theme and my primaryelements (my main text) set to black (Figure V).Figure VJoomla! User GuideDraft Version 0.1. August 2008Module 1 – Introduction to Joomla!Program IT (UK) Ltd Copyright 200816
Select the Header Themes drop down box (Figure W)Figure WA number of options will be displayed.Select which ever Header Theme you would like from the list of optionsSelect which ever Background Theme colour you would like from the list ofoptionsSelect which ever Primary Element you would like from the list of optionsJoomla! User GuideDraft Version 0.1. August 2008Module 1 – Introduction to Joomla!Program IT (UK) Ltd Copyright 200817
To view your changes click the Preview icon displayed at the top of yourscreen (Figure X).Figure XYour website will display with the new changes.If you are happy with the changes click the Save icon (Figure X)Joomla! User GuideDraft Version 0.1. August 2008Module 1 – Introduction to Joomla!Program IT (UK) Ltd Copyright 200818
1.3 Adding Content to your web siteContent can be added in a number of different ways depending on how bigyour site is going to be and how much content you wan to add.In the simplest form Joomla! accepts content known as articles which is idealfor static content. You add the content in a similar way to writing a MicrosoftWord document.For larger and more complicated sites, Joomla! organises content bySections which can contain one or more Categories very much like anewspaper. An example of a section could be sport with categories beinggolf, basketball and cricket in the sports section. You then add your articles toa Section and CategoryIn this example we are going to look at adding content in a simple way, so weare going to add a Front page article, an about us article and a contact usarticle and add this information to the website.1.3.1. Creating an ArticleClick the Content menuClick Article Manager from the Content menu option (Figure Y)Figure YJoomla! User GuideDraft Version 0.1. August 2008Module 1 – Introduction to Joomla!Program IT (UK) Ltd Copyright 200819
The Article Manager page will display (Figure Z)Figure ZClick the New icon displayed at the top of the browser windowThe Article New page will display (Figure AA)Figure AAJoomla! User GuideDraft Version 0.1. August 2008Module 1 – Introduction to Joomla!Program IT (UK) Ltd Copyright 200820
Before you begin adding your content you will need to give the Article a title(example: Welcome Front Page) (Figure AB).So that you will be able to view the content make sure that the Publishedradio button is selected to Yes.Figure ABThe Alias field (which is the internal name of the article) does not need to becompleted as Joomla! will complete this field for you.If you wish your article to be displayed on your front page then check that theFront Page radio button is selected to Yes.For this example we are going to leave the Section ‘uncategorized’ as ourcontent is static which will automatically make the Category ‘uncategorized’Joomla! User GuideDraft Version 0.1. August 2008Module 1 – Introduction to Joomla!Program IT (UK) Ltd Copyright 200821
Add your content in to the edit area of the Article (Figure AC)Figure ACFor each article, you can often just copy and paste the content from yourexisting web site (using your browser) or Microsoft Word document into theedit area.You can see that the toolbar in figure AC is not dissimilar to Microsoft Word sotext formatting is quite straightforwardNoteIn some cases, if you are copying from your existing website, depending onthe amount of custom HTML in the source page, you may need to copy thepage to a plain text editor first (such as Notepad) and then copy from thereinto Joomla!.Joomla! User GuideDraft Version 0.1. August 2008Module 1 – Introduction to Joomla!Program IT (UK) Ltd Copyright 200822
When you are happy with the content you can click the Save icon displayedat the top of your browser window (Figure AD)Figure ADIf you selected the Front Page radio button you can now click the Previewicon and see your content displayed on the Front Page (Figure AE)Figure AETo create further articles, repeat the process described remembering that ifyou don’t want the content to be displayed on the Front Page make sure thatyou select No using the Front Page radio buttonJoomla! User GuideDraft Version 0.1. August 2008Module 1 – Introduction to Joomla!Program IT (UK) Ltd Copyright 200823
1.3.2. Adding a Menu item and linking to an ArticleIn this section we are going to add a menu item to the left hand Main Menuand link it to one of our articles.We have already described how to create an article and for this example Ihave created an About Us article and I want to be able to link to it when Iclick About Us on the Main MenuFigure AFClick the Menu menu (Figure AF)Click Menu Manager from the Menu menu option (Figure AF)The Menu Manager page will display (Figure AG)Figure AGJoomla! User GuideDraft Version 0.1. August 2008Module 1 – Introduction to Joomla!Program IT (UK) Ltd Copyright 200824
Click Menu Item(s) next to the menu you wish to edit (Figure AH)Figure AHThe Menu item Manager page will display (Figure AF)Figure AIIn this example we only have one menu item displayed.Click the New icon displayed at the top of the browser window (Figure AI)Joomla! User GuideDraft Version 0.1. August 2008Module 1 – Introduction to Joomla!Program IT (UK) Ltd Copyright 200825
The Select Menu Item Type page will display where you can select whatcontent you want to display (Figure AJ).As we have created just an article we want to select Article LayoutFigure AJJoomla! User GuideDraft Version 0.1. August 2008Module 1 – Introduction to Joomla!Program IT (UK) Ltd Copyright 200826
The Article Layout page will display (Figure AK)Figure AKType a Title in the Title field and check that you have the Published radiobutton selected on YesYou now need to select the article that the menu is going to link toClick the Select button displayed at the right hand top corner of thebrowser window (Figure AK)Joomla! User GuideDraft Version 0.1. August 2008Module 1 – Introduction to Joomla!Program IT (UK) Ltd Copyright 200827
The Article Select pop up window will displayFigure ALSelect the Article in the Article Title column (Figure AL)The selected Article will be displayed in the Select Article fieldClick the Save icon displayed at the top of the Menu Item page (Figure AM)Figure AMJoomla! User GuideDraft Version 0.1. August 2008Module 1 – Introduction to Joomla!Program IT (UK) Ltd Copyright 200828
The Menu Item Manager page will display (Figure AN) with your new menuitem displayedFigure ANClick the Preview link (Figure AN) to display your web page with the newMenu item.Joomla! User GuideDraft Version 0.1. August 2008Module 1 – Introduction to Joomla!Program IT (UK) Ltd Copyright 200829
Your web page will display with the new Menu option where you can test tosee if by clicking it your About Us (for this example) page will be displayed(Figure AO)Figure AOJoomla! User GuideDraft Version 0.1. August 2008Module 1 – Introduction to Joomla!Program IT (UK) Ltd Copyright 200830
1.3.3. Adding an Image to an ArticleNow that we have created some articles and linked to them, I am going toshow you how to add an image to one of our articles.Click Content from the Menu Bar.Click Article Manager from the Content Menu option.The Article Manager page will displaySelect your article (for this example we are selecting the Front Page Article)The Article Edit page will display.At the bottom of the Edit screen there is an Image button (Figure AP).Figure APClick Image buttonJoomla! User GuideDraft Version 0.1. August 2008Module 1 – Introduction to Joomla!Program IT (UK) Ltd Copyright 200831
The Image Organiser pop up window will displayFigure AQYou can either select an image from the window or to upload your own imageclick the Browse buttonJoomla! User GuideDraft Version 0.1. August 2008Module 1 – Introduction to Joomla!Program IT (UK) Ltd Copyright 200832
Figure ARThe Choose File window will display where you can navigate to where youhave your images stored (Figure AR)Select your image and click the Open buttonYour image will then be displayed in the Image Organiser pop up window.Select your image and click the Insert button (Figure AS)Figure ASJoomla! User GuideDraft Version 0.1. August 2008Module 1 – Introduction to Joomla!Program IT (UK) Ltd Copyright 200833
Click the Save icon at the top of the Article Edit page.Click the Preview hyperlink at the top of the browser window.Your image will now display on the relevant article.1.3.4. Editing the Article ParametersYou may have noticed that having created your article and published it onyour website so that you can now see the content that there are some extrafunctions that you may not want.Figure ATLooking along the top of your content is an information banner (Figure AT)that displays the date of when the document was created, who created it andthree icons that allows your visitor to get a copy of this page as an AdobeAcrobat .pdf file, print this page and email a link to this page.You may also not want to display all of the content but instead have a ReadMore link.You can edit these functions so that they don’t display and a Read More linkwill be displayed automatically.Click Content from the Menu Bar.Click Article Manager from the Content Menu option.The Article Manager page will displaySelect your article (for this example we are selecting the Front Page Article)The Article Edit page will display.Joomla! User GuideDraft Version 0.1. August 2008Module 1 – Introduction to Joomla!Program IT (UK) Ltd Copyright 200834
To hide the functionality of the page such as who wrote the content etc youwill need to use the Parameters (Advanced) option.This is displayed on the left hand side of the Article Edit page. If the optionsare not displayed click the Parameters (Advanced) heading to display a listof options (Figure AU).Figure AUTo hide the options such as pdf icon, Print icon, E mail icon, title, AuthorName etc Select Hide from any of the drop down menus.Joomla! User GuideDraft Version 0.1. August 2008Module 1 – Introduction to Joomla!Program IT (UK) Ltd Copyright 200835
To create an automatic Read More link to your content position your mousecursor at the section of the page you want the link.Click the Read More button (Figure AV)Figure AVYou will notice that a red line will be displayed at the section of the page youwish to have a link to Read More.Click Save icon to save your changesClick Preview link at the top of the page to view your changesJoomla! User GuideDraft Version 0.1. August 2008Module 1 – Introduction to Joomla!Program IT (UK) Ltd Copyright 200836
Notice now that we no longer have the information displayed along the top ofthe page and we have a Read More link that when clicked will display the restof the content (Figure AW)Figure AWJoomla! User GuideDraft Version 0.1. August 2008Module 1 – Introduction to Joomla!Program IT (UK) Ltd Copyright 200837
1.3.5. Adding a Top Menu using a ModuleWe can now begin to add a further content to our page in other positions.In 1.2.4 Viewing the Layout section of this document we demonstrated howyou can view where the positions are on the page so that you can add contentto those positions (Figure AX).Figure AXFor this example we are going to add further menu options, but this time weare going to add it to the position along the top of the page called hornav.This module doesn’t come with any outline to it.Click Extensions menu options (Figure AY)Figure AYJoomla! User GuideDraft Version 0.1. August 2008Module 1 – Introduction to Joomla!Program IT (UK) Ltd Copyright 200838
Click Module Manager from the Extensions menu options (Figure AY)The Module Manager page will display (Figure AZ)Figure AZClick New icon (Figure AZ)Joomla! User GuideDraft Version 0.1. August 2008Module 1 – Introduction to Joomla!Program IT (UK) Ltd Copyright 200839
The Module New page will display (Figure BA).Figure BAThis page allows you to select from many different types of modules. For thisexample we want to create another menu.Select the Menu radio buttonNoteFor a detailed description of what each module does, click the Help icon atthe top of the browser (looks like a lifebuoy).Joomla! User GuideDraft Version 0.1. August 2008Module 1 – Introduction to Joomla!Program IT (UK) Ltd Copyright 200840
The Module Edit page will displayFigure BBType a title in the Title fieldCheck that the Module is enabled.To position the menu along the top of our web page select hornav from thePosition drop down listSelect your menu from the Menu Name drop down list in the ModuleParameters section of this page.NoteIf you had created another menu(s) then you could select from any in the listJoomla! User GuideDraft Version 0.1. August 2008Module 1 – Introduction to Joomla!Program IT (UK) Ltd Copyright 200841
Click Save icon and Preview your changes by clicking on the Preview link.Figure BCYou can see that we now have a menu bar along the top of the page (FigureBC)Joomla! User GuideDraft Version 0.1. August 2008Module 1 – Introduction to Joomla!Program IT (UK) Ltd Copyright 200842
1.3.6 Creating Sections and CategoriesWe have already looked at creating articles in an earlier chapter. Joomla!allows you to organise your content in Sections and Categories. For thisexample we are going to create a Medical Condition section and add Bloodtest and Back Pain categories to the Section.We are then going to add the Section/Categories/Articles to the SectionModule and display the module (which is a container for content etc) to theright hand side of our web page.Click the Content MenuFigure BDClick the Section Manager option (Figure BD)The Section Manager page will display (Figure BE)Figure BEClick the New icon (Figure BE)Joomla! User GuideDraft Version 0.1. August 2008Module 1 – Introduction to Joomla!Program IT (UK) Ltd Copyright 200843
The Section Manager New page will displayType a title in the Title fieldClick the Save iconYou have now created a Section where you can now add CategoriesClick the Content MenuClick the Category Manager option (Figure BF)Figure BFThe Category Manager page will display (Figure BG)Figure BGClick the New icon (Figure BG)The Category Manager New page will displayJoomla! User GuideDraft Version 0.1. August 2008Module 1 – Introduction to Joomla!Program IT (UK) Ltd Copyright 200844
Figure BHType a title in the Title fieldSelect the Section you wish to associate the Category to (In this exampleMedical Conditions)Click the Save iconYou have now created a CategoryRepeat the process so that you have a number of categories (In this examplewe are going to create a Back Pain CategoryWe can now create our articles to be associated with the CategoriesFollow the process in 1.3.1 Creating an Article ensuring that you select thecorrect Section (In this example) and the correct Category (We have createdBlood Tests and Back Pain categories)The article will then be associated to which ever category you choose (In thisexample we are going to create two articles – one on Blood Tests and one onBack Pain)We are now going to associate our Section/Categories to one of the modules(In this example the Sections Module)Joomla! User GuideDraft Version 0.1. August 2008Module 1 – Introduction to Joomla!Program IT (UK) Ltd Copyright 200845
Click Extensions menu options (Figure BI)Figure BIClick Module Manager from the Extensions menu options (Figure BI)The Module Manager page will displayClick New iconThe Module New page will displaySelect the Sections radio buttonThe Module Edit page will displayType a title in the Title field (In this example Medical Conditions)Check that the Module is enabled.To position the menu to the right of our web page select Right from thePosition drop down listClick Save icon and Preview your changes by clicking on the Preview linkJoomla! User GuideDraft Version 0.1. August 2008Module 1 – Introduction to Joomla!Program IT (UK) Ltd Copyright 200846
Figure BJYou will notice that we now have our Medical Conditions module displayeddown the right hand side of our web page.Within the Medical Conditions module is our Section which we calledMedical Conditions as well and if we click the Medical Conditionshyperlink our two new categories will be displayed (Figure BK)Joomla! User GuideDraft Version 0.1. August 2008Module 1 – Introduction to Joomla!Program IT (UK) Ltd Copyright 200847
Figure BKIf we click one of the categories we can then see our article displayed in thecategory (Figure BL) (In this example our Back Pain article)Figure BLJoomla! User GuideDraft Version 0.1. August 2008Module 1 – Introduction to Joomla!Program IT (UK) Ltd Copyright 200848
Joomla! User GuideDraft Version 0.1. August 2008Module 1 – Introduction to Joomla!Program IT (UK) Ltd Copyright 200849
1.3.6. Creating a Custom Module1.3.7. Creating a New MenuJoomla! User GuideDraft Version 0.1. August 2008Module 1 – Introduction to Joomla!Program IT (UK) Ltd Copyright 200850
1.2 Joomla! - First Time User Having installed Joomla! the first thing you will want to do is login to the Administrator area so that you can set up your content, images etc. 1.2.1 Logging on to the Administrator section Navigate to your website where Joomla! has been installed. The website