Transcription
GuttaCore Crosslinked Gutta-Percha Core ObturatorsDirections for Use
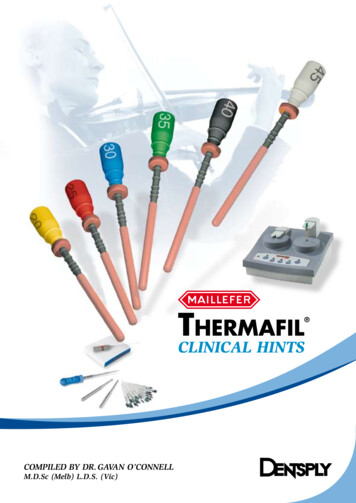
Travel the mostchallenging canalswith confidence
Directions for UsePrior to usingany new product,read all of themanufacturer’sinstructions. Makesure that you arecompetent whenusing the productand techniqueprior to clinicaluse. Consider thefollowing directivesto ensure successfulapplications andoutcomes.ADVERSEREACTIONSPatients with latexsensitivity mayexperience allergicreactions to guttapercha, which maycontain dry naturalrubber.DESCRIPTIONGuttaCore Crosslinked Gutta-Percha Core Obturators areused for filling root canal systems.INDICATIONS FOR USEGuttaCore and GuttaCore for WaveOne Gold Obturatorsare used to fill the cleaned, shaped and irrigated rootcanal space.CONTRAINDICATIONSNone Known.WARNINGSThis product may contain dry natural rubber.PRECAUTIONS Select the GuttaCore or GuttaCore for WaveOne GoldObturator according to the appropriate GuttaCore sizeverifier that fits the shaped canal passively. GuttaCore Obturator cores and/or hand files should notbe used as size verifiers. Do not remove gutta-percha from the apical sectionof GuttaCore Obturator prior to filling the root canalspace. Removing the gutta-percha may damage theobturator.Manufactured By:DENTSPLY Tulsa Dental SpecialtiesJohnson City, TN 37604Phone: 1.800.662.1202Fax: 1.800.597.2779www.dentsplysirona.comFOR DENTAL USE ONLYCONSULTINSTRUCTIONSFOR USE3RX ONLYEXP DATENONRETURNABLEIF SEAL IS BROKENSINGLEUSE ONLYTHIS PRODUCT MAY CONTAINDRY NATURAL RUBBERGuttaCore Crosslinked Gutta-Percha Core Obturators
Step-by-Step InstructionsThese instructionsCrosslinkingare designedCrosslinking is a well known chemical process of linkingto help gain anpolymer chains together. Crosslinking creates the subtleunderstanding ofstrength needed in a centrally compacting obturator.the technique andGuttaCore Obturators create the hydraulics you expectsafe applicationfrom Dentsply Sirona obturators with the added benefitof the product.of having a gutta-percha core. It is important to notePractice on plasticthat Crosslinked gutta-percha is not sticky, does notblocks and extractedmelt and will not dissolve with solvents.teeth are stronglyrecommendedprior to clinicalHydraulicsapplications. Pleasecontact one of ourGuttaCore Obturators move warm gutta-perchastaff clinicians at3-dimensionally into the root canal system. Many1-800-662-1202 toobturation techniques use lateral or verticalguide you in thecompaction, however the hydraulic force from thesetechnique andtechniques generally moves gutta-percha in one or twoassist you withunequal directions (laterally or apically). GuttaCoreany questions oruses a crosslinked gutta-percha core for centrallyconcerns.compacting the flowing gutta-percha in the canal. Thehydraulic force compacts warm gutta-percha flowingequally in 3-dimensions. Proper cleaning, shaping andirrigation, along with the central compacting hydraulicforce facilitates the flow of gutta-percha in the rootcanal system.1. Consult the File System Directions For UseConsult the file system’s directions for use when usingGuttaCore or GuttaCore for WaveOne Gold Obturatorsto ensure the proper final shape is created.2. Flare the CanalFlare the canal coronally and ensure the GuttaCore Obturator has sufficient space to enter the root canalalong the straight line access by using an orificeshaping instrument as necessary such as Endo AccessKit Gates Glidden Bur, GT Accessory File, ProFile O.S.Orifice Opener, or a ProTaper SX or S1 file.3. Verify the Shape at Working Length andPassive FitFollowing proper cleaning and shaping, confirm thefinal working length measurement using a size verifierthat reaches the apical constriction passively, with no4GuttaCore Crosslinked Gutta-Percha Core Obturators
Step-by-Step Instructions continuedsignificant resistance or twisting. It is necessary to usethe GuttaCore size verifier from the obturator packageto confirm the shape at working length and passivefit. Verifying the shape at working length and passivefit ensures that the GuttaCore Obturator being usedmatches the correct apical canal diameter.The size verifiers included in the GuttaCore package aremade of nickel titanium and are fluted, making themexcellent for minor apical shaping, if necessary. If the sizeverifier is slightly short of your working length, you canuse it to enlarge to your working length by rotating it in aclockwise direction while exerting slight apical pressure.i.Remove the GuttaCore or GuttaCore forWaveOne Gold size verifier from the obturatorpackage to confirm a passive fit at workinglength; set the silicone stopper at your workinglength using the size verifier’s calibration mark.Check passivity by taking the size verifier toworking length and confirm by rotating in thecanal 180 .ii. If the fit is passive, remove a GuttaCore Obturatorfrom the package and proceed to step 5.iii. If the fit is not passive, use the size verifier as afinishing file to gently enlarge the canal terminusor select a smaller size verifier. If the smallersize verifier fits passively, remove a GuttaCoreObturator of the same size as the verifier andproceed to step 5.4. Irrigate the CanalThe cleaning of the shaped root canal system isaccomplished primarily through the use of copiousirrigation with NaOCl. Irrigants are activated using acavitation and acoustic streaming device or ultrasonicirrigation needle. The activated irrigants improvedebridement and disrupts the smear layer andbiofilm inside the canal, promoting deep cleaning anddisinfection of lateral canals, fins, webs, isthmuses,anastomoses, and dentinal tubules. Dry the canalthoroughly using absorbent points.5GuttaCore Crosslinked Gutta-Percha Core Obturators
Step-by-Step Instructions continued5. Selecting the Obturator and SettingWorking LengthWhen the finalshape is a .04 taper,select a GuttaCoreObturator packageone size smaller thanthe last file takento working length.When the finalshape is a .06 taperor larger, select aGuttaCore packageof the same size asthe last file taken toworking length.When usingGuttaCore forWaveOne Gold,select the GuttaCorefor WaveOne GoldObturator packageof the same size asthe last WaveOneGold file taken toworking length.Set the siliconestopper on theGuttaCore Obturatorto coincide withthe working lengthestablished.Place the siliconestop on thecalibration ring.Calibration rings areset at the followingworking lengths (inmillimeters): 18, 19,20, 22, 24, plus 27and 29 on theobturator handles.6Select a GuttaCore or GuttaCore for WaveOne GoldObturator from the same package as the size verifierused to verify the shape of the workingGuttaCore ObturatorsFinal Shape.04 TaperGuttaCoreObturatorFinal Shape.06 5560/.045560/.066070 /.046070 /.067080 /.047080 /.068090 /.048090 /.0690GuttaCore for WaveOne Gold ObturatorsFinal ShapeGuttaCore forWaveOne GoldWaveOne argeLargeGuttaCore Crosslinked Gutta-Percha Core Obturators
Step-by-Step Instructions continued6. AsepsisDisinfect the obturator in a sodium hypochloritesolution (bleach) for one minute. Gently wipe the guttapercha on the GuttaCore Obturator with 2” X 2” gauzemoistened with alcohol.7. Drying the Canal and Applying SealerUse a sterile paper point of the same tip and taperas the last file taken to working length. Brush a verylight coating of ThermaSeal Plus Ribbon sealercircumferentially to the canal wall with the paper point.To help ensure the obturator reaches working length,use an additional absorbent point to remove any excesssealer that may have accumulated on the canal walls orpooled in the apex.If obturating more than one canal in a single tooth,place sealer in all the canals at the same time. Thisfacilitates removal of excess gutta-percha bypreventing the gutta-percha from sticking toother orifices or dentin.8. Heating GuttaCore Obturators in theObturator OvenFor details on the obturator oven please refer to theGuttaCore Obturator Oven Instruction Manual.9. Placing Obturator in the CanalAfter the first signal “beep” of the GuttaCore Oven,the obturator is ready for use. Push the obturatorholder and guide the holder with your finger. Take theobturator carefully out of the holder by first lifting it upand pulling it toward you. The oven will “beep” every15 seconds to remind you that the obturator is still inthe oven. After 90 seconds, the oven will switch offautomatically. Insert GuttaCore Obturator directly intoorifice of canal. Avoid touching the walls of theocclusal opening.7GuttaCore Crosslinked Gutta-Percha Core Obturators
Step-by-Step Instructions continuedNote: If the canal has been properly shaped and thegutta-percha properly heated, the obturator shouldseat to place without twisting or forcing. To avoidoverextension, don’t force the GuttaCore Obturatorbeyond the working length. You will note a backflow ofsealer and gutta-percha resulting in an accumulation atthe orifice. This is to be expected, especially in multirooted teeth, because the obturator is designed withexcess gutta-percha to accommodate even the mostwidely flared or anatomically irregular canals.10. Removing the GuttaCore Obturator Shaftand HandleRemove the shaft and handle at the orifice bybending to either side of the canal wall. Alternatively,while stabilizing the GuttaCore Obturator with yourindex finger, use a round bur, or an inverted conebur in a high-speed handpiece, or use a sharp spoonexcavator. Dispose of obturators in an appropriatebiohazard container.11. Compacting Gutta-Percha in Large, Oval orIrregular Shaped Canals.Insert a small segment of conventional gutta-percha,4-6 mm long, alongside the shaft of the GuttaCoreObturator with a lubricated plugger and compact. Thegutta-percha segment compacts the heat softenedgutta-percha and becomes an integral part of the filling.This will also prevent inadvertent removal of guttapercha from the orifice with an inadequately lubricatedplugger, as well as compensate for the lack of guttapercha in uncommonly large canals or those withinternal resorption defects. Due to the tacky nature ofthe plasticized gutta-percha, you must use a lubricantsuch as ProLube root canal conditioner, sealer, topicalanesthetic, etc., on the plugger.12. Removing Excess Gutta-PerchaUsing a spoon excavator, explorer, etc., remove anyexcess gutta-percha that may block access to thechamber and other canals. Repeat all of the abovesteps on each canal of a multi-rooted tooth.8GuttaCore Crosslinked Gutta-Percha Core Obturators
Step-by-Step Instructions continuedIf necessary, protect adjacent canal orifices from debrisand guttapercha with tiny cotton pellets or a paperpoint until time for obturation. Clean the canalchamber and create an occlusal leakage barrierwith a composite restorative.13. Removing GuttaCore Obturation MaterialsCreating post space and retreating are accomplishedusing traditional methods for removing obturationmaterial. For creating post space, remove theGuttaCore Obturator by selecting either anappropriately sized Pro-Post , GT Post drill, GatesGlidden or Peeso Reamer. When removing theobturation material for retreatment purposes, use thesame sized rotary file used for shaping and engagethe obturation material (A non-landed rotary file ispreferable). Take a radiograph to confirm the removal ofall obturation material.Use a hand file with solvent to soften the guttapercha on the GuttaCore Obturator if retreating andencountering intricate anatomy in the apical 1/3 ofthe canal.9GuttaCore Crosslinked Gutta-Percha Core Obturators
Directions for UseDENTSPLY Tulsa Dental SpecialtiesDENTSPLY International, Inc.608 Rolling Hills Dr.Johnson City, TN 37604www.DentsplySirona.comPhone: 1-800-662-1202 Fax: 1-800-597-2779T US GC0D DFU MAS/Rev00/07-2017Rx OnlyCrosslinked Gutta-Percha Core Obturators 2017 Dentsply Sirona, Inc.GuttaCore
8. Heating GuttaCore Obturators in the Obturator Oven For details on the obturator oven please refer to the GuttaCore Obturator Oven Instruction Manual. 9. Placing Obturator in the Canal After the first signal "beep" of the GuttaCore Oven, the obturator is ready for use. Push the obturator holder and guide the holder with your finger .