Transcription
ENGLISH - ESPAÑOL - FRANÇAISRSpeed ScrubR2401/2601Automatic ScrubberFregadora AutomáticaBalayeuse AutomatiqueThe Safe Scrubbing AlternativerModel No.:613037 -- 2401612216 -- 2401 Complete613038 -- 2601612219 -- 2601 Complete613386 -- 2401 FaST Complete613385 -- 2601 FaST CompleteOperator and Parts ManualManual del Operador y PiezasOpérateur Manuel et Liste Des Piéces612815Rev. 05 (12-2006)*612815*Home Find. Go To.
OPERATIONThis manual is furnished with each new model.It provides necessary operation and maintenanceinstructions and an illustrated parts list.MACHINE DATARead this manual completely and understand themachine before operating or servicing it.When ordering replacement parts, use the illustratedparts lists section in this manual. Before ordering partsor supplies, be sure to have your machine modelnumber and serial number available. Parts andsupplies may be ordered by phone or mail from anyauthorized parts and service center, distributor or fromany of the manufacturer’s subsidiaries.Please fill out at time of installation for future reference.Model No.Install. Date Serial No.-This machine will provide excellent service. However,the best results will be obtained at minimum costs if:S The machine is operated with reasonable care.S The machine is maintained regularly - per themachine maintenance instructions provided.S The machine is maintained with manufacturersupplied or equivalent parts.PROTECT THE ENVIRONMENTPlease dispose of packaging materials,old machine components such asbatteries, hazardous fluids such asantifreeze and oil, in a safeenvironmentally way according to yourlocal waste disposal regulations.Always remember to recycle.Tennant CompanyPO Box 1452Minneapolis, MN 55440Phone: (800) 553--8033 or (763) 513--2850www.nobles.comSpecifications and parts are subject to change without notice.FaST--Pak and ES logo are registered United States trademarks of TennantCompany.E2001, 2002, 2005, 2006 Tennant Company. All rights reserved.Printed in U.S.A.2Home Find. Go To.Speed Scrub 2401/2601 (06--06)
OPERATIONTABLE OF CONTENTS(ESPAÑOL.25)(FRANÇAIS.50)SAFETY PRECAUTIONS . . . . . . . . . . . . . . . . . . . .4TRANSPORTING MACHINE . . . . . . . . . . . . . . . . .20SAFETY LABELS . . . . . . . . . . . . . . . . . . . . . . . . . . .5STORING MACHINE . . . . . . . . . . . . . . . . . . . . . . . .20MACHINE COMPONENTS . . . . . . . . . . . . . . . . . . .6RECOMMENDED STOCK ITEMS . . . . . . . . . . . . .21CONTROL PANEL SYMBOLS . . . . . . . . . . . . . . .7TROUBLE SHOOTING . . . . . . . . . . . . . . . . . . . . . .22MACHINE INSTALLATION . . . . . . . . . . . . . . . . . . .UNCRATING MACHINE . . . . . . . . . . . . . . . . . .INSTALLING BATTERIES . . . . . . . . . . . . . . . .888SPECIFICATIONS . . . . . . . . . . . . . . . . . . . . . . . . . .24ELECTRICAL DIAGRAMS . . . . . . . . . . . . . . . . . . .74MACHINE SETUP . . . . . . . . . . . . . . . . . . . . . . . . . .ATTACHING SQUEEGEE ASSEMBLY . . . . .INSTALLING BRUSH OR PAD DRIVERS . . .INSTALLING FaST--PAK AGENT (OPTION)FILLING SOLUTION TANK . . . . . . . . . . . . . . .8891011MACHINE OPERATION . . . . . . . . . . . . . . . . . . . . .PRE--OPERATION CHECKS . . . . . . . . . . . . . .OPERATING MACHINE . . . . . . . . . . . . . . . . . .OPERATING FaST SCRUBSYSTEM (OPTION) . . . . . . . . . . . . . . . . . . . . . .WHILE OPERATING MACHINE . . . . . . . . . . .STOPPING MACHINE . . . . . . . . . . . . . . . . . . .EMERGENCY STOPPING (OPTION) . . . . . .CIRCUIT BREAKERS . . . . . . . . . . . . . . . . . . . .1111111313141414DRAINING TANKS . . . . . . . . . . . . . . . . . . . . . . . . . .DRAINING RECOVERY TANK . . . . . . . . . . . .DRAINING SOLUTION TANK . . . . . . . . . . . . .151515CHARGING BATTERIES . . . . . . . . . . . . . . . . . . . .15MACHINE MAINTENANCE . . . . . . . . . . . . . . . . . .DAILY MAINTENANCE . . . . . . . . . . . . . . . . . . .MONTHLY MAINTENANCE . . . . . . . . . . . . . . .QUARTERLY MAINTENANCE . . . . . . . . . . . .SQUEEGEE BLADE REPLACEMENT . . . . . .SQUEEGEE BLADE ADJUSTMENT . . . . . . .BATTERY MAINTENANCE . . . . . . . . . . . . . . .17171818181919Speed Scrub 2401/2601 (06--06)Home Find. Go To.PARTS LIST . . . . . . . . . . . . . . . . . . . . . . . . . . . . . . . 76REPLACEMENT BRUSHES ANDPAD DRIVER GROUP . . . . . . . . . . . . . . . . . . . 76SOLUTION TANK GROUP . . . . . . . . . . . . . . . . 78RECOVERY TANK GROUP . . . . . . . . . . . . . . . 80CONTROL CONSOLE GROUP . . . . . . . . . . . 82COMPONENT PANEL GROUP . . . . . . . . . . . . 84DRIVE GROUP . . . . . . . . . . . . . . . . . . . . . . . . . 86BRUSH DRIVE GROUP . . . . . . . . . . . . . . . . . . 88BRUSH DRIVE GROUP . . . . . . . . . . . . . . . . . . 89SKIRT GROUP . . . . . . . . . . . . . . . . . . . . . . . . . . 90SOLUTION GROUP, STANDARD MODEL . . 92SOLUTION GROUP, FaST MODEL . . . . . . . 94SQUEEGEE CONTROL GROUP . . . . . . . . . . 96SQUEEGEE ASSEMBLY GROUP -STD. WIDTH, 33 in / 838 mm . . . . . . . . . . . . . 98BATTERY AND CHARGER GROUP . . . . . . . 100FaST SOLUTION PUMP BREAKDOWN . . . . 101FaST AIR PUMP BREAKDOWN . . . . . . . . . . . 101OPTIONS . . . . . . . . . . . . . . . . . . . . . . . . . . . . . . . . . .ES (EXTENDED SCRUB)SOLUTION GROUP . . . . . . . . . . . . . . . . . . . . .SQUEEGEE WAND ASSEMBLY . . . . . . . . . .HOUR METER, EMERGENCY STOP,KEYSWITCH AND LOW VOLTAGE KITS . .CONVERSION KIT . . . . . . . . . . . . . . . . . . . . . .1021021041051063
OPERATIONSAFETY PRECAUTIONSThis machine is intended for commercial use. It isdesigned exclusively to scrub hard floors in anindoor environment and is not constructed for anyother use. Use only recommended pads, brushesand commercially approved floor cleanersintended for machine application.All operators must read, understand and practicethe following safety precautions.The following warning alert symbol and the “FORSAFETY” heading are used throughout this manual asindicated in their description:WARNING: To warn of hazards or unsafepractices which could result in severe personalinjury or death.FOR SAFETY: To identify actions which must befollowed for safe operation of equipment.Failure to follow these warnings may result inpersonal injury, electrical shock, fire or explosion.WARNING: Fire Or Explosion Hazard:--Never Use Flammable Liquids Or OperateMachine in Or Near Flammable Liquids,Vapors Or Combustible Dusts.This machine is not equipped with explosion proofmotors. The electric motors will spark upon startup and during operation which could cause a flashfire or explosion if machine is used in an areawhere flammable vapors/liquids or combustibledusts are present.--Do Not Pick Up Flammable Materials OrReactive Metals.--Batteries Emit Hydrogen Gas. Keep SparksAnd Open Flame Away. Keep BatteryCompartment Open When Charging.WARNING: Electrical Shock Hazard.Disconnect Battery Cables Before ServicingMachine.4The following information signals potentiallydangerous conditions to the operator orequipment:FOR SAFETY:1. Do not operate machine:-- With flammable liquids or near flammablevapors as an explosion or flash fire mayoccur.-- Unless trained and authorized.-- Unless operator manual is read andunderstood.-- If not in proper operating condition.2. Before operating machine:-- Make sure all safety devices are in placeand operate properly.3. When using machine:-- Go slow on inclines and slippery surfaces.-- Wear non--slip shoes.-- Use care when reversing machine.-- Reduce speed when turning.-- Report machine damage or faultyoperation immediately.-- Never allow children to play on or around.-- Follow mixing and handling instructionson chemical containers.4. Before leaving or servicing machine:-- Stop on level surface.-- Turn machine off.5. When servicing machine:-- Avoid moving parts. Do not wear loosejackets, shirts, or sleeves.-- Disconnect battery connections beforeworking on machine.-- Wear protective gloves and eye protectionwhen handling batteries or battery cables.-- Avoid contact with battery acid.-- Use hoist or jack that will support theweight of the machine.-- Do not power spray or hose off machine.Electrical malfunction may occur.-- Use manufacturer supplied or approvedreplacement parts.-- All repairs must be performed by aqualified service person.-- Do not modify the machine from itsoriginal design.Home Find. Go To.Speed Scrub 2401/2601 (04--05)
OPERATION6. When transporting machine:-- Turn machine off.-- Use a recommended ramp whenloading/unloading on/off truck or trailer.-- Use tie--down straps to secure machine totruck or trailer.-- Put scrub head in the lowered position.SAFETY LABELSThe safety labels appear on the machine in the locations indicated. Replace labels if they are missing or becomedamaged or illegible.WARNING LABEL -- LOCATED ON THE RECOVERY TANK.BATTERY CHARGE LABEL -LOCATED IN BATTERY COMPARTMENT.WARNING: Fire Or ExplosionHazard. Batteries Emit HydrogenGas. Keep Sparks And Open FlameAway. Keep Battery CompartmentOpen When Charging.Speed Scrub 2401/2601 (06--06)Home Find. Go To.5
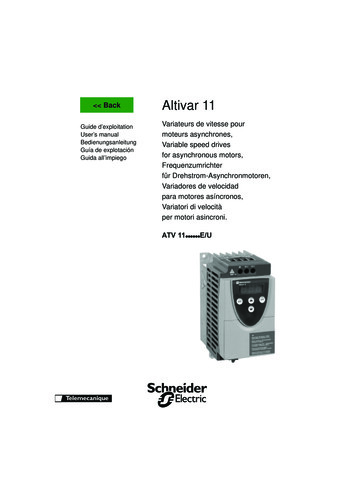
OPERATIONMACHINE 82936132021191832313534332336FaST 7.Control ConsoleControl Twist GripsKey Switch (Optional)Main ON/OFF SwitchVacuum ON/OFF SwitchBrush/Solution ON/OFF SwitchBrush Pressure SwitchesBrush Pressure MeterBattery MeterReverse SwitchSpeed Control KnobPower Kill Button (Optional)Main, Vac/Drive Circuit BreakersSqueegee Lift LeverHour Meter (Optional)Solution Flow Adjustment KnobES (Extended Scrub) Switch(Optional)18. Scrub Head Actuator19. Adjustable Control ConsoleLevers20. Recovery Tank Drain HoseHome Find. Go .37.Solution Tank Drain HoseRear Fill PortSqueegee AssemblyRecovery TankRecovery Tank LidSolution TankSolution Fill PortSafety LightsBattery CompartmentCharger PlugDrive WheelsRear CastersBrush SkirtSkirt HousingSkirt Housing LatchWall RollersFaST Scrub/ConventionalScrub Switch (Option)38. FaST--PAK DispensingSystem (Option)Speed Scrub 2401/2601 (04--05)
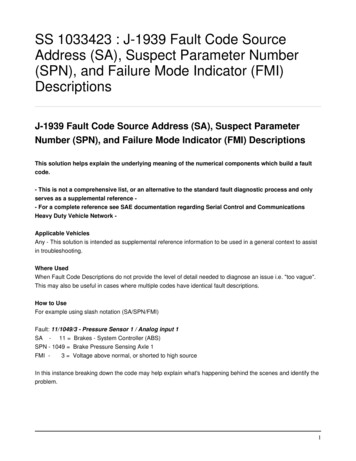
OPERATIONCONTROL PANEL SYMBOLSMain PowerFast SpeedRight HandBrush MotorCircuit BreakerRead ManualBefore OperatingVacuumSlow SpeedLeft HandBrush MotorCircuit BreakerSolution FlowVacuumMotor CircuitBreakerBattery ChargeMeterBrushReverseLess BrushPressureSqueegee UpMain PowerCircuit BreakerMore BrushPressureSqueegee DownFaST System10A Circuit Breaker(option)Speed Scrub 2401/2601 (07--02)Home Find. Go To.Brush PressureMeter7
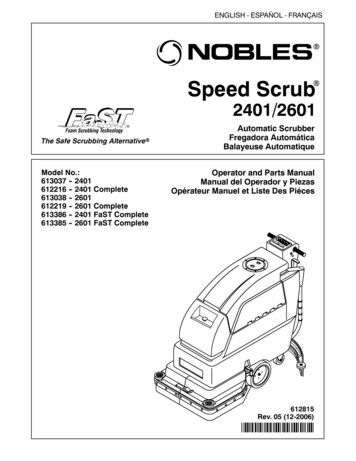
OPERATIONMACHINE INSTALLATION3. Carefully install batteries into battery tray atbottom of compartment and arrange battery postsas shown (Figure 2).UNCRATING MACHINECarefully check carton for signs of damage. Reportany damage at once to carrier. Check carton contentsto ensure all accessories are included. Squeegee ispackaged with machine. Batteries, battery charger andpad driver(s) are packaged separately.(-- )( )( )(-- )ATTENTION: Battery installation must beaccomplished after removing machine fromshipping crate.To uncrate your machine, remove shipping straps andcarefully lift or make a ramp using crate boards toremove machine from pallet.FIG. 2ATTENTION: Do not roll machine off pallet,damage may occur.ATTENTION: Do not drop batteries intocompartment, battery and machine housingdamage may result. This damage is not coveredby warranty.INSTALLING BATTERIES4. Connect battery cables to battery posts as shown(RED TO POSITIVE & BLACK TO NEGATIVE)(Figure 2).WARNING: Fire Or Explosion Hazard.Batteries Emit Hydrogen Gas. Keep Sparks AndOpen Flame Away. Keep Battery Hood Open WhenCharging.5. Turn on the main switch and check battery metercharge level to ensure batteries are fully charged.Charge if necessary (See CHARGINGBATTERIES).FOR SAFETY: When servicing machine, wearprotective gloves and eye protection whenhandling batteries and battery cables. Avoidcontact with battery acid.MACHINE SETUPBattery Specifications:Two 12 volt, deep cycle, 215 A hour batteries. Consultwith an Authorized Distributor for specific batteries.Maximum battery dimensions are 7 in / 178 mm W x15 in / 381 mm L x 14 in / 356 mm H.1. Turn all switches to the OFF position.2. Carefully hinge open recovery tank to accessbattery compartment. Remove loose batterycables from compartment (Figure 1).ATTACHING SQUEEGEE ASSEMBLY1. Turn main switch to the off position.FOR SAFETY: Before leaving or servicingmachine, stop on level surface and turn offmachine.2. Raise squeegee mount bracket. Pull back onsqueegee lift lever to raise squeegee mountbracket (Figure 3).FIG. 18Home Find. Go To.FIG. 3Speed Scrub 2401/2601 (06--06)
OPERATION3. Loosen two thumb knobs on squeegee assemblyand slide squeegee into slots on squeegee mountbracket (Figure 4).3. Turn main switch to the off position.FOR SAFETY: Before leaving or servicingmachine, stop on level surface and turn offmachine.4. Unfasten black latch at front of machine and hingeopen skirt housing to access motor hub (Figure 7).FIG. 44. Tighten thumb knobs securely.5. Connect vacuum hose from machine to squeegeeassembly (Figure 5).FIG. 75. Select recommended pads or brushes that bestmeets your cleaning needs.NOTE: Consult an authorized distributor for pad/brushrecommendations.6. (For Pad Installation) Attach pads to pad driversbefore connecting drivers to motor hub. Securepads with plastic centerlock ring (Figure 8).FIG. 5INSTALLING BRUSH OR PAD DRIVERS1. Turn main switch to the on position.2. Make sure the scrub head is raised by turning offthe brush switch (Figure 6).FIG. 8FIG. 6Speed Scrub 2401/2601 (04--05)Home Find. Go To.9
OPERATION7. Align pad driver mounting studs with slots in motorhub. Give the driver a quick turn toward the motorhub spring clip. Be certain that spring clip locksinto one of the studs before operating machine(Figure 9).2. Place the FaST--PAK carton in the carton holder atthe rear of the machine and connect the supplyhose to the FaST--PAK bag (Figure 11).FIG. 11FIG. 9NOTE: Always make sure pad drivers and motor hubsurfaces are always clean before installing drivers.Clean surfaces will ease pad driver removal later.8. Close skirt housing and refasten latch.NOTE: If any dried concentrate is visible on the supplyhose connector or on the FaST--PAK connector, soakand clean with warm water.3. Make sure to connect the supply hose onto thehose storing plug when not in use (Figure 12).This will prevent the FaST solution system fromdrying out and clogging up the supply hose.INSTALLING FaST--PAK AGENT (OPTION)Machine must be equipped with the FaST Option.1. Remove the perforated knock-outs from theFaST--PAK MP (Multi-purpose) Hard FloorConcentrate carton. Do not remove the bag fromthe carton. Pull out the bag’s hose connector atthe bottom of the bag and remove the orangehose cap from the connector (Figure 10).ATTENTION: The FaST--PAK MP Hard FloorConcentrate is specifically designed for the FaSTsystem scrubbing application. NEVER use asubstitute, machine damage will result.FOR SAFETY: When using machine, always followthe handling instructions on chemical container.FIG. 124. The FaST solution system MUST be primed forfirst time use. To prime system, make sure thesolution tank is empty and operate the machine inthe FaST Scrub Mode for 3 minutes (SeeMACHINE OPERATION). This step is onlyrequired for first time FaST system use.FIG. 1010Home Find. Go To.Speed Scrub 2401/2601 (04--05)
OPERATIONFILLING SOLUTION TANKMACHINE OPERATIONATTENTION: For Models equipped with the FaSTOption. USE CLEAR COOL WATER ONLY. DO NOTadd cleaning agents in solution tank. Conventionalcleaning agents/restorers may cause failure to theFaST solution system.FOR SAFETY: Do not operate machine unlessoperator manual is read and understood.1. Transport machine to filling station. Raisesqueegee and brush when transporting.PRE--OPERATION CHECKS2. Turn main switch to the off position.3. Remove fill-port cover at front of machine and fillsolution tank with 17 gal / 64 L of clean water,140 F / 60 C maximum temperature. Or use therear fill port to fill solution tank. Pull off plug andinsert hose to fill. The clear tube below the fill porthas 5 gal / 19 L increment markers to indicateamount of water in tank (Figure 13).S Sweep and dust mop floor to remove particles andother debris.S Check battery meter charge level to ensurebatteries are fully charged (See CHARGINGBATTERIES).S Check condition of pads or brushes.S Check condition of squeegee blades.S FaST Scrub Mode (option): Make sure that thesolution tank is filled with clear cool water only. Allconventional cleaning agents/restorers must bedrained and rinsed from solution tank. CheckFaST--PAK agent level, replace carton as needed.OPERATING MACHINEFIG. 13NOTE: If filling with a bucket be certain that bucket isclean. This will prevent possible solution line clogs.4. Add cleaning chemical. See proper dilution ratioinstructions on bottle.NOTE: If your machine is equipped with the FaSTOption, refer to page 13 for additional operationprocedures.1. Adjust control grips to a comfortable operatingheight, squeeze together the two levers below theconsole (Figure 14).FOR SAFETY: When using machine, follow mixingand handling instructions on chemical containers.ATTENTION: Use only recommended cleaningchemicals, DO NOT use substitutes. Consult anauthorized distributor for recommendations.WARNING: Fire or Exposion Hazard.Never Use Flammable Liquids.FIG. 14Speed Scrub 2401/2601 (06--06)Home Find. Go To.11
OPERATION2. Disengage squeegee lift lever from the up positionand lower squeegee (Figure 15).8. Once machine begins to move, check the needleposition of the brush pressure meter. Use the (2)pressure adjustment switches to adjust brushpressure. Never operate machine in the red zone(Figure 18).FIG. 153. Turn main switch to the on position.4. Turn brush switch to the on position to lower scrubhead to the floor (Figure 16).FIG. 18ATTENTION: To prevent floor damage and brushmotor overload, do not operate brush pressuremeter in red zone.9. To operate machine in reverse, simply pull reverseswitch backwards (one speed)(Figure 19).FIG. 165. Turn vacuum switch to the on position.NOTE: The brushes and solution flow will not startuntil control grips are rotated.6. Before starting, turn speed control knob to slowestsetting (Figure 17).7. Begin scrubbing by rotating control grips forward.Gradually increase your speed by turning speedcontrol knob forward (Figure 17).FIG. 1910. To stop machine, release control grips.FIG. 1712Home Find. Go To.Speed Scrub 2401/2601 (04--05)
OPERATIONOPERATING FaST SCRUB SYSTEM (OPTION)How the FaST System operates (Foam ScrubbingTechnology). The FaST--PAK concentrate agent isinjected into the system with a mixture of a smallamount water and compressed air. This mixture createsa large volume of expanded wet foam. The expandedfoam mixture is then dispersed onto the floor while twoscrubbing disks go to work. By the time the squeegeepicks up the mixture, the patented foaming agent hascollapsed and recovered into the recovery tank. Byperforming the FaST system application, you canincrease your productivity rate by 30% by reducing yourdump/fill cycle. You will also reduce your chemical usageand storage space. One FaST--PAK of concentratedagent allows you to scrub up to 90,000m2(1,000,000 ft2).WHILE OPERATING MACHINEFOR SAFETY: When using machine, go slow oninclines and slippery surfaces.WARNING: Fire Or Explosion Hazard. Do NotPick Up Flammable Materials Or Reactive Metals.1. Observe amount of solution flow on floor. Toincrease or decrease water flow, adjust solutioncontrol knob (Figure 21).NOTE: When scrubbing with the FaST Option, thesolution flow knob is inactive.1. Make sure that the FaST--PAK MP Hard FloorConcentrate carton is properly installed(See INSTALLING FaST--PAK AGENT).2. Make sure that the solution tank is filled with clearcool water only. DO NOT add conventionalcleaning agents in solution tank. Conventionalcleaning agents/restorers in the solution tank willresult in premature FaST system failure.3. Press the FaST Scrub/Conventional Scrub Switchtoward the FaST Scrub mode position (Figure 20).NOTE: To scrub with clear water only, simply pressthe FaST Scrub/Conventional Scrub Switch toward theConventional Scrub mode position. This allows you tooperate the machine in a rinsing application.FIG. 212. Periodically observe recovery tank for excessivefoam. If excessive foam appears, pour arecommended foam control solution into recoverytank.ATTENTION: Do not allow foam or water to enterfloat shut--off screen, vacuum motor damage willresult. Foam will not activate float shut--offscreen.3. Always operate at a slower speed when scrubbingaround walls or obstacles.4. Always reduce speed to maintain control whenturning machine.5. If squeegee leaves streaks, raise and wipe bladeswith a cloth. Pre-sweep area to prevent streaking.6. Overlap each pass by 2 in / 51 mm.FIG. 204. Make sure that the main solution switch is in theON position.NOTE: The water flow rate from the solution tank isautomatically regulated by the operation of the FaSTsystem. The solution flow rate can not be adjusted bythe Solution Control Adjustment Knob during the FaSTScrub mode.5. Follow the standard MACHINE OPERATIONinstructions to begin scrubbing.7. Change or turn over pads when worn.8. Stay clear of floor obstructions, such as electricalplates or grates, they will destroy pads.9. During brief stops, you do not have to turn off anyswitches, the brushes and solution flow willautomatically stop when control grips arereleased.10. Periodically check battery meter discharge level.When needle drops to the red zone, rechargebatteries.General Information: The FaST and ES options cannot be equipped on the same machine.Speed Scrub 2401/2601 (06--06)Home Find. Go To.13
OPERATIONATTENTION: Do not continue to run machinewhen battery meter needle is in the red zone,battery damage will result.11. While cleaning, view clear tube at rear of machinefor remaining cleaning solution. Each mark onhose indicates 5 gal / 19 L.12. When solution tank runs dry, turn off brush switch,and continue to vacuum until all dirty water isconsumed. Then drain recovery tank(See DRAINING TANKS).STOPPING MACHINE1. Turn off brush switch, and continue to vacuumuntil all dirty water is consumed.2. Release control grips.CIRCUIT BREAKERSThe machine is equipped with (4) circuit breakers toprotect machine from damage.If circuit breakers should trip, the breakers will notreset immediately upon tripping. Determine reasonwhy breaker tripped, allow motor to cool and reset.Brush motor circuit breakers will trip due to excessiveoverload on pad. Reduce pad pressure or replace padif breaker should trip.The main and drive/vacuum circuit breakers arelocated at the rear of machine. The brush motor circuitbreakers are located near the charging plug(Figure 23).-- 10A Main Circuit Breaker3. Raise squeegee.4. Turn off switches and remove key if equipped.FOR SAFETY: Before leaving or servicingmachine, stop on level surface and turn offmachine.-- 35A Drive Motor/Vacuum Circuit Breaker-- 30A Brush Motor Circuit Breaker (2)-- 10A FaST System (Option)FaST ModelEMERGENCY STOPPING (OPTION)To stop machine in case of an emergency, hit the redpower kill button located at rear of control console.The power kill button immediately stops all power tomachine (Figure 22).To reset power kill button, shut off all switches andturn kill button to the right. Resume to normaloperation.BrushMotorCircuitBreakersFIG. 2214Home Find. Go To.FIG. 23Speed Scrub 2401/2601 (06--06)
OPERATIONDRAINING SOLUTION TANKDRAINING TANKSFOR SAFETY: Before leaving or servicingmachine, stop on level surface and turn offmachine.To drain leftover cleaning solution from solution tank,perform the following steps:1. Pull clear hose off hose barb at rear of machineand drain solution into floor drain or bucket(Figure 25).DRAINING RECOVERY TANKWhen finished scrubbing or when refilling solutiontank, recovery tank should be drained and cleaned.ATTENTION: If recovery tank is not drainedbefore refilling, foam or water will enter floatshut-off screen and vacuum motor damage willresult.1. Remove drain hose from holder, position hoseover floor drain and twist off drain hose cap. Tocompletely drain recovery tank, hinge open tankand flip up tank support stand to rest tank on(Figure 24).NOTE: If using a bucket to drain machine, do not usesame bucket for filling solution tank. This will preventpossible solution line clogs.FIG. 252. Rinse out solution tank and solution flow systemwith clean water after each use. This will preventclogging due to chemical buildup.3. Reconnect solution tank drain hose securely afterdraining.CHARGING BATTERIESATTENTION: To prolong the life of the batteriesand to provide optimum machine performance,ONLY recharge the batteries after a total of 30minutes of use or more. Do not leave batteriesdischarged for lengthy periods.FIG. 242. Clean recovery tank after each use. Use a hose torinse out tank. Be careful not to spray water intofloat shut--off screen.3. Replace drain hose cap tightly after draining.The following charging instructions are intended forbattery chargers supplied with the machine. Only usea battery charger with the following specifications toprevent battery damage.BATTERY CHARGER SPECIFICATIONS:SSSSSCHARGER TYPE: FOR LEAD ACID BATTERIESOUTPUT VOLTAGE - 24 VOLTSOUTPUT CURRENT - 25 AMPS MAXIMUMAUTOMATIC SHUT--OFF CIRCUITFOR DEEP CYCLE BATTERY CHARGING1. Transport machine to a well ventilated area forcharging.WARNING: Fire Or Explosion Hazard.Batteries Emit Hydrogen Gas. Keep Sparks AndOpen Flame Away. Keep Battery CompartmentOpen When Charging.Speed Scrub 2401/2601 (04--05)Home Find. Go To.15
OPERATION2. Before charging the batteries, check theelectrolyte level in each battery cell (Figure 26).4. Plug charger’s DC output connector to batteryconnector located near battery compartment(Figure 29).FIG. 26FOR SAFETY: When servicing machine, wearprotective gloves and eye protection whenhandling batteries or battery cables. Avoid contactwith battery acid.The electrolyte level (A) should slightly cover thebattery plates (B). Add distilled water as needed.DO NOT OVERFILL, the fluid may expand andoverflow while charging. Replace cell caps beforecharging (Figure 27).FIG. 295. The charger will automatically begin charging andshut off when fully charged.6. Rest the recovery tank on the support stand topromote ventilation during charging (Figure 30).ABFIG. 30FIG. 273. Connect the charger’s AC power supply cord to aproperly grounded receptacle (Figure 28).Grounded3 Hole OutletATTENTION: Do not disconnect the charger’s DCcord from the machine’s receptacle when thecharger is operating. Arcing may result. If thecharger must be interrupted during charging,disconnect the AC power supply cord first.WARNING: Fire Or Explosion Hazard.Batteries Emit Hydrogen Gas. Keep Sparks AndOpen Flame Away. Keep Battery CompartmentOpen When Charging.Ground PinFIG. 2816Home Find. Go To.Speed Scrub 2401/2601 (04--05)
OPERATION7. After charging, check the electrolyte level (A)again. The level should be approximately0.38 in / 1 cm from the bottom of the fill--port (B)(Figure 31). Add distilled water if needed.DO NOT OVERFILL.B4. FaST Model Only: When FaST--PAK carton is notinstalled on machine, make sure the supply hoseis connected the hose storing plug. This willprevent the FaST solution system from drying outand clogging up (Figure 33). If any driedconcentrate is visible on the FaST--PAK connectoror supply hose connector, soak in warm water toremove.AFIG. 31MACHINE MAINTENANCEFIG. 33To keep the machine in good working condition, simplyfollow the daily, monthly and quarterly maintenanceprocedures.WARNING: Electrical Hazard. DisconnectBattery Cables Before Servicing Machine.DAILY MAINTENANCE(After Every Use)5. Raise squeegee and wipe it off with a dry cloth.Store squeegee in the up position to preventsqueegee damage.6. Clean the machine with an all purpose cleaner anddamp cloth (Figure 34).FOR SAFETY: When cleaning machine, do notpower spray or hose off machine. Electricalmalfunction may occur.1. Remove and clean pads/brushes. Never usesoiled pads when cleaning. Replace pads whenthey become loaded with residue.2. Remove and clean lint from float shut--off screenlocated in recovery tank (Figure 32).FIG. 347. Recharge the batteries after a total of 30 minutesof use or more (See CHARGING BATTERIES).FIG. 323. Drain and rinse tanks thoroughly. After drainingtanks, hinge recovery tank until you can seevacuum intake hole at rear of tank. Remove anydebris in hole if necessary.Speed Scrub 2401/2601 (06--06)Home Find. Go To.17
OPERATIONMONTHLY MAINTENANCE(Every 80 Hours of Use)SQUEEGEE BLADE REPLACEMENT2. Clean battery tops to prevent corrosion (SeeBATTERY MAINTENANCE).The squeegee has two squeegee blades. The rearsqueegee blade has four wiping edges, the front bladehas two wiping edges. When the blades become worn,simply rotate the blades to a new wiping edge.Replace blade if all wiping edges are worn.3. Check for loose or corroded battery cables.Rotating or replacing the rear blade:4. Remove inline strainer filter and rinse out. Beforeremoving filter, be certain solution tank is empty.Filter is located under machine at rear (Figure 35).1. Remove the squeegee assembly from the machine.1. Check fluid level in battery cells (See BATTERYMAINTENANCE).2. Loosen the band clamp and remove the band fromthe squeegee assembly (Figure 36).FIG. 355. Lubricate caster grease fittings with a waterresistant grease.6. Lubricate all linkage pivot points with siliconespray then coat with a water resistant grease tomaintain a smooth operation.FIG. 363. Rotate the rear blade to a new wiping edge andreinstall the band (Figure 37).7. Check machine for water leaks and loose nuts andbolts.QUARTERLY MAINTENANCE(Every 250 Hours of Use)Check the drive transaxle motor, the vacuum motorand the brush motor for carbon brush wear. Re
OPERATION 2 Speed Scrub 2401/2601 (06--06) This manual is furnished with each new model. It provides necessary operation and maintenance instructions and an illustrated parts list. Read this manual completely and understand the machine before operating or servicing it. When ordering replacement parts, use the illustrated parts lists section in this manual. Before ordering parts or supplies, be .