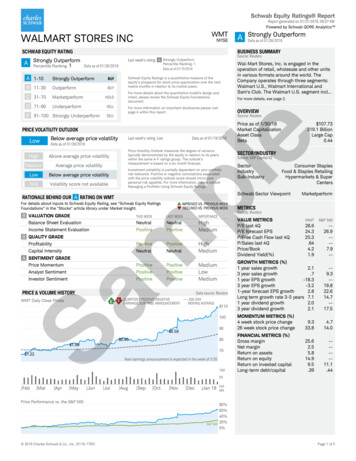
Transcription
Page 1 of 34WMT User’s GuideWMT User’s GuideAdvanced Internet Technologies, Inc.October 11, 2005Revision History: This is version 1.0 of the WMT or Website Management Tool User’sGuide. All updates to this document will be noted below.Version 1.0This version has base file management tools through a browser basedinterface.Preface:This document is the user’s manual for the Website Management Tool offered by AIT.This application can be installed for all domains hosted on AIT servers, or used bypeople who are not hosted with AIT. The application will allow end users to managethe content (text and images) in the WMT.Target Audience:WMT Users and AIT Resellers.
Page 2 of 34Table of Contents OverviewWebsite Management Tool (WMT) LoginWelcome ScreenAdd a SiteSelect a SiteDelete a SiteSite Configurationo Userso Templates Uploading WMT-Specific Templates Template Composero FieldsContent Editoro Make a New Page Images HTML Editoro Publish this Siteo Make Global Changeso Edit This Pageo Delete This Pageo Publish This Pageo Copy This Pageo View or Print SourceTemplateso Using existing templateso Creating your own templatesWMT User’s Guide
Page 3 of 34WMT User’s GuideOverviewWhat is the WMT? The WMT or Website Management tool is a content management utilitythat AIT provides its customer base. This tool can be used with pre-defined templates thatare provided inside of the WMT, or can be used with custom built templates for personalizeddesign. The WMT can be setup with templates created by a web designer (for example, anAIT Reseller) and then the content of the WMT can be managed by someone at a businesswho has no knowledge of HTML or web design. That business owner, or person inside thebusiness can manage the website content by themselves. This tool lends itself well to AITResellers that are providing customized web design to their customers and want theircustomers to be able to update content dynamically after the web design process has beencompleted to create the template.Website Management Tool LoginOnce you have ordered your WMT service, you will receive an initial email from AIT thatprovides you with a URL, IP, username and password. To login to the WMT, proceed in abrowser to the URL http://wmt.yourdomainname.com orhttp://IP provided to you.Once you have provided the correct password in the appropriate fields simply click the“Login” button. Figure 1-1 below shows what you should see when you attempt to login.Figure 1-1
Page 4 of 34WMT User’s GuideWelcome ScreenOnce you have successfully logged into the WMT, you will see a screen like what is listed inFigure 2-1 below. The screen will have instructions in the center of the page, and reallyonly have one major option, which is to add a site.Figure 2-1Add a SiteThe first real item to configure is the site. In the WMT, you can add several sites that youcan manage. Each site is in essence a completely different web address or URL. Whenadding a site (as shown in Figure 3-1 below), you will need several items configured. Site Name – This can be a generic name that you assign to your site, such as ‘MySite’ or ‘My Domain’.Site Address – This will be the HTTP address of your website (i.e. http://mysite.com)FTP Address – This is the domain name or IP address of your web hosting accountwhere files need to be FTP’ed to.FTP Port – The standard FTP port for most hosts is 21, however if necessary, youcan modify this port.FTP Username – The Username for the FTP account that has been created. Thisaccount must have access to upload data to the FTP address listed above. In mostinstances, this can be the default FTP account that you receive when signing up an
Page 5 of 34 WMT User’s Guideaccount with AIT, or it can be another FTP account that you create through the SMT /cpanel interface.FTP Password – This password must match the FTP account that you createdabove. If you change the password in the SMT, then the password in the WMTconfiguration will also need to be updated. See Select a Site for more details on howto change the password.FTP Document Root – This is the default document root for the website, ascompared to the FTP site. When the WMT publishes your files to your FTP server,the web server is normally in a different directory. Thus, the WMT needs to knowthe path to the web root of your files. If you are hosted with AIT, and your accountis a Linux Fully managed hosting account, the document root is the “/www/htdocs”path. If your account is a Windows Fully managed hosting account, then the defaultdocument root will be the “/www” path.
Page 6 of 34WMT User’s GuideFigure 3-1Select a SiteTo select a site that you have already created/added, select the site name from the dropdown menu entitled “Select a Site” on the top left hand side of the screen. As shown inFigure 4-1 below, you will see the site configuration displayed, and you will also note thatthere are several additions to the sidebar navigation menu, and the top screen menu. Theoptions on the side that are added are the Delete a Site option, and the Site Config option,and the Content Editor option. You will also notice the top menu changes for Configuration(same as Site Config), Users, Templates and Fields.
Page 7 of 34WMT User’s GuideFigure 4-1Delete a SiteThis section is used to delete a site that has been created. If you select a site from theSelect a Site option, this site is loaded into the WMT. If you then click the ‘Delete a Site’option, it will attempt to delete that site. Note that this will delete all users, templates,fields, and all unpublished content. Before the site is deleted, it will ask the user to confirmthe deletion. Figure 5-1 below shows the confirmation screen, before you will actuallydelete the site.
Page 8 of 34WMT User’s GuideFigure 5-1Site ConfigurationOnce you have Selected a Site, the base site configurations that were entered into the WMTwhen you added the site are displayed. Also, sub options are shown below the ‘Site Config’option on the left hand menu. These options are explained below.Note that the Site Config options can be edited in the same way that they were added in theAdd a Site option above.UsersFrom this area you will see the following sections: My Account – This allows you to change your username and password for accessingthe WMT. Granted Users – Here you can add new users, or edit existing users. In the secondsection you will be able to modify the username and password of any user you havecreated.Within the Granted Users section (Figure 7-1 below), you have the ability to add additionalusers that can login to the WMT for that site. This basically allows AIT Resellers who areweb designers to provide a login to business owners or other members of a business thatwant to manage the day to day content of a website after the design is done. This is thearea that you would add a login for those users.
Page 9 of 34WMT User’s GuideFigure 7-1To add a new user to the WMT, enter the username of the individual in the Add New Userarea. Then, click the Add button. Once the user has been added, a password can beapplied to that user in the section labeled Privileged Access. Once this has beenaccomplished, users can access the WMT site (http://wmt.theirdomain.com) with thatlogin and password.TemplatesInside of the WMT, users can add templates to their pages. These templates can beselected from the list of predefined templates that AIT provides inside of the WMT (see theTemplates section in this User’s Guide), or the user can create a new Templates themselvesand insert the template into the WMT. This section allows for users to use an existingtemplate in the WMT or use a new template created by the user. Figure 8-1 below showsan example of what the default template screen will look like. Upload Your WMT-Specific Templates – This section allows you to upload any.wmt file that you may have from the TemplateStore, or from the WMT itself.Template Composer – This allows users to input their own template, either fromcopying and pasting an existing template that the user has into the WMT, or bytyping in HTML code to create the template.
Page 10 of 34WMT User’s GuideFigure 8-1Uploading WMT-Specific TemplatesIf you have a WMT-specific template (usually a .wmt file), you can simply upload your WMTtemplate file in this section. The WMT will handle the rest of the configuration process foryou. Your template will be automatically added to your template composer and all fields willbe auto-generated for editing or creation of new pages.
Page 11 of 34WMT User’s GuideFigure 8-2Template ComposerIf you do not have a WMT template file, you can create your own or write in the HTML inthis section (Figure 8-3 below). In this figure, a template is shown typed into the text areaallowed. This template can be created by a user, or be one of the templates downloadedfrom the Template Download section of the WMT. Once the template has been submitted,enter a Template name in the input box, and then click the save button. This saves theTemplate file in the WMT as that name.
Page 12 of 34WMT User’s GuideFigure 8-3FieldsWhen templates are created or added in the WMT, fields will be added as ‘place holders’ forcontent that can be updated at a later time. Figure 9-1 below shows a template that hasalready been created and visually displays where the ‘fields’ are located so that you can seehow these can be places where content would be editable.
Page 13 of 34WMT User’s GuideFigure 9-1When adding a template, the user can input where the editable content would be placed byputting in certain HTML code for the fields. Below is an example of what the fields wouldlook like.Example: @COMPANY NAME@ If this content (above) is placed into a template in the WMT, then when creating a newpage, the screen will look like Figure 9-2 below, where COMPANY NAME is an editable field.
Page 14 of 34WMT User’s GuideFigure 9-2If the field is a field that the user should be allowed to put HTML content in, then throughthe Fields section, the administrator can change that field from a simple text field (likeFigure 9-2 above) to a complex HTML field like Figure 9-3 below. To make this change,under ‘Fields’, select the variable field that needs to be changed, and as Figure 9-4 belowshows, turn the HTML Editor from ‘Off’ to ‘On’.
Page 15 of 34WMT User’s GuideFigure 9-3
Page 16 of 34WMT User’s GuideFigure 9-4The HTML Editor is especially valuable for areas that HTML content is necessary, such as amain body area, or areas that may need images.Content EditorIn order to begin making, editing, or publishing content, click the “Content Editor” link fromthe left side navigation. This action will produce the Content Editor screen and reveal thefollowing left links; Make A New Page, Publish This Site, Make Global Changes.Below you will find a brief description of each link and the purpose of the link. Make A New Page – Click this link to post new content to the sitePublish This Site – Click this link to publish one or many documents at one timeMake Global Changes – will allow you to quickly add items to all of your publishedpagesNote: As your site grows you may need to locate the newly created or modified page byusing the “Find A Web Page” feature. In order to find the page that was recently createdsimply type in the page title into the search field and click the search button. Once you have
Page 17 of 34WMT User’s Guidelocated the appropriate page the WMT will provide you the ability to edit, view source,publish, delete, or copy a page.Make a New PageTo make a new page, after clicking the ‘Make a New Page’ link, the user will select thetemplate to be used from the dropdown menu (much like section 11-1 below).Figure 11-1
Page 18 of 34WMT User’s GuideFigure 11-2When creating a new page, the user will be asked for input in the areas below. Template – This is the name of the template, which is selected before a page iscreated. A template an be changed for the content of the page after it’s created,however a template must be selected when creating a page.Page Name – This is the name that will be used for the page when using the WMT.Publishing Directory / Upload directory – By default, this can be left blank. Thisis the directory under the document root that was configured in the SiteConfiguration section. For example, if you wish to upload a file to the documentroot, leave the input area blank. If you wish to put this page in another ‘subdirectory’ then you can just input the name of the directory (i.e. sampledir).Configurable areas – These are the areas that are defined when adding atemplate. These fields are specified in the template, then they are displayed whenadding or editing a page.ImagesImages that are used in any template, outside of a page, must be uploaded separately viaFTP. WMT 1.0 does not have a feature for uploading images individually. Images must beuploaded to the web server using an FTP program.
Page 19 of 34WMT User’s GuideImages used OUTSIDE of templates can be called directly via the HTML editor’s ‘InsertImage’ section.HTML editorThe HTML editor option inside of the WMT is a what-you-see-is-what-you-get (WYSIWYG)application. This feature allows for users to have word processor-style editing right at theirfingertips inside of any configurable areas in the WMT.With the WYSIWYG text box enabled for both the summary and content text box you canformat text without using HTML tags. Your options now include bold, italic, underline, alignleft/center/right, numbered lists, bulleted lists, indent right/left, text color, text highlightcolor, insert horizontal rule, add link, add image link, and view html source.Please note that the WYSIWYG text box will only function in HTML mode on Windows, andonly for Internet Explorer version 5.5 . All other browsers will use a regular text box toenter and edit information.As you enter text, pressing enter starts a new paragraph, which leaves a blank line. Forsingle line breaks, press shift enter .To enter HTML directly into the WYSIWYG text box, select the HTML button " ", paste theHTML and select the HTML button again to view the results.To input images into the HTML editor, select the Insert Image icon (Figure 11-3). Onceselected, a screen much like Figure 11-4 will appear. The user can type in the URL to theuploaded image file, input alternate text, and other configurations for layout, and click ‘OK”.Figure 11-3Figure 11-4The result of the inserted image will display in the HTML editor inside of the browser. Figure11-5 below shows an example of an image that has been inserted into the HTML editor thisway.
Page 20 of 34WMT User’s GuideFigure 11-5Publish this SiteThis option will allow a user to publish all created pages. By default (Figure 12-1), all pagesinside of the site selected are NOT selected. The user will need to select which pages theywant to publish (FTP) and then ensure the file names are configured the way they wantthem to be. By default, the file extension will be .html. This can be changed for all files to.php, or .asp as needed.
Page 21 of 34WMT User’s GuideFigure 12-1After the ‘Publish’ button is clicked, the WMT will take all content, create static pages withthe results, and publish the files directly to the web server via FTP. Figure 12-2 belowshows the results of publishing the pages. The WMT will provide you with a direct link toeach page that will open in a new window (to check your work), and give you the status ofeach publish attempt.
Page 22 of 34WMT User’s GuideFigure 12-2If there are any errors, the WMT will report those errors. For example, Figure 12-3 belowshows an error message. This message will most often happen if the FTP account that wasassigned in the Site Configuration area is not setup properly (i.e. password has changed, orthe FTP account does not exist).
Page 23 of 34WMT User’s GuideFigure 12-3Make Global ChangesThis option allows WMT users to globally change all pages (as there may be hundreds ofpages) with specific content. For example, if the company motto changes, then editing eachpage for the new motto may take a long time. This option allows you to update allconfigurable areas. Figure 13-1 below shows an example of how the configurable areas canbe edited globally. To update that specific configurable field globally, input the new text orimages as necessary, and then click the checkbox next to the name of that configurablearea.
Page 24 of 34WMT User’s GuideFigure 13-1Edit This PageThis option allows users to edit the content of a previously created page. Much like the AddA New Page option above, this option gives you all the configurable areas that can beedited, and the directory in which to put this page when published. Figures 14-1 and 14-2below show an example of editing a page that has already been created.
Page 25 of 34WMT User’s GuideFigure 14-1
Page 26 of 34WMT User’s GuideFigure 14-2Delete This PageThis option removes the page from the WMT. This will remove all configurable areas for thispage, content and configurations for the page. Prior to deleting this page, the user will beprompted (Figure 15-1 below) to confirm the deletion of the page.
Page 27 of 34WMT User’s GuideFigure 15-1Publish This PageThis option publishes the page selected. Unlike the Publish This Site option, this option justpublishes the currently selected page.Copy This PageThis feature takes a copy of the current page and moves it to a new page name. Thisoption is best used for creating backups of files or updating content without editing thecontent of an existing (live) page. When done, the old page with the outdated content canbe deleted, and the new page can be renamed to take the place of the old page.Figure 17-1 below shows the WMT asking the user for a new name of the copied page. TheWMT will suggest a name in case one is not input by the user.
Page 28 of 34WMT User’s GuideFigure 17-1View or Print SourceThis feature allows users to look at the HTML content of a specific page. Figure 18-1 belowshows an example of viewing the HTML source of a test page. This source code can bepasted into any other editor locally and edited for content, or it can be printed for otheruses.
Page 29 of 34WMT User’s GuideFigure 18-1TemplatesThis templates option will allow users to download and use existing templates that arealready in the WMT. These templates come with the purchase of the WMT and AIT updatesthese templates and adds new ones weekly.
Page 30 of 34WMT User’s GuideFigure 19-1Using existing templatesDownloading template files from the WMT can be done by going to the Download Templatescreen (Figure 19-1 above), selecting a category of interest (Figure 19-2), and thenselecting the template you wish to download (Figure 19-3).
Page 31 of 34WMT User’s GuideFigure 19-2
Page 32 of 34WMT User’s GuideFigure 19-3Once you have selected the template you wish to download, you will see something likeFigure 19-4. Save the .zip file to your local PC, selecting a location where you want the filestored (Figure 19-5).
Page 33 of 34WMT User’s GuideFigure 19-4Figure 19-5Once the file WMToohas been saved, you can unzip the file. All .zip files will contain the following:directory, which contains images – A directory full of images for the template.index.htm – An example HTML page of the template.
Page 34 of 34WMT User’s Guideindex.wmt – A WMT template file that can be pasted directly into theTemplates area of the WMT.o style.css – Cascading Style Sheet for the template.PSD file - Good for editing the template in Adobe Photoshop.readme.txt file – Information about templates and how they can be put into yourWMT account.o Creating your own templatesIf you are a web designer, and you wish to create your own website templates,Figure 20-1 below shows simple HTML code that could have been hand written, or it couldhave been generated by an HTML editor.Figure 20-1Once the template file has been created, and HTML has been exported out of it, a .wmt filecan be created. The .wmt file is nothing more than a simple HTML file, with fieldspositioned inside the HTML at specific locations. These will become the configurable areasof the pages that can be created through the WMT.Once you have created a template, upload the images to the web server in the properlocation, then paste the template you created into the WMT.
Page 1 of 34 WMT User's Guide WMT User's Guide Advanced Internet Technologies, Inc. October 11, 2005 Revision History: This is version 1.0 of the WMT or Website Management Tool User's Guide. All updates to this document will be noted below.