Transcription
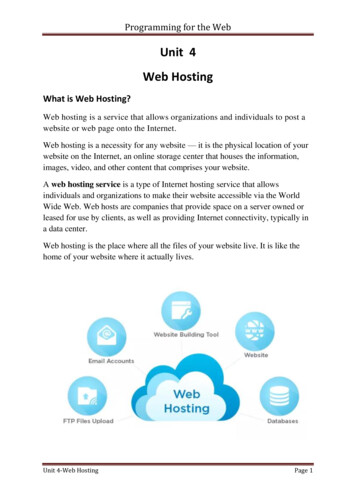
Getting StartedWith ADOBE CONNECTHosting a Web Conference (Webinar) with Adobe ConnectAs a Macomb Community College employee, if you are reading this, you haveprobably considered using Adobe Connect to facilitate a web conference(webinar). Prior to hosting your conference, you need access to a MacombCommunity College account. If you already have access to an account, skip tothe Getting Started section.To create an account, please contact the Center for Teaching and Learning at586.445.4774 or ctlsupport@macomb.edu. A representative will create alicensed account for you (or confirm that a departmental account alreadyexists). The representative will need the following information from you in orderto create the account:Account name – This could be you or your department.Login Name – this must be in the form of an e-mail address. Your e-mailaddress or a department administrator’s will suffice.Once the CTL representative creates the account, he or she will confirm itsstatus and provide you with a password. Upon receipt of that information, youcan enter the site and create a meeting. The login page ishttps://macomb.adobeconnect.com.To get started, follow the attached documentation. This information may alsobe found online ted/index.html.Discover. Connect. Advance.
2Getting Started with Adobe Connect Meetings1Navigate to https://macomb.adobeconnect.com in your favorite webbrowser.Log in with your Adobe Connectusername and password. If youdon’t know your password, click2 the Forgot your password link. Ifyour department created theaccount password, contact youradministrator.3Once authenticated, you aretaken to the Adobe ConnectCentral home page. Click theCreate New Meeting button tobegin the Meeting Wizard.4Enter a meeting name and aneasy to remember custom URLsuch as your first name orusername.5Optionally, fill in the additionalfields and click Finish. Yourmeeting room has beencreated.6Enter your meeting room byclicking on the meeting roomURL on the confirmation pageor by copying and pasting theURL into your web browser.Tip: The meeting room you have just created will always be available at the URLyou specified, as the room exists. It is a good idea to bookmark your room forquick and easy access.Discover.Connect. Advance.2
Install the Adobe Connect Add-in1If you have never hosted anAdobe Connect meetingbefore, you will be prompted toinstall the Adobe Connect Addin. Click Install and follow theinstructions.Tip: Meeting participants are only required to have Adobe Flash Player 10.1 orlater (already on most desktops) installed and do not need to install the AdobeConnect Add-In.3Discover. Connect. Advance.
4Sharing PowerPoint ContentClick the right arrow beside ShareMy Screen and select Share1Document.2Click Browse My Computer toselect a file from your system. Inthe Browse dialog, locate thePowerPoint (PPT or PPTX)presentation you would like toshare and click Open. The file isautomatically uploaded andconverted for use with AdobeConnect.3Once the file has beenconverted, it will appear in theShare pod. Use the Next andPrevious controls to navigatethrough your presentation.Tip: You can also follow these steps to share other supported file types includingimage files (JPG or PNG), video files (FLV), flash files (SWF), and MP3 audio files.Discover.Connect. Advance.4
Using voice-over-Internet Protocol (VoIP) for audio communication1VoIP allows you to communicatewith meeting attendees usingyour computer’s microphoneand speakers. If you intend touse this feature, it isrecommended that you first runthrough the Audio Setup Wizard.To do this, begin by selectingMeeting Audio Setup Wizard.2The wizard guides you throughfour steps in which you are askedto test your speakers, select amicrophone, and optimize theaudio. If you have never usedAdobe Connect before, youmay see a Flash Player settingsbox asking for permission to useyour camera and microphone.Selecting Remember will skip thisprompt in the future.3To begin using VoIP, locate theMicrophone button near the topof the application. Click thebutton once to activate VoIP.You can use the arrow besidethe icon to mute yourmicrophone or adjust yourvolume.Tip: If you are having problems with the VoIP audio, you can enable the Speexcodec in Audio Preferences. Select Meeting Preferences Audio5Discover. Connect. Advance.
6Sharing Webcam Video123You can easily share webcamvideo with meeting attendees.To do this, make sure yourwebcam in plugged in and clickeither the webcam button orthe Start My Webcam button ona Video pod.The webcam will give you apreview of what will be sheared.If you are happy with thepreview, you can click StartSharing to broadcast yourwebcam to all participants. TheVideo pod will accommodatemultiple webcams and scale theimages appropriately; you don’tneed to open a separate pod foreach presenter.If you would like to adjust thesettings for your webcam toincrease or decrease the qualitybased on available bandwidth,click Preferences from the Videopod options menu, or selectMeeting Preferences Video.Tip: If you are having problems with the VoIP audio, you can enable the Speexcodec in Audio Preferences. Select Meeting Preferences AudioDiscover.Connect. Advance.6
Sharing Your Screen1Click the Share My Screen buttonin the Share pod.2In the Start Screen Sharingdialog, choose how youwould like to share yourscreen.Desktop: Share allapplications on your desktop.Windows: Choose specific,already open window toshareApplications: Share one ormore applications along withrelated windows.After selecting your desiredoption, click Share.3An Adobe Connect iconappears in your system tray(Windows) or your toolbar (Macand Linux) while you are sharingyour screen. Click on this icon toview a menu where you canstop sharing or access otheravailable options.Tip: Reducing the number of applications running that use bandwidth will alsoprovide a better experience for the attendees.7Discover. Connect. Advance.
8Inviting Attendees1You can invite attendees to yourmeeting by sharing the meetingURL in an email, chat message oreven verbally over the phone.From within a meeting, you caninvite attendees by selectingMeeting Manage Access &Entry Invite Participants.2In the Invite Participantsdialog, click Compose e-mail.An e-mail appears in yourdefault e-mail client withmeeting information prepopulated. Simply addattendees by entering their email addresses in your e-mailclient and send the invitation.3When attendees arrive to themeeting, a notification windowmay appear asking you toaccept or decline their requestto enter. Click the checkmark toaccept the request. You canalso accept multiple requests bychoosing Allow Everyone.Discover.Connect. Advance.8
Managing AttendeesMeeting attendees fall into threecategories:Host: Organizes and facilitatesthe meeting.Presenter: May assist in meetingfacilitation, presenting content,or sharing their screen.Participant: Largely spectators inthe meeting who can chat,respond to polls, and changetheir status.1There are two easy ways tochange any participant’s role.Hovering your mouse over aparticipant’s name will bring up amenu with several options givingyou the ability to choose a rolefor the individual.2Additionally, the Attendees podsupports drag and dropfunctionality. Click and dragusers from one role to another.3Tip: If you wish to change the role of multiple attendees at the same time, holddown Control (Windows/Linux) or Command (Mac) while selecting usernamesand then drag and drop to set the role.Learn moreYou can find additional resources by visiting the Adobe Connect UserCommunity at www.connectusers.com9Discover. Connect. Advance.
Discover. Connect. Advance.!!! !!!! ADOBE CONNECT! Getting Started With Hosting a Web Conference (Webinar) with Adobe Connect As a Macomb Community College employee, if you are reading this, you have probably considered using Adobe Connect to facilitate a web conference (webinar). Prior to hosting your conference, you need access to a Macomb

