Transcription
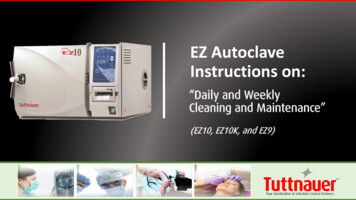
Manual AutoclaveInstructions on:“Weekly Cleaningand Maintenance”(Valueklave1730M, 2340M , 2540M-MK, 3870M)
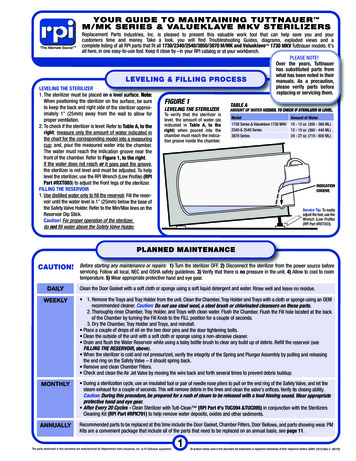
Items to have on hand Chamber Brite TMSoft cloth or spongeDrain hose (to drain water reservoir)Pail (to drain reservoir water into)GlovesNon abrasive stainlesssteel cleaner (for trays and tray rack) Steam distilled water
Chamber BriteTM InstructionsModel Amount of Chamber Brite RequiredValueklave 1730M Use one half of a packet of Chamber Brite2340MUse one packet of Chamber Brite2540M2540MK3870M Use two packets of Chamber Brite
What is ChamberTMBrite ?Chamber Brite is a cleaning and descaling agent designedspecifically for the cleaning and removal of water deposit oxidesand other sediments that are found in steam sterilizers. The material is a combination of acidic salts and additionalcleaning materials. Chamber Brite is not for use in the Elara11 or any otherpre/post vacuum autoclave. It is recommended that your autoclave be cleaned withChamber Brite after every 20 cycles.
Why is cleaning important? Cleaning the autoclave chamber is a very simple, but importantprocedure to keep your sterilizer operating properly. If the autoclave is not cleaned regularly, dirt and debris willbuild up and clog the tubing and valves. This dirt can also be transmitted to the instruments duringsterilization. In addition, a layer of dirt on the stainless steel chamber trapsmoisture against the metal and will lead to the chamberbecoming porous and failing.
ChamberTMBriteInstructionsImportant things to remember: NEVER use bleach, steel wool, a steel brush or anything abrasive toscrub or clean the Chamber. Do NOT sterilize instruments during the chamber cleaning process. Before using Chamber Brite, the autoclave chamber MUST be cold.If the chamber is hot, Chamber Brite will react and give off an odor. All steps in this procedure must be completed withoutinterruption.
Step 1Remove all of the traysfrom the autoclave
Step 2Remove the tray rackfrom the autoclaveThe tray rack is easilyremoved by squeezing itin on both sides whilesliding it out of theautoclave
Step 3Open the appropriateamount of Chamber Britepackage(s) and pour a linefrom the front to the rearalong the bottom of theCOLD Chamber.Avoid leaving a pile ofChamber Brite in one spot.
Step 4Make sure the water reservoiris filled with steam distilledwater.Set temperature to 273⁰F(134⁰C).With the chamber door OPEN,turn the multivalve clockwisefrom “0“ to “FILL WATER”.
Step 4 (continued)Water will begin to flowin from the back of thechamber.Monitor the flow until itgets to the indentationline at the front of thechamber.
Step 4 (continued)Turn the multivalve to“STERILIZE” (OLDERmodels are labeled “STE”)Close and lock the door
Step 5For Valueklave or any “MK”models, set timer to 12 minutesFor all other “M” models, setthe timer to 30 minutes
Step 6The pressure gauge will rise to30psi and when the timerreaches “Zero” the bell will ringImmediately turn the multivalveto “EXH DRY” and the water inthe chamber will be forced outand back into the water reservoir
Step 7Once the pressure gauge reaches“ZERO”, open the chamber doorand use the drain valve and drainhose to drain ALL of the water outof the water reservoir into a pail.The Chamber Brite solution is inthe waste water
Step 8Tighten the drain valve.Refill the water reservoir withclean steam distilled water
Step 9Immediately run another cycle the same way as before, but this timeWITHOUT the Chamber Brite. This will remove any residue from theinternal plumbing.To refresh, let’s look at these steps again
Step 9 (continued)Make sure the water reservoiris filled with steam distilledwater.Set temperature to 273⁰F(134⁰C).With the chamber door OPEN,turn the multivalve clockwisefrom “0“ to “FILL WATER”.
Step 9 (continued)Water will begin to flowin from the back of thechamber.Monitor the flow until itgets to the indentationline at the front of thechamber.
Step 9 (continued)Turn the multivalve to“STERILIZE” (OLDER modelsare labeled “STE”)Close and lock the door
Step 9 (continued)For Valueklave or any “MK”models, set timer to 12 minutesFor all other “M” models, setthe timer to 30 minutes
Step 9 (continued)The pressure gauge will rise to30psi and when the timerreaches “Zero” the bell will ringImmediately turn the multivalveto “EXH DRY” and the water inthe chamber will be forced outand back into the water reservoir
Step 9 (continued)Once the pressure gauge reaches“ZERO”, open the chamber doorand use the drain valve and drainhose to drain ALL of the water outof the water reservoir into a pail.
Step 10TURN THE AUTOCLAVE OFF ANDALLOW THE CHAMBER TO COOL.Once the chamber is cool,wipe the inside of thechamber with a damp clothor sponge to remove anyresidue.
Step 11Tighten the drain valve.Refill the water reservoir withclean steam distilled water
The chamber has now been cleaned withChamber Brite.The final step is to clean the tray holder andtrays before returning them to the chamber.
Clean the tray holder and trays with anon-abrasive stainless steel cleaner and water, using asoft cloth or sponge.It’s important to rinse the tray holder and traysimmediately with water to avoid staining the metal.DO NOT use steel wool, a steel brush or bleach or anycleaning agent containing bleach as this can damagethe chamber and trays.
Step 11Once dry, return the traysand tray holder to thechamber.The autoclave is nowready for use.
That concludes this demonstration of cleaning thechamber of a Tuttnauer Manual Autoclave withChamber Brite.Remember, cleaning and maintenance are animportant part to the proper functioning of yourTuttnauer autoclave.It is recommended that your autoclave be cleanedwith Chamber Brite after every 20 cycles.For a full list of Scheduled & PreventativeMaintenance, refer to the Operators Manual.
chamber of a Tuttnauer Manual Autoclave with Chamber Brite. Remember, cleaning and maintenance are an important part to the proper functioning of your Tuttnauer autoclave. It is recommended that your autoclave be cleaned with Chamber Brite after every 20 cycles. For a full list of Scheduled & Preventative Maintenance, refer to the Operators .