Transcription
SECTION 14: CURING INSTRUCTIONSCURING INSTRUCTIONSIt is recommended that the rubber lining be cured as soon as possible after the rubber is applied. All rubber lining curing specifications aredetermined under lab conditions. Adjustments must be made by an experienced rubber engineer to compensate for all possible variables thatcan affect the state of cure. Some of these variables are: altitude, weather conditions, vessel insulation, multiple layers of rubber, different liningtypes in the same vessel or autoclave, green strength (tendency of rubber to flow during cure), ozone and sunlight deterioration, etc. Cure Chartsthat indicate the temperature of the cure are necessary to ensure the lining is thoroughly cured. Several locations may be necessary to certifythat there are not any hot or cold spots. Variation in temperatures from top to bottom or other locations within the cure indicate stratification andmay result in damaging the integrity of the cure. Cure charts with diagrams indicating the location of the temperature probes or thermocouples isnecessary to make a rubber lining warranty valid.The methods of curing rubber, in order of preference, are as follows:1. Autoclave Cure2. Internal Pressure Cure3. Exhaust, Or Atmospheric, Steam Cure4. Hot Water Cure5. Chemical Cure1. AUTOCLAVE CURINGThis type of vulcanization is the fastest, most economical, provides the best possible properties, and most uniform cure. All the air in theautoclave needs to be displaced by steam before the cure time is started. To ensure all air is displaced, a thermometer should be placednear the bottom of the autoclave and there should be a pressure gauge somewhere on the vessel. When the temperature approaches thetheoretical temperature for the pressure shown, all the air has been displaced, i.e. 30 psi is equal to 274 F (134 C) and 50 psi is equal to297 F (147 C).All the rubber lined parts should be placed in the autoclave so that condensate will drain off and not collect in low points as this can causea cold spot that will result in under cure. Ideally, the autoclave should be equipped to record the temperature and the pressure. At the veryminimum, there should be a temperature recorder on the autoclave. Cure temperature variations can go unnoticed without any recordingequipment.The autoclave must be ASME certified to withstand the cure pressure and the boiler must be capable of producing enough steam to reachthe required pressure in a short period of time and maintain the pressure throughout the cure.When the cure is finished, the use of air pressure and water to cool down the autoclave and the parts within is recommended. To precludethe possibility of cracking hard rubber linings and over curing of natural rubber linings, care must be taken to properly cool down theautoclave. Cool down of soft and synthetic rubber linings may require one hour with air and water. Cool down of semi-hard, hard and threelayer – soft-hard-soft – construction linings require a gradual cool down to prevent cracking of the hard rubber.5020 Panther Parkway Seville, Ohio 44273Ph. 800-321-5583 Fx. 330-769-9334BLAIR ENG 140 V6 REV. 0www.blairrubber.com
SECTION 14: CURING INSTRUCTIONSAUTOCLAVE CURING PRECAUTIONSWhen curing semi-hard rubber linings - over 80 durometer “Shore A” - in an autoclave, special precautions must be taken to avoid eitherunder- or over-curing the lining. Some of the variables to consider are:1. Size of the autoclave. The time it takes the autoclave to come up to curing temperature will vary with the size. It may require 5 to10 minutes for a small unit or 60 to 90 minutes for a large unit to reach the specified cure temperature. The same is true for thecool down. Some only have air for cooling others may have water-cooling. If you have a long warm-up and/or a long cool down time,it may be necessary to reduce the cure temperature or time to avoid overcure of the lining.2. Amount of steel in parts or tanks being cured or how full or empty the autoclave is can affect the time required to heat and/or coolthe parts.3. Length of time to get up to cure temperature. If the time is short to heat it up, it may require a longer cure time, and if the unitrequires a long time to heat - it may require a shorter cure time.4. Length of time to cool down with rubber lined equipment left in autoclave will also have an influence on the cured lining hardness. Ifit takes a long time to cool down, the cure time may need to be reduced.5. It should be noted that light color semi-hard linings, such as whites or tans, might darken at high cure temperatures.The cure times stated on our individual lining specifications may require some adjustments when the above precautions are taken intoconsideration. Please contact Blair Rubber Company if there are any questions about the proper curing of the rubber lining.AUTOCLAVE DESIGN AND BASIC OPERATIONThe basic design and operating procedures are for informational purposes only and in no way should this be used in place of the autoclavemanufacture’s procedures. Most autoclave designs will require a pressure relief valve and a vacuum breaker.BLAIR RUBBER COMPANY SECTION 14: CURING INSTRUCTIONS CURING INSTRUCTIONSBLAIR ENG 140 V6 REV. 02
SECTION 14: CURING INSTRUCTIONSSTART UP1. Check boiler to ensure it is operating properly2. Check autoclave gasket to ensure it will seal properly3. Close autoclave door and ensure it is locked properly4. Shut air supply valve5. Shut drain valve6. Open condensate drain valve (steam trap)7. Shut cooling water valve8. Shut blow down valve9. Set any automatic controls for the desired cure time and temperature10. Open vent control valve11. Open steam control valve12. Monitor steam pressure and autoclave temperature13. Make certain the recorder is operating properlyNOTE: The boiler and automatic controller operating instructions take priority over these instructions.SHUT DOWN1.2.3.4.5.6.7.When the cure is completed the air line should be openedClose the steam valveShut the automatic vent valve (if installed)Open the cooling water valve. Cooling water pressure must exceed the air pressure.Caution must be exercised to ensure the pressure doesn’t drop more than 10 psi below the cure pressure or pull a vacuumFor soft rubber, a one hour cool down is sufficientFor semi-hard, hard and tri-ply linings, and gradual cool down is required to prevent cracking. A three hour step process is best.Start with air and water the first hour, reaching 200 F (93 C). then air only for the next hour and finish by adding water until cool.8. Shut the cooling water valve9. Shut the air valve10. Slowly open the drain valve11. Open the autoclave door only when there is no pressure and the water has completely drainedCAUTION: Opening the autoclave door when there is any pressure may cause death, injury or equipment damage2. INTERNAL PRESSURE STEAM CUREA. Pressure Cure of Equipment too Large for your autoclaveCAUTION: Before proceeding with this method, you should get written permission from the owner stating the article can besafely cured at the proposed pressure.BLAIR RUBBER COMPANY SECTION 14: CURING INSTRUCTIONS CURING INSTRUCTIONSBLAIR ENG 140 V6 REV. 03
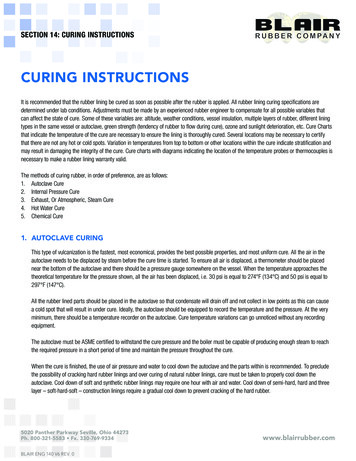
SECTION 14: CURING INSTRUCTIONSAll flange faces should be lined with chemical cure or cured rubber. These areas should be lined early to allow for full cure so a good sealcan be made without squeezing the rubber off the flange faces. It is recommended that the internal lining of the nozzles be turned out ontothe flange face 1” to 1 1/2 “ with an open skive. See Sketch 3 “Flange Construction”. Then apply a donut of CU76BC cured Chlorobutyl witha matching skive using Endurabond primers and Normac 900R cement. A second donut of CU76BC is bonded over the flange facemaking certain the top layer covers the joint in the bottom layer. By using this construction, the blind flanges can be bolted down enoughto hold the pressure without damaging the rubber on the flange faces. See sketch F-1. Other methods may be used on approval from BlairRubber Company.For tanks without a sump, place them in such a position that all the condensate can be drained during the cure. If necessary, userefrigeration grade copper tubing that can be bent by hand to reach the low points and allow the pressure of the steam to blow out thecondensate.For tanks with a sump, such as tank trucks and rail cars, use a sump pipe or dip tube that will reach the bottom of the sump, but not so longit will damage the rubber, and allow the pressure of the cure to push out the condensate.Some live steam should escape from the condensate drains to make certain there is no condensate trapped in the tank. CAUTION: Ifcondensate is allowed to accumulate it may result in under cure and premature failure of the area covered with condensate.Always use adequate pressure gauges and thermometers to monitor the progress of the cure and be sure to record all the information. It isadvisable to use surface thermometers at numerous locations on the tank to be sure there are no cold spots that could affect the service lifeof the tank. If the temperature at the bottom is colder than the top, gradually open the drain valve in the bottom until the temperature is moreuniform. If the work is being done in cold weather, it may be necessary to insulate the tank to get uniform temperature. Additional steamcannot compensate for cold conditions.Thick steel will effect the cure time because it is a greater heat sink and requires more time to get hot. Check with Blair Rubber Company forproper cure times.The following table lists temperature equivalents for various pressures at sea level:TEMPERATURES FOR VARIOUS PRESSURES10psi240 F (115 C)15psi250 F (121 C)20psi258 F (125 C)30psi274 F (134 C)It is best to contact Blair Rubber Company with vessel size, steel thickness, lining type, lining thickness and service conditions to get theproper cure time and temperature.BLAIR RUBBER COMPANY SECTION 14: CURING INSTRUCTIONS CURING INSTRUCTIONSBLAIR ENG 140 V6 REV. 04
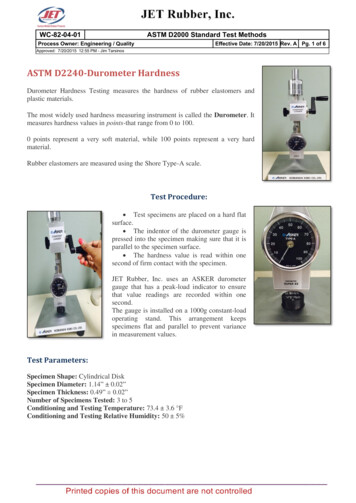
SECTION 14: CURING INSTRUCTIONSFIGURE PINTERNAL PRESSURE CUREBLAIR RUBBER COMPANY SECTION 14: CURING INSTRUCTIONS CURING INSTRUCTIONSBLAIR ENG 140 V6 REV. 05
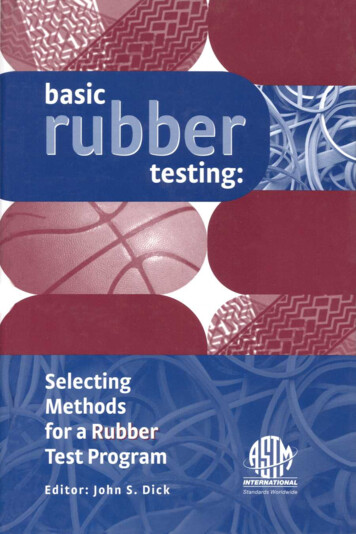
SECTION 14: CURING INSTRUCTIONSFIGURE P-1TANK WITH SUMP INTERNAL PRESSURE CUREBLAIR RUBBER COMPANY SECTION 14: CURING INSTRUCTIONS CURING INSTRUCTIONSBLAIR ENG 140 V6 REV. 06
SECTION 14: CURING INSTRUCTIONSSKETCH F-1FLANGE CONSTRUCTION USING PRECURED RUBBERBLAIR RUBBER COMPANY SECTION 14: CURING INSTRUCTIONS CURING INSTRUCTIONSBLAIR ENG 140 V6 REV. 07
SECTION 14: CURING INSTRUCTIONS3. EXHAUST OR ATMOSPHERIC STEAM CURINGThis type of cure is performed when the article is too large to fit the autoclave, cannot be removed from its present location and/or cannotbe pressurized for an internal pressure cure. Canvas or heavy plastic should be used to contain the steam as much as possible. The morelive steam contained in the article being cured, the higher the temperature that can be obtained. In these cases, a bleed-off of some sortmust be installed to drain condensate. Steam should be introduced into the tank through a piping system that will allow steam to flow acrossand around all the rubber covered surfaces (see drawing P-2). Steam must be introduced in a manner that direct impingement of the steamcannot occur and flow is directed downward in order to cure the bottom of the vessel.The steam should be introduced slowly at first per the Lining Specification. During the first stages of the warm up (approximately afterthe first hour), the steam may be turned off and an inspection made. If there are any visible blisters, they can be repaired by removing thetrapped air with a hypodermic needle and applying a small patch over the needle hole. The above inspection must be done while the tank ishot. This inspection is optional. Care must be taken or more damage to the lining could result due to equipment or personnel entering andleaving the tank. The rubber is very soft at this stage and is easily damaged.EXHAUST STEAM CURING PRECAUTIONSCure specifications are based on consistent lab conditions. Frequently the cure times must be extended for the lining to receive the optimumcure. The following is a discussion on some of the situations you may find helpful in figuring and setting up your next cure.Warm Up. Raise the temperature 10-15 degrees/hour until the cure temperature is reached. The time it takes to warm up the unitdoes not count toward the cure time as specified in the Lining Specification.2. Cure times are figured as variables of time and temperature. Eighteen degrees Fahrenheit (ten degrees Celsius) lower temperaturecan lengthen the cure by as much as two times. Tank insulation, temperature of the surrounding air, and wind velocity over the tankcan shorten or lengthen the cure.3. Structure. The thickness and surface area of the metal acts as a heat sink and must be taken into account when calculating thesteam required for proper cure. The metal structure must reach a constant temperature before the cure time is started.4. Cold Spots. Cold spots form because of poor steam circulation, trapped air pockets in vessels with complicated shapes orcondensate that is not continuously removed. Thermocouples must be strategically placed to monitor the coldest spots in the tank.Temperature readings must also be taken on the outside of the metal to ensure the metal temperature is high enough (150 F(66 C) minimum) to cause the rubber/cement interface to cure. Stiffeners or other weldments on the outside of a vessel can alsocause cold spots that will prevent the interface from curing properly. Insulation around such areas can help solve the problem.5. Steam Volume. The amount of steam must be properly calculated. For correct boiler size see the formula in this section of ourEngineering and Application Manual. The steam must escape around the nozzles and other openings to assure proper cure of theflange faces. If the steam is stagnant, cold spots form. Petcocks can be installed on extended piping and used to insure that steamflows through those areas and across the flange faces. The steam supply must not only be adequate but must be directed in sucha way to ensure it is flowing over all rubber lined surfaces, especially the bottom. All condensate must be removed. Drains shouldbe provided at the bottom of the vessel and elsewhere to ensure condensate will run off and not collect in any pockets. An opentop tank or one sitting on a concrete pad can result in situations where the tank walls are cured but the floor is not. The steammust be directed towards the bottom of the tank and flow around all surfaces.1.BLAIR RUBBER COMPANY SECTION 14: CURING INSTRUCTIONS CURING INSTRUCTIONSBLAIR ENG 140 V6 REV. 08
SECTION 14: CURING INSTRUCTIONS6. Vacuum Caution. The entire cure and cool down must be monitored, especially if it is possible to pull a vacuum and collapse thevessel. Vacuum breakers may be necessary depending on the construction of the vessel.We have tried to set the specific cure time on the individual lining specification that will provide a middle of the range cureddurometer hardness. However, the supervisor on the job may be required to make adjustments to cure times to compensate forthe many situations than can be found in the field. Good engineering practice and sound judgment cannot be over emphasized.Blair’s Technical Department should be consulted concerning major changes to the cure specifications.BLAIR RUBBER COMPANY SECTION 14: CURING INSTRUCTIONS CURING INSTRUCTIONSBLAIR ENG 140 V6 REV. 09
SECTION 14: CURING INSTRUCTIONSFIGURE P-2TYPICAL EXHAUST STEAM PIPING ARRANGEMENTNOTE: For larger tanks or during cold weather, larger sized piping and/or insulation may be required to maintain an inside curing temperature180 F (82 C) to 200 F (93 C).BLAIR RUBBER COMPANY SECTION 14: CURING INSTRUCTIONS CURING INSTRUCTIONSBLAIR ENG 140 V6 REV. 010
SECTION 14: CURING INSTRUCTIONS4. HOT WATER CURING SPECIFICATIONTo be used only on specified linings (i.e. VE621BC). Consult with Blair’s Technical Department before this procedure isimplemented.The only advantage for using a hot water cure on new installations is that it will add a little pressure from the weight of the water that mayhelp secure the lining to a tank that is badly pitted. The disadvantages are that it takes much longer to cure, it requires more steam, it is notsuitable for all linings and acquiring enough water, or disposing of the water, for a large tank can be a problem.This method can offer some advantages for curing of a large tank that has been partially relined, i.e. the top portion or bottom portion.If the top of a tank has been relined, fill the tank with water to just below the new lining and introduce the steam above the water to cure thenew lining. This reduces the volume of steam required for cure and also dramatically reduces the amount of heat on the old lining. Withoutthe water to protect it, the excess heat from the cure can destroy an old lining that is saturated with liquid.If the bottom of a tank has been relined, fill the tank with water to just above the new lining and introduce the steam into the water andallow the hot water to cure the lining. Be sure to vent the top portion of the tank as much as possible to reduce the heat on the old lining. Asabove, this puts the heat where you want it without exposing the old lining to excess heat.In preparation for water cure, the outlets and/or man ways either must be prepared using precured rubber as shown on Sketch F-1 on page8 of this section or use chemical cure rubber on the flange faces and cure them with exhaust steam or have the outlet exhaust cured sothe man way covers and blind flange plates can be tightened to hold the water. The tank must be vented to prevent any pressure build-up.The tank itself needs verification that is structurally designed to handle the hydrostatic weight of the water and the welds are suitable towithstand curing temperatures up to 210 F (99 C). Also, the tanks need to have sufficient foundation to support the water filled vessel.On open top tanks, the preparation procedures are the same, except the tank is lined all the way to the top; and the water is filled to the top.After the hot water cure has been completed, a weather resistant chemical cure lining is then used to finish the top area.Prior to filling the tank with water, steam sparger piping should be installed near the bottom of the vessel. The steam itself shall be directedso it will not impinge directly on the rubber surface, and it is recommended that the steam be introduced in an angled, downward position.It may take considerable time for the water mass to heat. Once the temperature has reached 180 F (82 C) and the outside wall temperatureis a minimum of 150 F (66 C), timing of the cure may commence. It is best for the water temperature to be 180 F (82 C) -205 F (96 C).Time to cure: 180 F (82 C) - 60 hours minimum; at 190 F (88 C) - 48 hours minimum; and at 205 F (96 C) - 36 hours minimum to cure.The higher curing temperature of 190 F (88 C) to 200 F (93 C) is recommended. Well water or tap water may be used as the liquid media.A water source containing hydrocarbons of any type is not acceptable.Thermocouples shall be used to monitor the temperature within the vessel from top to bottom. Also, metal temperature probes may beutilized on the outside for temperature information if the tank is not insulated. If the vessel is exposed to cool weather or wind it will decreasethe cure rate of the rubber. If this happens, insulation will need to be installed on the tank walls.BLAIR RUBBER COMPANY SECTION 14: CURING INSTRUCTIONS CURING INSTRUCTIONSBLAIR ENG 140 V6 REV. 011
SECTION 14: CURING INSTRUCTIONSAfter the cure is completed, it is recommended that the water be allowed to cool down to approximately 110 F (43 C) before draining thevessel. This reduces any trapped air expansion. If the water temperature is slow to come down, it’s permissible to add cold water.5. CHEMICAL CURINGThere are cases where using heat to cure the rubber lining is not possible. Steam may not be available, or the equipment to produce thesteam is inadequate. Chemical cure rubber has been in the industry for many years. The cure system is based on sulfur and acceleratorsactivated by amines at low temperatures. Carbon Disulfide was used frequently in the past but because of its extreme flammability andtoxicity, it is not recommended today. We specifically do not recommend the use of carbon disulfide with our linings.Chemcure activator is coated on the rubber lining sheet and allowed to dry. Then another coat is applied and allowed to dry. It is essentialthat the Chemcure is allowed to completely dry before any heat is applied. Failure to do so may result in blisters from the trapped solventin the lining.Chemical cure linings are typically used for field repairs. This type of curing can only be done with a chemical activator that is added to alining that is designed to be cured in this manner. Curing of these types of linings may take days to weeks to fully cure depending on thetemperature it is exposed to. Steam, heat lamps or other heat sources may be used to accelerate the curing process.Even the best of chemical curatives applied with several coats may not penetrate through the lining and cure the lining adhesive. Care mustbe taken to ensure that no dynamic forces (chemical or physical) will be applied to the lining until it has cured throughout the lining.Chemcure is solvent based and, as in the adhesives and cements, may be hazardous to the health of the applicators. Suitable masks andbreathing apparatus during application of the products are required. All vapors should be removed from the tanks via adequate ventilation.Always observe proper safety precautions when using chemical cure rubber. Consult Blair’s technical department as well as lining andChemcure specifications for details. Refer to the Chemcure and lining MSDS for information regarding safety.STEAM REQUIREMENTS FOR ATMOSPHERIC CURESPounds of steam/hour during 2 hour warm-up period:Based on an enclosed vessel with 3/8” plate on bottom and 1/4” on sides and top:.05V .15A .005W pounds of steam/hourV - Volume in cubic feetA - Area in square feetW - Weight of rubber and steel in poundsBLAIR RUBBER COMPANY SECTION 14: CURING INSTRUCTIONS CURING INSTRUCTIONSBLAIR ENG 140 V6 REV. 012
SECTION 14: CURING INSTRUCTIONSPounds of steam per hour 30 Boiler HorsepowerExample of steam requirement @ 2000 pounds/hour:Steam source 1000’ away with 2” line - 75# pressure needed Steam source 500’ away with 2” line - 50# pressure needed Steam source 200’away with 2” line - 30# pressure neededFLOW OF STEAM PER 1000’ OF PIPE IN POUNDS/MINUTE50# GAUGE 5# GAUGE 0100# GAUGE 0LENGTH OF 600'1.29700'1.20800'1.12900'1.051000'1.02Example: If steam source is 100’ away and if a 2” pipe is used and gauge pressure is 50#, then 3.16 X 25.8 81.53# of steam delivery/minute.BLAIR RUBBER COMPANY SECTION 14: CURING INSTRUCTIONS CURING INSTRUCTIONSBLAIR ENG 140 V6 REV. 013
SECTION 14: CURING INSTRUCTIONSBOILER SIZE CALCULATIONSHeat Loss x (TF TI)BTU / HR Heat Loss1–eSpecific Heat()Heat loss is expressed as BTU’s lost per square foot per degree Fahrenheit above ambient.TF is the final temperature you expect to achieve.TI is the initial or ambient temperature.e is the natural logarithm.Specific heat is expressed as the BTU’s required to raise the temperatures of one pound of material one degree Fahrenheit in one hour.This formula uses the heat loss and specific heat of the entire tank. You will need the area of the tank in square feet for the calculations.To calculate heat loss of a tank sitting on a concrete pad, multiply the area of the roof and sides by 2.4 if uninsulated and by 0.5 if insulated.Add this to the area of the bottom multiplied by 0.1 and you have the heat loss of the tank. If the tank is elevated use the same multiplier forthe bottom that you used for the roof and sides.To calculate specific heat, you will need the total weight of the tank and 4 inches of concrete under the tank. 1/8 inch steel weights 5.1pounds per square foot. Concrete weighs 140 pounds per cubic foot. For open top tanks, assume 1/4 inch thick steel. Multiply the totalweight by 0.14 and you have the specific heat of the system. If the tank is elevated use only the weight of the steel.As an example, to calculate the boiler required to cure a 40 foot diameter by 40 foot high open top tank on a concrete pad. The averagethickness of the walls is 5/16 inch thick, the floor is 3/8 inch thick and 1/4 inch steel is assumed for the open top. Ambient temperature is60 F (16 C) and final temperature is 180 F (82ºC).Area of the roof 1257 square feetArea of the walls 5027 square feetArea of the floor 1257 square feetThe volume of concrete 0.33 ft x 1257 sq ft 415 cu ftCALCULATE HEAT LOSS - UNINSULATED1257 FT2 5027 FT26284 x 2.41257 FT2 x .1Total heat loss 6284 FT215,082 BTU/HR/ F126 BTU/HR/ F15,208 BTU/HR/ FBLAIR RUBBER COMPANY SECTION 14: CURING INSTRUCTIONS CURING INSTRUCTIONSBLAIR ENG 140 V6 REV. 014
SECTION 14: CURING INSTRUCTIONSCALCULATE SPECIFIC HEATRoof 1257 ft² x 10 lbsWalls 5027 ft² x 12.5 lbsFloor 1257 ft² x 15 lbsConcrete 415 ft³ x 140 lbsTotal WeightSpecific heat 152,363 x 0.14 12,570 lbs.62,838 lbs.18,855 lbs.58,100 lbs.152,363 lbs.21,331You now have all the information to calculate boiler size.BTU/HR 3,578,3531 boiler horsepower 33,500 BTU/HR3,578,353 33,500 107 horsepowerA 100 horsepower boiler will work but a 125 horsepower boiler is recommended.The same tank with insulation calculates to 84 horsepower. It is recommended that a 100 horsepower boiler be used.Generally, you should increase the boiler size for open top tanks because it is impossible to prevent steam leaking around your cover.For very large tanks, please call for more information.BLAIR RUBBER COMPANY SECTION 14: CURING INSTRUCTIONS CURING INSTRUCTIONSBLAIR ENG 140 V6 REV. 015
SECTION 14: CURING INSTRUCTIONSPRESSURE-TEMPERATURE EQUIVALENTS OF SATURATED STEAMGAUGE PRESSURE AT SEA LEVELPOUNDS PER SQUARE INCHTEMPERATURE F C0212.0100.05227.110GAUGE PRESSURE AT SEA LEVELPOUNDS PER SQUARE INCHTEMPERATURE F .970316.0157.872317.7158.7BLAIR RUBBER COMPANY SECTION 14: CURING INSTRUCTIONS CURING INSTRUCTIONSBLAIR ENG 140 V6 REV. 016
Cure charts with diagrams indicating the location of the temperature probes or thermocouples is necessary to make a rubber lining warranty valid. The methods of curing rubber, in order of preference, are as follows: 1. Autoclave Cure 2. Internal Pressure Cure 3. Exhaust, Or Atmospheric, Steam