Transcription
HUB 81670 REV 8/18INSTALLATION MANUALZIPSYSTEM.COM
HUB 81670 REV 8/18ZIP SYSTEM SHEATHING AND TAPEINSTALLATION MANUALATTENTION: This installation guide is intended to providegeneral information for the designer and end user. Thefollowing guidelines will help you safely and properly installthe ZIP System roof and wall wall sheathing. We urge you,and anyone installing this product, to read these guidelinesin order to minimize any risk of safety hazards and to preventvoiding any applicable warranties. This manual is a generalinstallation guide and does not cover every installationcondition. Proper installation shall be deemed to mean themost restrictive requirement specified by Huber EngineeredWoods (HEW), local building code, engineer or architect ofrecord or other authority having jurisdiction. You are fullyand solely responsible for all safety requirements and codecompliance. For additional information contact HuberEngineered Woods LLC.10925 David Taylor Drive, Suite 300Charlotte, NC 28262Phone: 800.933.9220 // Fax: 704.547.92282
HUB 81670 REV 8/18ZIP SYSTEM SHEATHING AND TAPEINSTALLATION MANUALSAFETY GUIDELINES: Follow all OSHA regulations andany other safety guidelines and safety practices duringinstallation and construction.Use approved safety belts and/or harnesses or otherfall protection equipment.Install ZIP System panels and tape only in dryconditions and on dry surfaces. Do not install in rain,snow, frost or other slippery conditions.Wear rubber-soled or other high-traction footwear whileinstalling ZIP System sheathing in a roof application.Do not wear footwear with worn soles or heels.Ensure the roofing surface is free from oil, chemicals,sawdust, dirt, tools, electric cords, air hoses, clothingand anything else that might create a tripping hazard.Install temporary toe boards along the ZIP System sheathing roof surface.3
HUB 81670 REV 8/18ZIP SYSTEM SHEATHING AND TAPEINSTALLATION MANUALCONTENTSZIP SYSTEM SHEATHING AND TAPEOVERVIEWNOTES & LIMITATIONSSTORAGE AND HANDLINGAVAILABLE PANEL SIZESTAPE SIZESFASTENING GUIDEGENERAL INFORMATION AND COMPATIBILITY781112131314ZIP SYSTEM WALL SHEATHINGGENERAL INSTALLATION - WALLPANEL ORIENTATION AND EDGE SPACINGFASTENINGTAPINGCOMMON DETAILSPIPESWINDOWSDOORSFOUNDATION TRANSITIONSTRAPPINGCLADDINGDECK AND PORCHES1717181920202642454748594
HUB 81670 REV 8/18ZIP SYSTEM SHEATHING AND TAPEINSTALLATION MANUALCONTENTSZIP SYSTEM ROOF SHEATHINGGENERAL INSTALLATION - ROOFPANEL ORIENTATION AND EDGE SPACINGTAPINGCOMMON DETAILSROOF COVERINGSICE AND WATER MEMBRANESH-CLIPSALTERNATIVE DETAILS606061626970715
HUB 81670 REV 8/18ZIP SYSTEM SHEATHING AND TAPEINSTALLATION MANUALCONTENTSCOMMON FIXESSMALL HOLESLARGE HOLESSAW KERFSCHIPS IN THE OVERLAYSIDING REMOVALCRANE HOLESDIRTY PANELS808286889093976
HUB 81670 REV 8/18ZIP SYSTEM SHEATHING AND TAPEINSTALLATION MANUALZIP SYSTEM SHEATHING // OVERVIEWZIP System roof and wall sheathing panels are oriented strandboard (OSB), wood structural panels with built-in protectiveoverlays that eliminate the need for building wrap or roofingfelt. Install the panels, tape the seams with ZIP System tape,and the building is rough dried-in.When used on a wall, ZIP System sheathing functions as acombination wall sheathing and code-recognized water-resistiveand air barrier. The sheathing panel seams are sealed withZIP System tape, protecting the wall from water intrusion.When ZIP System sheathing is utilized for roof applications,felt underlayment is not required. In wall and roof coveringssystem requiring multiple layers of water-resistive barriers orunderlayment, ZIP System sheathing and tape is intended toreplace only the first layer.ZIP System sheathing can be used with a range of exteriorcladdings and roof coverings. Approved wall coverings includebrick, vinyl, stone, wood fiber cement, wood and cedar shakes,traditional hard coat stucco and EIFS applications, howeverit is not recommended for use with adhesively attached EIFS.Approved roof coverings include asphalt-fiberglass shingles,metal tiles and panels, clay and concrete tiles, slate and slatetype shingles and wood shakes and shingles. Follow all claddingand roof covering manufacturer’s installation instructions. ZIPSystem sheathing may be used for roofs and walls in Type Vconstruction, in Type III construction as roof sheathing only,and other construction permitted under the InternationalResidential Code.7
HUB 81670 REV 8/18ZIP SYSTEM SHEATHING AND TAPEINSTALLATION MANUALZIP SYSTEM SHEATHING // NOTES & LIMITATIONSDo not use on roofs with slopes less than 2/12.Do not use abutted against general stone or masonrywithout providing a minimum of a 1/2" gap.Do not install ZIP System tape in temperaturesless than 0 FZIP System products are not recommended formanufactured housing applications that are builtunder a federal building code administered by theU.S. Department of Housing and Urban Development(HUD).Do not use ZIP System tape to permanently sealaround circular roof projections (plumbing vents,pipes, curved walls, etc.)ZIP System sheathing should be covered with thefinished roof covering or exterior cladding within 180days of installation.Finished roof and exterior cladding products shouldbe installed per the manufacturer’s installationinstructions.8
HUB 81670 REV 8/18ZIP SYSTEM SHEATHING AND TAPEINSTALLATION MANUALZIP SYSTEM SHEATHING // NOTES & LIMITATIONSWhen original roofing or claddings are removed andreplaced on existing ZIP System sheathing, theroof or wall should be covered with an additionalroofing underlayment or water resistive barrier prior toinstallation of the new finished roofing or cladding.In cladding systems requiring multiple layers of waterresistive barriers, like traditional hard-coat stucco,ZIP System sheathing is intended to replace onlythe first layer.9
HUB 81670 REV 8/18ZIP SYSTEM SHEATHING AND TAPEINSTALLATION MANUALZIP SYSTEM SHEATHING // NOTES & LIMITATIONSWET BLOWN CELLULOSE INSULATIONIn addition to following manufacturer installation instructions,we recommend a maximum moisture content of the celluloseof less than 25% measured at the inside surface of the ZIPSystem panel before closing the wall cavity.SECONDARY COATINGSDo not apply secondary coatings or treatments to ZIP System sheathing panels with the exception of the following:11Field applied water-soluble borate insecticide or fungicidetreatments applied to the non overlay side of the panel.See technical tip, “Termite Treatments on ZIP System sheathing,” on ZIPSystem.com for more information.2Permeable laminated radiant barrier foil or paint. For aradiant barrier foil or coating to be considered permeable,it must have an applied permeance of five perms orgreater as tested by the ASTM E 96 wet cup standard. Fora radiant foil, the permeance evaluation would includeany adhesive and/or backer used to laminate a foil. For aradiant paint/coating, the permeance evaluation should beconducted at the applied thickness of the paint/coating.10
HUB 81670 REV 8/18ZIP SYSTEM SHEATHING AND TAPEINSTALLATION MANUALZIP SYSTEM SHEATHING // STORAGE & HANDLINGSet panel stack on three supports (stickers) to keepoff the ground.Outdoors, cover panels loosely with waterproofprotective material.Anchor covers on top of the stack, but keep away fromsides and bottom to assure good air circulation.In high moisture environments, cut banding on thepanel stack to prevent edge damage.11
HUB 81670 REV 8/18ZIP SYSTEM SHEATHING AND TAPEINSTALLATION MANUALZIP SYSTEM SHEATHING // PANEL SIZESZIP System sheathing panels are available in 4' x 8' sheetswith self-spacing edge profiles and tongue and grooveedge profile (5/8 only). ZIP System panels are Exposure1 rated and are available in the following span ratings andperformance categories.The green ZIP System sheathing denotes a 7/16-inch panelwhile the sienna ZIP System sheathing denotes either a 1/2inch or 5/8-inch panel. Both the green and the sienna canbe used interchangeably for the wall or roof.24/16, Structural 1, 7/16 PERF CATNOTE: 4’ x 8’ 7/16-inch Structural 1 are not available in allareas of the country. Please check with your supplier foravailability in your area. Available lengths in 7/16 thickness:- 4' x 8'- 4' x 9'- 4' x 10'32/16, Structural 1, 1/2 PERF CATAvailable lengths in 1/2 thickness:- 4' x 8'40/20, Structural 1, 5/8 PERF CATAvailable lengths in 5/8 thickness:- 4' x 8'Longer length panels are available for wall applications.12
HUB 81670 REV 8/18ZIP SYSTEM SHEATHING AND TAPEINSTALLATION MANUALZIP SYSTEM SHEATHING // TAPE SIZESPlate Size 42” x 50”Print area 42” x 48”ZIP System tape rolls are availablein 3-3/4 inch and 6 inch widths.Non-print area ( ) .75” from top and bottomBleed ( ) .125”ZIP System stretch tape rolls areavailable in 6 inch and 10 inch widths.Plate Size 42” x 50”Print area 42” x 48”Non-print area ( ) .75” from top and bottomBleed ( ) .125”Additional widths are forthcomingZIP SYSTEM SHEATHING // FASTENINGZIP System sheathing circles denote 16 inch o.c. framingand squares denote 24 inch o.c. framing.SQUARE 24 inch o.c. framingCIRCLES 16 inch o.c. framing13
HUB 81670 REV 8/18ZIP SYSTEM SHEATHING AND TAPEINSTALLATION MANUALZIP SYSTEM SHEATHING// GENERAL INFORMATION & COMPATIBILITYFASTENERSZIP System sheathing must be installed with code-approvedfasteners and by code approved methods. Please note, fastenersused to install ZIP System sheathing are not required to bering-shank, galvanized, stainless steel unless otherwise statedby the local building code, designer of record or the engineerof record.COMPATIBLE SUBSTRATESZIP System tape is compatible with dimensional lumber(treated and untreated), OSB, plywood, house-wraps, PVC,vinyl and metal substrates. Please note, the ZIP System panelsubstrate must be dry to the touch and free of any dirt or debrisat the time of tape installation.SEALANTSZIP System sheathing and tape is compatible with butyl,polyurethane and 100% silicon sealants. When using 100%silicon sealants over ZIP System tape use a primer such as3M Hi-Strength 90 or rub the tape with an acetone cleaner.Please note, when installing ZIP System tape over sealants thesealants must be completely cured before the tape is installed.14
HUB 81670 REV 8/18ZIP SYSTEM SHEATHING AND TAPEINSTALLATION MANUALZIP SYSTEM SHEATHING// GENERAL INFORMATION & COMPATIBILITYFLASHINGS - TAPESZIP System tape must be used where two ZIP System panelscome together to create a seam at inside corners, outside cornersand in the same plane; however, other code approved flashingtapes that satisfy AAMA-711 or AC-148 can be used to flashpenetrations and fenestrations.FLASHINGS – FLUID APPLIEDZIP System liquid flash can be used in lieu of ZIP System tapewhere two ZIP System panels come together to create a seam atinside corners, outside corners and in the same plane. Other codeapproved liquid applied flashing membranes that satisfy AAMA714 can be used to flash penetrations and fenestrations. Whenusing Liquid Flash or other fluid applied flashing products overZIP System tape, use a primer such as 3M Hi-Strength 90 or rubthe tape with an acetone cleaner.WRINKLES IN THE TAPERolling the tape during installation will significantly reduce thechance of tape wrinkling occurring. If wrinkles occur in the ZIPSystem tape there are two options. First, try to roll the wrinklesout with the ZIP System tape roller. This should help eliminateany wrinkles or fish mouths (avenues for water to get to the seam).Secondly, if rolling the tape does not remove the fish mouths thatsection of tape can be removed and a new piece of tape must beapplied that overlaps the existing tape by three inches or placeanother piece of tape over the fish mouth and roll the tape.15
HUB 81670 REV 8/18ZIP SYSTEM SHEATHING AND TAPEINSTALLATION MANUALZIP SYSTEM SHEATHING// GENERAL INFORMATION & COMPATIBILITYPARAPET WALL TERMINATIONZIP System sheathing used as parapet wall sheathing iscompatible with TPO and EPDM built-up roofing membraneterminations. It is recommended to transition from the top ofthe built-up membrane to the surface of ZIP System sheathingwith a piece of ZIP System tape or ZIP System liquidflash. Refer to roofing membrane manufacturer’s installationinstructions to ensure the roofing membrane is firmly attachedto the wall sheathing. Please note, a polyurethane or solventbased adhesive should be used when adhering the built-upmembrane to ZIP System sheathing, and that all panel seamsshould be taped prior to installing the built-up membrane overZIP System sheathing.TOOLSCommon Recommended- Pneumatic nail gun- Flush nail collars- Framing hammer- Air line regulators- Air compressor- Speed square- Tape Roller- PPE16
HUB 81670 REV 8/18ZIP SYSTEM SHEATHING AND TAPEINSTALLATION MANUALZIP SYSTEM WALL SHEATHING// GENERAL INSTALLATION - WALLThe following installation steps are presented as a generaloutline of the installation process. These are manufacturerinstallation recommendations – please visit ZIPSystem.com fora library of flashing and installation details. You are fully andsolely responsible for all safety requirements. Good constructionand safety practices should be followed at all times.ZIP SYSTEM WALL SHEATHING// PANEL ORIENTATION AND SPACINGInstall ZIP System sheathing panels positioned with the waterresistive barrier facing outside. The panels may be installedwith the long side of the panel oriented either horizontally orvertically to the framing members. Walls that are designed toresist lateral shear forces and sheathed with wood structuralpanels typically require solid framing or blocking behind allpanel edges. If oriented horizontally, block horizontal joints ifwall is designed for bracing or as a shear wall.17
HUB 81670 REV 8/18ZIP SYSTEM SHEATHING AND TAPEINSTALLATION MANUALZIP SYSTEM WALL SHEATHING// PANEL ORIENTATION AND SPACING- 1/8" spacing between square edges of all adjacent panels isrecommended in accordance with industry standards for woodsheathing installation.- The unique edge profile is designed to accommodate incrementalpanel expansion and does not require manual gapping along the8' edges.- Maintain 1/8" space where 8' panel edges meet 4' panel edges.Unique edge profile does not provide the full 1/8" recommendedspace in this situation.- Maintain 1/8" space where 4' edges meet. Unique edge profile ison 8' edges only.- For information on vertical panel installations, go here to learn more.ZIP SYSTEM WALL SHEATHING // FASTENINGFasten the panels to the framing members with code approvedfasteners. Space fasteners 6" o.c. along supported edges and 12" o.c.at intermediate supports, unless otherwise specified by local code orthe designer of record. It’s the responsibility of the general contractor toverify proper fastener type and spacing prior to installation.Apply fasteners 3/8" from the ends and corners. ZIP Systemsheathing does not have proprietary shear values and havethe same shear values of Structural 1* OSB or plywood ofequivalent thickness.*Note: 4’ x 8’ 7/16” ZIP System “Structural 1” panels are not available in all areasof the country. Please check with your local supplier for availability in your area.18
HUB 81670 REV 8/18ZIP SYSTEM SHEATHING AND TAPEINSTALLATION MANUALZIP SYSTEM WALL SHEATHING // TAPINGApply ZIP System tape after all ZIP System sheathing panelsare fully fastened to wall-framing members. ZIP System tapeis a contact tape that requires pressure for an adequate seal.REMEMBER TO ALWAYS:Only ZIP System tape should be used to seal the seamsof ZIP System panels, including inside and outsidecorners.Ensure that the panel surface is dry and free of sawdustand dirt prior to taping.Ensure that the tape is centered over the seam within /- 1/2" to provide adequate coverageWherever tape splices occur at a horizontal or verticalseam, create an overlapping splice of at least 3".At T-joints, tape pieces should overlap by at least 1".Tape over any areas of the panel that are damagedduring construction.Use the ZIP System tape gun or roller to apply pressureto the tape and smooth out any wrinkles.19
HUB 81670 REV 8/18ZIP SYSTEM SHEATHING AND TAPEINSTALLATION MANUALZIP SYSTEM WALL SHEATHING // TAPINGTake special care to remove any voids and/or trapped air atsplice areas and T-joints. When taping inside corner seams, itis helpful to cut a manageable length of ZIP System tape andhold the ends in the middle using only your index fingers andthumbs. Slightly pulling both ends of the tape causes the tapeedges to naturally curl inward. With the tape in tension, placeit in the inside corner. Repeat as you go up the full height of thewall. For optimal air leakage reduction, all untaped edges ofthe panels can be caulked, gasketed or sealed with a weatherstripping material.20
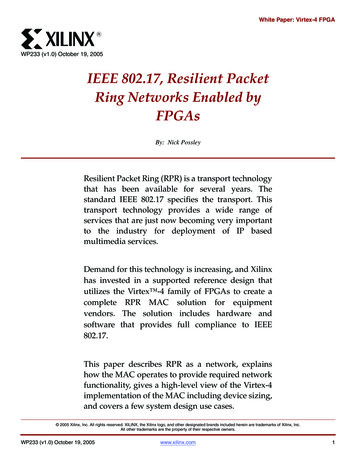
HUB 81670 REV 8/18ZIP SYSTEM SHEATHING AND TAPEINSTALLATION MANUAL21ZIP SYSTEM WALL SHEATHING // COMMON DETAILSTRETCH TAPESHIMPIPES // ZIP SYSTEM TAPE AROUNDBOOTSTEP 1: Insert the boot over the penetrationTAPEROLLER
HUB 81670 REV 8/18ZIP SYSTEM SHEATHING AND TAPEINSTALLATION MANUAL22ZIP SYSTEM WALL SHEATHING // COMMON DETAILSTRETCH TAPESHIMPIPES // ZIP SYSTEM TAPE AROUNDBOOTSTEP 2: Place a piece of ZIP System tape onthe bottom of the bootTAPEROLLER
HUB 81670 REV 8/18ZIP SYSTEM SHEATHING AND TAPEINSTALLATION MANUAL23ZIP SYSTEM WALL SHEATHING // COMMON DETAILSTRETCH TAPESHIMPIPES // ZIP SYSTEM TAPE AROUNDBOOTSTEP 3: Place of piece of ZIP System tapeon each jamb of the bootTAPEROLLER
HUB 81670 REV 8/18ZIP SYSTEM SHEATHING AND TAPEINSTALLATION MANUAL24ZIP SYSTEM WALL SHEATHING // COMMON DETAILSTRETCH TAPESHIMPIPES // ZIP SYSTEM TAPE AROUNDBOOTSTEP 4: Place a piece of tape on the head ofthe boot and roll all pieces of tapeTAPEROLLER
HUB 81670 REV 8/18ZIP SYSTEM SHEATHING AND TAPEINSTALLATION MANUAL25ZIP SYSTEM WALL SHEATHING // COMMON DETAILPIPES // ZIP SYSTEM STRETCH TAPESTRETCH TAPESTEP 1: Starting from the top, center a pieceof ZIP System stretch tape so that thetape can be pulled down on either side of the pipe sothe tape can meet together in the middle of the pipe.SHIM
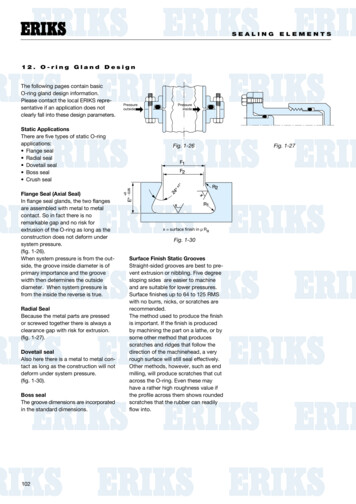
HUB 81670 REV 8/18ZIP SYSTEM SHEATHING AND TAPEINSTALLATION MANUAL26ZIP SYSTEM WALL SHEATHING // COMMON DETAILWINDOW // FLANGED WINDOWSTRETCHTAPETAPESTRETCHSTEP 1: Install a piece of ZIP System stretch tape and install shimswindow per manufacturer’s installation guidelines.SHIMSHIMTTA
HUB 81670 REV 8/18ZIP SYSTEM SHEATHING AND TAPEINSTALLATION MANUAL27ZIP SYSTEM WALL SHEATHING // COMMON DETAILSTRETCH TAPE WINDOWSHIMSTRETCH TAPEWINDOW // FLANGEDTAPESHIMTAPE ROLLERSEALANTROLLERSTEP 2: Apply sealant on the back side ofthe window flange and set into the rough opening.Install ZIP System tape on the window jambs.SEAL
HUB 81670 REV 8/18ZIP SYSTEM SHEATHING AND TAPEINSTALLATION MANUALZIP SYSTEM WALL SHEATHING // COMMON DETAILWINDOW // FLANGED WINDOWSTRETCH TAPESHIMSTEP 3: Install ZIP System tape at head of window.TAPE28
HUB 81670 REV 8/18ZIP SYSTEM SHEATHING AND TAPEINSTALLATION MANUAL29ZIP SYSTEM WALL SHEATHING // COMMON DETAILSTRETCHSTRETCHTAPETAPEWINDOW // FLANGED WINDOWSHIMSHIMTAPETAPEROLLERROLLERSTEP 4: Install head flashing above window.Optional for self-flashed J-channel windows. Tape tophead of flashing. From the back side of the window,install window/door foam per window manufacturer’sinstallation guidelines.SEAL
HUB 81670 REV 8/18ZIP SYSTEM SHEATHING AND TAPEINSTALLATION MANUALZIP SYSTEM WALL SHEATHING // COMMON DETAILWINDOW // FLANGED WINDOWPRO TIP: From the interior, apply low-pressure polyurethanefoam (for windows) between the rough opening andthe window frame. (Caulk sealant compatible withthe sill flashing may be used at the sill if the openingbetween the sill flashing and window is too narrow toallow the use of low-pressure polyurethane foam.)30
HUB 81670 REV 8/18ZIP SYSTEM SHEATHING AND TAPEINSTALLATION MANUAL31ZIP SYSTEM WALL SHEATHING // COMMON DETAILWINDOW // STORE FRONT WINDOWSTRETCH TAPESTRETCHSHIMTAPETAPESHIMSTEP 1: Install a piece of ZIP System stretch tape in the window sill and then installZIP System tape in the jambs of the rough opening.TA
HUB 81670 REV 8/18ZIP SYSTEM SHEATHING AND TAPEINSTALLATION MANUAL32ZIP SYSTEM WALL SHEATHING // COMMON DETAILSTRETCH TAPEWINDOW // STORE FRONT WINDOWSHIMTAPE TAPESTRETCHSTEP 2: Install a piece of ZIP System stretch tape in the head of the roughopening overlapping the jamb flashing.SHIMROLLERTAPE
HUB 81670 REV 8/18ZIP SYSTEM SHEATHING AND TAPEINSTALLATION MANUALZIP SYSTEM WALL SHEATHING // COMMON DETAILWINDOW // STORE FRONT WINDOWSTEP 3: Secure window in accordance to manufacturer’swritten instructions and insert a backer rod in betweenthe gap of the rough opening and the window.33
HUB 81670 REV 8/18ZIP SYSTEM SHEATHING AND TAPEINSTALLATION MANUALZIP SYSTEM WALL SHEATHING // COMMON DETAILSTRETCH TAPEFRONTSHIM WINDOWTAPEWINDOW // STOREROLLERSTEP 4: Using ZIP System liquid flash flash fromthe window frame on to the panel side.SEALANT34
HUB 81670 REV 8/18ZIP SYSTEM SHEATHING AND TAPEINSTALLATION MANUALZIP SYSTEM WALL SHEATHING // COMMON DETAILSTRETCH TAPESHIMTAPEWINDOW // PICTUREFRAMEWINDOWROLLERSTEP 1: Install a bead of sealant between the1x or 2x wood stud and the surface of theZIP System sheathing.SEALANT35
HUB 81670 REV 8/18ZIP SYSTEM SHEATHING AND TAPEINSTALLATION MANUAL36ZIP SYSTEM WALL SHEATHING // COMMON DETAILWINDOW // PICTURE FRAME WINDOWSTRETCH TAPESTRETCHSHIMTAPETAPESHIMSTEP 2: Install a piece of ZIP System tapeover the buck and minimum of 2 inches of the surfaceof ZIP System sheathing. Install a piece of ZIPSystem stretch tape into the rough opening. Next,apply sealant on the back side of the window flangeand set the window into the rough opening.TA
HUB 81670 REV 8/18ZIP SYSTEM SHEATHING AND TAPEINSTALLATION MANUALZIP SYSTEM WALL SHEATHING // COMMON DETAILWINDOW // PICTURE FRAME WINDOW STRETCH TAPESHIMTAPESTEP 3: Install a piece of ZIP System tape over the windowflange jamband a minimum of 2 inches of the surfaceof ZIP System sheathing.37
HUB 81670 REV 8/18ZIP SYSTEM SHEATHING AND TAPEINSTALLATION MANUAL38ZIP SYSTEM WALL SHEATHING // COMMON DETAILSTRETCHTAPESHIM TAPEWINDOW // PICTURE LERSHIM SEALANTSTEP 4: Install a piece of ZIP System tape over the head of the windowflange and over a minimum of 2 inches of the surfaceof ZIP System sheathing. At the top corners of thepicutre frame window install a piece of ZIP System stretch tape.T
HUB 81670 REV 8/18ZIP SYSTEM SHEATHING AND TAPEINSTALLATION MANUALZIP SYSTEM WALL SHEATHING // COMMON DETAILSTRETCH TAPESHIMWINDOW // RECESSEDWINDOWTAPESTEP 1: Install ZIP System liquid flash into therough opening.ROLLERSEALANT39
HUB 81670 REV 8/18ZIP SYSTEM SHEATHING AND TAPEINSTALLATION MANUALZIP SYSTEM WALL SHEATHING // COMMON DETAILSTRETCH TAPESHIMWINDOW // RECESSEDWINDOWTAPEROLLERSTEP 2: Apply sealant on the back side of thewindow flange and set into the rough openingafter the liquid flash has cured.SEALANT40
HUB 81670 REV 8/18ZIP SYSTEM SHEATHING AND TAPEINSTALLATION MANUALZIP SYSTEM WALL SHEATHING // COMMON DETAILSTRETCH TAPESHIMWINDOW // RECESSEDWINDOWTAPEROLLERSEALANTSTEP 3: Secure window to manufacturer writteninstructions, install ZIP System liquid flashon to the flange of the window on to the existing liquidflash a minimum of 1 inch.41
HUB 81670 REV 8/18ZIP SYSTEM SHEATHING AND TAPEINSTALLATION MANUAL42ZIP SYSTEM WALL SHEATHING // COMMON DETAILSTRETCHTAPETAPESHIMSTRETCHMOULDTAPE TAPESHIMDOOR STRETCH// P 1: Install ZIP System tape inthe jambs of the rough opening. Install sealant asthree separate beads in the threshold and minimumof 6-inch up the jambs.ROLLERSEALANT
HUB 81670 REV 8/18ZIP SYSTEM SHEATHING AND TAPEINSTALLATION MANUALZIP SYSTEM WALL SHEATHING // COMMON DETAILSTRETCHTAPESHIMTAPEDOOR // TYPICALBRICKMOULDDOORROLLERSEALANTSTEP 2: Once the door has been installed into therough opening in accordance to the manufacturer’sinstallation guidance, apply a bead of sealant atmolding/ZIP System sheathing intersection.43
HUB 81670 REV 8/18ZIP SYSTEM SHEATHING AND TAPEINSTALLATION MANUAL44ZIP SYSTEM WALL SHEATHING // COMMON DETAILSTRETCHTAPESHIMSTRETCHTAPESHIMDOOR // TYPICAL BRICK MOULDDOORSTEP 3: Install head flashing above doorand then tape top of head flashing.TAPETAPEROLLERROLLERSEAL
HUB 81670 REV 8/18ZIP SYSTEM SHEATHING AND TAPEINSTALLATION MANUALZIP SYSTEM WALL SHEATHING // COMMON DETAILTRANSITIONS // FOUNDATION TRANSITIONSHEATHING IN PLANE WITH FOUNDATION WALL:Hold the bottom edge of ZIP System sheathing aminimum of ½ inch from the foundation wall.45
HUB 81670 REV 8/18ZIP SYSTEM SHEATHING AND TAPEINSTALLATION MANUALZIP SYSTEM WALL SHEATHING // COMMON DETAILTRANSITIONS // FOUNDATION TRANSITIONSHEATHING OUT OF PLANE WITH FOUNDATION WALL:Install ZIP System sheathing in line with the bottomof the sill plate.46
HUB 81670 REV 8/18ZIP SYSTEM SHEATHING AND TAPEINSTALLATION MANUAL47ZIP SYSTEM WALL SHEATHING // COMMON DETAILSTRAPPINGSTRETCHSTRETCHTAPETAPESHIMSHIMTape the ZIP System sheathing paneledges prior to installing strapping.TAPETAPEROLLERROLLERSEAL
HUB 81670 REV 8/18ZIP SYSTEM SHEATHING AND TAPEINSTALLATION MANUAL48ZIP SYSTEM WALL SHEATHING // COMMON DETAILCLADDING // LAPPEDSTRETCHSTRETCHTAPETAPESHIMSHIMTAPETAPESTEP 1: Tape top edge of drip edge back tothe surface of ZIP System sheathing.ROLLERROLLERSEAL
HUB 81670 REV 8/18ZIP SYSTEM SHEATHING AND TAPEINSTALLATION MANUALZIP SYSTEM WALL SHEATHING // COMMON DETAILCLADDING // LAPPEDSTEP 2: Install lapped siding in accordanceto siding manufacturer’s written instructions.49
HUB 81670 REV 8/18ZIP SYSTEM SHEATHING AND TAPEINSTALLATION MANUAL50ZIP SYSTEM WALL SHEATHING // COMMON DETAILCLADDING // OLLERSTEP 1: Tape the top edge of the masonryflashing back to the ZIP System sheathing. Installbrick ties in accordance to local building code andbrick tie manufacturer’s written instructions.SEAL
HUB 81670 REV 8/18ZIP SYSTEM SHEATHING AND TAPEINSTALLATION MANUALZIP SYSTEM WALL SHEATHING // COMMON DETAILCLADDING // BRICKSTEP 2: Install brick veneer with a minimum of a 1 inch airspace per the local building code.51
HUB 81670 REV 8/18ZIP SYSTEM SHEATHING AND TAPEINSTALLATION MANUAL52ZIP SYSTEM WALL SHEATHING // COMMON DETAILCLADDING // ROLLERSTEP 1: Tape the top edge of the weepscreen flashing back to the ZIP System sheathing.Install a mechanically fastened water resistive barrierequivalent to a Grade D felt paper after all ZIP System sheathing panel seams have been taped.SEAL
HUB 81670 REV 8/18ZIP SYSTEM SHEATHING AND TAPEINSTALLATION MANUALZIP SYSTEM WALL SHEATHING // COMMON DETAILCLADDING // STUCCOSTEP 2: Install wire mess, scratch coat, brown and finishin accordance to stucco manufacturer’s writteninstructions. Install expansion joints as needed.53
HUB 81670 REV 8/18ZIP SYSTEM SHEATHING AND TAPEINSTALLATION MANUAL54ZIP SYSTEM WALL SHEATHING // COMMON DETAILCLADDING // OLLERSTEP 1: Tape the top edge of the dripedge/weep screen flashing back to the ZIP System sheathing. Install a mechanically fastened waterresistive barrier equivalent to a Grade D felt paperafter all ZIP System sheathing panel seams havebeen taped.SEAL
HUB 81670 REV 8/18ZIP SYSTEM SHEATHING AND TAPEINSTALLATION MANUALZIP SYSTEM WALL SHEATHING // COMMON DETAILCLADDING // STONESTEP 2: Install wire mesh, scratch coat, brown and finishin accordance to stone manufacturer’s writteninstructions.55
HUB 81670 REV 8/18ZIP SYSTEM SHEATHING AND TAPEINSTALLATION MANUAL56ZIP SYSTEM WALL SHEATHING // COMMON DETAILCLADDING // LLERSTEP 1: Tape the top edge of the dripedge back to the ZIP System sheathing. Install foamlayer using mechanical fasteners.SEAL
HUB 81670 REV 8/18ZIP SYSTEM SHEATHING AND TAPEINSTALLATION MANUALZIP SYSTEM WALL SHEATHING // COMMON DETAILCLADDING // EIFSSTEP 2: Install wire mesh, scratch coat, brown and finishin accordance to EIFS written instructions. Installexpansion joints as needed.57
HUB 81670 REV 8/18ZIP SYSTEM SHEATHING AND TAPEINSTALLATION MANUALZIP SYSTEM WALL SHEATHING // COMMON DETAILDECKS & PORCHESSTEP 1: Install ledger board in accordance to designer ofrecord.58
HUB 81670 REV 8/18ZIP SYSTEM SHEATHING AND TAPEINSTALLATION MANUAL59ZIP SYSTEM WALL SHEATHING // COMMON DETAILDECKS & PORCHESSTRETCHSTRETCHTAPETAPESHIMSHIMTAPETAPESTEP 2: Tape the top edge of the dripedge back to the ZIP System sheathing.ROLLERROLLERSEAL
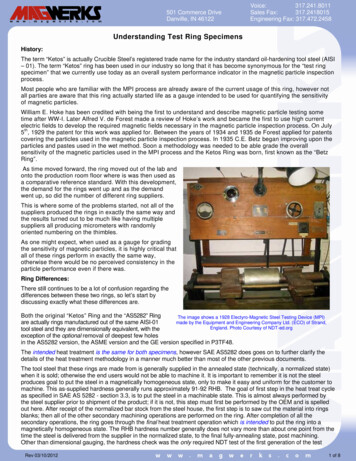
HUB 81670 REV 8/18ZIP SYSTEM SHEATHING AND TAPEINSTALLATION MANUALZIP SYSTEM ROOF SHEATHING// GENERAL INSTALLATION - ROOFThe following installation steps are presented as a generaloutline of the installation process. These are manufacturerinstallation recommendations – please visit ZIPSystem.com fora library of flashing and installation details. You are fully andsolely responsible for all safety requirements. Good constructionand safety practices should be followed at all times.ZIP SYSTEM ROOF SHEATHING// PANEL ORIENTATION AND SPACINGEnsure that the panel surface is dry and clean of any nails,sawdust, or other debris or protrusions prior to installing orwalking on the panels.After ensuringcompliancewith all OSHA and localcode safety guidelines, installZIP System sheathing panelswith the moisture barriersurface facing outside. The longedge (8’) should be orientedperpendicular to the framingmembers, and panels should beinstalled with the 4’ edge seamsstaggered a minimum of 24”60
HUB 81670 REV 8/18ZIP SYSTEM SHEATHING AND TAPEINSTALLATION MANUALZIP SYSTEM ROOF SHEATHING/
it is not recommended for use with adhesively attached EIFS. Approved roof coverings include asphalt-fiberglass shingles, metal tiles and panels, clay and concrete tiles, slate and slate-type shingles and wood shakes and shingles. Follow all cladding and roof covering manufacturer's installation instructions. ZIP