Transcription
OnlPremium 2015Level 1ySage 50 AccountingCoursewareForEvaluation1618-1MasterTrak Accounting Series
Sage 50Premium Accounting 2015Lesson ObjectivesOnlLesson 1: IntroductionyLevel 1The objective of this lesson is to introduce you to the basic operation of Sage 50 Premium Accounting 2015.Upon successful completion of this lesson, you should know how to:define what Sage 50 Accounting is work with the Session Date start and exit Sage 50 Accounting input dates into Sage 50 Accounting identify the Sage 50 Accounting Home window change to accounting terminology move around Sage 50 Accounting review the General Module linked accounts use the Help system input, adjust, or reverse General Journal understand the Chart of Accounts create, modify, find, edit and delete accounts store and recall recurring transactions save changes to data files produce a General Journal report find and amend the company information backup data filesluatiotransactionsvaOverviewn What is Sage 50 Premium Accounting 2015?Sage 50 Premium Accounting 2015 is an integrated, modular accounting package suitable for most small toEmedium-sized businesses needing such accounting modules as the General Ledger, Accounts Payable,Accounts Receivable, Canadian Payroll, Inventory, Time and Billing and Project (Job) Costing.Sage 50 Accounting is a popular program as it includes a variety of important and “user-friendly” features.When using the program, windows and data entry screens resemble their actual paper counterparts; forr Foexample, the Sales Journal screen resembles a paper invoice. The package is easy to learn, providing you with icons, menus and toolbars, as well as keyboard-activatedcommands. You can customize the package to your needs with such options as interest on overdue receivableaccounts, using non-accounting terminology, varying the aging periods for Receivables and Payables. Payroll entry is quick and straightforward, eliminating the need for manual tax table searching withcurrent payroll tables. (Additional fees apply.) You can track profitability by job or project to determine the most profitable areas of your business.1618-1 v1.00 CCI Learning Solutions Inc.1
Lesson 1 Sage 50 Premium Accounting 2015 – Level 1You can keep accurate track of your inventory, including inventory turnover and minimum inventorylevels. You can customize and print invoices, cheques and statements. You can print professional reports and graphs without wasting time designing and formatting. In one easy report, you can track all Sales Taxes, (GST, HST and PST) paid or received on transactions The program offers extensive help and on-line accounting advice, as well as assistance available fromOnllocal Certified Consultants or Premier Advisors. You have the ability to use Purchase Orders, To Do Lists, Check Lists, Business Advice, Sage 50 Wizardsand toolbar buttons. The bank reconciliation feature can be fully automated with downloaded statements from the Internet(discussed in the Level 2 courseware). yprocessed using the Payables and Receivables modules.This version enables you to export data to Microsoft Excel, Access or other programs, provides automaticadvice, a credit card section, lets you update budget amounts, provides the ability to create quotes to ncustomers or quotes from vendors, and keeps track of shipping information and management reports.It also provides automatic import of emailed invoices, orders and quotes. You can send emails to vendors luatioand customers directly from the vendor and customer ledgers, and email invoices to customers.The software also provides for maintenance of accounts in foreign currency (discussed in the Level 2courseware).Starting Sage 50 AccountingThere are a number of ways to start Sage 50 Accounting, depending on how it was installed on your system: Click Start, and then All Programs. Click Sage 50 Premium Accounting 2015 on the menu and thenSage 50 Premium Accounting (2015) on the submenu.Double-click the Sage 50 Premium Accounting 2015 icon on the desktop.va This courseware requires the data to be saved on a hard drive. Please see the Preface for instructionson how to download the data files from www.ccilearning.com and then expand the data files to adesignated place, as directed by your instructor.ELearn the SkillIn this exercise, you will learn how to start Sage 50 Accounting.At the Windows desktop, click Start, All Programs.2Click Sage and then Sage 50 Premium Accounting on the submenu. (You may have to click Sage 50r1FoPremium Accounting again on the next submenu.)21618-1 v1.00 CCI Learning Solutions Inc.
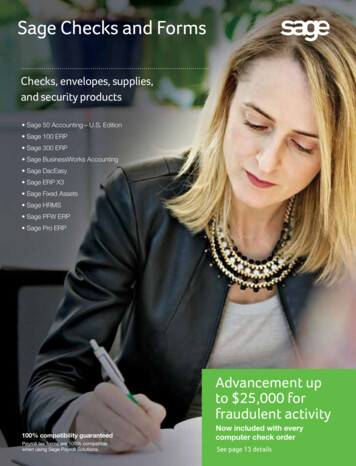
Lesson 1Leave this screen displayed for the next exercise to learn more about the Select Company window.luatio3nOnlyIntroductionSelecting a Set of Data FilesEvery time you enter the Sage 50 Accounting environment, the opening screen or window asks you to selectthe company data files to use from existing data files stored on your computer or network. This enables youto have several companies’ accounting data files on your hard disk.If you are just beginning to work with Sage 50 Accounting, you will not have any existing accounting datafiles and you will have to create them. You can create a new set of files from scratch by entering all of theGeneral Ledger accounts. Alternatively, you can create a set of files by using the “starter” data file templatesvathat come with Sage 50 Accounting.In the Level 2 courseware, you will learn to create the accounting data files from scratch. Creating a companyand preparing data files using one of Sage 50 Accounting’s pre-defined Chart of Accounts templates arecovered in the Appendix of this courseware. For this courseware, you will work with a set of data files thatEhave already been set up for you.From the Sage 50 – Sage 50 Premium Accounting screen, you will see the following:Open samplercompanyUse this feature as a tutorial and a learning tool to help you learn Sage 50Accounting. This can also be very useful to review how the professionals completedsome more complicated transactions.When you are starting a new company, you can choose to start from scratch or selectRestore fromRestore from your backup data in the event your current data is corrupt and you areSelect an existingWhen you want to use one of the companies you worked on previously.FoCreate a newcompanybackupcompanyamong the many Chart of Accounts templates provided by Sage 50 Accounting.unable to open it in Sage 50 Accounting.1618-1 v1.00 CCI Learning Solutions Inc.3
Lesson 1Sage 50 Premium Accounting 2015 – Level 1Open the lastcompany youworked onOpen the file for the last company you worked on. This option will not appear thefirst time you start Sage 50 Accounting.Do not show thisSelect this option to bypass the Sage 50 Premium Accounting window and take youwindow at startupfile. Except for experienced users, it is generally not a good idea to checkmark thisdirectly to the Sage 50 Accounting Open Company window to select an existing databox.ySelect CompanyOnlIf you decide to store your company data files on your own hard disk, store these files within the Sage 50Premium Accounting\blankdb folder (generally found in C:\Program Files). Sage 50 Accounting has createdthis folder for this purpose so that you can easily locate your company data file(s).Throughout this courseware, the material assumes that the default drive for saving data files of informationis your hard disk drive, usually Drive C. Check with your instructor to learn where you should save the files,Learn the Skillnor where they may be located on the network, for your course.In this exercise, you will restore and open an existing company data file.luatioThe student data file download from CCI Learning is comprised of two sets of data files – Harmony HouseMusic - Student.cab and United Building Supplies - Student.cab.For Sage 50 Accounting to use these data files, they must be restored to the computer.In the Sage 50 window select Restore from backup and click OK.2In the Restore from Backup dialog box click Next.3Click Browse to locate the Harmony House Music - Student.CAB file, select the file and click Open.4In the Select Backup File dialog box click Next.5In the Confirm Backup File dialog box click Next.6Browse to the folder where the restored data file is to be stored, and type: HHM Lesson 1 - your name inva1the File name field to replace the word New and click Save. (Use your own name to replace the wordsyour name)7In the New File Name dialog box click Next, then Finish.EThe data file will be restored and Sage 50 Accounting will proceed to open it.If you are working with a later version of Sage 50 Accounting you may be asked to upgrade the data file tothe more recent version. The data file for this course was created using Version A. In the event you need toForupgrade accept all the prompts by clicking Next and finally Finish.84The Session date should be February 28, 2015 (02/28/2015). Click OK to accept the Session Date.1618-1 v1.00 CCI Learning Solutions Inc.
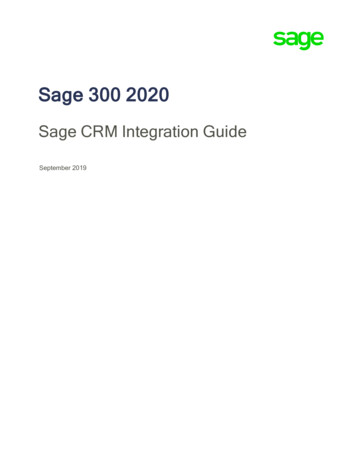
Lesson 1IntroductionOn the screen you may see several windows:Getting Started window Checklists – turned off in the Harmony House Music data file Daily Business Manager - turned off in the Harmony House Music data file BC PST Update Reminder - turned off in the Harmony House Music data file Product Enhancement Program window (only shows up under some circumstances).va9luationOnly If necessary, close the BC Provincial Sales Tax (PST) Changes Reminder and click OK in the Sage 50 –Warning screen.ELooking at the Getting Started WindowThe Getting Started window should appear in front of the Sage 50 Accounting Home window. If it does not,you may need to minimize the Home screen to see it. The purpose of this window is to assist in setting upryour company and educating you on using the various modules (such as the General Ledger and AccountsFoReceivables for example) after the database has been created.As you progress through the exercises in this course, you may occasionally note a variance in the imagedisplayed on your computer screen to that shown in the manual. There are a number of reasons for thatto occur. The version used to create this courseware is the Sage 50 Premium Accounting Educationversion. Sage 50 occasionally creates updates, which may contain slight enhancements and/or changes.This will not affect the overall operation of the program.1618-1 v1.00 CCI Learning Solutions Inc.5
Lesson 1luationOnlySage 50 Premium Accounting 2015 – Level 1There are four parts to the window to make understanding the modules easier and more efficient, so youcan utilize the program immediately; otherwise, if you are already familiar with the program, you can deselectthe Show this window on start up option and go directly to the Sage 50 Accounting Home window thenext time you start the program. If this option has been deselected, it can be brought back to the screen byselecting Getting Started Guide from the Setup menu.ExploreThere are nine quick start videos that vary in length and will assist you in learning thesoftware. The videos include What’s New in Sage 50 Accounting, The Home Window,Setup Guide – Customers, Setup Guide - Vendors, Setup Guide - Employees, Setup GuidevaSage 50- Accounts, Reports, Sage 50 – Essentials, and Sage 50 – Comprehensive.Add BusinessEmployees, Inventory, and Divisions) without going through the Home window to accessERecordsAllows you to directly open the various ledgers (Accounts, Customers, Suppliers,them.By clicking on the Open the Setup Guide option, the Setup Guide window appears andrallows you to access the Customers, Suppliers, Employees, and Accounts in a spreadsheetFoCustomizeSage 50Learn How To6format for easy addition, removal, or editing.This option allows you to go directly to the Settings window of the software. Currentlythe options are Set company preferences, Schedule data backups, Customize yourinvoices and other business forms.Provides a link to various topics in the Help feature of the software.1618-1 v1.00 CCI Learning Solutions Inc.
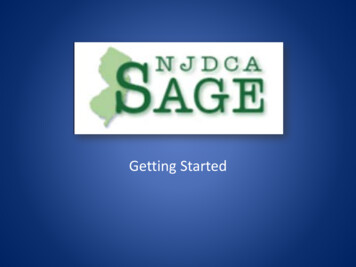
Lesson 1IntroductionLearn the SkillThis exercise displays ways of assisting you to make changes in various modules in Sage 50 Accounting withoutgoing through the Home window.The Checklists and Daily Business Manager screens appear at start up or when changing the session date1luationOnlyunless they are turned off in the Setup, User Preferences menu. (This is dealt with later in this Lesson.)If necessary, close the Checklists window and the Daily Business Manager window. These two windowsusually appear on top of one another (the Daily Business Manager window may be hidden behind theHome window). Later in the courseware, the Daily Business Manager will be used.In the Add Business Records area of the Getting Started window, click Open the Setup Guide.3Click the Customers option and the following window will be displayed:ForEva21618-1 v1.00 CCI Learning Solutions Inc.7
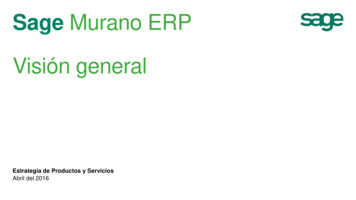
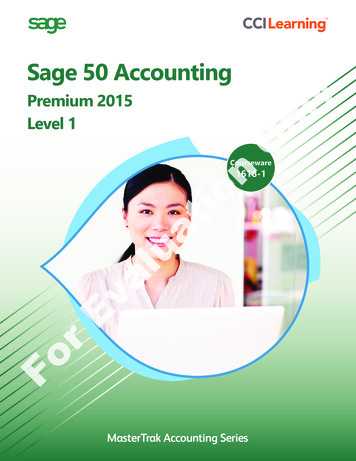
Lesson 1Sage 50 Premium Accounting 2015 – Level 14Locate H.G. Palmer Secondary School. Click in the Telephone field, and enter the following phone5Find Deborah Mackie, and in the address area copy the address information from Street 2 to Street 1number: 6044034325.and then delete the address from Street 2. The Telephone number for Deborah is incorrect, replace 569with 403.Similarly, copy the address for the School Board District #56 from Street 2 to Street 1 and clear the Street7Enter the E-mail address for Pitt Meadows Elementary as follows: j.royal@pme.edu.8Click the Close button.9Click Close twice more to close the Setup Guide and Getting Started windows.Looking at the Home WindowOnl2 field.y6nSage 50 Premium Accounting now displays the Sage 50 Accounting – Home window. This is the windowyou see after you load the program. The view shown below is the Enhanced View for the Customers & ximizeMinimizeForEvaControlIconluatiomodule. We will be using the Enhanced View throughout this courseware.Module Icons8Customize ShortcutStatus BarCurrent User1618-1 v1.00 CCI Learning Solutions Inc.
Lesson 1IntroductionControl IconContains the Control Menu to select such options as Restore, Move, Size, Minimize,Maximize and Close. These options are standard Windows options available on mostControl icons.Title BarContains the name of the program, followed by the name of the active data file, forMenu BarProvides access to the main menus (File, Edit, View, Setup, Business Assistant, and soexample, HHM LESSON 1 – YOUR NAME.SAI.yon). Each main menu contains a different set of commands or features to manipulatethe data.ToolbarOnlUse the buttons on the toolbar in the Home window to perform various actions thatare shortcuts for menu-activated functions. Hovering the mouse pointer over abutton provides a description of the button’s function.Journal IconsAccess journals to enter transactions such as General Journals, AccountReconciliations, Vendors, Purchases, Orders & Quotes, Payments, Customers, Sales,Orders & Quotes, Receipts, Employees, Paycheques, Payroll Cheque Run, Inventory& Services, Item Assembly, Inventory Adjustments and Project. If you point to anjournal icon, a description of the icon’s function appears in thestatus bar at the bottom of the Home window (only in ClassicluatioView). Some icons have an arrow attached to them. This is anindication that menu choices are available. Clicking the arrowopens a drop-down menu of those choices. Clicking directly onthe icon activates the default attached to that icon.ViewAllows the user to switch from the Enhanced View to the Classic View depending ontheir preference and familiarity with the software. The Enhanced View feature is usedto save time and enhance usability.Minimize,Maximize/Restoretaskbar,size, or(Minimize) the Sage 50 Accounting window to the(Maximize) to the screen,(Restore Down) to the original window(Close) the program.vaor Close ButtonsUse these buttons to eitherModule IconsAccesses the data areas to manipulate items such as General Ledger, Suppliers &Purchases (Accounts Payable), Customers & Sales (Accounts Receivable), Employees& Payroll, Inventory & Services, Divisions (sometimes shown as Projects orDepartments), Banking and the Dashboard (a management tool which provides anEinstant snapshot of the business’ key performance indicators.)CustomizerShortcutAllows the user to create customizable shortcut lists to add links to the features mostcommonly used. A shortcut for the Getting Started Guide has been set up bydefault.In the Classic View the Status Bar displays help or status messages when you pointCurrent UserIdentifies the user currently logged into Sage 50 Accounting using these files. If usingFoStatus Barto an icon or a field.a single user copy (as in the case of this courseware), the user name will show assysadmin until you set up individuals to use Sage 50 Accounting on this computer.On a network, the person designated as the Administrator will set up the user namesand will require you to log in with a user name and password before you can openSage 50 Accounting.1618-1 v1.00 CCI Learning Solutions Inc.9
Lesson 1Sage 50 Premium Accounting 2015 – Level 1Learn the SkillIn this exercise you will view a report which will be added to your commonly viewed reports list.Click the Payables module located on the left side of the Home window.2Move the mouse to point to thetheOnly1within the Suppliers heading on the right side of the window. Clickand the list of Suppliers will disappear. This is known as “collapsing” the view.3Click the4In the Reports area click the drop-down arrow, select the Supplier Aged Summary report, and click theluationof the Suppliers heading to show the expanded view.rEvabutton.FoThe report can be modified, exported, customized, and so on, which will be discussed later in the course.5Clickto close the report.In the Recently viewed reports area, the last report viewed willappear. This feature saves you time when viewing commonreports. Depending on the activity in the data file, the Recentlyviewed reports list may vary from one computer to the next.101618-1 v1.00 CCI Learning Solutions Inc.
There are a number of ways to start Sage 50 Accounting, depending on how it was installed on your system: Click Start, and then All Programs. Click Sage 50 Premium Accounting 2015 on the menu and then Sage 50 Premium Accounting (2015) on the submenu. Double-click the Sage 50 Premium Accounting 2015 icon on the desktop.