Transcription
Media HubHome Entertainment StorageNMH SeriesUser Guide
About This GuideAbout This GuideIcon DescriptionsWhile reading through the User Guide you may seevarious icons that call attention to specific items. Below isa description of these icons:NOTE: This check mark indicates that there isa note of interest and is something that youshould pay special attention to while using theproduct.WARNING: This exclamation point indicatesthat there is a caution or warning and it issomething that could damage your property orproduct.WEB: This globe icon indicates a noteworthywebsite address or e-mail address.Online ResourcesWebsite addresses in this document are listed withouthttp:// in front of the address because most current webbrowsers do not require it. If you use an older web browser,you may have to add http:// in front of the web work Securitywww.linksysbycisco.com/securityCopyright and Trademarks 2009 Cisco Systems, Inc. All rightsreserved. Cisco, the Cisco logo, and Linksysare trademarks or registered trademarksof Cisco Systems, Inc. and/or its affiliatesin the United States and certain othercountries. All other trademarks mentionedin this document or website are theproperty of their respective owners. Theuse of the word partner does not imply apartnership relationship between Ciscoand any other company.Media Hubi
Table of ContentsChapter 1: Product Overview1Front Panel of the Media Hub with LCD (NMH400 Series) . . . . . . . . . . . . . . . . . . . . . 1Front Panel of the Media Hub (NMH300 Series) . . . . . . . . . . . . . . . . . . . . . . . . . . . 2Back Panel . . . . . . . . . . . . . . . . . . . . . . . . . . . . . . . . . . . . . . . . . . . . . . . . . . . 2Top Panel . . . . . . . . . . . . . . . . . . . . . . . . . . . . . . . . . . . . . . . . . . . . . . . . . . . 3Install a Second Hard Disk . . . . . . . . . . . . . . . . . . . . . . . . . . . . . . . . . . . . . . . . . 3Replace a Hard Disk . . . . . . . . . . . . . . . . . . . . . . . . . . . . . . . . . . . . . . . . . . . . . 3Chapter 2: Getting Started5Overview . . . . . . . . . . . . . . . . . . . . . . . . . . . . . . . . . . . . . . . . . . . . . . . . . . . 5Media Importer . . . . . . . . . . . . . . . . . . . . . . . . . . . . . . . . . . . . . . . . . . . . . . . 5NTI Shadow (Windows only) . . . . . . . . . . . . . . . . . . . . . . . . . . . . . . . . . . . . . . . 7Copy-and-Paste . . . . . . . . . . . . . . . . . . . . . . . . . . . . . . . . . . . . . . . . . . . . . . . 8Chapter 3: Ways to Use the Media Hub14Overview . . . . . . . . . . . . . . . . . . . . . . . . . . . . . . . . . . . . . . . . . . . . . . . . . . 14Centralized Storage . . . . . . . . . . . . . . . . . . . . . . . . . . . . . . . . . . . . . . . . . . . . 14Digital Media Sharing . . . . . . . . . . . . . . . . . . . . . . . . . . . . . . . . . . . . . . . . . . 15On-Demand Backups . . . . . . . . . . . . . . . . . . . . . . . . . . . . . . . . . . . . . . . . . . . 17Automatic Backup of Computers(Windows only) . . . . . . . . . . . . . . . . . . . . . . . . . . . . . . . . . . . . . . . . . . . . . . 17Chapter 4: Use of the Media Browser18How to Access the Media Hub . . . . . . . . . . . . . . . . . . . . . . . . . . . . . . . . . . . . . 18How to Use the Media Browser . . . . . . . . . . . . . . . . . . . . . . . . . . . . . . . . . . . . 18Music . . . . . . . . . . . . . . . . . . . . . . . . . . . . . . . . . . . . . . . . . . . . . . . . . . . . . 22Photos . . . . . . . . . . . . . . . . . . . . . . . . . . . . . . . . . . . . . . . . . . . . . . . . . . . . 25Videos . . . . . . . . . . . . . . . . . . . . . . . . . . . . . . . . . . . . . . . . . . . . . . . . . . . . 28File Browser . . . . . . . . . . . . . . . . . . . . . . . . . . . . . . . . . . . . . . . . . . . . . . . . . 29Chapter 5: Use of the LCD Menu33How to Navigate the LCD Menu . . . . . . . . . . . . . . . . . . . . . . . . . . . . . . . . . . . . 33How to Access the LCD Menu . . . . . . . . . . . . . . . . . . . . . . . . . . . . . . . . . . . . . 33Backup . . . . . . . . . . . . . . . . . . . . . . . . . . . . . . . . . . . . . . . . . . . . . . . . . . . . 33Status . . . . . . . . . . . . . . . . . . . . . . . . . . . . . . . . . . . . . . . . . . . . . . . . . . . . . 34Settings . . . . . . . . . . . . . . . . . . . . . . . . . . . . . . . . . . . . . . . . . . . . . . . . . . . 35Power Off . . . . . . . . . . . . . . . . . . . . . . . . . . . . . . . . . . . . . . . . . . . . . . . . . . 36Alerts . . . . . . . . . . . . . . . . . . . . . . . . . . . . . . . . . . . . . . . . . . . . . . . . . . . . . 36Chapter 6: Windows File Backup (Windows only)37Overview . . . . . . . . . . . . . . . . . . . . . . . . . . . . . . . . . . . . . . . . . . . . . . . . . . 37NTI Shadow . . . . . . . . . . . . . . . . . . . . . . . . . . . . . . . . . . . . . . . . . . . . . . . . . 37Backup Jobs . . . . . . . . . . . . . . . . . . . . . . . . . . . . . . . . . . . . . . . . . . . . . . . . 39Media Hubii
Table of ContentsChapter 7: Advanced Configuration41How to Access the Configuration Utility . . . . . . . . . . . . . . . . . . . . . . . . . . . . . . . 41Overview . . . . . . . . . . . . . . . . . . . . . . . . . . . . . . . . . . . . . . . . . . . . . . . . . . 42System . . . . . . . . . . . . . . . . . . . . . . . . . . . . . . . . . . . . . . . . . . . . . . . . . . . . 42Disk . . . . . . . . . . . . . . . . . . . . . . . . . . . . . . . . . . . . . . . . . . . . . . . . . . . . . . 45Backup . . . . . . . . . . . . . . . . . . . . . . . . . . . . . . . . . . . . . . . . . . . . . . . . . . . . 47Services . . . . . . . . . . . . . . . . . . . . . . . . . . . . . . . . . . . . . . . . . . . . . . . . . . . 47Appendix A: Troubleshooting51Appendix B: Specifications55Model NMH300 - Media Hub . . . . . . . . . . . . . . . . . . . . . . . . . . . . . . . . . . . . . . 55Model NMH305 - Media Hub . . . . . . . . . . . . . . . . . . . . . . . . . . . . . . . . . . . . . . 55Model NMH405 - Media Hub with LCD . . . . . . . . . . . . . . . . . . . . . . . . . . . . . . . . 55Model NMH410 - Media Hub with LCD . . . . . . . . . . . . . . . . . . . . . . . . . . . . . . . . 56Appendix C: Warranty Information57Limited Warranty . . . . . . . . . . . . . . . . . . . . . . . . . . . . . . . . . . . . . . . . . . . . . 57Appendix D: Regulatory Information59FCC Statement . . . . . . . . . . . . . . . . . . . . . . . . . . . . . . . . . . . . . . . . . . . . . . . 59Safety Notices . . . . . . . . . . . . . . . . . . . . . . . . . . . . . . . . . . . . . . . . . . . . . . . 59Industry Canada Statement . . . . . . . . . . . . . . . . . . . . . . . . . . . . . . . . . . . . . . . 59User Information for Consumer Products Covered by EU Directive 2002/96/EC on WasteElectric and Electronic Equipment (WEEE) . . . . . . . . . . . . . . . . . . . . . . . . . . . . . 60Appendix E: Software End User License Agreement64Cisco Products . . . . . . . . . . . . . . . . . . . . . . . . . . . . . . . . . . . . . . . . . . . . . . . 64Software Licenses . . . . . . . . . . . . . . . . . . . . . . . . . . . . . . . . . . . . . . . . . . . . . 64Media Hubiii
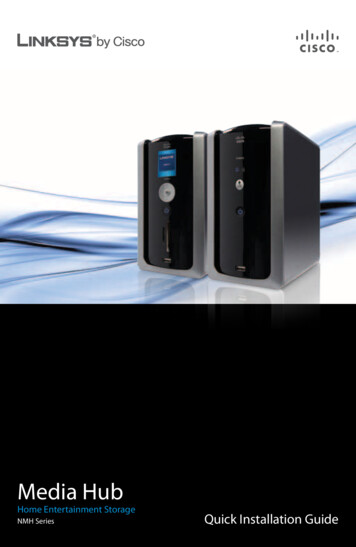
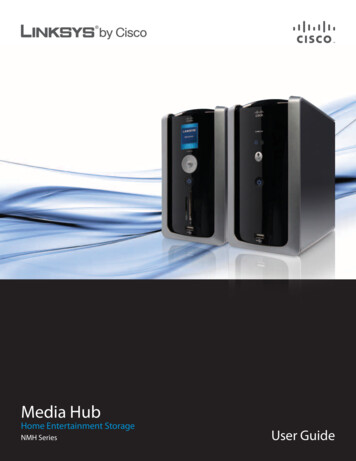
Product OverviewChapter 1Chapter 1:Product OverviewThank you for choosing the Linksys by Cisco Media Hub.One Serial-ATA (SATA) hard disk is pre-installed (except forthe NMH300 model), and a second SATA hard drive bay isavailable if you want to add more storage space. Use theUSB ports to add USB hard drives or connect USB flashdrives to access your portable files. (USB hard drives mayrequire external power supplies.) The Media Hub with LCD(NMH400 Series) offers additional features, a LCD screenwith navigation pad and memory card slots.The front panel features vary for the NMH400 and NMH300Series. The back panel and top panel features are the samefor both series.Front Panel of the Media Hub with LCD(NMH400 Series)OKNavigation Pad Use the navigation pad tonavigate the LCD menus. Press the up or downarrow to move up or down the menu choices.Press the right arrow to move to a lower menulevel. Press the left arrow to move to a highermenu level.To select a menu choice, press the OK button.Refer to the end of this chapter for moreinformation.Power Button and LED (Blue/Red) To poweron the Media Hub, press the Power button.To shut down the Media Hub, press and holdthe button until the Power LED starts flashing(this may take more than three seconds). Acomplete shutdown may take 10-15 seconds.The Power LED flashes blue when theMedia Hub boots up, installs a disk, or shutsdown. It is solidly lit blue when the MediaHub is ready for use. The LED flashes eitherblue or red when there is an error. (Refer toAppendix A: Troubleshooting, page 51.)NOTE: If the Media Hub must be shutdown for a long period of time, Linksysrecommends that you disconnect thepower adapter from the Media Hub.Secure Digital (SD) Memory Card Slot Insertthe SD, MultiMediaCard (MMC), extreme Digital(xD), or Memory Stick (MS) card to access itsfiles.CompactFlash (CF) Memory Card Slot Insertthe CF memory card to access its files.LCD Screen When the Media Hub is poweredon, the menu is displayed. Use it to initiatebackup jobs, display status information,configure LCD screen settings, or power off theMedia Hub. Refer to Chapter 5: Use of the LCDMenu, page 33 for more information.Media HubUSB The USB port connects to a USB storagedevice.1
Product OverviewChapter 1Front Panel of the Media Hub (NMH300Series)Power Button and LED (Blue/Red) To poweron the Media Hub, press the Power button.To shut down the Media Hub, press and holdthe button until the Power LED starts flashing(this may take more than three seconds). Acomplete shutdown may take 10-15 seconds.The Power LED flashes blue when theMedia Hub boots up, installs a disk, or shutsdown. It is solidly lit blue when the MediaHub is ready for use. The LED flashes eitherblue or red when there is an error. (Refer toAppendix A: Troubleshooting, page 51.)NOTE: If the Media Hub must be shutdown for a long period of time, Linksysrecommends that you disconnect thepower adapter from the Media Hub.USB The USB port connects to a USB storagedevice.Back PanelBoth series of the Media Hub share the same back panel.DISK 1 (Blue/Red) The DISK 1 LED serves twopurposes. The LED is solidly lit blue when Disk 1is ready for use. The LED is not lit when no diskis detected.DISK 2 (Blue/Red) The DISK 2 LED serves twopurposes. The LED is solidly lit blue when Disk 2is ready for use. The LED is not lit when no diskis detected.Back Up Button To initiate backup jobsspecified by the backup software on yourcomputer(s), press the back up button.NOTE: The back up button onlysupportsWindowscomputersinstalled with the backup software.NOTE: Your computer(s) must bepowered on for the jobs to run.Air Vent The air vent allows air to circulate andcool the Media Hub.WARNING: Do not block the airvent on the back of the Media Hub;otherwise, overheating can occur.Media Hub2
Product OverviewChapter 1Security Slot The security slot is where youcan attach a lock to protect the Media Hub fromtheft.USB The USB port connects to a USB storagedevice.Ethernet The 10/100/1000 Gigabit Ethernetport connects to an Ethernet network device,such as a router or switch. The LED on theleft lights up green when there is a 100 Mbpsconnection. It lights up orange when there isa 1000 Mbps connection. It does not light upwhen there is a 10 Mbps connection.The amber LED on the right flashes when thereis network activity.Install a Second Hard DiskNOTE: If you plan to install a second diskand mirror (RAID 1) these disks, then matchdisk sizes for maximum disk use. For moreinformation about disk configuration options,refer to Available Disk Configuration Actions,page 45.To install a second SATA hard disk, follow theseinstructions:1. To shut down the Media Hub, press and hold the Powerbutton until the Power LED starts flashing.2. Disconnect the power adapter from the Power port.Reset To restore the factory default settings,press and hold the Reset button for threeseconds. (User data on the hard disk(s) will notbe affected.)3. Disconnect the Ethernet network cable from theEthernet port.Power The Power port connects to the includedpower adapter.5. To remove the empty drive bay, push together its clipsand pull out the drive bay.NOTE: If the Media Hub must be shutdown for a long period of time, Linksysrecommends that you disconnect thepower adapter from the Media Hub.4. To release the drive bay cover, push the button on thetop panel.6. Make sure the screw holes of the hard disk line up withthe screw holes of the drive bay. Then insert the harddisk into the drive bay.7. Use the four included screws to secure the hard diskin its bay.Top Panel8. With the hard disk’s label facing the right side of theMedia Hub, slide the disk into the empty slot.Both series of the Media Hub share the same top panel.9. Push down on the hard disk to make sure theconnectors are securely seated.The drive bay cover protects the drive bays. Disk 1, a SATAhard disk, is pre-installed.10. Lower the cover, and push it down to secure it.11. Connect the Ethernet network cable to the Ethernetport.12. Connect the power adapter to the Power port.Replace a Hard DiskWARNING: The replacement hard disk must beblank with no partitions; otherwise, the MediaHub cannot use it. (If you want to install a harddisk that was previously used in a Windowscomputer, refer to Before You Begin, page 53.)Button Push the button to open the drivebay cover.Media Hub3
Chapter 1To replace a hard disk, follow these instructions:1. To shut down the Media Hub, press and hold the Powerbutton until the Power LED starts flashing.Product Overview10. Push down on the hard disk to make sure theconnectors are securely seated.If this step does not shut down the Media Hub, thenproceed to step 2.2. Disconnect the power adapter from the Power port.3. Disconnect the Ethernet network cable from theEthernet port.4. To release the drive bay cover, push the button on thetop panel.5. To remove the hard disk you want to replace, pushtogether the clips of its drive bay, and then pull outthe drive bay.6. Remove the hard disk from its drive bay.7. To install the replacement hard disk, make sure thescrew holes of the hard disk line up with the screwholes of the drive bay. Then insert the hard disk intothe drive bay.11. Lower the cover, and push it down to secure it.8. Use the four included screws to secure the hard diskin its bay.12. Connect the Ethernet network cable to the Ethernetport.9. With the hard disk’s label facing the right side of theMedia Hub, slide the drive bay back into its slot.13. Connect the power adapter to the Power port.Media Hub4
Getting StartedChapter 2Chapter 2: Getting StartedWindows Media ImporterNOTE: For Mac-specific information, refer toMac Media Importer, page 6.OverviewThe Media Hub is designed to store your media content inone location for convenient access. (There are additionalways to use the Media Hub; refer to Chapter 3: Ways toUse the Media Hub, page 5.)The Media Hub offers three ways to help you copy filesto the Media Hub. This chapter describes how to usethe Media Importer, NTI Shadow (Windows only), andthe Copy-and-Paste feature. (FTP is another option forcopying files.)You can copy media files from a computer or othernetwork device. You can also copy media files from a USBstorage device or memory card directly connected to theMedia Hub.NOTE: Only the Media Hub with LCD (NMH400Series) supports direct connection of memorycards.AccessTo access the Media Importer, double-click the systemtray icon.Importer System Tray Icon (Active)Importer System Tray Icon (Offline or Disconnected)If you do not see the icon, go to Start All Programs Cisco Media Hub Linksys Media Importer LinksysMedia Importer.System Tray Icon MenuNOTE: The Media Hub does not support theuse of apostrophes in file, folder, or devicenames. Please remove any apostrophes fromfile or folder names before you copy them tothe Media Hub, and please rename your USBstorage device or memory card before youconnect it to the Media Hub.Media ImporterThe Media Importer is the import tool that wasautomatically installed by the Setup Wizard. It supportsmost popular formats, such as mp3, jpg, and mpg files.Use the Media Importer to automatically find, copy, andupdate media files to the Media Hub. In the future, anychanges made or new files added will be automaticallyupdated on the Media Hub.Files using the following file formats and extensions areimported:Right-click the system tray icon to view the followingoptions:Importer Icon MenuOpen Click this option to open the Media Importer.Go to Media Hub Online Click this option to open theMedia Browser.Media Importer Status Click this option to view thestatus of the file transfers to the Media Hub.Shutdown Linksys Media Importer Click this option toexit the Media Importer.About Linksys Media Importer Click this option to viewthe version number of the Media Importer. Music .mp3, .wma, .m4a, .aac, .lpcm, .ogg, .flac, .ac3,.mpa, .aif Photos .jpg, .png Videos .mpg, .mpeg, .mp4, .avi, .wmv, .divx, .3gp, .asf,.xvid, .m1v, .m4v, .movIf the Media Importer is not installed on your computer,run the Setup Wizard on the enclosed CD-ROM and clickConnect Computers.Media Hub5
Getting StartedChapter 2Main MenuThe main menu appears with the following options:Media Importer Status Click this option to view thestatus of the file transfers to the Media Hub.Media Importer Main MenuDisconnect/Connect Click this option to connect ordisconnect the Media Hub from the Media Importer.Switch Media Hub Click this option to switch to adifferent Media Hub.Manage Media Importer Click this option to select thefolders you want to copy to the Media Hub.Media Importer Status Import Status The number and size of files beingimported are displayed. Time Left The amount of time left for the import andits speed are displayed. Current Transfers For each file, the % (percentage),Folder, File name, Sent (size of imported data), and Size(total size of file) are displayed. Files imported in this session For each file, the TimeCompleted, Folder, File name, and Size are displayed.To exit the Media Importer Status screen, click Close.To exit the Media Importer, click the X button in the upperright corner.Mac Media ImporterManage Media Importer Choose the folders that will be regularly searchedfor media Select the appropriate folders. Only these types Select the file types that will beIf the Setup Wizard located on the CD-ROM does not runon your Mac, then download the Mac Setup Wizard fromwww.linksysbycisco.com. Run the Mac Setup Wizard toinstall the Mac Media Importer.copied.AccessThe percentages and size of files by type (Photos/Images, Music, and Video) are displayed.To access the Media Importer, double-click the icon on themenu bar in the upper right corner.To exit the Manage Media Importer screen, click Finish.Importer System Tray Icon (Active)Importer System Tray Icon (Offline or Disconnected)If you do not see the icon, double‑click the MacintoshHD icon on your desktop. Go to Application MediaImporter.Media Hub6
Getting StartedChapter 2System Tray Icon MenuClick the icon to view the following options: (Folders) Select the folders that will be regularlysearched for media. Only these Select the file types that will be copied.The percentages and size of files by type (Music,Photos/Images, and Video) are displayed.To exit the Manage Media Importer screen, click OK.Importer Icon MenuOpen Manager Media Importer Click this option toopen the Media Importer.Manage Importer Status Click this option to view thestatus of the file transfers to the Media Hub.Go to Media Hub Online Click this option to open theMedia Browser.Open Media Importer Status Click this option to viewthe status of the file transfers to the Media Hub.About Media Importer Click this option to view theversion number of the Media Importer.Shutdown Media Importer Click this option to exit theMedia Importer.Main MenuMedia Importer StatusThe main menu appears with the following options: Import Status The number and size of files beingimported are displayed. Time Left The amount of time left for the import andits speed are displayed. Current Transfers For each file, the % (percentage),Folder, File name, Sent (size of imported data), and Size(total size of file) are displayed. Files imported in this session For each file, the TimeMedia Importer Main MenuDisconnect/Connect Click this option to connect ordisconnect the Media Hub from the Media Importer.Change Media Hub Click this option to switch to adifferent Media Hub.Manage Media Importer Click this option to select thefolders you want to copy to the Media Hub.Completed, Folder, File name, and Size are displayed.To exit the Media Importer Status screen, click the Xbutton in the upper left corner.To exit the Media Importer, click the X button in the upperleft corner.NTI Shadow (Windows only)NTI Shadow is the backup software you installed duringthe Setup Wizard. Use it to automatically copy yourdocuments to the Media Hub for safekeeping.If you chose not to install the backup software, then NTIShadow will not be available. To install NTI Shadow, runthe Setup Wizard on the enclosed CD-ROM and clickConnect Computers.AccessGo to Start All Programs Cisco Media Hub NTIShadow.Manage Media ImporterMedia Hub7
Getting StartedChapter 2After you have accessed NTI Shadow for the first time, thesystem tray icon appears. Double-click the icon to accessNTI Shadow.NTI Shadow System TraySystem Tray Icon MenuRight-click the system tray icon to view the followingoptions:Default Backup JobThe Setup Wizard creates a default backup job that backsup specific files in the Documents folder. (This folderis named “Users” in Windows Vista or “Documents andSettings” in Windows XP.)These files include the following file types: document(.doc, .docx, .xls, .xlsx, .pdf, .ppt, .txt, .htm, etc.) and .pptx.The backup files are saved to the \backup\ ComputerName \Documents folder on the Media Hub and areorganized by date. You can change the default backup jobcreated by the Setup Wizard; for example, you can back upadditional folders on your computer.OptionsNTI Shadow Icon MenuShadow Setting Click this option to open NTI Shadow.About NTI Shadow Click this option to view the versionnumber of NTI Shadow.Exit Click this option to exit NTI Shadow.Select the appropriate backup job, and then click one ofthe following options:Start Backup Click this option to start a backup job.Edit Click this option to change a backup job.Disable Click this option to disable a backup job.Disable All Click this option to disable all backup jobs.Delete Click this option to delete a backup job.Main MenuThe main menu appears.To exit NTI Shadow, click Done.NOTE: For more information about NTI Shadow,click Help.Copy-and-PasteUse the Copy-and-Paste feature to manually copy files tothe Media Hub. Paste music to the music folder, photos tothe photos folder, and videos to the videos folder.NOTE: File transfers may take minutes orhours, depending on file transfer speeds andthe number and size of your files. File transferspeeds will vary, depending on networkconditions, including use of wireless.NTI Shadow Main MenuCreate Backup JobCreate Backup Job Click this option to create a backupjob. For more information, refer to Create Backup Job,page 31.Modify Backup JobBackup jobs are listed in this section.Media Hub8
Getting StartedChapter 2Instructions to Copy Media Files to the Media HubWindows VistaFollow these guidelines:Right-click Start. Click Computer, and then click the driveletter to access the media folder of the Media Hub. Copy files of a single file type together at one time.For example, copy music files at one time; do not copymusic, photo, and video files at the same time. Copy music files to the media\music folder of theMedia Hub. Copy photo files to the media\photos folder of theMedia Hub. Copy video files to the media\videos folder of theMedia Hub.NOTE: The files you copy to the Media Hub canbe accessed by all users of the Media Hub.Windows XPDouble-click My Computer, and then click the drive letterto access the media folder of the Media Hub.Drive Letter Not FoundIf you do not see a drive letter for the Media Hub, runthe Setup Wizard on the enclosed CD and click ConnectComputers. You can also follow these instructions:1. To open Windows Explorer, go to Start Programs Accessories Windows Explorer. (You can alsoright‑click Start and click Explore.)2. Right-click My Computer (Windows XP) or Computer(Windows Vista).Windows Access3. Select Map Network Drive.NOTE: For Mac-specific information, refer toMac Access, page 11.1. To open Windows Explorer, go to Start Programs Accessories Windows Explorer. (You can alsoright‑click Start and click Explore.)2. During the Setup Wizard, you created a Friendly Nameor device name for the Media Hub.4. In the Folder field, enter \\ Friendly Name \media.5. Click Finish.For additional information, refer to Windows Help.NOTE: If you do not see the Media Hub, thenchange the Workgroup of the Media Hub tomatch the Workgroup of your computer (referto System, page 32).In the Address field of Windows Explorer,enter the Friendly Name of the Media Hub:IP Address (For Advanced Users)\\ Friendly Name (Example: \\mediahub)1. In the Address field of Windows Explorer, enterthe IP address of the Media Hub:\\ xxx.xxx.xxx.xxx Friendly Name3. Press Enter.You can also use the drive letter or IP address to access theMedia Hub.NOTE: The drive letter is mapped directly to themedia folder, which holds the music, photos,and videos sub-folders. Use the Friendly Nameor IP address of the Media Hub to access thebackup and media folders.Drive LetterIP Address of Media Hub2. Then press Enter.NOTE: For the Media Hub with LCD (NMH400Series), look up its IP address through the LCDmenu. Refer to Status, page 22. For the MediaHub (NMH300 Series), look up its IP addressthrough the router’s browser-based utility.Refer to the router’s documentation for moreinformation.During the Setup Wizard, the Media Hub was assigned adrive letter to identify it on your computer.Media Hub9
Getting StartedChapter 2File DirectoryDevice FolderOpen the folders of the Media Hub. Use Windows Explorerto add, copy, move, or delete files.If you have a USB storage device or memory card directlyconnected to the Media Hub, you can access it throughthe Media Hub.If you accessed the Media Hub through its FriendlyName or IP address, the name of the USB storage deviceor memory card is displayed. Double-click the name toaccess its files.Media Hub Accessed Through Friendly NameUSB Storage Device Accessed Through Friendly NameIf you accessed the Media Hub through its drive letter, goto media devices mnt. The name of the USB storagedevice or memory card is displayed. Double-click thename to access its files.Media Folder of Media Hub Accessed Through Drive LetterMapped DriveYou can map any folder of the Media Hub as a separatedrive.1. To open Windows Explorer, go to Start Programs Accessories Windows Explorer. (You can alsoright‑click Start and click Explore.)2. Right-click Computer (Windows Vista) or MyComputer (Windows XP).USB Storage Device Accessed Through Drive Letter3. Select Map Network Drive.4. From the Drive drop-down menu, select an availabledrive letter.5. In the Folder field, enter the following:\\ Friendly Name of Media Hub \ foldername . (Example: \\mediahub\backup.)6. Click Finish.Media Hub10
Getting StartedChapter 2Import FolderThe media\import folder stores the data importedfrom USB storage devices or memory cards. The data isorganized
NMH Series User Guide. About This Guide Media Hub i About This Guide Icon Descriptions While reading through the User Guide you may see various icons that call attention to specific items. Below is a description of these icons: NOTE: This check mark indicates that there is

![gauVI suKmnI m: 5 ] - SikhNet](/img/61/sukhmani-20-gurmukhi.jpg)