Transcription
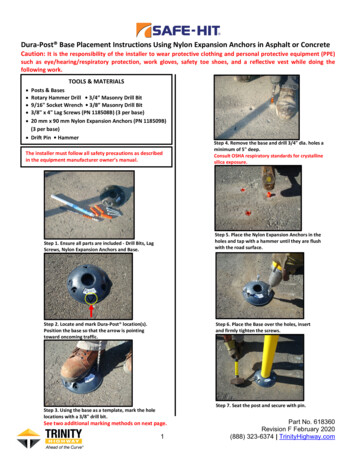
Dura‐Post Base Placement Instructions Using Nylon Expansion Anchors in Asphalt or ConcreteCaution: It is the responsibility of the installer to wear protective clothing and personal protective equipment (PPE)such as eye/hearing/respiratory protection, work gloves, safety toe shoes, and a reflective vest while doing thefollowing work.TOOLS & MATERIALS Posts & BasesRotary Hammer Drill 3/4” Masonry Drill Bit9/16" Socket Wrench 3/8” Masonry Drill Bit3/8" x 4" Lag Screws (PN 118508B) (3 per base)20 mm x 90 mm Nylon Expansion Anchors (PN 118509B)(3 per base) Drift Pin HammerThe installer must follow all safety precautions as describedin the equipment manufacturer owner’s manual.Step 4. Remove the base and drill 3/4" dia. holes aminimum of 5" deep.Consult OSHA respiratory standards for crystallinesilica exposure.Step 5. Place the Nylon Expansion Anchors in theholes and tap with a hammer until they are flushwith the road surface.Step 1. Ensure all parts are included ‐ Drill Bits, LagScrews, Nylon Expansion Anchors and Base.Step 2. Locate and mark Dura‐Post location(s).Position the base so that the arrow is pointingtoward oncoming traffic.Step 6. Place the Base over the holes, insertand firmly tighten the screws.Step 7. Seat the post and secure with pin.Step 3. Using the base as a template, mark the holelocations with a 3/8" drill bit.See two additional marking methods on next page.1Part No. 618360Revision F February 2020(888) 323-6374 TrinityHighway.com
Dura‐Post Base Placement Instructions Using Nylon Expansion Anchors in Asphalt or ConcreteCaution: It is the responsibility of the installer to wear protective clothing and personal protective equipment (PPE)such as eye/hearing/respiratory protection, work gloves, safety toe shoes, and a reflective vest while doing thefollowing work.Alternate Hole Marking Method 1Alternate Hole Marking Method 2TOOLS & MATERIALS TOOLS & MATERIALS 3/4" Masonry Drill BitRotary‐Hammer Drill9/16" Socket Wrench2"‐3" Long Nails (3 per base)Construction Marking Crayon3/8" x 4" Lag Screws (PN 118508B) (3 per base)20 mm x 90 mm Nylon Expansion Anchors(PN 118509B) (3 per base)Step 3. Using the base as a template, position nails in thehole centers and tap about 3/8" into the ground.3/4" Masonry Drill BitRotary‐Hammer Drill9/16" Socket WrenchConstruction Marking Paint3/8" x 4" Lag Screws (3) (PN 118508B)20 mm x 90 mm Nylon Expansion Anchors(PN 118509B) (3 per base)Step 3. Using the base as a template, apply a quick shot ofmarking paint (do not spray longer than 1 second).Step 4. Remove the base and mark around the nails witha marking crayon, and then remove the nails.Step 4. Remove the base and drill 3/4" diameter holes aminimum of 5" deep at the center of each paint spot.Consult OSHA respiratory standards for crystalline silicaexposure.CONTINUE WITH STEP 5 ON PAGE 1Step 5. Drill 3/4" diameter holes a minimum of 5" deep atthe center of each nail location.Consult OSHA respiratory standards for crystalline silicaexposure.2Revision F February 2020(888) 323-6374 TrinityHighway.com
Dura‐Post Base Placement Instructions Using Hilti HIT‐RE 500 V3 EPOXYFor Placement on Asphalt or ConcreteCaution: It is the responsibility of the installer to wear protective clothing and personal protective equipment (PPE)such as eye/hearing/respiratory protection, work gloves, safety toe shoes, and a reflective vest while doing thefollowing work. TOOLS & MATERIALSHilti HIT‐RE 500 V3, 330 ml [11.1 fl. oz.](one cartridge supports two and a halfbases).Hilti HIT‐RE 500 V3, 500 ml [16.9 fl. oz.](one cartridge supports four bases).Hilti HDM Manual DispenserHilti “Black” Cartridge HIT‐CB 500Utility knifeBroom or Motorized BlowerGlovesDrift Pin HammerStep 5. Position the base so that the arrow is alignedwith the direction of oncoming traffic and pressdown firmly on the road surface until epoxy appearsaround the edge.Step 1. Check that you have all necessary tools andparts for the job.Temp95⁰F72⁰F50⁰F32⁰FSet Up12 min25 min1.5 hours2 hoursInitial Cure2 hours4 hours12 hours24 hoursFull Cure4.5 hours6.5 hours24 hours36 hoursStep 6. Follow the epoxy guidelines and allow an initialcure before post placement and service.Step 2. Locate and mark Dura‐Post location(s). Aclean dry surface is required. Prepare the base sitesby blowing or sweeping.Step 3. Trim the mixing nozzle to its largest opening.Step 7. After the initial cure, insert the post and drivethe securing pin into place with a hammer. To removethe post, use a drift pin to remove the securing pin andthen lift the post from the base.Step 4. Apply epoxy to the bottom of the base asshown.3Revision F February 2020(888) 323-6374 TrinityHighway.com
Dura‐Post Base Placement Instructions Using Safe‐Hit EpoxyFor Placement on Asphalt or ConcreteCaution: It is the responsibility of the installer to wear protective clothing and personal protective equipment (PPE)such as eye/hearing/respiratory protection, work gloves, safety toe shoes, and a reflective vest while doing thefollowing work.Step 4. Apply epoxy evenly to the bottom of the base.Step 1. Check that you have all necessary tools andparts for the job. You should have post(s), surfacemount base(s) and epoxy kit(s) (allow one epoxy kitper base). Bulk epoxy containers are also available.Step 5. Press the base down firmly on the road surface untilepoxy appears around the edge. The arrow must faceoncoming traffic.Step 6. Epoxy must set before post placement. Allow onehour at 80 F or longer in cooler conditions.Step 2. Locate and mark Dura‐Post location(s). Aclean dry surface is required. Prepare each base siteby blowing or sweeping.Note: Do not attempt toapply the adhesive whenthe ambient temperature isbelow 41 F (5 C) or above104 F (40 C).The adhesiveis easiest to work with ifwarmed to approximately80 F (26 C).Step 3. Mix epoxy kit (PN SHEPX‐13‐‐KI) 4 oz. Part “A”and 4 oz. Part “B”. The mixed epoxy color should begray with no black or white streaks.4Step 7. Insert the post and drive the securing pin in placewith a hammer. To remove the post, use a drift pin toremove the securing pin and then lift the post from the base.Note: It is the responsibility of the installer tofollow all epoxy manufacturer safety precautions.Revision F February 2020(888) 323-6374 TrinityHighway.com
Dura‐Post Base Placement Instructions Using Butyl PadFor Placement on Asphalt or ConcreteCaution: It is the responsibility of the installer to wear protective clothing and personal protective equipment (PPE)such as eye/hearing/respiratory protection, work gloves, safety toe shoes, and a reflective vest while doing thefollowing work.Step 5. Set the Dura‐Post base on the Butyl Pad, centering itwithin the edges of the pad. Press on the base to secure it tothe pad.Step 1. Check to ensure you have all parts necessary for thejob. You should have post(s), surface mount base(s) and ButylPad(s). Allow one Butyl Pad per base.Step 6. Lift the base and remove the remaining release paperfrom the other side of the pad.Step 2. Locate and mark Dura‐Post location(s). A clean, drysurface is required.Step 3. Sweep or blow off area with compressed air toremove all gravel, sand and other debris within a one footdiameter where the base will be applied.Step 7. Place the base in position with the arrow pointingtoward oncoming traffic. Press base down firmly on surface.Note: For optimum performance, the recommendedtemperature is 50 F or above. In lower temperatures, thebases and pads should be warmed to this temperature priorto use.Step 8. To properly set the base, drive a vehicle’s front tireonto the base and remain for 10 to 15 seconds.Step 4. Remove the release paper from one side of the ButylPad and place Butyl Pad on the ground with the exposedsurface facing up.Step 9. Insert the post and drive the securing pin in placewith a hammer. To remove the post, use a drift pin toremove the securing pin and then lift post from base.5Revision F February 2020(888) 323-6374 TrinityHighway.com
Dura‐Post Soil Anchor Placement InstructionsCaution: It is the responsibility of the installer to wear protective clothing and personal protective equipment (PPE)such as eye/hearing/respiratory protection, work gloves, safety toe shoes, and a reflective vest while doing thefollowing work.TrafficDirectionStep 5. Drive the anchor into the ground until the holes are1/4” above the ground.Step 1. Check to ensure you have all parts necessary for thejob. You should have post(s), soil anchor(s), a 5/16” X 3” boltand one 5/16” nut for each. You will also need a SH‐30 drivetool.Step 2. Locate and mark Dura‐Post location(s).Step 3. Position the anchor so the bolt will be perpendicularto the traffic direction upon completion.Bolt & Lock NutStep 4. Keep the anchor vertical when driving it into theground. This will ensure that the post will be vertical.Step 6. Insert the post and align the post holes with theanchor holes. Use a bolt and lock nut to secure the assembly.6Revision F February 2020(888) 323-6374 TrinityHighway.com
Step 5. Set the Dura‐Post base on the Butyl Pad, centering it within the edges of the pad. Press on the base to secure it to the pad. Step 6. Lift the base and remove the remaining release paper from the other side of the pad. Step 7. Place the base in position with the arrow pointing