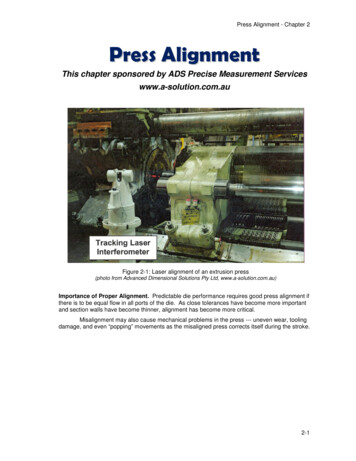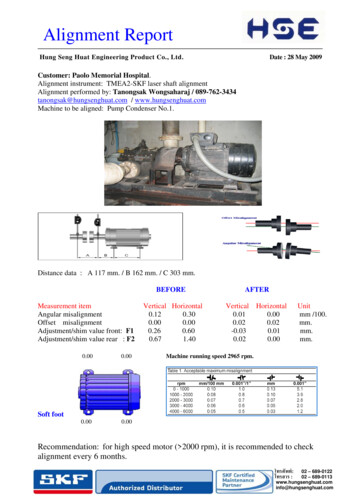
Transcription
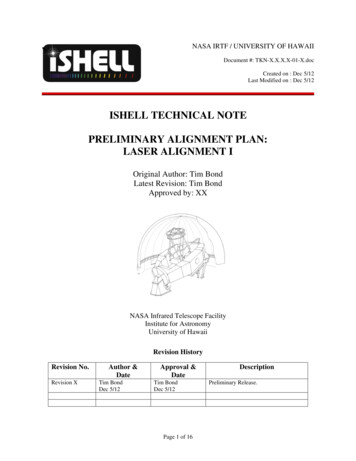
NASA IRTF / UNIVERSITY OF HAWAII Document #: TKN-X.X.X.X-01-X.docCreated on : Dec 5/12Last Modified on : Dec 5/12ISHELL TECHNICAL NOTEPRELIMINARY ALIGNMENT PLAN:LASER ALIGNMENT IOriginal Author: Tim BondLatest Revision: Tim BondApproved by: XXNASA Infrared Telescope FacilityInstitute for AstronomyUniversity of HawaiiRevision HistoryRevision No.Revision XAuthor &DateTim BondDec 5/12Approval &DateTim BondDec 5/12Page 1 of 16DescriptionPreliminary Release.
align-laser-2.docxCreated by Tim BondContents1 Introduction / Document Purpose . 32 Summary of Alignment Procedures . 33 Details of Alignment Procedures . 43.1 Mounting of Alignment Laser . 43.1.1 Selection of the laser: . 43.1.2 Mounting of the laser: . 43.2 First Element Tip/Tilt Adjustment Procedure: . 83.3 Sequential Element Tip/Tilt Adjustment Procedure: . 93.4 Alignment of the COLD STOP:. 113.5 Confirmation of Fiducial Locations in optical path: . 114 Additional General Comments . 115 Appendices . 125.1 Appendix A: General Laser System Top Level Requirements: . 125.2 Appendix A: Laser Selection Requirements: . 125.3 Appendix B: CCD Selection Requirements. 135.4 Appendix C: Misc. Additional Specifications: . 145.4.1 Penta Prism Beam Splitters. 145.4.2 Penta Prisms . 155.4.3 Electronics / Computer Control . 16Page 2 of 16
align-laser-2.docxCreated by Tim Bond1 Introduction / Document PurposeThe purpose of this document is to outline the procedures that will be undertaken in the initial alignment of theinternal optics of the ISHELL instrument. In particular, the details of the use of a laser for the refinement of theoptical element’s angular registration are established.2 Summary of Alignment ProceduresIn summary, the following steps will need to be performed during the “Laser I Alignment” procedure: A laser is mounted to the periphery of the optical bench and adjusted to the level of accuracy required. Inaddition to a laser, several penta prisms and a set of CCD detectors are also mounted onto the periphery ofthe optical bench. The laser is aligned to the entrance and exit port of the optical bench using additional CCD detectorsmounted into custom machined fixtures. These fixtures are examined with a metrology microscope after theCCDs are attached in order to determine their location on the fixture. The first optical element is assembled onto the optical bench to the tolerances specified by the initialalignment procedures using standard shop practices and utilizing a coordinate measuring machine. A blank is mounted into the second optical elements mounting fixture, and metrology is performed toensure that the blank is located to the level required. A CCD is attached to the blank at a known position(relative to the seating points of the blank). And the laser is imaged onto the CCD. The tip and tilt of the first element are adjusted in order to center the laser to its desired location on theCCD at the second element. The procedure is then repeated sequentially along the optical path until all of the reflective elements havebeen assembled into their fixtures and adjusted in tip and tilt. The cold stop is then adjusted to be centered on the laser beam.Page 3 of 16
align-laser-2.docxCreated by Tim Bond3 Details of Alignment Procedures3.1 Mounting of Alignment LaserAn appropriate laser must be selected (power levels, beam size, wavelength, etc.) and then mounted repeatably tothe optical bench. The mounting should be in such a way that the laser can be removed and reassembled onto thebench with minimal effort. Adjustment needs to be provided in order to align the laser, and the adjustment must befine enough to meet the requirements stated below.3.1.1 Selection of the laser:A cost effective alignment laser needs to be selected with appropriate operating parameters.Some of the specifications that need to be considered are beam stability, power level, beam diameter, beamdivergence, beam drift, operating wavelength, additional hardware requirements, etc.Details of the specifications for the laser are found in Appendix A.3.1.2 Mounting of the laser:The mounting of the laser itself onto the top of the optical bench needs to be done in such a way that it is somewhatrepeatable. It may be the case that the laser will be mounted and removed several time during the course of theinstrument assembly and alignment procedures and possibly again in the future if realignment is required.Once the laser is located on the bench, there needs to be adjustments built into the mount that allow for refinementof both the angle and position (perpendicular to the beam) of the laser. Since the accuracy of the alignment can beimproved by increasing the moment arms on each end of the laser beam (outside of the entrance port), it may benecessary to fold the beam in order to achieve the desired length. If the length needs to be increased past the lengthof the bench, simple penta prism folds may be incorporated.Page 4 of 16
align-laser-2.docxCreated by Tim BondA penta prism beam splitter needs to be located near the laser to create a second beam line for positional location ofthe laser. As close as possible to the penta prism beam splitter, a CCD camera will be mounted, and the location ofthe laser spot on the CCD can be used for the reference for one end of the laser beam line.The laser will then pass through a penta prism beam splitter that is mounted immediately over the top of the entranceport of the instrument thus directing an additional beam line directly into the instrument. This penta prism needs tobe mounted in a fairly robust mount that is protected from any possible bumping or misalignment for the duration ofthe alignment procedures. The mounting also needs to accommodate an initial alignment of the prism by allowingfor translational adjustment along the “long axis” of the instrument (along pass through beam) as well as angularPage 5 of 16
align-laser-2.docxCreated by Tim Bondadjustment about the axis of the pass through beam. This will allow for centering in both the entrance and exit portsof the optical bench.Once the beam has been established, it can be confirmed at the entrance and exit ports of the bench to within adesired tolerance.Two additional penta prisms (non-beam splitter type) will be required on the opposite end of the optical bench as thelaser, and these will also need to be robustly mounted with protective covers. It may be possible to mount theseprisms without adjustment as their sole purpose is to deliver the laser beam to a CCD detector at the far end of thebench. They do need to remain accurately aligned throughout the alignment procedures.The specifications that need to be determined for the actual mounting of the laser are: The total amount of adjustment required in decentration.The resolution of adjustment required in decentration. The amount of adjustment required in tip/tilt.The resolution of adjustment required in tip/tilt.In addition to the above, the following specifications need to be established: The location and accuracy of the fiducials used for initial laser alignment (i.e. the entrance and exit port onthe optical bench).The mounting locations of the various penta prisms and penta prism beam splitters as well as a tolerance onthe location.The total adjustment required for the various penta prism and penta prism beam splitters as well as aresolution on the adjustment.The following chart is a first estimate of the adjustments required for the various elements within the laser TIONREQUIREDCOMMENTSLASERDX, DYRX, RY250 µm0.15 ( 10 arcmin)25 µm0.0025 ( 10 arcsec)Req. fine adjustmentReq. fine adjustmentPPBS #1 (laser)TZRZ250 µm1.0 (60 arcmin)50 µm0.15 ( 10 arcmin)One time shimOne time shimPPBS #2 (entrance)TZRZ250 µm0.15 ( 10 arcmin)25 µm0.0025 ( 10 arcsec)Req. fine adjustmentReq. fine adjustmentPP #3 (90 fold)RZ1.0 (60 arcmin)0.15 ( 10 arcmin)One time shimPP#4 (90 fold)RZ1.0 (60 arcmin)0.15 ( 10 arcmin)One time shimCCD (near end)DX, DY250 µm50 µmOne time shimCCD (far end)DX, DY250 µm50 µmOne time shimPage 6 of 16
align-laser-2.docxCreated by Tim BondThe initial laser alignment should take place with the optical bench mounted on some form of support fixture andheld in its “zenith” orientation. The support fixture needs to mimic the mounting and support scheme that will beused for locating the optical bench inside the vacuum jacket. This will ensure that the optics are being consistentlyaligned in the most probably orientation the instrument will experience – namely zenith oriented.Ideally the handling fixture will allow for the tilting of the entire bench such that assembly can occur with the bechfacing upwards. Note that this requires three different orientations – one with the optical entrance port facing zenith,one with the foreoptics side of the bench facing zenith, and one with the spectrograph side of the bench facingzenith.Initially a scheme was considered in which the beam passed directly through the optical bench (entrance port to exitport) and this would have been ideal except for the fact that once the alignment of the first element (the dichroic)was performed, the output beam would no longer be available for maintaining the alignment of the laser.With the laser mounted directly to the optical bench, it is now possible to begin assembly of the optics onto thebench.Page 7 of 16
align-laser-2.docxCreated by Tim Bond3.2 First Element Tip/Tilt Adjustment Procedure:The procedure for the mounting and tip/tilt adjustment of the first element in the path (the dichroic) would be asfollows:The next element in the optical path needs to be determined (in this case, the collimator mirror in the next element inthe sequence). A special fixture needs to be made that will allow mounting of a CCD array at the next elementsmounting fixture, and centered as accurately as possible. (Basically, the CCD array must be positioned in such a waythat the lasers beam would fall entirely within the CCD’s field, if the laser were pointed directly to the center of themount).There will be some tolerance stack up here that will be result from both the fabrication tolerances of the mount, thereaffirmation of the locations with the coordinate measuring machine, and with the metrology used to determine thelocation of the CCD pixels on the blank fixture. This stack up is accounted for within the scheme.The laser is then used to illuminate the CCD and adjustments can be made to the dichroic (tip and tilt only)accordingly.A calculation can be performed to show how accurately one can adjust the dichroic based on the length of the leverarm to the next element (the collimator) and precision with which one can expect to centroid the laser at the nextelement.It is also possible to determine how much adjustment is required at the dichroic element if some assumptions aremade on the mounting scheme for the element. It will be necessary to mount the element within a cell, and that cellneeds to be mounted onto the optical bench. The general process anticipated is that the mounts to the bench will bedesigned in such a way that a “one time” shimming process would be undertaken in order to refine the elementsalignment. Once the procedure is performed, the element should not need to be adjusted again, and if in the future,removal of the element is anticipated, the mounting scheme needs to account for this.Page 8 of 16
align-laser-2.docxCreated by Tim BondAgain a calculation can be performed in order to determine the requirements for the mounting scheme (resolution onthe angular adjustment).The mounts for the dichroic element must be designed in such a way to account for the adjustment required foralignment. Specifically, they must be designed to allow for adjustment resolutions that are practical for thealignment levels specified. This means that the actual placement of the shims may need to be further from theelement than nominally designated.The mounting scheme must also account for the fact that the shim will probably need to be removed for refinement,and will need to be replaced repeatably.3.3 Sequential Element Tip/Tilt Adjustment Procedure:Once an alignment laser is in place to provide a repeatable nominal optical axis, it is simply a matter of sequentiallystepping through the optical elements in order to tighten down the required angles. This process can be applied to allof the reflective elements along the optical path, through to the detector.Initially, a reflective element would be used in the slit wheel in order to continue on through the slit viewing portionof the instrument. Once the Slit viewer is fully aligned, it is simply a case of switching the reflective element at theslit, out for an actual slit (or transmissive element) and then alignment can continue on through the spectrographportion of the instrument.The accuracy in which the elements can be corrected has been determined and tabulated in the following chart. Alsoan indicator what the alignment requirement is has been shown, and how well the requirement is met is shown.Page 9 of 16
align-laser-2.docxCreated by Tim BondIt is also possible to show all of the required resolutions for the element mounts based on a nominal shim size andspacing. The following table demonstrates some of the possible combinations in order to meet the requirements. It isalso possible to adjust some of the numbers in order to achieve a more simplified design, as long as the combination(shim distance and shim resolution) are able to achieve the necessary adjustment angle.The following chart is a tabulation of the shim requirements for the element mounts through to the end of the slitviewer subsystem of the instrument.Page 10 of 16
align-laser-2.docxCreated by Tim Bond3.4 Alignment of the COLD STOP:Once an alignment laser is in place and the reflective elements have all been adjusted to within their requiredtolerances, one can then establish proper alignment of the cold stop. Since the optical axis has been established forthe laser, it is necessary to move the cold stop into alignment with this axis as close as possible (any misalignment atthis point will propagate though the entire optical path, as all of the elements are being aligned to the laser)It is assumed that a onetime adjustment will be required, and once this adjustment is performed, no furtheradjustments would be allowed (i.e. any further adjustments would cause a misalignment from the optical elements).The exact process for this alignment needs to be further refined3.5 Confirmation of Fiducial Locations in optical path:An additional (optional) step that can be taken is to confirm the location of the mounting fiducials for the imagerotator and the lens barrels once the alignment laser path has been established. The fiducials have been establishedusing the coordinate measuring machine, but refinement and/or reaffirmation is also possible.To do this the CCD would again need to be mounted onto an appropriate mounting blank and the blank moved to thevarious fixtures. The list of features that can be checked include: The telescope focusThe cold stopThe first and second bearing mount of the image rotatorThe fiducials for the mounting of the lens barrelsThe nominal positioning of the filter wheelThe positioning of any baffling structures along the optical path4 Additional General CommentsThe optical bench will need to be fabricated in such a way as to allow for the mounting of the laser, penta prismsand CCD detectors onto the periphery of the optical bench. The mounting should be robust enough to ensure thatalignment will be maintained throughout the entire procedure and the fixtures need to be easily removed andreplaced should this be necessary during the commissioning phase of the instrument.During the alignment of the elements onto the optical bench, the bench needs to be supported in a way that is similarto the way that the bench will be supported within the vacuum jacket. In particular, the bench should be supportedby a three point contact scheme, using the same contact points anticipated for final mounting. The bench should alsobe held in an orientation equivalent to the orientation of pointing at zenith on the telescope.Confirmation should be made that all safety procedures required are adhered to with use of the specified laser.Anyone tasked with working around the laser should be aware of the safety issues involved. Also anyone that iswithin a line of site distance of the laser during operation must be outfitted with the appropriate safety equipment(i.e. safety glasses)There are several large beam members that are attached to the sides of the optical bench. These beam members needto be properly located and installed during all of the alignment procedures. Also any elements that are deemed tohave a potential impact on the alignment of the optical bench needs to be installed or an appropriate dummy massinstalled in its place.Page 11 of 16
align-laser-2.docxCreated by Tim Bond5 Appendices5.1 Appendix A: General Laser System Top Level Requirements:The following are a list of the general top level requirements of the laser alignment system: The system needs to be stable over long periods of time, and over the temperature excursions that areexpected within the laboratory environment.The system needs to be easily removable and reinstalled as may be necessary during the commissioningphase.The system needs to define the optical axis to a level of better than 25 µm locational and 0.0025 ( 10arcsec) angular through the entire length of the beam.The laser beam needs to be located to a positional tolerance of 25 µm at both the entrance port and the exitport of the optical benchThe system needs to operate at any orientation with respect to gravity.5.2 Appendix A: Laser Selection Requirements:The following are a list of the requirements for the actual laser selected: The laser needs toPage 12 of 16
align-laser-2.docxCreated by Tim Bond5.3 Appendix B: CCD Selection RequirementsThe following are a list of the requirements for the actual CCD selected: The CCD needs toThe following excerpt from the Edmund Optics Catalogue shows a fairly inexpensive yet viable candidate for theCCD camera:Page 13 of 16
align-laser-2.docxCreated by Tim Bond5.4 Appendix C: Misc. Additional Specifications:5.4.1 Penta Prism Beam SplittersThe following excerpt from the Edmund Optics Catalogue shows a fairly inexpensive yet viable candidate for thepenta prism beam splitters:Page 14 of 16
align-laser-2.docxCreated by Tim Bond5.4.2 Penta PrismsThe following excerpt from the Edmund Optics Catalogue shows a fairly inexpensive yet viable candidate for thepenta prisms:Page 15 of 16
align-laser-2.docxCreated by Tim Bond5.4.3 Electronics / Computer ControlPage 16 of 16
A penta prism beam splitter needs to be located near the laser to create a second beam line for positional location of the laser. As close as possible to the penta prism beam splitter, a CCD camera will be mounted, and the location of the laser spot on the CCD can be used for the reference for one end of the laser beam line. The laser will then .