Transcription
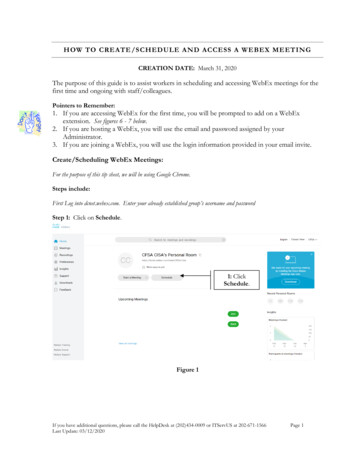
HOW TO CREATE/SCHEDULE AND ACCESS A WEBEX MEETINGCREATION DATE: March 31, 2020The purpose of this guide is to assist workers in scheduling and accessing WebEx meetings for thefirst time and ongoing with staff/colleagues.Pointers to Remember:1. If you are accessing WebEx for the first time, you will be prompted to add on a WebExextension. See figures 6 - 7 below.2. If you are hosting a WebEx, you will use the email and password assigned by yourAdministrator.3. If you are joining a WebEx, you will use the login information provided in your email invite.Create/Scheduling WebEx Meetings:For the purpose of this tip sheet, we will be using Google Chrome.Steps include:First Log into dcnet.webex.com. Enter your already established group’s username and passwordStep 1: Click on Schedule.1: ClickSchedule.Figure 1If you have additional questions, please call the HelpDesk at (202)434-0009 or ITServUS at 202-671-1566Last Update: 03/12/2020Page 1
Step 2: Enter all meeting Scheduling a Meeting details.The Meeting password will automatically populate by the system.Step 3: Click Start.All invited attendees will automatically receive and Outlook email notification of meeting, and it will appear on theirOutlook calendar.2: EnterMeetingType, Topic,Date, Time,Attendees.3: ClickStart.Figure 2Initial Steps for Joining a WebEx Meeting for the First Time:The following steps will provide an overview of how to access or join a WebEx meeting for the first time.For this example, Google Chrome is being used.Pointers to Remember:1. You may be prompted to add-on a WebEx extension if using WebEx for the first time.2. After clicking “Add WebEx to Chrome”, you will be prompted to add Cisco WebEx Extension.3. This will allow you to join a WebEx meeting. See steps below.Steps include:Step 1: Open the Calendar Invite from MS Outlook.If you have additional questions, please call the HelpDesk at (202)434-0009 or ITServUS at 202-671-1566Last Update: 03/12/2020Page 2
Step 2: Click on Attendee Link.Figure 3Step 3: Fill in the information requested on the page. (name, email address etc.) and click Submit.Figure 4If you have additional questions, please call the HelpDesk at (202)434-0009 or ITServUS at 202-671-1566Last Update: 03/12/2020Page 3
Step 4: Click Join.Figure 5Step 5: You may get the following screen asking you to Run a temporary application. If so click the bluelink.Figure 6If you have additional questions, please call the HelpDesk at (202)434-0009 or ITServUS at 202-671-1566Last Update: 03/12/2020Page 4
Step 6: Click RUN at the bottom of the page.Figure 7Step 7: Click Join Event.Figure 8If you have additional questions, please call the HelpDesk at (202)434-0009 or ITServUS at 202-671-1566Last Update: 03/12/2020Page 5
Joining Web Ex Meetings Ongoing BasisFirst, access your Outlook email account.Step 1: Click Accept.Step 2: Click Join Meeting.Figure 9Step 3: Your name will automatically appear.Step 4: Enter Email address.If you have additional questions, please call the HelpDesk at (202)434-0009 or ITServUS at 202-671-1566Last Update: 03/12/2020Page 6
Step 5: Click Next.Figure 10Step 2: Click Join Meeting.Figure 11If you have additional questions, please call the HelpDesk at (202)434-0009 or ITServUS at 202-671-1566Last Update: 03/12/2020Page 7
Notes:Notes:The following icons (in order) allow you to: Mute/Unmute your phone Enable/Disable video Share your screen Show Participants Chat Manage your Audio and Video Settings Leave MeetingNote: Remember to click on leave meeting icon when meeting is completed.Figure 12If you have additional questions, please call the HelpDesk at (202)434-0009 or ITServUS at 202-671-1566Last Update: 03/12/2020Page 8
For this example, Google Chrome is being used. Pointers to Remember: 1. You may be prompted to add-on a WebEx extension if using WebEx for the first time. 2. After clicking "Add WebEx to Chrome", you will be prompted to add Cisco WebEx Extension. 3. This will allow you to join a WebEx meeting. See steps below. Steps include:
