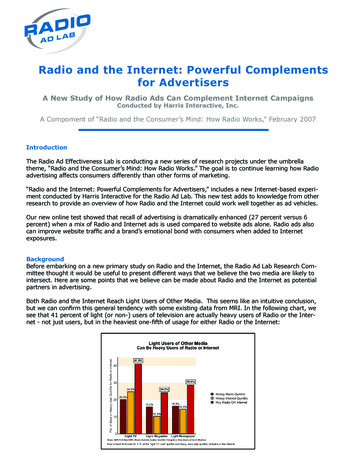
Transcription
How to Connect Reveal LoRaWAN Sensors
How to Connect Reveal LoRaWAN Sensors GuideDocument Number: RB00001CopyrightThis publication may not be reproduced, in whole or in part, without the specific and express prior written permission signed by anexecutive officer of Multi-Tech Systems, Inc. All rights reserved. Copyright 2022 by Multi-Tech Systems, Inc.Trademarks and Registered TrademarksMultiTech, the MultiTech logo, Conduit , SubGig and BridgeBee are registered trademarks and Reveal is a trademark of Multi-TechSystems, Inc. All other products and technologies are the trademarks or registered trademarks of their respective holders.DisclaimersInformation in this document is subject to change without notice and does not represent a commitment on the part of Multi-TechSystems, Inc. Multi-Tech Systems, Inc. provides this document “as is,” without warranty of any kind, expressed or implied, including, butnot limited to, the implied warranties of fitness or merchantability for a particular purpose. Multi-Tech Systems, Inc. may makeimprovements and/or changes in this manual or in the product(s) and/or the software described in this manual at any time.Legal NoticesSee the Legal Notices section of the website for up-to-date information on MultiTech warranty, returns policy, privacy statement, termsof sale, and terms of service.Customer SupportMultiTech offers free technical support for Reveal sensors at: https://support.radiobridge.comMultiTech also offers technical support plans and service packages to help our customers get the most out of their MultiTech products.World HeadquartersMulti-Tech Systems, Inc.2205 Woodale Drive, Mounds View, MN 55112
HOW TO CONNECT LORAWAN SENSORSContentsChapter 1Overview . 6Introduction. 6Stand-Alone vs Network Provider . 6AppEUI / JoinEUI. 6Revision History . 7Document Conventions . 7Chapter 2The Things Network (TTN) . 8Register through the Console. 8Add Your Gateway . 8Add Devices to Console . 8Connect your own TTN Account . 9Create a New Application on TTN. 9Create API Key on TTN . 9Add Integration to the Console . 9Add Integration to TTN . 10Add Devices to Console . 10Chapter 3MachineQ . 11Registering Devices through the Console . 11Using Your MachineQ Account . 11Create the Output Profile . 11Create the Application . 12Bypassing the Console . 14Add Devices to Console . 14Chapter 4Stand-Alone MultiTech Conduit AP/AEP . 15Add Gateway to the Console . 15Bring the Gateway Online . 15Update Gateway Firmware . 15Enable the LoRa Network Server. 15Install Python Script. 16Add Devices to Gateway. 16Add Devices to the Console. 17Chapter 5ChirpStack . 18Using the Reveal ChirpStack Server. 18COPYRIGHT 2022, Multi-Tech Sytems INC.3
HOW TO CONNECT LORAWAN SENSORSConfigure the ChirpStack Gateway . 18Add the ChirpStack Gateway to the Console . 18Add Devices to the Console. 18Using Your ChirpStack Server . 19Configuring HTTP Integration in ChirpStack . 19Configuring the Integration in the Console . 20Update Your ChirpStack Server Settings . 21Chapter 6Senet . 22Registering Devices through Reveal . 22Using Your Senet Account . 22Request API Key. 22AppEUI . 22Contract ID and Profile ID . 23Notification Target . 24Senet Configuration on the Console. 26Add Devices to Console . 26Chapter 7Loriot. 27Registering Devices through Reveal . 27Optional: Add Your Loriot Gateway . 27Using your Loriot.io account . 27Loriot.io Server Location . 27Loriot.io API Key . 27Loriot.io Application ID . 28Loriot.io Access Token . 29Loriot Output . 29Add Devices to Console . 30Chapter 8Kerlink Wansey Management Center (WMC) . 31Registering Devices through Wanesy . 31Add Your Kerlink Gateway . 31Update Gateway Firmware . 31Configure using the Magic Link . 32Add the Gateway . 32COPYRIGHT 2022, Multi-Tech Sytems INC.4
HOW TO CONNECT LORAWAN SENSORSUsing your Wanesy Management Center account . 33Integrate your WMC Account. 33Push Configuration . 33Clusters . 36Add Devices to Console . 36Chapter 9Third Party Network Servers . 38Sensor to Network Server . 38Network Server to Console . 38COPYRIGHT 2022, Multi-Tech Sytems INC.5
HOW TO CONNECT LORAWAN SENSORSChapter 1 OverviewIntroductionReveal wireless sensors provide full sensor to cloud solutions for Internet of Things (IoT) applications.Reveal LoRaWAN sensors can connect toa variety of LoRaWAN compliant network servers, located eitheron a local gateway or as acloud-based network server. From there, the sensor messages can be sent tothe web-based console or a third-party application. This document provides instructions for connectingLoRaWAN sensors using several different methods.For more information on the web-based console, visit https://console.radiobridge.comStand-Alone vs Network ProviderA network provider for LoRaWAN will set up LoRa base stations and charge for accessing theirnetworkmuch like a cell phone provider will charge to connect your phone to their network.In some cases,however, it may be desirable to set up a stand-alone gateway that does not use a network provider.Reasons for this may include lack of coverage in remote area or simplyreducing the cost when there aremany sensors in the field.AppEUI / JoinEUIThe LoRaWAN AppEUI, now known as the JoinEUI (they are sometimes used interchangeably),isconsistent among Reveal products and thus is not listed on the product labels. Earlierproducts use ageneric, non-unique, JoinEUI, and newer products use a unique JoinEUI as described in the followingtable.Table 1 AppEUI/JoinEUI for Reveal -01-01Used in the following product families: RBS301, RBS304,RBS305, and RBS30678-94-E8-00-00-00-00-00Used in product families not listed aboveNote that the AppEUI/JoinEUI can be modified at the time of manufacturing to match theendcustomer’s requirements. Please contact Reveal for more details on customization and preconfigurationCOPYRIGHT 2022, Multi-Tech Sytems INC.6
HOW TO CONNECT LORAWAN SENSORSRevision HistoryTable 2 Revision HistoryRevisionDateDescription1.0August 2018Initial release of the document1.1September 2018Added section for general gateways1.2January 2019Added support for TTN1.3February 2019Added process ID for TTN1.4May 2019Added APPEUI definition to TTN1.5June 2019Added Senet1.6July 2019Added Loriot1.7February 2020Added ChirpStack1.8April 2020Additional add gateway features, A1.9April 2020Added new AppEUI/JoinEUI1.10June 2020Added Kerlink integration1.11March 2021New Python script for stand-alone MultiTech gateway1.12July 2021Updated for TTN v3Document ConventionsTable 3DocumentConventionsFont / IconMeaningImportant notesWarnings and cautionsCOPYRIGHT 2022, Multi-Tech Sytems INC.7
HOW TO CONNECT LORAWAN SENSORSChapter 2 The Things Network (TTN)The Things Network, also referred to as TTN, is a collaborative global LoRaWAN network. TheTTN network server is located in the cloud and the gateways act as simple packet forwarders.Instructions for setting up a gateway and adding devices are provided on the websitehttps://www.thethingsnetwork.org and are not repeated here.Do not add devices to TTN directly. After this integration is setup, adding devices to the console will automatically adddevices to your TTN account.This section describes the setup required to link your TTN account with the console.Register through the ConsoleThe easiest way to utilize TTN is to register your devices through the console. In this case, it isnot necessary to set up your own TTN account or set up any integrations in the console. Go to:https://console.radiobridge.com/Add Your GatewayIf there is TTN coverage in your area, it is not necessary to add your own gateway, but ifadding coverage is necessary, this section describes the process to do so. Log into the console,select the Gateways tab on the left side, and click “Add Gateway.” Select the “TTN Gateway”from the listed network, fill in your Gateway EUI (Generally, it is your Gateway MAC ID with“00:00” inserted between the first three and last three bytes),select the appropriate frequencyplan, and select the appropriate router zone.Once the gateway is registered, you should see it in gateway list. Click the “Gateway Setup”link for the new gateway and note the gateway ID and gateway Key. This ID and Key need tobe added to your gateway to complete the link. Once this is done you should see a connectedstatus on the console as well as within your gateway.Add Devices to ConsoleWhen you add devices in the console, select The Things Network, select the option touse theReveal account, and add the device.COPYRIGHT 2022, Multi-Tech Sytems INC.8
HOW TO CONNECT LORAWAN SENSORSConnect your own TTN AccountIf you already have a TTN account and wish to connect it to the console, follow the steps inthis section.Create a New Application on TTNIn your TTN console, go to Applications - add application. Make sure you change yourApplication EUI to the Reveal AppEUI (see section on AppEUI/JoinEUI above). If thisApplication EUI is not set, it won’t link correctly to the console.Create API Key on TTNGo to your application on TTN and select API Keys - Add API Key. Name the new key“console” and select: Grant all current and future rights. Click Create API key.Add Integration to the ConsoleGo to the console and select the Integrations tab - The Things Network. Add the TTNapplication ID to the Application ID field and the API key generated in the last step to the APIKey field. Note that the Application API Key is not the name of the key, but the randomlygenerated string that was created. Enter the Application server, Gateway Server, IdentityServer, Join Server and Network server host address. You can find these on the TTN Homepage (Check below screenshot). Click Update.COPYRIGHT 2022, Multi-Tech Sytems INC.9
HOW TO CONNECT LORAWAN SENSORSAdd Integration to TTNGo to the TTN application and select Integrations - Webhooks - Add Webhook. Enter thefields as shown in the following table.Table 4 Parameters for TTN integrationParameterDescriptionWebhook IDEnter any nameWebhook FormatJSONBase URLUse the URL from the TTN tab on the consoleMethodPOSTDownlink API keyLeave this field blankAdditional headersAuthorizationUse the Authorization Value from the TTN tab on theconsoleEnabled messagesUplink messageTick and leave the path field as blankAdd Devices to ConsoleYour console should now be connected to your TTN account. When you add devices in theconsole, select The Things Network and add the device. Adding and deleting devices in theconsole will now be reflected in your TTN account, and messages coming through TTN willappear in the console.COPYRIGHT 2022, Multi-Tech Sytems INC.10
HOW TO CONNECT LORAWAN SENSORSChapter 3 MachineQMachineQ is a LoRaWAN connectivity service from Comcast. The MachineQ network server is located in thecloud, and the MachineQ gateways forward packets between the network server and the LoRaWANsensors. There is no configuration required on a MachineQ gateway, just plug it in and it is ready to go.Registering Devices through the ConsoleThe easiest way to add MachineQ devices is to let console register them for you. In this scenario, you don’tneed your own MachineQ account or a direct engagement with MachineQ. There is no cost associated withregistering through the console.Log into the console and select the Devices tab on the left side of the page and click “Add Device.” Fromthere select the MachineQ icon and then “Register through RadioBridge”. Once the device has been added,you will see sensor messages appear in the console.https://console.radiobridge.com/Using Your MachineQ AccountIf using your own MachineQ account is required, this section shows how to link MachineQ back end to theconsole.Create the Output ProfileGo to the console, select Integrations along the left and then MachineQ along the top. The three settingsunder “MachineQ Output Profile Settings” including the URL, TokenType, and TokenValue will be used inthe MachineQ backend setup.In the MachineQ backend, go to the Integrations tab on the left, select “Output Profiles” along the top, andthen click “Add Output Profile”. Under REST Profiles select “add rest profile”. Provide a name for the outputprofile and then enter the URL, TokenType, and TokenValue from the console as shown below.COPYRIGHT 2022, Multi-Tech Sytems INC.11
HOW TO CONNECT LORAWAN SENSORSClick Submit to create the new profile.Create the ApplicationOn the MachineQ window and select Integrations - Application Management and then Get Started. Givethe application a name and hit start. Copy the Client ID shown and paste into the client ID field on theconsole. Click next and do the same forthe client secret. Hit done inside of MachineQ and the applicationwill be created.Back in the console, click on “Refresh Dropdowns” and you will see the output profile displayed as shownbelow.COPYRIGHT 2022, Multi-Tech Sytems INC.12
HOW TO CONNECT LORAWAN SENSORSFor the Decoder Type select “Unknown” and for Device Profile select “LoRaWAN-1.0.2- class A-FCC20dBm”. Service profile should be on “default”. Click Update, and if everything was set up correctly you willget a message saying that the account detail hasbeen saved. You can now add devices and see the uplinkmessages come through your MachineQ backend account and up to the console.COPYRIGHT 2022, Multi-Tech Sytems INC.13
HOW TO CONNECT LORAWAN SENSORSBypassing the ConsoleIf the console is not used, and sensor messages will be sent directly from theend customer’s MachineQaccount to a third-party application, please refer to the table below for the parameters required to add thedevice to the MachineQ back end.Table 5 Parameters for MachineQ SetupParameterDescriptionDev EUIThe Device ID listed on your sensorApp EUISee section on AppEUI/JoinEUI aboveApp KeyEnter the Key listed on your sensorDevice ProfileLoRaWAN 1.0.2 Class A 20dBmDecoder TypeUse “Unknown”DevAddr AssignDynamicAdd Devices to ConsoleYour console should now be connected to your MachineQ account. When youadd devices in the console,select MachineQ and add the device. Adding and deleting devices in the console will now be reflected inyour MachineQ account, and messages coming through MachineQ will appear in the console.COPYRIGHT 2022, Multi-Tech Sytems INC.14
HOW TO CONNECT LORAWAN SENSORSChapter 4 Stand-Alone MultiTech ConduitAP/AEPThis section describes the steps necessary to connect a stand-alone MultiTech Conduit AP or AEPLoRagateway to the console. In the stand-alone configuration, the network server is located on the localgateway and a Python script is used to pass messages to the console.A cloud-based network server is highly recommended vs a standalone setup. If you wish to use this method, we recommendcontacting our support to discuss your application further.Add Gateway to the ConsoleLog into the console at console.radiobridge.com, select the Gateways tab on theleft side, and click “Add Gateway”.Follow the menu to select MultiTech and give the gateway a name. Click on “Register Gateway” and notethe link to the installation script that will be used in future steps.Bring the Gateway OnlineTo bring the gateway online, refer to the standard setup instructions from MultiTech. Note the gatewaymay default to a static IP of 192.168.2.1.Be sure to set the DNS correctly in the network setup, as future steps will fail if the DNS is notcorrect.Update Gateway FirmwareVerify the gateway is running firmware version 5.3.0 or later. If it is not, follow the MultiTech instructionsfor upgrading the system firmware before proceeding to the nextsteps.Enable the LoRa Network ServerNavigate to the LoRaWAN tab on the left side of the screen, select network settings, and under Mode select“Network Sever”.The default settings should be in the correct state, but double check that the Channel Plan is “US915”, thefrequency sub-band set to 1, and the network mode is set to “PublicLoRaWAN”. Click on Submit.Click on Administration - Access Configuration and check the box “Via WAN” under the SSH heading. ClickSubmit.Go to Firewall- Settings and check the box “Allow Inbound”. Click Submit.Click Save and Apply.COPYRIGHT 2022, Multi-Tech Sytems INC.15
HOW TO CONNECT LORAWAN SENSORSInstall Python ScriptLog into the gateway via SSH. You can use a program such as PUTTY on Windows or theTerminal on a Mac.The command will usually take the form:ssh user @ gateway IP address Navigate to the home folder:cd /var/config/home/adminRun the wget command using the link provided by the console when the gateway wasregistered. Thecommand will look like:wget https://console.radiobridge.com/download-setup/ code /multitech sdk.tar.gzExtract the files with the command:tar -xzvf multitech sdk.tar.gzNavigate to the extracted folder and execute the following commands to run the setup:cd multitech sdksudo chmod x ./mqtt gateway.shsudo ./mqtt gateway.shsudo rebootIf you are prompted for a password in the above commands, use the admin password set forthe gateway.You can close the SSH session.After the gateway reboots, login through the web interface, click on LoRaWAN, and under network settingsverify that the LoRa mode is set to “network server” and the status shows“running” in green.Add Devices to GatewayLog into the gateway and go to LoRaWAN - Key Management. Under Location select “LocalKeys” and clickAdd New.Enter the fields as shown in the following table.Table 6 Parameters for Device SetupParameterDescriptionDev EUIThe Device ID listed on your sensorApp EUISee section on AppEUI/JoinEUI aboveCOPYRIGHT 2022, Multi-Tech Sytems INC.16
HOW TO CONNECT LORAWAN SENSORSApp KeyEnter the Key listed on your sensorClick OK.Make sure the Enabled box is NOT checked under Local Network Settings. Once you haveadded all of yourdevices click on Submit then click Save.Note that this only adds the devices to the gateway, they will still need to be added to the console. Addinga device to the gateway does not automatically add to the console, and adding to the console does notautomatically add them to the gateway, so theymust be added separately.Add Devices to the ConsoleAs mentioned in the previous step, even though the devices have been added to thegateway, they will stillneed to be added to the console.Log into the console and select the Devices tab on the left side of the page and click “AddNew Device”.Select the MultiTech stand-alone gateway in the Select Network screen. Forthe ID and Key, use thenumbers found on the sensor label which is the same ID/Key pair entered on the gateway.Reveal sensors can now connect to the console through the stand-alone gateway. Trycreating sensor eventsand verify that you see messages in the console.COPYRIGHT 2022, Multi-Tech Sytems INC.17
HOW TO CONNECT LORAWAN SENSORSChapter 5 ChirpStackChirpStack is an open source LoRaWAN network server that can be deployed by end users whowish tomaintain their own private installation. You can register devices through the console ChirpStack installation,or you can connect your own ChirpStack installation to the console. Both methods are described below.Using the Reveal ChirpStack ServerThe easiest way to use ChirpStack is to let the console provision the device tothe Reveal ChirpStack server.In this scenario, you don’t need to install your own ChirpStack network server.https://console.radiobridge.com/Configure the ChirpStack GatewayYou will need to set up a gateway to direct LoRaWAN traffic to the Reveal ChirpStack server. To do so, setthe gateway to use the basic Semtech packet forwarderand point it to the IP addresschirpstack.radiobridge.com port 1700 as shown in the following image.Add the ChirpStack Gatew
Chapter 1 Overview Introduction Reveal wireless sensors provide full sensor to cloud solutions for Internet of Things (IoT) applications. Reveal LoRaWAN sensors can connect to a variety of LoRaWAN compliant network servers, located either
