Transcription
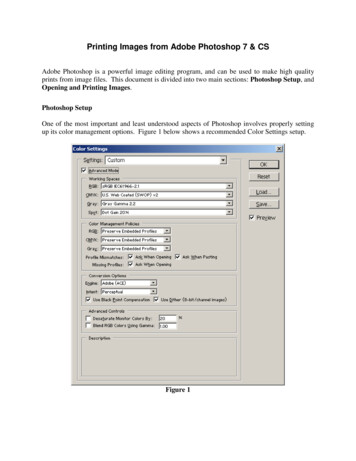
Printing Images from Adobe Photoshop 7 & CSAdobe Photoshop is a powerful image editing program, and can be used to make high qualityprints from image files. This document is divided into two main sections: Photoshop Setup, andOpening and Printing Images.Photoshop SetupOne of the most important and least understood aspects of Photoshop involves properly settingup its color management options. Figure 1 below shows a recommended Color Settings setup.Figure 1
Opening and Printing ImagesOpen the image that you want to print in Photoshop. If the image contains an embedded profilethat differs from your Working Space, a dialog will be displayed asking whether you want toconvert the image to your Working Space. Generally, you should use the embedded profile.This is shown in Figure 2 below.Figure 2If the image you are opening does not contain an embedded profile, a dialog will be displayedasking what you want to do. If you know what color space the image is in, assign a profile,either the working RGB (if it’s the same as your default working space shown here as sRGB), orselect a profile from the dropbox. If you don’t know what color space the image is in, selectLeave as is (don’t color manage). This is shown in Figure 3.Figure 3-2-
Now that your image is open in Photoshop, you can edit it as needed. Before printing the image,you should check the size, to ensure that it will print at the desired size. To do this, select Image Image Size. A dialog will appear similar to the one shown in Figure 4. Make sure that theConstrain Proportions and Resample Image: checkboxes are checked. Set the resolution to 300pixels/inch if printing to a Kodak ML-500 or 314 pixels/inch if printing to a Kodak 8500 printer.Set either the Height or Width dimension to the desired size. The other dimension willautomatically change to maintain the correct proportions. Once you have resized the image tothe desired size, click on the OK button.Figure 4If you wish to “soft proof” (monitor preview) what your print will look like, you can use theProof Colors feature of Photoshop. To setup this feature, select Proof Setup from the Viewmenu. A dialog similar to the one shown in Figure 5 will appear. Select the profile for theprinter/media that you are using in the Profile: box. Set the Intent: to Perceptual, and check theBlack Point Compensation and Preview checkboxes. You can optionally check the Paper Whitecheckbox for a more accurate indication of the overall print contrast. Once you have setup theparameters in the Proof Setup dialog, click on the Save button to save the proof setup values.After saving, the named file will now appear near the bottom of the Proof Setup dialog. You cannow click on the name to apply the selected proofing setup. Once selected, you can toggle theProof Colors function by pressing Ctrl-Y. When the Proof Colors feature is enabled, the namedProof Setup will appear in parentheses next to the filename as shown in Figure 6.-3-
Figure 5Figure 6Photoshop interacts with the Windows and Macintosh operating systems differently. Therefore,Windows and Macintosh will be discussed separately.Windows 98/Me/2000/XPWhen you are ready to print the image, select Print with Preview from the File menu. A dialogsimilar to the one shown in Figure 7 will appear. Check the Show More Options checkbox andselect Color Management from the dropdown box below the checkbox. Set the Source Space: toDocument (the document color space will be shown to the right). To color manage the printedoutput, set the Print Space Profile: dropdown box to Printer Color Management. This willallow Windows ICM to color manage the image data when it is sent to the printer driver. If youwish to turn off printer color management, set the Print Space Profile: dropdown box to Same asSource. If you wish to have Photoshop apply the printer ICM profile when sending the imagedata to the printer driver, select the ICM profile that you wish to use in the Print Space Profile:dropdown box. You can now specify the Rendering Intent via the dropdown box below theprofile name. Normally, you should select Perceptual for the rendering intent. Photoshopinteracts with Windows and turns off Windows ICM so that the profiles are not applied twice.You are now ready to click on the Print One button to send the image to the printer driver forprinting on the selected printer.-4-
Figure 7Macintosh (OS 9.x/10.2.x)When you are ready to print the image, select Print with Preview from the File menu. A dialogsimilar to the one shown in Figure 8 will appear. Check the Show More Options checkbox andselect Color Management from the dropdown box below the checkbox. Set the Source Space: toDocument (the document color space will be shown to the right). The Macintosh drivers (bothOS 9 & 10) always apply the printer ICC profiles when an image is printed. To color manage theprinted output, set the Print Space Profile: dropdown box to Printer Color Management(Postscript Color Management for OS X). Note that selecting Same as Source will give the sameresults.-5-
If you wish to apply the printer profile in Photoshop, you must first disable the printer colormanagement, or the print will be doubly color managed. Since the printer driver selects theprinter profile by means of the profile’s filename, the easiest way to disable the printer colormanagement is to rename the profile. I would suggest adding a number at the end of the profilename. For example, you could rename the Kodak 1400 Glossy.icm profile to be Kodak 1400Glossy1.icm. The profiles are embedded within one of the driver files (the filename variesdepending upon the printer model). Once you have disabled the printer color management, youcan select the ICC profile that you wish to use in the Print Space Profile: dropdown box. Youcan now specify the Rendering Intent via the dropdown box below the profile name. Normally,you should select Perceptual for the rendering intentFigure 8 (OS X)-6-
checkbox for a more accurate indication of the overall print contrast. Once you have setup the parameters in the Proof Setup dialog, click on the Save button to save the proof setup values. After saving, the named file will now appear near the bottom of the Proof Setup dialog. You can now click on the name to apply the selected proofing setup.

![Adobe Photoshop 2021 (Version 22.1.1) [32 64bit] [2022] - GWBC](/img/64/adobe-photoshop-2021-version-2211.jpg)