Transcription
Sierra User Guide
WelcomeCongratulations on purchasing a Lightspeed Aviation Sierra headset. Your headset is a premium productthat will provide many years of comfortable high performance for your flying endeavors.If this is your first Lightspeed Aviation headset—welcome to the Lightspeed family! We look forward tobuilding a lasting community with our customers founded on products and service that are best in class. Tosupport your passion for flying we invite you to visit LightspeedAviation.com where you’ll find useful insightsabout our other products and aviation.Thank you for choosing a Lightspeed Aviation headset.2
ContentsIntroduction. 2ComPriority .10Getting startedFitting your headset.6Wired auxiliary devices .10Battery installation.7Battery types.7Mic gain adjustment.10Bluetooth wireless technology enabled devicesBattery life .7Connecting Bluetooth wireless technologyenabled devices for the first time.11Controller.8Bluetooth mode—ON and OFF .12Using your Sierra headsetBluetooth wireless technology phone features.13Turning ON and OFF.9FlightLink .14Matching stereo/mono setting to anaudio panel .9FAQs.15Setting the DIP switch.9Specifications.18Peak performance tips.17Warranty information.193
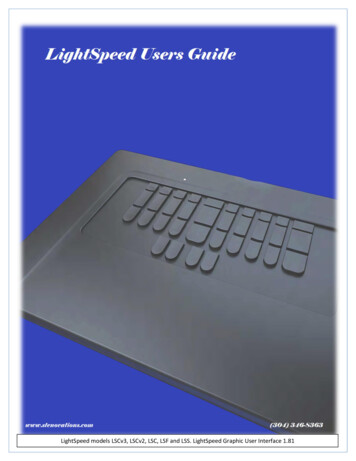
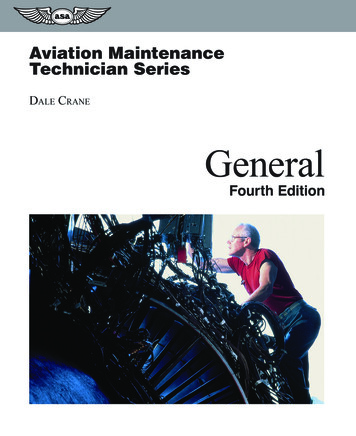
IntroductionYour Sierra headset package includes (clockwise, from top left on the following page):4 Carrying case User and Quick Start guide with warranty information Sierra ANR headset with Sierra controller Two AA batteries Cord clip Audio device cable with 3.5mm connector
Introduction5
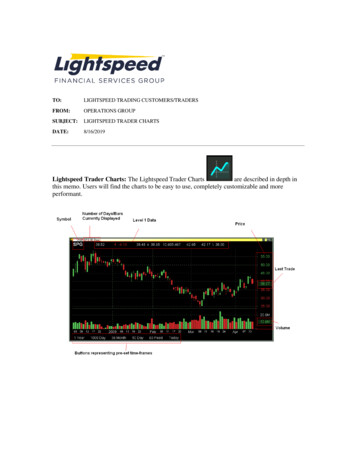
Getting StartedFitting your headsetFitting your headset properly is the key tocomfortable use and superior Active Noise Reduction(ANR) capabilities. To gain peak performance from theANR feature it’s necessary to have a solid seal aroundyour entire ear combined with a symmetrical fit onyour head.4. Position the microphone 1 8 inch from yourmouth, with the gain adjustment cap facingaway from you (visible when you remove themic muff ).This side of the microphoneshould face away from you.The following tips will assist in achieving the proper fit.1. Extend the sliders fully.2. Place the headset on your head and compressthe sliders slowly and evenly on each side untilthe headset fits firmly on your head.3. Adjust the ear cups to ensure the ears are fullyinside the ear seal and there is uniform pressureon your head.6Note: The microphone will not transmit unlessplugged into an intercom.
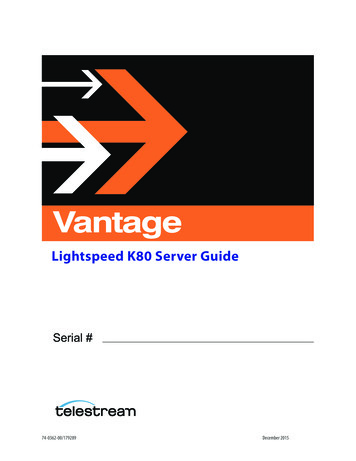
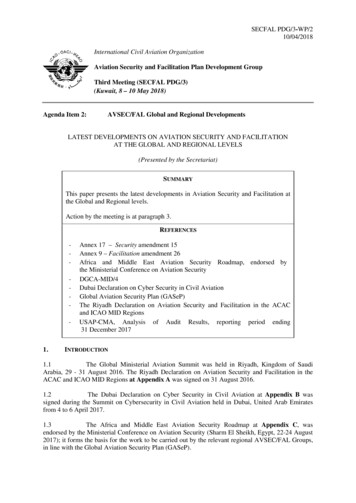
Getting StartedBattery installationThe Sierra headset requires two AA batteries(included). Use alkaline or lithium batteries for bestperformance.A. Open the controller battery/DIP switch door byeither pressing down on the circle icon or bypulling open the door along the notched edges.Insert two AA batteries with the correct polaritypositioning.B. The LED flashes GREEN when charged batteriesare in use and the power is on.C. When batteries begin to run low the power LEDflashes red. If the LED flashes red during flightthe headset will continue to operate. Install newbatteries as soon as possible at any indication oflow batteries.Battery typesUse two “AA” alkaline or lithium batteries. Lithiumbatteries may provide improved battery life incolder temperatures. We do not recommend usingrechargeable batteries or mixing battery types andbrands.Battery lifeA set of batteries can provide up to 40hours of power. However, heavy usageof Bluetooth wireless technology cansignificantly reduce battery life. Underquiet conditions Sierra will auto shutoff approximately five minutesafter the headset is removedfrom your head.Stereo/mono switchBattery/DIP switch door7
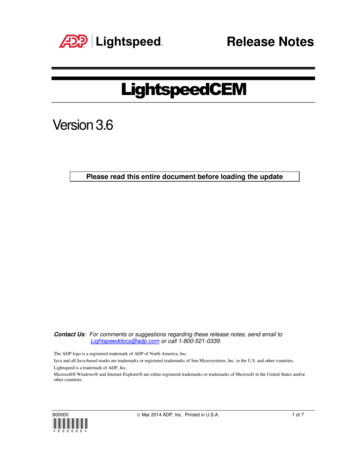
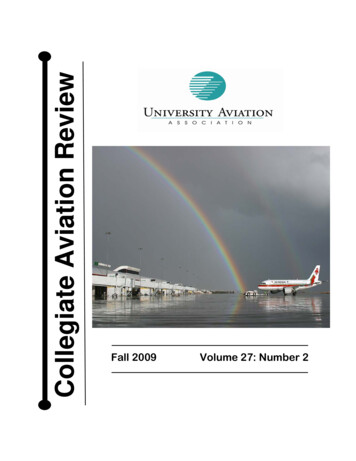
Getting StartedThe controllerA. Power indicator LED: Flashes green when poweris supplied to Sierra and batteries are strong.Flashes red when batteries are low.E. Bluetooth button: Turns on and off the Bluetoothwireless technolgy signal and controls devicesconnected via Bluetooth wireless technology,including cell phones and music players.B. Power button: Powers on headset, turning onActive Noise Reduction (ANR). Press button onceto turn Sierra on; press and hold to turn Sierra off.To toggle the LED brightness from bright to dimquickly press the power button twice.F. Auxiliary input jack: Providesa wired input for cell phonesand audio devices.C. Volume control: Controls audio panel volumewith individual sliders for each ear. Does notaffect the volume of auxiliary devices.D. Bluetooth indicator LED: Flashes blue whenBluetooth mode is on and red when Bluetoothwireless technology is being turned off. Inpairing mode, flashes alternating red and blue.G. Bluetooth volume buttons:Controls the volume ofdevices connected viaBluetooth wireless technology.H. ComPriority button: Quietsmusic and audio from auxiliarydevices during radiocommunications.ABCDEFGHThe Sierra controller8
Using Your Sierra HeadsetTurning ON and OFFON: Press the power button once to turn on theheadset. The green power LED flashes whenpower is supplied. Active Noise Reduction (ANR) isengaged when you turn on the headset.OFF: Press and hold the power button until thegreen power LED turns off.Sierra will auto shut off approximately five minutesafter removing the headset and under quietconditions.The power LED flashes red when batteries are low;see Battery Installation, on page 7.Matching stereo/mono setting to an audio panelThe stereo/mono DIP switch setting should matchthe signal from your audio panel. For a stereo panel,best performance is gained by setting the headsetfor stereo. The same is also relevant to a monopanel. Incorrect settings result in communicationsbeing heard in only one ear. The Stereo/Mono DIPswitch does not affect auxiliary devices, so you canenjoy auxiliary audio in stereo regardless of how theStereo/Mono DIP switch is set.Setting the DIP switchThe DIP switch is factory set to match most aircraftaudio panels. To change a DIP switch setting openthe controller battery compartment door. Use a smallpointed object like a wood toothpick to slide the DIPswitch to ON or OFF depending on your preference.9
Using Your Sierra HeadsetComPriority ComPriority is turned on or off by the bottom-mostcontroller button. With ComPriority on and whenradio communications are detected, the volume ofauxiliary devices will be significantly reduced.To enable ComPriority, turn on the feature, plug intoyour intercom and talk into the headset microphonewhile playing music over a wired device; see WiredAuxiliary Devices in the next section. If enabled, yourauxiliary music volume will decrease when you startto talk. During cell phone calls, the other party will bemuted, so disable ComPriority before making calls.Wired auxiliary devicesTo connect a music player or cell phone to Sierra’sauxiliary input jack, use the cord provided.IMPORTANT: To use a cell phone via the auxiliary inputjack, the headset must be connected to the intercom.10To adjust the volume on a device connected toSierra’s auxiliary input jack, use the controls on thedevice itself.Mic Gain AdjustmentYou can think of microphone gain as a volumecontrol for your microphone, helping balance loudand soft voices in a multi-headset environment.To access the gain adjustment dial, remove thefoam windscreen on your microphone and thenremove the small cap next to the Lightspeed logo.Turn the dial clockwise to increase gain sensitivityand counterclockwise to decrease gain sensitivity.Move the dial in small increments (think one-hourincrements on a clock face) and test it in your aircraft.Replace the cap and foam windscreen when you aresatisfied with the adjustment.
Connecting Devices with Bluetooth Wireless TechnologyConnecting devices with Bluetooth wirelesstechnology for the first timeBefore using a cell phone or other Bluetooth wirelesstechnology enabled device for the first time withSierra, it must be “paired” or electronically connected.To pair a Bluetooth wireless technology enabled cellphone with Sierra:1. Turn on the headset and verify the green LEDis flashing. Make sure Sierra’s Bluetooth mode isturned off. (See “Bluetooth Mode—ON and OFF”,page 12).2. Press and hold the Sierra Bluetooth button forabout five to ten seconds or until the BluetoothLED continually flashes red and blue. Thisindicates the Sierra pairing mode setting andlasts about two minutes. If this step takes longerand the Bluetooth LED is no longer alternatingred and blue, start over from step one.3. With Sierra in pairing mode, follow the menuprompts on your Bluetooth wireless technologyenabled device directing it to look for Bluetoothwireless technology devices.4. Select Lightspeed-V### (numbers may vary) onyour Bluetooth wireless technology enableddevice from the list of found devices.5. If asked to enter a password or PIN, enter 0000.Your Bluetooth wireless technology enabled deviceshould now be paired and ready for continued usewith Sierra.11
Bluetooth Wireless TechnologyBluetooth mode—ON and OFFON: With Sierra turned ON, press and hold theBluetooth button (see page 8) until you hear a hightone and the Bluetooth indicator LED flashes threeblue pulses. For first time pairing see instructions onpage 11.OFF: Press and hold Sierra’s Bluetooth button forabout three seconds until a high tone is emitted andthe Bluetooth indicator LED flashes three red pulses.Note: The Bluetooth wireless technology featuremust be turned ON for devices with Bluetoothwireless technology to correctly function.Note: The headset mic will not work with phonecalls unless plugged into the intercom.12When you turn on Bluetooth mode again, it willconnect to the most recently paired device. Mostmobile devices connect to Sierra automatically. Ifthat doesn’t happen it may be necessary to use thesettings menu of your device to choose and re-pairLightspeed-V### (numbers may vary).
Bluetooth Wireless TechnologyBluetooth wireless technology phone featuresDepending on the Bluetooth wireless technologyprofile of the phone, you can use Sierra’s Bluetoothbuttons to perform several functions. Some typicalfunctions are: Press the Bluetooth button once for voice dialing(if supported by your phone). Press the Bluetooth button once to answer thephone when it rings. Press the Bluetooth button once to disconnectfrom a call. Press and hold the Bluetooth button for twoseconds to redial the last number called. Use the Bluetooth volume buttons (Sierra’s and– buttons) to adjust the volume. You can alsoadjust the volume on your device.13
FlightLinkFlightLink is the first in-flight cockpitrecording application for the iPad andiPhone. The free app works seamlesslywith Sierra headsets to capture and retrieve allincoming and outgoing communications.Features Record all activity over the intercom, as well asin-cabin conversation. Playback the prior two seconds or two minutes. Store your recording library. Draw notes, codes, or diagrams on theconvenient iPad scratchpad for reference.How to Activate Download the FlightLink app from the App Store. 14Connect your Apple device to the controllerusing the supplied auxilliary device/iPhone cable. The recipient of a cell phone call willhear all sounds on the intercom. Toavoid this, unplug your headset fromthe panel during phone calls. Tap the icon to begin using the app.Toggling Between AppsPress your device’s Home button andselect another app. Your recording will continueuninterrupted as you switch between differentapplications.NOTE: If you simultaneously use an app that providesaudio, you will need to run it on a second device toprevent interruption of FlightLink recording.
FAQsWhy do I hear radio communications in onlyone ear or weakly in both?Sierra’s Stereo/Mono DIP switch is probably setto Stereo while your audio panel is transmitting amono signal. To fix this, change Sierra’s Stereo/MonoDIP switch to Mono. This setting does not affectmusic or audio from auxiliary devices; you can hearstereo sound on auxiliary devices even when theStereo/Mono DIP switch is set to Mono.Why doesn’t my Bluetooth-enabled deviceaccept Sierra’s 0000 passcode?Your headset may not be in pairing mode. Somedevices prompt for a pass code without checkingfor pairing mode. When the device cannot pair withthe headset, it rejects the passcode. To enter pairingmode, you must start with Bluetooth mode turnedfully OFF (see “Connecting devices with Bluetoothwireless technology for the first time,” on page 11).When pairing Sierra with my Bluetooth wirelesstechnology device, why does my device indicateit cannot connect?The headset may not be in pairing mode. To enterpairing mode, you must start with Bluetooth modeturned fully OFF; (see “Connecting devices withBluetooth wireless technology for the first time,” onpage 11).Why can’t the other party hear me when I makea call?When you speak into the microphone during a call,Sierra’s ComPriority feature decreases the volumeby 80%. To prevent this, disable ComPriority beforeplacing calls (See page 10).15
FAQsHow can I reduce static noise during cell phonecalls?To reduce RF interference during phone calls,keep cell phones at least 12 inches from the Sierracontroller and headset when making calls.When flying what causes a warbling noise in theear cup?If your ear is not entirely inside the cup, with atight seal, air can seep in and cause the ANR tocompensate for uneven internal cup pressure.16Where is my product serial number?The serial number (a small,white, bar-code sticker withnumbers) can be foundunderneath the head pad.The head pad, located on theinner radius of the headband,must be removed to reveal theserial number. Simply pinch thecushioned part of the head pad,pull down and it will snap out.
Peak Performance Tips Start with an excellent fit—see “Fitting yourheadset,” on page 6. Set Sierra’s Stereo/Mono DIP switch to matchthe signal from your audio panel; see “MatchingSierra’s Stereo/Mono setting to your audio panelsignal,” on page 9. Keep cell phones at least 12 inches from theSierra controller and headset when making callto reduce static noise during phone calls. To conserve battery life, turn OFF Bluetoothmode when not in use. Lightspeed recommends replacement of thesoft goods on your headset (ear seals, head padsand mic muffs) every 18 months to ensure peakANR performance and comfort. These are wearitems and are not covered by the Lightspeedwarranty and are available for purchase on ourwebsite at LightspeedAviation.com/Accessories. When packing your headset into its case, placethe mic just over the headband to avoid chafingthe boom.17
SpecificationsConnectorDual general aviation connectors with .250-inchcommercial stereo headphone plug and .206-inchMIL-SPEC microphone plugGeneralBattery power supply: 3V, two AA batteriesWeight: 16 oz.HeadphoneTransducer: 40mm moving coilFrequency response: 20 Hz-20 kHzNominal impedance @ 1 kHz:Off—Mono: 180 ohms, On—Mono: 300 ohmsOff—Stereo: 250 ohms, On—Stereo: 600 ohms18MicrophoneTransducer principle: Noise-canceling electretFrequency response: 200 Hz-6000 HzMaximum SPL: 114 dBTerminating impedance: 220–2200 ohmsOperating voltage: 8V-16V DCANRMaximum SPL: Greater than 120 dB at 100 Hz
Warranty InformationWe encourage you to register your headset at ourwebsite LightspeedAviation.com. That way, if yourheadset ever needs servicing, registration helpsassure quick and efficient processing.5-Year Limited Warranty for New Aviation Headsets Sold by Lightspeed Aviation, Inc.Lightspeed Aviation, Inc. (“LSA”) warrants that the new aviation headset sold by LSA (“NewHeadset”) is free from all material defects in workmanship and materials. For the NewHeadset, all warranties provided by LSA and all implied warranties imposed by law arelimited to a 5-year period, beginning on the purchase date shown on the New Headset’ssales receipt (“Warranty Period”). This 5-year Limited Warranty (“Limited Warranty”) isprovided solely for the benefit of the initial purchaser of the New Headset (“Purchaser”),and it excludes all 3rd parties, including distributors, dealers, retailers, subsequent owners,and other users of the New Headset. This Limited Warranty is not assignable and remainsin full force and effect during the Warranty Period, but only if the New Headset: (a) hasbeen properly maintained; (b) has not been abused or misused; and (c) has not beenrepaired, altered, or modified without LSA’s approval. This Limited Warranty specificallyexcludes all taxes, shipping costs, and problems relating to any: (1) repair, alteration, ormodification not approved by LSA; (2) abuse or failure to properly maintain the NewHeadset; (3) faulty workmanship by any person, except LSA or its approved agent; (4)operation of the New Headset, except as specified in its operating manual; (5) ordinarywear and tear; or (6) finish and appearance item. For each claim made under this LimitedWarranty (“Claim”), Purchaser must, within 10 days of discovering a New Headset problemindicating a breach of this Limited Warranty, deliver to LSA a written notice that explainsin detail the New Headset’s specific defect, that shows proof of Purchaser’s purchase ofthe New Headset before the end of the Warranty Period, and that shows proof that thisLimited Warranty applies to the New Headset. LSA or its agent may investigate any Claim.For each Claim, LSA may, in its sole discretion, choose any of the following exclusiveremedies: (I) repair or replace the New Headset or any part thereof, without charge toPurchaser, but first Purchaser must return the New Headset to LSA’s authorized repairfacility, pre-paying all shipping charges, and Purchaser must accept the same as repairedor replaced at the facility’s location (i.e., FOB the facility) within 10 days of the date of LSA’scompletion notice sent to Purchaser, or else LSA will deem the New Headset abandoned,in which case LSA may keep, sell, or otherwise discard it; or (II) refund the New Headset’spurchase price to Purchaser. Without paying any amount to Purchaser, LSA may keep, sell,or otherwise discard all replaced New Headsets and parts thereof and all New Headsetswhere LSA has refunded the purchase price to Purchaser. In repairing or replacing anyNew Headset, LSA may, in its sole discretion, use new, used, or reconditioned parts orprovide a refurbished used headset as a replacement. In connection therewith, LSAwarrants that all new, used, or reconditioned parts or refurbished used headsets will befree from all material defects in workmanship and materials during the Warranty Periodand for a period of up to 90 days thereafter, but only to the extent that such event occursduring the final 90 days of the Warranty Period. LSA may, in its sole discretion, (i) establishseparate, additional, non-warranty repair and replacement programs for any new or usedheadset (“Non- Warranty Service Programs”), (ii) the Non-Warranty Service Programs maycover any time period, before or after any Warranty Period has expired, and (iii) chargeany amount and impose any term with respect to any Non-Warranty Service Program.For Non-Warranty Service Programs, LSA warrants that all new, used, reconditioned, orrefurbished parts and headsets used to repair or replace any headset will be free from allmaterial defects in workmanship and materials, but only for a limited period of 90 daysthereafter. Purchaser acknowledges that used or reconditioned parts may be used torepair any new or used headset, and that a refurbished used headset may be provided asa replacement for any new or used headset. LSA may hire a 3rd party to repair or replaceany new or used headset. “Including” means “including, but not limited to. ”19
Warranty InformationTHE TERMS IN THIS DOCUMENT ARE THE ONLY TERMS THAT GOVERN LSA’S WARRANTYOBLIGATIONS FOR ANY NEW OR USED HEADSET OR PART THEREOF. NO ORAL OROTHER WRITTEN TERM APPLIES. THIS DOCUMENT PROVIDES THE EXCLUSIVE REMEDYFOR ALL CLAIMS AGAINST LSA WITH RESPECT TO ANY NEW OR USED HEADSET OR PARTTHEREOF. NOTWITHSTANDING ANY PROVISION TO THE CONTRARY IN THIS LIMITEDWARRANTY, LSA RESERVES THE RIGHT TO MODIFY, AT ANY TIME AND FROM TIME TOTIME IN ITS SOLE DISCRETION, ANY AND ALL TERMS IN THIS LIMITED WARRANTY. EACHSUCH MODIFICATION IS DEEMED EFFECTIVE UPON PUBLICATION ON LSA’S WEBSITE OROTHERWISE.TO THE EXTENT ALLOWED BY LAW: LSA DISCLAIMS AND PROVIDES THIS LIMITEDWARRANTY IN LIEU OF ALL OTHER EXPRESS OR IMPLIED WARRANTIES, INCLUDINGANY WARRANTY OF MERCHANTABILITY OR FITNESS FOR A PARTICULAR PURPOSE.LSA IS NOT LIABLE FOR CONSEQUENTIAL, INCIDENTAL, PUNITIVE, INDIRECT, SPECIAL,LOST PROFITS, OR SIMILAR DAMAGES CLAIMED UNDER ANY STATUTE OR LEGAL OREQUITABLE THEORY. LSA’S TOTAL LIABILITY FOR ALL CONTRACT, TORT (INCLUDINGNEGLIGENCE), STATUTORY, OR OTHER CLAIMS ARISING FROM OR RELATING TO THISLIMITED WARRANTY OR ANY HEADSET OR PART THEREOF IS LIMITED TO 1,000. SOMESTATES DO NOT ALLOW THE LIMITATION OF CONSEQUENTIAL DAMAGES, SO THEABOVE LIMITATIONS MIGHT NOT APPLY TO PURCHASER. THIS LIMITED WARRANTY GIVESPURCHASER SPECIFIC LEGAL RIGHTS, AND PURCHASER MIGHT HAVE OTHER RIGHTSTHAT VARY FROM STATE TO STATE.FOR PURCHASERS IN CALIFORNIA: PURCHASER HAS THE RIGHT TO HAVE THE NEWHEADSET SERVICED AND REPAIRED DURING THE WARRANTY PERIOD. THE WARRANTYPERIOD WILL BE EXTENDED FOR THE NUMBER OF WHOLE DAYS THAT THE NEWHEADSET HAS BEEN OUT OF PURCHASER’S HANDS FOR WARRANTY REPAIRS. IF ADEFECT EXISTS DURING THE WARRANTY PERIOD, THIS LIMITED WARRANTY WILL NOT20EXPIRE UNTIL THE DEFECT HAS BEEN FIXED. IF ANY WARRANTY REPAIR HAS BEENDELAYED BECAUSE OF CIRCUMSTANCES BEYOND PURCHASER’S CONTROL, OR IFANY WARRANTY REPAIR DID NOT REMEDY A DEFECT AND PURCHASER NOTIFIES LSAOF SUCH FAILURE WITHIN 10 DAYS AFTER THE REPAIR, THE WARRANTY PERIOD WILLBE EXTENDED FOR A PERIOD EQUAL TO THE DURATION OF THE DELAY. IF, AFTER AREASONABLE NUMBER OF ATTEMPTS, THE DEFECT REMAINS UNFIXED, PURCHASERMAY RETURN THE NEW HEADSET FOR REPLACEMENT OR REFUND, SUBJECT TO AREASONABLE DEDUCTION FOR PURCHASER’S USE OF THE NEW HEADSET. ANYEXTENSION OF THE WARRANTY PERIOD DOES NOT AFFECT ANY PROTECTION ORREMEDY AVAILABLE TO PURCHASER UNDER APPLICABLE LAW.
lease register your headset atPLightspeedAviation.com to optimize yourcustomer experience.Cert: 0046503Lightspeed Aviation, Inc.’s ManagementSystem is Registered to ISO 9001:2015Per FCC 15.19(a)(3) and (a)(4) This device complies with part 15 of the FCC Rules. Operation is subject to the following two conditions: (1) This device may not cause harmful interference, and (2) thisdevice must accept any interference received, including interference that may cause undesired operation.Caution: Per FCC 15.21, any changes or modifications to this system not expressly approved by Lightspeed Aviation could void the user’s authority to operate the equipment. 2018 Lightspeed Aviation, Inc. All rights reserved. ComPriority and Auto Shutoff are trademarks of Lightspeed Aviation, Inc. Sierra and Lightspeed are registered trademarks of Lightspeed Aviation,Inc. iPhone and iPad are trademarks of Apple, Inc., registered in the U.S. and other countries. “Made for iPhone” and “Made for iPad” mean that an electronic accessory has been designed to connectspecifically to iPhone or iPad, respectively, and has been certified by the developer to meet Apple performance standards. Apple is not responsible for the operation of this device or its compliancewith safety and regulatory standards. Please note that the use of this accessory with iPhone or iPad may affect wireless performance. The Bluetooth word mark and logos are registered trademarksowned by the Bluetooth SIG, Inc. and any use of such marks by Lightspeed Aviation is under license. Other trademarks and trade names are those of their respective owners. Specifications aresubject to change without notice. Part Number 704-00001-000 Rev A6 041821
Lightspeed Aviation6135 Jean RoadLake Oswego, Oregon oll freetelfaxLightspeedAviation.com
remove the small cap next to the Lightspeed logo. Turn the dial clockwise to increase gain sensitivity and counterclockwise to decrease gain sensitivity. Move the dial in small increments (think one-hour increments on a clock face) and test it in your aircraft. Replace the cap and foam windscreen when you are satisfied with the adjustment.