Transcription
SonicWall Secure MobileAccess 12.3 Connect TunnelUser Guide
Contents1Introduction . . . . . . . . . . . . . . . . . . . . . . . . . . . . . . . . . . . . . . . . . . . . . . . . . . . . . . . . . . . . . . . . . . . . . . . . 4About Connect Tunnel . . . . . . . . . . . . . . . . . . . . . . . . . . . . . . . . . . . . . . . . . . . . . . . . . . . . . . . . . . . . . . . . . . 4Organization of This Guide . . . . . . . . . . . . . . . . . . . . . . . . . . . . . . . . . . . . . . . . . . . . . . . . . . . . . . . . . . 4Guide Conventions . . . . . . . . . . . . . . . . . . . . . . . . . . . . . . . . . . . . . . . . . . . . . . . . . . . . . . . . . . . . . . . . . 5Connect Tunnel Service . . . . . . . . . . . . . . . . . . . . . . . . . . . . . . . . . . . . . . . . . . . . . . . . . . . . . . . . . . . . . . . 6About Connect Tunnel Service . . . . . . . . . . . . . . . . . . . . . . . . . . . . . . . . . . . . . . . . . . . . . . . . . . . . . . . . . . . 6Installing Connect Tunnel Service . . . . . . . . . . . . . . . . . . . . . . . . . . . . . . . . . . . . . . . . . . . . . . . . . . . . . . . . . 6Importing the Client Certificate . . . . . . . . . . . . . . . . . . . . . . . . . . . . . . . . . . . . . . . . . . . . . . . . . . . . . . . . . . 8Using Windows Services to run CTS . . . . . . . . . . . . . . . . . . . . . . . . . . . . . . . . . . . . . . . . . . . . . . . . . . . . . . . 9Using a Command or Script to run CTS . . . . . . . . . . . . . . . . . . . . . . . . . . . . . . . . . . . . . . . . . . . . . . . . . . . . 9Troubleshooting . . . . . . . . . . . . . . . . . . . . . . . . . . . . . . . . . . . . . . . . . . . . . . . . . . . . . . . . . . . . . . . . . . . . . . 10Connect Tunnel Client for Windows . . . . . . . . . . . . . . . . . . . . . . . . . . . . . . . . . . . . . . . . . . . . . . . . . . . 11About Connect Tunnel . . . . . . . . . . . . . . . . . . . . . . . . . . . . . . . . . . . . . . . . . . . . . . . . . . . . . . . . . . . . . . . . . 11Resources Available from Connect Tunnel . . . . . . . . . . . . . . . . . . . . . . . . . . . . . . . . . . . . . . . . . . . . . 11How to Tell if Connect Tunnel is Running . . . . . . . . . . . . . . . . . . . . . . . . . . . . . . . . . . . . . . . . . . . . . . 12Running the Connect Tunnel Client . . . . . . . . . . . . . . . . . . . . . . . . . . . . . . . . . . . . . . . . . . . . . . . . . . . . . . 12Downloading Connect Tunnel . . . . . . . . . . . . . . . . . . . . . . . . . . . . . . . . . . . . . . . . . . . . . . . . . . . . . . . 13Starting Connect Tunnel . . . . . . . . . . . . . . . . . . . . . . . . . . . . . . . . . . . . . . . . . . . . . . . . . . . . . . . . . . . 13Specifying a Login Group . . . . . . . . . . . . . . . . . . . . . . . . . . . . . . . . . . . . . . . . . . . . . . . . . . . . . . . . . . . 15Processing Server Certificates . . . . . . . . . . . . . . . . . . . . . . . . . . . . . . . . . . . . . . . . . . . . . . . . . . . . . . . 17Quitting Connect Tunnel . . . . . . . . . . . . . . . . . . . . . . . . . . . . . . . . . . . . . . . . . . . . . . . . . . . . . . . . . . . . . . . 17Configuring Connect Tunnel Settings . . . . . . . . . . . . . . . . . . . . . . . . . . . . . . . . . . . . . . . . . . . . . . . . . . . . . 17Viewing Current Connect Tunnel Settings . . . . . . . . . . . . . . . . . . . . . . . . . . . . . . . . . . . . . . . . . . . . . 18Configuring General Settings . . . . . . . . . . . . . . . . . . . . . . . . . . . . . . . . . . . . . . . . . . . . . . . . . . . . . . . 18Connecting to a Different VPN . . . . . . . . . . . . . . . . . . . . . . . . . . . . . . . . . . . . . . . . . . . . . . . . . . . . . . 19Configuring Connections . . . . . . . . . . . . . . . . . . . . . . . . . . . . . . . . . . . . . . . . . . . . . . . . . . . . . . . . . . . 19Configuring a Default Connection . . . . . . . . . . . . . . . . . . . . . . . . . . . . . . . . . . . . . . . . . . . . . . . . . . . . 20Establishing an Initial Network Connection . . . . . . . . . . . . . . . . . . . . . . . . . . . . . . . . . . . . . . . . . . . . 21Updating the Connect Tunnel Software . . . . . . . . . . . . . . . . . . . . . . . . . . . . . . . . . . . . . . . . . . . . . . . . . . . 21Troubleshooting . . . . . . . . . . . . . . . . . . . . . . . . . . . . . . . . . . . . . . . . . . . . . . . . . . . . . . . . . . . . . . . . . . . . . . 22Unable to Connect . . . . . . . . . . . . . . . . . . . . . . . . . . . . . . . . . . . . . . . . . . . . . . . . . . . . . . . . . . . . . . . . 22Unable to Access Resources or the Internet . . . . . . . . . . . . . . . . . . . . . . . . . . . . . . . . . . . . . . . . . . . 22Working with Logs . . . . . . . . . . . . . . . . . . . . . . . . . . . . . . . . . . . . . . . . . . . . . . . . . . . . . . . . . . . . . . . . 23Connect Tunnel Client for MacOS and Linux . . . . . . . . . . . . . . . . . . . . . . . . . . . . . . . . . . . . . . . . . . . . . 24About Connect Tunnel . . . . . . . . . . . . . . . . . . . . . . . . . . . . . . . . . . . . . . . . . . . . . . . . . . . . . . . . . . . . . . . . . 24Starting Connect Tunnel . . . . . . . . . . . . . . . . . . . . . . . . . . . . . . . . . . . . . . . . . . . . . . . . . . . . . . . . . . . . . . . 24Connect Tunnel on MacOS . . . . . . . . . . . . . . . . . . . . . . . . . . . . . . . . . . . . . . . . . . . . . . . . . . . . . . . . . 25Connect Tunnel on Linux . . . . . . . . . . . . . . . . . . . . . . . . . . . . . . . . . . . . . . . . . . . . . . . . . . . . . . . . . . . 25Specifying a Login Group . . . . . . . . . . . . . . . . . . . . . . . . . . . . . . . . . . . . . . . . . . . . . . . . . . . . . . . . . . . 26Connecting to a Different VPN . . . . . . . . . . . . . . . . . . . . . . . . . . . . . . . . . . . . . . . . . . . . . . . . . . . . . . 26Quitting Connect Tunnel . . . . . . . . . . . . . . . . . . . . . . . . . . . . . . . . . . . . . . . . . . . . . . . . . . . . . . . . . . . 27SonicWall Secure Mobile Access 12.3 User GuideContents2
Managing Configurations . . . . . . . . . . . . . . . . . . . . . . . . . . . . . . . . . . . . . . . . . . . . . . . . . . . . . . . . . . . . . . 27Viewing Connect Tunnel Settings . . . . . . . . . . . . . . . . . . . . . . . . . . . . . . . . . . . . . . . . . . . . . . . . . . . . 27Editing Connect Tunnel Settings . . . . . . . . . . . . . . . . . . . . . . . . . . . . . . . . . . . . . . . . . . . . . . . . . . . . 28Deleting a Configuration . . . . . . . . . . . . . . . . . . . . . . . . . . . . . . . . . . . . . . . . . . . . . . . . . . . . . . . . . . . 28Creating a New Configuration . . . . . . . . . . . . . . . . . . . . . . . . . . . . . . . . . . . . . . . . . . . . . . . . . . . . . . 29Selecting the Advanced Button . . . . . . . . . . . . . . . . . . . . . . . . . . . . . . . . . . . . . . . . . . . . . . . . . . . . . 30Advanced Options . . . . . . . . . . . . . . . . . . . . . . . . . . . . . . . . . . . . . . . . . . . . . . . . . . . . . . . . . . . . . . . . 31Credential Caching/Secure Network Detection . . . . . . . . . . . . . . . . . . . . . . . . . . . . . . . . . . . . . . . . . 32Processing Server Certificates . . . . . . . . . . . . . . . . . . . . . . . . . . . . . . . . . . . . . . . . . . . . . . . . . . . . . . . . . . 32Configuring Proxy Server Settings (Linux Only) . . . . . . . . . . . . . . . . . . . . . . . . . . . . . . . . . . . . . . . . . . . . . 32Unable to Connect . . . . . . . . . . . . . . . . . . . . . . . . . . . . . . . . . . . . . . . . . . . . . . . . . . . . . . . . . . . . . . . . 33Unable to Access Resources or the Internet . . . . . . . . . . . . . . . . . . . . . . . . . . . . . . . . . . . . . . . . . . . 34SonicWall Support . . . . . . . . . . . . . . . . . . . . . . . . . . . . . . . . . . . . . . . . . . . . . . . . . . . . . . . . . . . . . . . . . . 35About This Document . . . . . . . . . . . . . . . . . . . . . . . . . . . . . . . . . . . . . . . . . . . . . . . . . . . . . . . . . . . . . . . . . 36SonicWall Secure Mobile Access 12.3 User GuideContents3
1IntroductionNOTE: For information on using SMA 12.3 Connect Tunnel for Device Guard, see the SMA 12.3 ConnectTunnel for Device Guard User Guide. About Connect Tunnel Connect Tunnel Service Connect Tunnel Client for Windows Connect Tunnel Client for MacOS and Linux SonicWall SupportAbout Connect TunnelThe Secure Mobile Access (SMA) 12.3 Connect Tunnel User Guide provides information on installing and usingthe Connect Tunnel Service and Connect Tunnel clients. A section on troubleshooting is also included.NOTE: SMA 12.3 provides the Central Management Service (CMS) with Global Traffic Optimization (GTO).To use this feature, you must upgrade to Connect Tunnel 12.3.Topics Organization of This Guide Guide ConventionsOrganization of This GuideIntroductionThis chapter provides a summary of the chapters in this guide as well as adescription of the conventions used.Connect Tunnel ServiceThis chapter provides instructions on installing and using Windows to run ConnectTunnel Service (CTS) as well as using a command line or script to run CTS.Connect Tunnel Clientfor WindowsThis chapter provides instructions on downloading, installing, configuring, andoperating the Secure Mobile Access (SMA) Connect Tunnel Client for Windows.Connect Tunnel Clientfor MacOS and LinuxThis chapter provides instructions on downloading, installing, configuring, andoperating the SMA Connect Tunnel (CT) client for macOSLinux.SonicWall SupportThis chapter provides SonicWall Support contact information.SonicWall Secure Mobile Access 12.3 User GuideIntroduction4
Guide ConventionsConventionUseBoldHighlights dialog, window, screen names, parameter names, and icons and buttons.CodeUsed for file names and text or values you are being instructed to type into the interface.ItalicIndicates the name of a technical manual. Also indicates emphasis on certain words in asentence. Sometimes indicates the first instance of a significant term or concept.SonicWall Secure Mobile Access 12.3 User GuideIntroduction5
2Connect Tunnel Service About Connect Tunnel Service Installing Connect Tunnel Service Importing the Client Certificate Using Windows Services to run CTS Using a Command or Script to run CTS TroubleshootingAbout Connect Tunnel ServiceThe Connect Tunnel Service client is a Windows server component of the SonicWall Secure Mobile Access (SMA1000) solution that enables secure, authorized access to Web-based and client/server applications andWindows file shares.In a server environment, you can install and configure an add-on component—CTS —so that the VPNconnection starts automatically without user intervention: no user login is required and no user interface oricons are displayed.For example, you may want to synchronize data between a remote system in the field and a file server securedbehind the VPN at corporate headquarters. On the remote system—running the Windows Server platform—CTSis configured to run at a specific time, connect to the corporate file server, and synchronize its database with themaster database at headquarters.CTS is supported on Windows Server 2008 R2 and above.Installing Connect Tunnel ServiceUsing Connect Tunnel Service involves installing both Connect Tunnel (CT) and Connect Tunnel Service (CTS).To install and configure Connect Tunnel Service:1 Log into the Appliance Management Console (AMC) on your SonicWall SMA 1000 Series appliance.2 Navigate to User Access Agent Configuration.3 In the Access Agents section, next to Client installation packages, click Download.4 In the Connect Tunnel Client section, click Download next to the version(s) of the Connect Tunnel clientyou need for your end-user client environment(s).5 In the Connect Tunnel Service section, select the version and language you need for your serverenvironment, then click Download.6 Install Connect Tunnel first (ngsetup xx .exe or ngsetup64 xx .exe).When the installation is completed, a shortcut named SonicWall VPN Connection should appear on thedesktop.SonicWall Secure Mobile Access 12.3 User GuideConnect Tunnel Service6
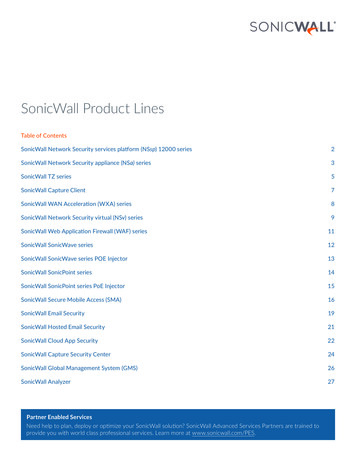
7 Install Connect Tunnel Service (ctssetup xx .exe or ctssetup64 xx .exe).When the installation is completed, a shortcut named SonicWall VPN Service Options should appear onthe desktop.8 On the desktop, double-click the SonicWall VPN Service Options shortcut. Alternatively, double-clickSonicWall VPN Service Options in the Control Panel. The SonicWall VPN Service Properties dialogappears.9 On the VPN tab, configure these settings:VPN Connection NameType the name of the SonicWall Connect Client connection object exactlyas it appears in the Windows Network Connections window(Start Connect To Show All Connections). By default, this is SonicWallVPN Connection.Hostname or IP addressType the host name or IP address of the SonicWall SMA 1000 Seriesappliance.Login groupType the name of the realm used by users in this login group.Username and PasswordType the credentials for a user in this Login group. You must enter ausername and password or a certificate CN. In some cases of chainedauthentication, both a username and certificate are required.Certificate CNA certificate's common name (CN) identifies its owner. Specify the CN forthe certificate associated with this realm.10 On the Service tab, configure the following settings:Number of attempts torestart a failed connectionSpecify how many times to attempt restarting if an initial connectionattempt fails.SonicWall Secure Mobile Access 12.3 User GuideConnect Tunnel Service7
Endless RetriesSelect this check box to continuously keep trying to connect untilconnected successfully.Time interval betweenrestart attemptsSpecify the amount of time (in minutes) to wait between restartattempts.11 Click the Start button. The Start and Stop buttons are used to control the service.12 To verify that Connect Tunnel started, open the SonicWall VPN Connection shortcut on the desktop. Youshould see the established connection.Alternatively, you can issue the ipconfig command on the command line to verify that you have avirtual IP address for the SonicWall VPN Connection.Importing the Client CertificateThe certificate specified for CTS must be located in the Local Computer certificate store of the user’s device;certificates in a user's store are not available to the service. The Microsoft Management Console (MMC) is a toolfor managing administrative tools, including snap-ins and extension snap-ins.To import a certificate into the user’s Local Computer store:1 To open the Microsoft Management Console, click the Windows start button and type mmc in the textfield.2 Press Enter.3 In the File menu, choose the option for adding a snap-in.4 To add a standalone snap-in, select Certificates, and then click the Add button. Snap-ins can managecertificates for different accounts.5 Select Computer account.6 Click Next.7 Select Local computer.8 Click Finish.You should now see Certificates (Local Computer) in the list of selected snap-ins. The certificate mustnow be copied to a certificate store.SonicWall Secure Mobile Access 12.3 User GuideConnect Tunnel Service8
9 In the Microsoft Management Console, right-click Personal Certificates in the left navigation pane, andthen select All Tasks Import.10 Specify the certificate file you want to import, along with its password.11 Place the certificate in your Personal store.Using Windows Services to run CTSYou can use Windows Services to manage CTS on a local or remote computer.How to use Windows Services to configure and run CTS:1 On the Windows Server platform running Connect Tunnel Service, run Windows Services.2 Open the SonicWall VPN Service Properties dialog (Control Panel Administrative Tools Services SonicWall SMA VPN Service).3 Use these settings to control the service (start, stop, pause, resume, or disable), set up recovery actionsin case of service failure, or disable the service for a particular hardware profile.4 Click OK.Using a Command or Script to run CTSYou can use the Windows sc.exe utility to communicate with Service Controller (services.exe) from thecommand prompt or in a batch file. This enables you to automate the startup and shutdown of the SonicWallVPN service.In an environment where you want users to be able to start the VPN connection by clicking on a shortcut (andwithout being aware of the credentials), you could also create a shortcut on the desktop that launches acommand or batch file. For example:To start and stop Connect Tunnel Service on a remote computer use the following commands:sc \\SERVERNAME start ctssrvsc \\SERVERNAME stop ctssrvSonicWall Secure Mobile Access 12.3 User GuideConnect Tunnel Service9
To start or stop the Connect Tunnel Service from the command line or a third-party application, invoke thesecommands:%windir%\system32\sc.exe start ctssrv%windir%\system32\sc.exe stop ctssrvTroubleshootingUse the Windows Event Viewer (Control Panel Administrative Tools Event Viewer Application, where theSource is CTS) to view any information, warning, or error messages related to running Connect Tunnel Service.For more detailed messages, look in the service log; the default location is:ALLUSERSPROFILE%\Application Data\SonicWall.NOTE: If your environment includes an outbound HTTP proxy for access to the Internet, you must use onethat does not require authentication; otherwise, you will see the following error message in the log file forCTS (ctssrv.log): Direct internet access is not available.NOTE: You must also configure CTS to run under a Windows user account with administrative privileges.SonicWall Secure Mobile Access 12.3 User GuideConnect Tunnel Service10
3Connect Tunnel Client for Windows About Connect Tunnel Running the Connect Tunnel Client Quitting Connect Tunnel Configuring Connect Tunnel Settings Updating the Connect Tunnel Software TroubleshootingAbout Connect TunnelThe Connect Tunnel client is a Windows client component of the Connect Tunnel (SMA) solution, which enablessecure, authorized access to Web-based client/server applications and Windows file shares.The Connect Tunnel client enables you to connect to network resources that are protected by the SonicWallSMA 1000 Series appliances.Connect Tunnel is supported on Windows 7 and above and Windows 10 Anniversary Update and above.Windows Vista is not supported.Resources Available from Connect TunnelConnect Tunnel enables you to securely access the following types of resources:Resource typesResource typeDescriptionClient/server resourcesClient/server applications, thin client applications, and terminal services, such asMicrosoft Outlook, Citrix, and Windows Terminal Services.Web sites and applications Web content and Web-based applications that can be accessed through abrowser, such as Microsoft Outlook Web Access, Domino Web Access, andgeneral Web sites (such as intranets).Windows network sharesShared Windows folders and files through Windows Network Neighborhood, andmapped drives.SonicWall Secure Mobile Access 12.3 User GuideConnect Tunnel Client for Windows11
How to Tell if Connect Tunnel is RunningWhen Connect Tunnel is running and connected to the VPN, an icon may appear in the taskbar notification area.If you pause on the icon with your cursor, connection status information will appear:You can configure Connect Tunnel to not display this during active connections: for more information, seeConfiguring Connect Tunnel Settings.You can also verify the state of the Connect Tunnel VPN connection in the Windows Network Connectionswindow.Viewing Connection Status InformationTo view connection status information:1 On the Start menu, click Control Panel. Continue with the following steps, depending on your operatingsystem. To display all available wireless, wired, dial-up, and VPN connections:a Click Network and Internet.b Click Network and Sharing Center.cClick the Connect to a network link.2 On the View menu, click Details.3 In the Dial-up section, view connection status information for the Connect Tunnel connection.NOTE: Your administrator may have customized the name of this application.)If Connect Tunnel experiences a temporary network interruption, a red circle with an X appears on theConnect Tunnel icon in the taskbar notification area. If the network connection is reestablished, the redcircle with the X disappears, and the Connect Tunnel icon returns to its normal state.Running the Connect Tunnel ClientTopics: Downloading Connect Tunnel Starting Connect Tunnel Specifying a Login Group Processing Server CertificatesSonicWall Secure Mobile Access 12.3 User GuideConnect Tunnel Client for Windows12
Downloading Connect TunnelConnect Tunnel can be downloaded from the WorkPlace menu. You must have administrator privileges to installthe software.To download Connect Tunnel:1 Log in to WorkPlace.Depending on your configuration, you might be issued a one-time password by your administrator, thatallows you to download Connect Tunnel.2 Enter the password that was sent to you. The Workplace application appears and allows you to downloadthe software.3 In WorkPlace, click the entry for Install Connect Tunnel.4 Click Install. When the installation is complete, log out of Workplace.Starting Connect TunnelTo access network resources through Connect Tunnel, you must first verify your identity. This ensures that onlyauthorized users can access protected network resources. The credentials used to verify your identity typicallyconsist of a username and password (or passcode).Depending on the resources, you may also need to enter a one-time password and/or accept an Acceptable UsePolicy.To start Connect Tunnel:1 For: Windows 7, click on Start All Programs SonicWall Secure Mobile Access SonicWall VPNConnection. For Windows 10:1) Click the Start button, then select either:NOTE: Your administrator may have customized the name of this application.SonicWall Secure Mobile Access 12.3 User GuideConnect Tunnel Client for Windows13
All Programs SonicWall VPN Connection, point to Connections, select theConnect Tunnel connection you want to use. Network SonicWall VPN Connection.2) Click the Connect button.SonicWall Secure Mobile Access 12.3 User GuideConnect Tunnel Client for Windows14
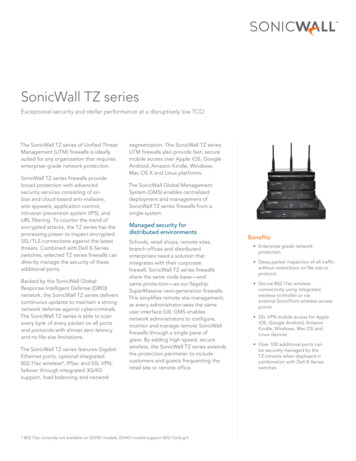
2 You will see an initial login screen.3 Enter your authentication credentials. Depending on how your administrator has configured ConnectTunnel, you may see a combination of these prompts: Type your username in the Username field. In the Password or Passcode field, type your password or passcode. (Passwords may becase-sensitive. Make sure the Caps Lock or Num Lock keys are not enabled.) Enter a one-time password that was sent to you by your administrator. If a client certificate is required for authentication, the Certificate list displays the ones on yourdevice that match the certificate authority (CA) used by the authentication server. Often therewill be only one listed.4 If an Acceptable Use Policy is displayed, click Accept to accept it.5 Click Connect.The Connect Tunnel icon appears in the taskbar notification area, indicating that Connect Tunnel isrunning and connected to the VPN.Your login may not be exactly the same as that shown above. Your administrator could send you a loginthat allows you to connect to a specific network.NOTE: In the Connect Tunnel login dialog, you can click Properties to display the Connect TunnelProperties dialog, where you can initiate a different connection or change program preferences. For moreinformation, see Configuring Connect Tunnel Settings.Specifying a Login GroupConnect Tunnel enables you to log in to different groups if necessary (for example, if you alternate betweenlogging in to the Sales group and the Marketing group). You may need to provide different authenticationcredentials for each login group.You must specify a login group each time you initiate a connection to your VPN. This option is available onlywhen Connect Tunnel is offline (that is, when not connected to your VPN). You do not need administrativeprivileges to change a host name or login group.To specify the login group:1 In the Secure Mobile Access VPN Connection login dialog, click Properties.SonicWall Secure Mobile Access 12.3 User GuideConnect Tunnel Client for Windows15
2 To the right of the Login group field, click Change.The Secure Mobile Access VPN Connection Login Groups dialog appears and displays the current list oflogin groups.3 In the Select or enter your login group field, select or type the name of the login group you want to log into.If the correct login group does not appear in the list, click Refresh to update the list of available logingroups.SonicWall Secure Mobile Access 12.3 User GuideConnect Tunnel Client for Windows16
Depending on how your administrator configured Connect Tunnel, some login groups may not appear inthe list; however, you can still log in to a “hidden” login group (if you are authorized to do so) by typing itsname in the Select or enter your login group.4 Click OK.Processing Server CertificatesSome VPN configurations require that you accept a server certificate before you can gain access to a protectednetwork resource. A server certificate is essentially a digital signature that verifies a server’s identity.If you access a network resource that uses a server certificate, Connect Tunnel may display the certificate.Connect Tunnel will display a certificate warning only if the VPN appliance certificate is not from a trustedsource. You must then verify that the server certificate is from a trusted source before accepting it. Otherwise,the login process will continue without any prompt.NOTE: Connect Tunnel will process/warn only certificates of the VPN during the login process but not fromresources. Applications, such as Internet Explorer, used to access resources should handle any certificatesthat are associated with resources.Because anyone can issue a certificate, you should accept certificates only from trusted sources, as theinformation you receive may be invalid. You do not need Administrator privileges to process server certificates.If you have any concerns about whether to accept a certificate or not, check with your administrator.To process a server certificate:1 When a trusted certificate appears, verify that the certificate is associated with the correct server.2 Accept or reject the certificate: If you click Reject, your connection is not established. If you click Accept, the certificate is accepted as valid, and the login process will continue.Similarly, you may be asked to accept a license agreement or Acceptable Use Policy.Quitting Connect TunnelQuitting Connect Tunnel ends your VPN session and disconnects you from the remote network.To quit Connect Tunnel:1 In the taskbar notification area, right-click the Connect Tunnel icon.2 Click Disconnect.Configuring Connect Tunnel SettingsThis section describes how to view and configure the Connect Tunnel client settings. You must haveadministrator privileges on your computer to change any of these settings.Topics: Viewing Current Connect Tunnel Settings Configuring General SettingsSonicWall Secure Mobile Access 12.3 User GuideConnect Tunnel Client for Windows17
Connecting to a Different VPN Configuring Connections Configuring a Default Connection Establishing an Initial Network ConnectionViewing Current Connect Tunnel SettingsTo view current Connect Tunnel settings:1 On the Start menu, click Control Panel. Continue with the following steps depending on your operatingsystem. To display all available wireless, wired, dial-up, and VPN connections:a Click Network and Internet.b Click Network and Sharing Center.cClick the Connect to a network link.2 In the Dial-up section, right-click the name of the Connect Tunnel connection (your administrator mayhave customized the name of this application), and then click Properties. The Connect Tunnel Propertiesdialog appears.3 Review the information on the Connection and About tabs: Click the Connections tab to view the current connection settings. Click the About tab to view basic information about the application. Click File Info on the About tab for more detailed information.Configuring General SettingsThis section describes how to configure general settings for Connect Tunnel.To configure general Connect Tunnel settings:1 On the Start menu, click Control Panel. Continue with the following steps depending on your operatingsystem. To display all available wireless, wired, dial-up, and VPN connections:a Click Network and Internet.b Click Network and Sharing Center.cClick the Connect to a network link.2 In the Dial-up section, right-click the name of the Connect Tunnel connection.NOTE: Your administrator may have customized the name of this application).3 Click Properties. The Connect Tunnel Properties dialog appears.4 Click the Connections tab, and configure the Connection settings as necessary. To display: A status bar during the connection process, select the Display progress while connectingcheckbox. The Connect Tunnel icon in the taskbar notification area during active connections, select theShow icon in notification area when connected checkbox.SonicWall Secure Mobile Access 12.3 User GuideConnect Tunnel Client for Windows18
A notification if the network connection is experiencing limited or no connectivity, select theNotify me when this connection has limited or no connectivity checkbox. A prompt to establish a new connection if network connectivity is lost, select the Prompt toconnect if connection is lost or dropped checkbox.5 Click OK.Connecting to a Different VPNTo specify the host name or IP address of the VPN:1 On the Start menu, click Control Panel. Continue with the following steps depending on your operatingsystem. To display all available wireless, wired, dial-up, and VPN connections:a Click Network and Interne
SonicWall VPN Service Options in the Control Panel. The SonicWall VPN Service Properties dialog appears. 9 On the VPN tab, configure these settings: 10On the Service tab, configure the following settings: VPN Connection Name Type the name of the SonicWall Connect Client connection object exactly as it appears in the Windows Network Connections .