Transcription
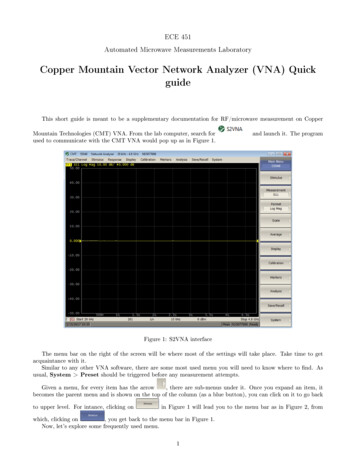
ECE 451Automated Microwave Measurements LaboratoryCopper Mountain Vector Network Analyzer (VNA) QuickguideThis short guide is meant to be a supplementary documentation for RF/microwave measurement on CopperMountain Technologies (CMT) VNA. From the lab computer, search forand launch it. The programused to communicate with the CMT VNA would pop up as in Figure 1.Figure 1: S2VNA interfaceThe menu bar on the right of the screen will be where most of the settings will take place. Take time to getacquaintance with it.Similar to any other VNA software, there are some most used menu you will need to know where to nd. Asusual,System Preset should be triggered before any measurement attempts.Given a menu, for every item has the arrow, there are sub-menus under it. Once you expand an item, itbecomes the parent menu and is shown on the top of the column (as a blue button), you can click on it to go backto upper level. For intance, clicking onwhich, clicking onin Figure 1 will lead you to the menu bar as in Figure 2, from, you get back to the menu bar in Figure 1.Now, let's explore some frequently used menu.1
Stimulus:to set Frequency range, Number of points etc.Figure 2: Stimulus menu Calibration:to perform calibration, add new cal. set (escpecially with self-designed TRL standards)2
Figure 3: Calibration menu Click onto pick the appropriate calibration set. In Figure 4, the Agilent 85054B N-type calkit was selected.3
Figure 4: Cal. kit selection Now, go back to Calibration menu (Figure 3), click, and perform calibration. As same as anyother VNAs, for each standard that is applicable, always specify the sex of connectors (Male or Female).After a standard was measured, it is greyed out and gets a tick in front. See Figure 5.4
Figure 5: Calibration process Display:to display measured data (Figure 6).5
Figure 6: Display menu bar You can changeNum Of Tracesyou want to observe at the same time. The highlighted trace is theactive one in case we want to perform calculations on the data trace.6
Figure 7: Multiple display Allocate Traces will allow you to pick a layout for all traces.7
Figure 8: Multiple display with layout In case you prefer switching between traces, click directly on the trace name located at the top leftcorner. You can also change the data format in which each trace is plotted as in Figure 9.Figure 9: Multiple display with layout Marker:to put makers on traces. Add many markers as you want. In case you have multiple traces on the8
screen, recall that the highlighted trace is active and makers will be added to it. Figure 10 shows how youcan change the location of a marker.Figure 10: Multiple display with layoutThere are many other fascinating features waiting for you to explore.9
Copper Mountain Vector Network Analyzer (VNA) Quick guide This short guide is meant to be a supplementary documentation for RF/microwave measurement on Copper Mountain ecThnologies (CMT) VNA. romF the lab computer, search for and launch it. The program used to communicate with the CMT VNA would pop up as in Figure 1. Figure 1: S2VNA interface