Transcription
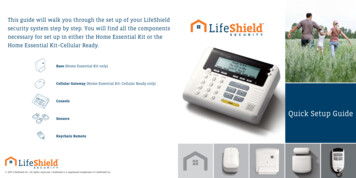
This guide will walk you through the set up of your LifeShieldsecurity system step by step. You will find all the componentsnecessary for set up in either the Home Essential Kit or theHome Essential Kit–Cellular Ready.Base (Home Essential Kit only)Cellular Gateway (Home Essential Kit –Cellular Ready only)ConsoleSensorsKeychain Remote 2011 LifeShield Inc. All rights reserved. LifeShield is a registered trademark of LifeShield Inc.Quick Setup Guide
Start HereSYSTEM COMPONENTSThe LifeShield home security system you are about to set up is wireless. To maximize wireless coverage, plan to place thecomponents throughout your home. Ideally, these components will be in different rooms on interior walls. A key considerationis making sure that all Sensors are within approximately 30 feet of one or more of the main components.NOW IS A GOOD TIME TO PLAN YOUR COMPONENT PLACEMENTKeychain Remotesensor/magnetBASEIncluded with bothHome Essential KIT and Home Essential KIT –Cellular ReadySENSORSENSORCONSOLESENSORBASECELLULAR GATEWAYHome Essential Kit ONLYHome Essential KIT–Cellular Ready ONLYC E L L U L A R G AT E W AYCommunication Connections:1InternetCellular GatewayThe Base connects the system to the Internet. Your Internetconnection is likely located where your Modem/Router isplaced. The Internet enables remote access to your system fromLifeShield.com. The Internet is also the primary communicationfor reporting alarms to the alarm monitoring center.The Cellular Gateway automatically establishes a connectionbetween your LifeShield system and the monitoring center. Thebest place to put this is on a high floor in your home since it’sdependant on your local cellular network.IMPORTANT: FOLLOW STEPS IN EXACT ORDER. DO NOT SKIP AHEAD.Component Placement Suggestions:console2
IMPORTANT: FOLLOW STEPS IN EXACT ORDER. DO NOT SKIP AHEAD.FOLLOW THE INSTRUCTIONS ON THIS PAGE IF YOU PURCHASED THEFOLLOW THE INSTRUCTIONS ON THIS PAGE IF YOU PURCHASED THEHOME ESSENTIAL KITHOME ESSENTIAL KIT–CELLULAR READY11Connect BaseConnects your LifeShield system to the InternetCellular GatewayBack ViewChigh floor in your homefrom the main body of the BaseCC Insert the LifeShield LS220 RechargeableB Connect Battery (match red/black polarity)Modem/Router-D Insert the power adapter plug fully into the jackon the back of the Base, then plug the poweradapter into the wall outletBase Back ViewBE Connect the Ethernet cable between an availableETable Standport on your router and the back of the BaseOptional: Connecting a phone cord from the Base to the telephone wall jackprovides a backup path for alarm communications if your internet connectionis not functioning. IF PHONE WALL JACK IS NOT AVAILABLE NEAR BASE LOCATION, YOU CANCONNECT A PHONE LINE TO THE CONSOLE.Ethernet CableD Power Adapter2Connect ConsoleControls security and telephone functionsBConnect ConsoleControls security and telephone functionsBFEA Locate Console near frequently used door,FEA Locate Console near frequently used door,ideally in different room than Cellular Gatewayideally in different room than BaseB Connect battery (match red/black polarity)B Connect battery (match red/black polarity)Battery CompartmentC Connect power cord on back of ConsoleBattery CompartmentC Connect power cord on back of ConsoleD Route power cord up through channelD Route power cord up through channelE For table-top placement, snap stand into Console*F Plug power cord into wall outletC Plug Cellular Gateway into wall outletBattery DPower CordTable StandE For table-top placement, snap stand into Console*F Plug power cord into wall outletConsole Back ViewC*Note: FOR MOUNTING ON WALL, SEE USER MANUAL.3BA Locate the Cellular Gateway, ideally on aB Remove the table stand, by sliding downward2Establishes a connection between your LifeShield system and monitoring center.(Optional)Phone CordA Locate Base near Modem/RouterBattery, observing correct polarity as shownCellular GatewayFor installation of the Home Essential Kit, follow the instructions on this page. After completing Steps 1 & 2, go to page 5.DPower CordTable StandConsole Back ViewC*Note: FOR MOUNTING ON WALL, SEE USER MANUAL.For installation of the Home Essential Kit–Cellular Ready, follow the instructions on this page. After completing steps 1 & 2, go to page 5.4
C O N T E N T S3SensorsIMPORTANT: DO NOT ASSEMBLE ANY OF THE SENSOR PIECES UNTIL INSTRUCTED.Sensors and Magnets create security for doors and windows.3aMount Bracket & MagnetA Select door or window that you want to monitor When a door or window is closed, the Sensor and Magnet must be within 3/4" of each otherB With Bracket and Magnet in hand, select a location on the door or window for mounting* As a door or window is opened, the Sensor and Magnet separate causing the Sensor to chime or alarmMagnetASensorDouble-Hung Window3/4" spacingMagnetClosed Door3/4" spacingBracketBSensorK I TBracketS E N S O RMagnetDoor MountingWindow MountingMagnet Tape*Note: WHEN POSSIBLE, PLACE THE BRACKET ON THE STATIONARY FRAME OF DOOROR WINDOW, AND PLACE THE MAGNET ON THE DOOR OR WINDOW ITSELF.C Various orientations between the Bracket and Magnet may be used as long as 3/4"Bracket Tapedistance is not exceeded.* See Example in Figures 1-4D Once you have determined the appropriate location and orientation for the Bracketand Magnet, attach them with double-sided tapeMagnet Spacer(optional use)DBracketCMagnetBracket Spacer(optional use)5Figure 1.Level OrientationOpen DoorFigure 2.Angled OrientationFigure 3.Perpendicular OrientationFigure 4.Perpendicular Orientation*Note: Spacers in bottom tray may be used on the bracket or magnet to adjust alignment.6
3b4Place & Program SensorIMPORTANT: IF YOU HAVE CLIPPED THE SENSOR INTO THE BRACKETPLEASE SEE “RESET INSTRUCTIONS” BELOW.Using PC:For this step you will need your Console and Sensor:A Go to www.LifeShield.comBattery TabA Remove battery tabB Enter User Name and PasswordAD Press MENU(Scroll Button found on right side of Console)C On Activate, press SELECTED Enter default Master Code 1234F Enter Activation Code and press SENDE Scroll to Sensors, press SELECTH Enter Master Code (Select a new 4-digitG Scroll to the type of Sensor (Open/Close) and press SELECT30 seconds to complete the installation. The display shows the time remaining Clip the Sensor into the Bracket. The Console will beep whenScrollButtonsReady To ArmThu 2/8 11:48aCalls: 0 Msg:0the system finds the Sensor. This may take a few seconds*PHNBKMenuMENUCONNCTWEATHRIRe-enter Master Code to confirmJ Now testing communication to Alarm Monitoring Center*K Upon completion press OK*C* NOTE: IF YOU DO NOT SUBSCRIBE TO ALARMMONITORING SERVICE, STEPS J AND K DO NOT APPLY.BJoeSafety@lifeshield.comName:Mary SafetyPhone:5555555555Address 1:770 Township Line RoadAddress 2:Suite 350State: Using the keys on your Console keypad, type in the desired name Press OK when completeL Sensor Placement: Scroll to Door or Window. Press OKM Alarm Type: Scroll to Stay & Away, Away Only, or Convenience. Press OKScrollButtonsReady To ArmThu 2/8 11:48aCalls: 0 Msg:0N Sensor Extension: Scroll to Sensor Only. Press OKPHNBKP Repeat Step G for additional Sensors5552227777Email:City: To change the Sensor Name, press the DELETE key to remove the default nameOtherwise, see troubleshooting in User ManualPhone:Monitoring Site ProfileALERTSYou may change the name now or at a later time.O Test your Sensor by opening the door. Correct installation will generate a chime.Joe SafetySecond Emergency Contact Profilecode used to access and control the system)H Wait 5 seconds before clipping the Sensor into the Bracket. You will then haveTesting your Sensor:Name:G Upon activation acceptance press OKF On Add New , press SELECTPress OKEmergency Contact ProfileUsing Console:C Scroll to Security Setup, press SELECTJeditwill be providedB Press MENUK Edit Sensor Name (Optional)Monitoring Site ProfileC Click on “Get Activation Code” and a 6-digit codeUsing Console:IActivate Your :BucksTownship/Borough:YardleyALERTShelpDNOTE: IF YOU DO NOT SUBSCRIBE TO PHONE SERVICE, GO TO LIFESHIELD.COMAND CLICK SETTINGS, THEN CLICK “EDIT” ON THE SYSTEM SETTINGS WINDOW.CLICK “NO” NEXT TO “HOME PHONE LINE” FIELD, THEN CLICK “CONTINUE” ATTHE BOTTOM OF THE WINDOW.NOTE: Low batteries may cause a trouble beep. To cancel troublebeep and allow time for charging, press CANCEL/OFF key, thenpress OK on display.*Note: I F THE SYSTEM DID NOT FIND THE SENSOR, REFER TO SENSORRESET INSTRUCTIONS, THEN REPEAT STEPS ABOVE.7Your system is now operational. If you subscribe to Alarm Monitoring Service, for the nextseven days it will be in a non-monitored “Practice” mode to allow you to become fullyacquainted with all of its features. For help, call Customer Support at 1-888-392-2044.8
4Optional accessory: included in home kitAdd Keychain RemoteUsing Your LifeShield Security SystemADDITIONAL CONSIDERATIONSNow that you have installed and activated your system, take the opportunity to learn how it can best fit your lifestyle.We recommend that you try Arming, Disarming, Alarming and Panicking the system. For systems that are professionallyFor this install step you will need your Console:monitored this should be done during the “Practice” time.A Press MENUReady To ArmThu 2/8 11:48aCalls: 0 Msg:0B Scroll to Security Setup, press SELECTPHNBKC Enter Master CodeD Scroll to Keychains, press SELECTE On Add New , press DAY ARMING SCENARIOS:DAF Wait 5 secondsG Press all buttons on Keychain Remote at same timeH Console display will indicate the Keychain Remoteis found and then added, press OKI On Master User, press SELECTJ Scroll to Enable or Disable, press SELECT(Makes Panic operable or inoperable on Keychain Remote)GStaying Home During the Day–Stay ArmingArm the system using the STAY key. A silent Exit Delay and an audible Entry Delay is provided. STAY is typically usedwhen someone is staying home and you want certain Sensors to be ignored (i.e. Motion Sensors and interior doors).Arm1. Press STAY on your Console2. Enter your User Code3. System is armed when the Exit Delay has expiredAdd Optional Phone Line BackupIf you have a phone wall jack near your Console, a phone cord can be added to each for additional phone backup.Leaving Your Home–Away ArmingArm the system using the AWAY key. It will provide an audible ExitDelay. The Exit Delay beep will increase in frequency during the last10 seconds of arming. AWAY arming is best used when you are leavingyour home unoccupied.Ready to ArmThu 2/8 11:48aCalls: 0 Msg:0ArmTable Stand1. Press AWAY on your Console2. Enter your User CodePHNBKMENUCONNCTWEATHRALERTS3. System is armed when the Exit Delay has expired910
REMOTE ARMING/DISARMING OF YOUR SYSTEMStaying Home for the Evening–Instant ArmingThere are many ways to remotely arm or disarm your system. Keychain Remote - from the exterior of your homeArm the system using the INSTANT key. No Exit or Entry Delay isprovided with Instant arming. Instant Stay is typically used in the eveningwhen you are not expecting anyone to enter your home. Opening a doorwhen armed INSTANT will generate an alarm immediately.Arm LifeShield.com - from a computer with broadband Internet access Mobile LifeShield - from a mobile phone or PDAReady to ArmThu 2/8 11:48aCalls: 0 Msg:0PHNBKMENUCONNCTWEATHRALERTS1. Press INSTANT on your Console2. Enter your User CodeKeychain RemoteArm your system as you close the door behind you or disarm your system before you enter your home usingyour Keychain Remote. It works from within 15 feet of your door, and does not require a User Code.ArmDisarming Your System1. Press STAY or AWAY on Keychain Remote2. T he system will respond with a light blink and beep, letting you knowthe system is armedDISArm1. Press CANCEL/OFF on your ConsoleDisarm2. Enter your User Code1. Press OFF to disarm the system before enteringNOTE: To cancel an alarm, follow the above disarm instructions.2. The system will respond with a light blink and beep, letting you know the system is disarmedPANIC ALARMFor Alarm Monitoring subscribers, the Alarm Monitoring Center willnot call to verify a PANIC alarm, but will immediately call the authoritiesand there may not be an opportunity to cancel the dispatch.For Personal Monitoring subscribers, the PANIC key will only generate alocal alarm and there will be no emergency dispatch.ALArm1. On the Console, press and hold PANIC for 2 seconds (if enabled)2. S elect Police, Medical or Fire (Alarm MonitoringSubscribers Only: If no selection is made, Police will be default selection)Press 1: PolicePress 2: MedicalPress 3: FireBACKselectCONNCTWEATHRALERTSOn the Keychain Remote, if PANIC is enabled, press STAY and AWAYat the same time when near your home and the alarm will sound.An alarm generated by pressing the PANICbutton on your LifeShield home securitysystem will send a message to the AlarmMonitoring Center to contact the authoritieswithout making a call to you to verify alarm.1112
FREQUENTLY ASKED QUESTIONSLifeShield.com Arming and DisarmingFrom a PC that has broadband Internet access you can go to LifeShield.com, anywhere and anytime,and arm or disarm your system.Arm1. Login to LifeShield.com2. Enter User Name and Password3. Click Arm Stay or Arm Away or Arm Inst Stay4. Click EnterDisarm1. Click Enter30-Day Return PolicyThis policy applies to purchases made directly from www.LifeShield.com only. Purchases made from a retailer or partner company must be returned tothe original seller, in accordance with the seller’s return policy. LifeShield will refund your purchase amount, minus original shipping charges, for returnsmade within 30 days of the original date on your receipt. Contact LifeShield Customer Support at 1-888-392-2044 to receive a Return MerchandiseAuthorization (RMA) number. Include the RMA number on the return package label. Return your item(s) in new condition (including all parts andmanuals) in the original packaging, along with a copy of your purchase receipt. Incomplete return shipments will not be eligible for refund. No returnswill be accepted without an RMA number.Service Billing PolicyService billing starts 30 days after your purchase, and continues automatically monthly after that. The first 30 days of service are free so that you cantry LifeShield’s products and services risk free. This coincides with LifeShield’s 30 day return policy that allows you to return your purchase within 30days without obligation.1. D o I have to purchase service with my LifeShield system? Yes. The LifeShield system will not operate without monitoring service. LifeShield offersseveral service plans.2. How do I cancel service? Service may be cancelled by calling LifeShield Support at 1-888-392-2044. Service may not be cancelled via email.3. I s there an early termination fee if I cancel service? Your contract terms are set at the time of purchase, and vary from time to time. If yourpurchase includes a contract term, that will be listed on your order receipt. If you purchase with a term contract, and cancel after the requiredminimum term, there is no early termination fee. If you purchase with a term contract, and cancel during the required minimum term, there is anearly termination fee.4. I s a telephone line required? No. The LifeShield system only requires a broadband connection. Telephone lines are optional. If you do not usea telephone line, you must change a system setting in My LifeShield so the system does not expect normal telephone line signals. LifeShieldrecommends a telephone line for the voice functionality of the Console and redundant backup communications to the monitoring center shouldthere be an interruption to your broadband connection.5. What if I have VoIP? LifeShield is VoIP compatible. Your VoIP modem telephone line can plug into your LifeShield system.LifeShield Mobile Arming and DisarmingTo arm or disarm, select Mobile LifeShield app on your mobile device and follow onscreen instructions.6. W hat if I have DSL? LifeShield is DSL compatible. An Ethernet cable may be connected between your LifeShield system and your home router,which in turn connects to your DSL modem. A telephone cord may then be connected between a telephone jack in your home and your LifeShieldsystem, so long as a DSL filter is installed into this connection. A DSL filter allows you to use the Console by preventing static from your DSL. NOTE:If you have DSL, you should use a DSL filter on all of your home telephones to prevent this type of interference.7. I s there interference with other RF products like my wireless network (Wi-Fi)? LifeShield uses advanced radio frequency technology to avoidinterference with other devices.8. W hat if there is no telephone line near my broadband connection? The LifeShield system can be connected to the telephone line from the Baseor Console. Therefore, it is not required to have a telephone line near your broadband connection.Warning: When arming remotely, either through LifeShield.comor Mobile LifeShield, the system will arm immediately with no exit delay.9. A re there special licenses needed to install a security system? No special licenses are required to install a system in your home. However, somemunicipalities require a monitoring permit for police/fire dispatch. LifeShield can help you navigate the process.10. How many Bases and Consoles can I have in my system? The system supports 1 Base and 4 Consoles.11. How many sensors can I have in my system? The LifeShield system can support the use of up to 50 sensors of any type.FOR HELP, CALL CUSTOMER SUPPORT AT1-888-392-20441314
This guide will walk you through the set up of your LifeShield security system step by step. You will find all the components necessary for set up in either the Home Essential Kit or the Home Essential Kit-Cellular Ready. Base (Home Essential Kit only) Cellular Gateway (Home Essential Kit-Cellular Ready only) Console Sensors Keychain Remote