Transcription
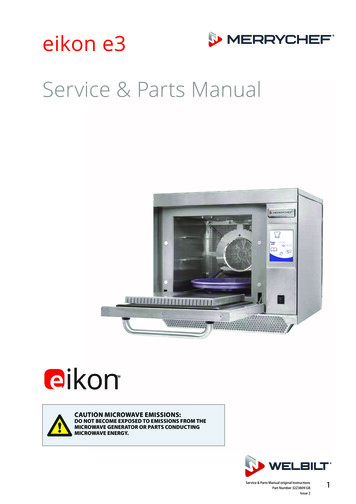
eikon e3Service & Parts ManualeikonTMCAUTION MICROWAVE EMISSIONS:DO NOT BECOME EXPOSED TO EMISSIONS FROM THEMICROWAVE GENERATOR OR PARTS CONDUCTINGMICROWAVE ENERGY.Service & Parts Manual original InstructionsPart Number 32Z3809 GBIssue 21
SYMBOLSThe symbols below are used, where applicable, as visual guidance throughout this manual.DANGERThis symbol is shown if there is a high risk of severe personal physical injury. The relevant safety precautions MUSTbe observed and implemented at all times.WARNINGThis symbol is shown if there is a possible risk of personal physical injury or if damage may occur to the equipment.The relevant safety precautions MUST be observed and implemented at all times.INFORMATIONThis symbol is used to highlight useful or important information. For example: The manual consists of main sections(tab markers on the extreme left and right of the pages), followed by the main subject heading, sub-headings andtext. Text with a reference number or letter, such as (1) refers to the same reference 1 on the image.2Service & Parts Manual original InstructionsPart Number 32Z3809 GBIssue 2
SAFETY ®ULATIONSCONTENTSSAFETY & S16 OVEN TESTING16.1 Equipment required16.2 Earth/Insulation Test:16.3 Screen calibration:16.4 OVEN TESTS16.5 Microwave Power Test16.6 Microwave Leakage Test16.7 Temperature Control Test16.8 Soak Test16.9 Recommission Test17 HIGH VOLTAGE COMPONENTS17.1 Power Transformer Test17.2 High Voltage Rectifier Test (Diode Board)17.3 High Voltage Capacitor Test17.4 High Voltage Magnetron Test18 MAINS VOLTAGE COMPONENTS18.1 Door Interlock AdjustmentSPARES & REPLACEMENT39414141424344SPARES &REPLACEMENT19 OVEN COMPONENTS20 SRB & BTS Circuit Boards20.1 SRB replacement20.2 BTS replacement20.3 PM (Personality Module) replacement21 SPARE PARTS EXPLODED VIEW22 SPARE PARTSFAULT FINDING23 ERROR CODES DISPLAYED47ELECTRICAL CIRCUITS4949495051525254565758596061FAULT FINDING24 SRB & BTS Circuit Boards24.1 BTS LEDs24.2 BTS Terminal Locations24.3 SRB LED’s24.4 SRB Terminal Locations:25 CIRCUIT DIAGRAMS25.1 e3 EE25.2 e3 XE : e3 XX25.3 POWER CONNECTIONS e325.4 CONTROL CIRCUIT e3EE, e3XE & e3XX25.5 HEATER CIRCUIT e3EE25.6 HEATER CIRCUIT e3XE & e3 XX25.7 MICROWAVE CIRCUIT e3EE25.8 MICROWAVE CIRCUIT e3XE & RVICING13 SERVICING THE OVEN13.1 Servicing Procedure:13.2 Enter Service mode:14 ERRORS & DIAGNOSTICS14.1 ERROR MESSAGES14.2 COPYING ERROR MESSAGES:14.3 ERROR LOG262728TESTING COMPONENTSPRODUCT DETAILS2 PRODUCT OVERVIEW & FUNCTIONS3 MAIN FEATURES4 TECHNICAL SPECIFICATIONS4.1 Specifications4.2 Serial Number (Rating Plate):4.3 Compliances:5 INSTALLATION5.1 OVEN LOCATION AND POSITIONING6 ELECTRICAL INSTALLATION7 ELECTRICAL INSTALLATION GUIDE7.1 Phase Loading8 QUICK START GUIDE: QUICK SERVICE OVEN8.1 START UP8.2 USING A COOKING PROGRAM8.3 SCREEN SAVER9 OPERATING GUIDE: FULL SERVICE OVEN9.1 easyToUCH MAIN MENU & KEYBOARD SCREEN9.2 DEVELOPMENT MODE: CREATING A COOK PROGRAM9.3 PRESS & GO9.4 USING A COOKBOOK PROGRAM9.5 CHANGING THE OVEN TEMPERATURE9.6 VIEWING & EDITING PROGRAMS9.7 ADDING A NEW PROGRAM GROUP9.8 MOVE A PROGRAM WITHIN A PROGRAM GROUP9.9 ADDING A PROGRAM TO A GROUP9.10 MANAGING PROGRAM GROUPS10 OVEN CONTROL SETTINGS10.1 Oven mode/navigation settings (A)10.2 Language options (B)10.3 Oven temperature settings and labels (C)10.4 Recipe counters (E)10.5 Date and Time settings (F)10.6 Sound levels (G)10.7 Oven Timer (H)10.8 USB oven programs (J)10.9 Temperature Band (K)10.10 Change Password (L)10.11 Screen saver (M)11 COOLING THE OVEN DOWN BEFORE CLEANING11.1 Oven cool down11.2 Preparing to clean the oven12 Cold oven CLEANING INSTRUCTIONS e314.4 OVEN COUNTERS14.5 VISUAL VIEW15 FIRMWARE UPDATESCOMMISSIONING26 Commissioning the oven26.1 Initial installation26.2 After Service626262Service & Parts Manual original InstructionsPart Number 32Z3809 GBIssue 23COMMISSIONING1 SAFETY REQUIREMENTS1.1 Important:
SAFETY ®ULATIONS1 SAFETY REQUIREMENTS1.1 Important:This manual provides technical guidance for engineerswho have successfully undertaken a recognised productfamiliarisation and training course run by Merrychef to carryout service/repair tasks to the appliance/s shown on thefront cover of this manual which must not be used for anyother make or model of appliance.Please remember that it is wiser not to attempt a service taskif you are unsure of being able to complete it competently,quickly, and above all safely.To avoid injury to yourself or others and to protect theappliance from possible damage, ensure you have read andunderstand all the relevant instructions and ALWAYS followthe Safety Codes when servicing an oven.1.1.1 Before attempting to repair the oven, check the ovenfor microwave emissions using a calibrated microwaveemission detector.1.1.2 Check that the oven is not emitting microwaves, evenwhen supposedly not in operation.1.1.3 Check that the oven is not operating continuously,whether the display indicates cooking or not.1.1.4 Never manipulate the mains power lead whilst it is live.1.1.5 Before removing the oven casing ALWAYS isolate theoven from the mains electricity power supply; switch offand disconnect the oven plug from the wall socket, turn offisolator switch to disconnect fixed wired ovens. NOTE: Theoven switch does not provide adequate protection againstelectric shock as it does not isolate all of the internal wiringfrom the mains.1.1.6 The equipment must be locked-off to prevent the ovenfrom being inadvertently powered up.1.1.7 Do not leave the oven unattended without the ovenpanels fitted and keep within sight of other personnelwhen testing the oven, ensuring persons other than trainedengineers are denied access.1.1.8 The minimum number of panels should be removedand the HT capacitors must be discharged before working onthe oven using a suitably insulated 10 MΩ Resistor.1.1.9 Temporary insulation should be used to preventaccidental contact with dangerous conductors.1.1.10 Do not touch any internal wiring within the Oven,whether you believe it is live or not and avoid touching theMetalwork (Casing, Panels, etc) of the Oven with your Body.1.1.11 Only use electrically rated screwdrivers for adjusting‘Pots’ etc., ensuring the tool touches nothing else.1.1.12 Ensure the Test Equipment is set correctly before use.1.1.13 Test equipment such as meter test leads or clampsmust be fitted and removed whilst the unit is dead, for eachand every test.1.1.14 Do not undertake functional Magnetron testing withthe oven panels removed.1.1.15 Avoid touching the Test Equipment, unless necessaryfor the operation.1.1.16 Upon completion of a service follow the steps for‘Commissioning the oven’ under the Commissioning sectionof this manual.4Service & Parts Manual original InstructionsPart Number 32Z3809 GBIssue 2IF SMOKE IS OBSERVED:Switch OFF the oven - Disconnect/isolatefrom the electrical supply Keep the oven door closed to stifle anyflames.DANGER:Before removing the oven casing, isolatethe oven from the mains electricitypower supply; switch off, disconnectoven plug from wall socket, turn offisolator switch to disconnect fixedwired ovens and lock-off.WARNING:Always discharge the HT capacitorsbefore working on the oven using asuitably insulated 10MΩ Resistor.
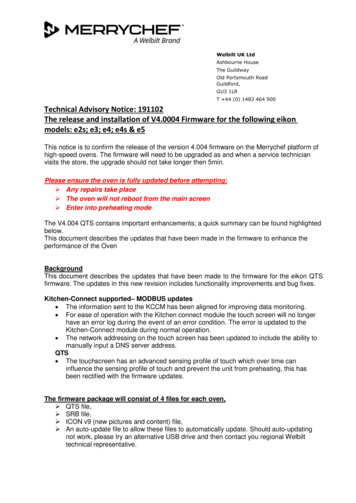
2 PRODUCT OVERVIEW & FUNCTIONSCONSTRUCTIONStainless Steel cavity and casework.MICROWAVE POWERDistribution system, rotating active antennae.Microwave settings, off or 5-100% in 1% increments.Safety system: Agency approved monitoredinterlock door system, current monitoring andoverheat detection for magnetron.CONVECTED HEATTemperature settings 0 C off and from 100 C to275 C in 1 C steps.Distribution system, convection fan.Safety system: oven cavity overheat detection.Start up SequenceWith the oven switch in the OFF position and themains power ON, the BTS & SRB boards boot up.When the oven switch is turned ON the splashscreen briefly displays oven information and thecabinet cooling fan is activated.After completing a successful logic test, the safetyrelay is energised and the oven preheats or displaysa preheat temperature choice. Once preheated theoven displays the main menu if in FS mode or arecipe selection if in QSR mode.Shutting Down SequenceWhen oven switch is turned OFF the screen displays‘Shutting Down’ and the cooling fan operates untilthe cabinet temperature has been sufficientlyreduced (cavity temperature of 50C).The safety relay is de-energised and the BTS & SRBboards remain active.PRODUCTDETAILSCONTROL SYSTEMColour touchscreen, icon driven.Storage for up to 1024 programs with 6 stages percooking program providing a user instruction foreach stage.USB memory stick data transfer.Support for optional remote communicationsEthernet module.Safety system: ensures control area temperature iswithin limits.Catalytic converterHeater ElementConvectionfanHow it works:Air in the oven cavity is cleaned by being drawn through thecatalytic convertor* (1) by the convection fan (2) and thenpasses over the heater element and is circulated into theoven cavity (3) at the set temperature.* e3C models only.Service & Parts Manual original InstructionsPart Number 32Z3809 GBIssue 25
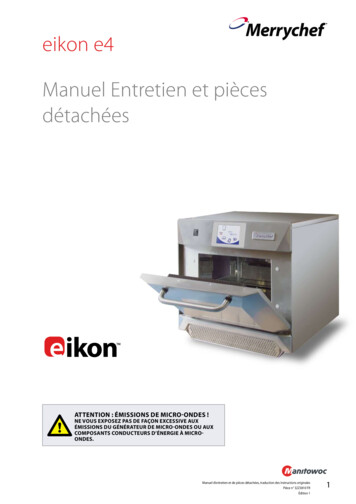
3 MAIN FEATURESPRODUCTDETAILS1 ON/OFF SWITCHON (I) activates the oven, OFF (0) switches theoven to standby mode. IT DOES NOT ISOLATEINTERNAL WIRING FROM THE MAINS SUPPLY.2 CONTROL PANELTouch sensitive controls (easyToUCH) forcontrolling oven functions, including diagnosticsand service mode.3 USB menuKeyA socket, located under the logo, allows a USBmenuKey to be used to update the cookingprograms and oven firmware on the pcb’s.4 OVEN CAVITYThe oven cavity is mostly constructed fromstainless steel panels which must be kept cleanto avoid contamination of food products andallow the oven to perform at peak efficiency.5 TURNTABLEA torque motor drives the turntable rotating itin opposite directions when the motor torquereaches maximum. The tray and turntablerequire cleaning as per instructions.6 OVEN DOORThe twin-skinned door has a thermally insulatedinner section to lower the surface temperatureand incorporates a microwave choke.7 DOOR SEALProvides a tight seal around the door andmust be kept clean. The seal must be checkedregularly and replaced if worn or damaged.8 AIR FILTERThe air intake provides cooling air for internalcomponents and must be cleaned daily andmust NOT be obstructed. The filter must be inplace for the oven to function.9 STEAM VENTVents steam from the oven cavity.10 HOT AIR FANCirculates hot air through the catalyticconvertors (where fitted) and oven cavity.11 RATING PLATEThe rating plate, located on the rear oven cover,states the Model, Serial Number, ElectricalRatings and Manufacturers telephone number.12 MAINS ELECTRIC POWER CABLELocated on the rear of the oven and must bereplaced if worn or damaged.4352617891011126Service & Parts Manual original InstructionsPart Number 32Z3809 GBIssue 2
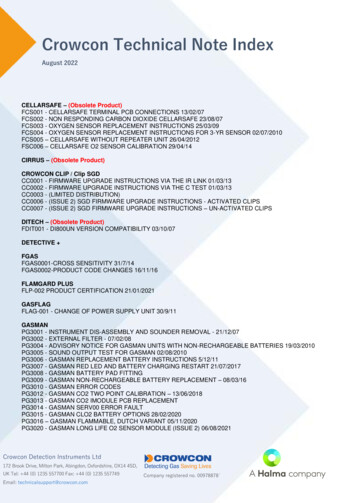
4 TECHNICAL SPECIFICATIONSDescriptionunite3Touch screen controlsprograms1024Ambient operating temperature C/ F 40/104External HxWxDmm551x598x622External HxWxDinches21.7x23.5x24.5Internal HxWxDmm319x332x325Internal HxWxDinches12.6x13.1x12.8Cooking chamberLtr (cu.ins)34.4 (2113)Power output microwaveWatts700/1000Power output convectionkW3 (3/1.5 EE)Power supplyHz50 & 60Power supplyV208 & 240Power supplykW3(EE) 4.3(XE) 4.7(XX)Unpackaged oven weight nettKg (lbs)62.5 (138)Sound pressure leveldB(A) 70Stacking (with kit)oven0PRODUCTDETAILS4.1 Specifications21.7inSerial number: YY MM SITE SERIALi.e. 10 06 2130 12345 (1006213012345)Oven manufactured 2010 in June at Sheffield (UK),production number 12345.Model Number: MODEL CONVECTION MICROWAVEVOLTAGE HERTZ LEAD PLUG COMMUNICATIONVERSION CUSTOMER/ACCESSORY COUNTRYi.e. e4C S V 30 5 H E U 1 GM EU(e4CSV305HEU1GMEU)model e4C, 3200W, 1500W, 230V, 50Hz, L N E(4mmEU), 3-pin plug, USB, 1, General Market, European.551mm4.2 Serial Number (Rating Plate):23.5in598mm24.5in622mm4.3 Compliances:EU DirectivesEMC 2004/108/ECLVD 2006/95/ECRoHS 2002/95/ECMD 2006/42/EC22.0in558mm15.0in381mmService & Parts Manual original InstructionsPart Number 32Z3809 GBIssue 27
PRODUCTDETAILSEC Declaration of ConformityManufacturerMerrychef, Ashbourne HouseThe Guildway, Old Portsmouth RoadGuildfordGU3 1LREquipment detailsGeneric Model Numberseikon e3, eikon e4, eikon e5DescriptionCommercial Combination Microwave OvenDeclaration of Conformity with directives and standardsThe manufacturer hereby declares that its commercial combination microwave ovens listed above comply with the followingdirectives and standards.Compliance with DirectivesThe commercial combination microwave ovens comply with the relevant provisions of the following European DirectivesEMC 2004/108/CELVD 2006/95/EC RoHS 2002/95/ECMD 2006/42/ECHarmonised Standards AppliedThe commercial combination microwave ovens comply with the relevant requirements of the following European standards.EN 60335-2-90: 2006EN 60335-1: 2002 A11 A1 A12 A2 A13EN 62233:2008EN 55014-2:1997 inc A2:2008 in accordance with Category IV requirementsElectrostatic dischargeRadiated RF interferenceFast transient common mode, AC portMains surge, AC portRF current, common mode, AC portMains voltage dips & interruptionsIEC 61000-4-2:1995IEC 61000-4-3:1996IEC 61000-4-4:1995IEC 61000-4-5:1995IEC 61000-4-6:1996IEC 61000-4-11:1994FlickerIEC 61000-3-11:2000Mains terminal disturbance voltageTable 2aTable 5aTable 5aTables 6, 7 and 8AS/NZS CISPR 11Radiated disturbanceConducted disturbanceQuality and environmental managementMerrychef8Service & Parts Manual original InstructionsPart Number 32Z3809 GBIssue 2CISPR 11:2003:A1:2004CISPR 11:2003:A1:2004
5 INSTALLATION5.1 OVEN LOCATION AND POSITIONINGAAPRODUCTDETAILSChoose a site away from major heat sources.DO NOT position so that hot air is drawn in fromfryers, grills, griddles, etc.A heat barrier to the height of the oven must beinstalled if sited next to a burner, stove or range.Place the oven on a permanent nonslip/nonflammable flat surface that is LEVEL, STABLE andSTRONG enough for the oven and contents.Allow a minimum clearance (A) of 2 inches (50mm)around the oven for hot air to escape.Allow sufficient clearance (B), in front of the oven forthe door to open fully.The air intake is located at the lower front of theoven (1) and it is important that the airflow isas cool as possible and not preheated by otherappliances such as burners, stoves, ranges, fryers,grills and griddles as this will deteriorate the lifeand performance of the oven.Do not affix labels/stickers to oven other than thoseapplied or approved by the manufacturer.1ABThe oven will not operate without the AIRFILTER correctly fitted in place.HANDLING & STORAGE:When moving an oven always observe and followNational and local requirements for lifting andmoving heavy objects. Do not use the oven doorhandle to lift oven.When not in use, electrically disconnect the ovenand store safely in a dry cool place, do not stackovens.Service & Parts Manual original InstructionsPart Number 32Z3809 GBIssue 29
6 ELECTRICAL INSTALLATIONDANGER!THIS APPLIANCE MUST BE EARTHED.FAILURE TO DO SO MAY RESULT INELECTRIC SHOCK AND DEATH.PRODUCTDETAILSThe oven must be connected to a separateelectrical supply installed by a qualified andapproved electrician.A suitably rated isolating switch with a 3mmcontact gap on all poles should be fitted foreach oven installed.Establishments with standard (Type ‘B’) circuitbreakers are sensitive to ‘surges’ which occur onswitching on freezers, refrigerators and othercatering equipment, including microwave ovens.Because of this, we strongly recommend thata separate Type ‘C’ circuit breaker (designedspecifically for this type of equipment) must befitted. An individual, suitably rated circuit breakershould be fitted for each oven installed.This equipment complies with EN61000-3-11,however, when connecting sensitive equipmentto the same supply as the oven, the user shoulddetermine in consultation with the supply authority,if necessary, that a low impedance supply is used.1SINGLE PHASEGREEN & YELLOW (EARTH)SINGLE PHASE (1)UK models are fitted with a Blue 32Amp Plug to IEC60309 (EN 60309)The Circuit Breaker should be rated at 40A (Type C).BLUE (NEUTRAL)BROWN (LIVE)TWIN PHASE (2)Twin Phase models should be connected as shown.The Circuit Breaker should be rated at 20A/Phase(Type C).2WARNING: HIGH LEAKAGE CURRENTEarth connection is essential.TWIN PHASEGREEN & YELLOW (EARTH)BROWN TO LIVE No.1EQUIPOTENTIALAn Equipotential Earth point is providedon the rear panel of the oven forindependent Earth (GND) connection.BLUE (NEUTRAL)BLACK TO LIVE No.2POWER SUPPLY: EARTH LEAKAGE CIRCUITBREAKERSIf the oven is connected to an Earth Leakage CircuitBreaker device, this should allow a minimum of 30milliamperes earth current without interrupting thecircuit.If you are in any doubt about your electrical supply, seek theadvice of a qualified electrician.10Service & Parts Manual original InstructionsPart Number 32Z3809 GBIssue 2
7 ELECTRICAL INSTALLATION GUIDEWARNINGDANGER!HIGH LEAKAGE CURRENT.THIS APPLIANCE MUST BE EARTHED. FAILURETO DO SO MAY RESULT IN ELECTRIC SHOCKAND DEATH.The oven must be connected to a separateelectrical supply installed by a qualified andapproved electrician.A suitably rated isolating switch with a 3mmcontact gap on all poles should be fitted for eachoven installed.TWIN PHASE OVENLOADINGBrownBrown16 Amps32 Amps230VBlue230VSINGLE PHASE n Equipotential Earth point is provided onthe rear panel of the oven for independentEarth (GND) connection.Blue16 AmpsGreyBlackEarthYellow/GreenEarth connection is essential.Phase Loading Diagram7.1 Phase LoadingREDBLUERear view of plugPlug Type:Three Phase32AmpIEC 60309[EN60309]L1 L2 N E[L3 is not used]Rear view of plugPlug Type:Single Phase32AmpIEC 60309[EN60309]L1 N E20 Amp40 AmpOven loading per phase is not equal therefore werecommend that other electrical equipment isconnected to L3 N.Circuit BreakersTWIN PHASECircuit Breakers should be rated at 20A per Phaseand be Time Delay, Motor Start Type (European Type C).SINGLE PHASECircuit Breakers should be rated at 40A per Phaseand be Time Delay, Motor Start Type (European Type C).Earth Leakage Circuit:If the oven is connected to an Earth Leakage CircuitBreaker device, this should allow a minimum of 30milliamps earth current without interrupting the circuit.If you are in any doubt about your electrical supply,seek the advice of a qualified electrician.Service & Parts Manual original InstructionsPart Number 32Z3809 GBIssue 211PRODUCTDETAILSEQUIPOTENTIAL
8 QUICK START GUIDE: QUICK SERVICE OVENThe easyToUCH screen display, layout and iconsshown herein, are for guidance purposes only and arenot intended to be an exact representation of thosesupplied with the oven.1PRODUCTDETAILS28.1 START UP1. Switch the oven on;Make all the relevant safety checks and ensure theoven is clean and empty before pressing the ovenswitch down to activate the oven.2. The easyToUCH screen illuminates with thedisplay briefly showing the serial number and ovendata. Lightly tap the screen once to freeze thedisplay, tap again to continue.3. When the oven is setup with two or morepreheating temperatures a choice is displayed.Scroll arrows at the bottom of the screen indicatesthere are more temperature choices not shownon screen, if necessary, use the scroll arrows, thenselect the temperature required to start preheatingthe oven.4. During preheating the display shows the progressas the oven heats up to the set temperature. (Tostop the oven heating touch the red ‘X’ symbol.)5. The oven is ready to use when the ‘COOKBOOK’ isdisplayed.345STOP/CANCELCOOKBOOK DISPLAYMULTIPLE LANGUAGES INSTALLEDDISPLAYS ALL COOKING PROGRAMS (Optional)SHOWS PROGRAM GROUPSFAVOURITES (Optional)PROGRAM GROUPEach group contains acollection of cookingprograms.CHANGE OVEN TEMPERATURE (Optional)12Service & Parts Manual original InstructionsPart Number 32Z3809 GBIssue 2
8.2 USING A COOKING PROGRAM11. Select a program group, for example, ‘BURGERS’to display the individual cooking programs.2. Select a cook program to start, for example, 2BURGERS.3. Follow instructions if displayed on the screen.4. Touch the green tick to cook.The cooking time counts down for each programstage.5. When the program ends a red bar is displayedusually with an audible sound - open the door ortouch the red ‘X’ to return to the cook program.Note; opening the oven door during cooking stopsthe cooking program and displays a warning. Closingthe door allows the user to continue or cancel thecooking program.AIR FILTER425PRODUCTDETAILSTaking all the necessaryprecautions to ensure you do notburn yourself, open the oven doorto place the food into the hot ovenand close the door.3PROGRAM STAGE6IMPORTANT:Clean the AIR FILTER (6) in the base of the ovenevery day and ensure that the air filter is in placeprior to operating the oven. See ‘CLEANING &MAINTENANCE’.8.3 SCREEN SAVERAn active screen saver will mask the screen showinga moving image. To use the touchscreen, tap thescreen to deactivate the screen saver.Service & Parts Manual original InstructionsPart Number 32Z3809 GBIssue 213
9 OPERATING GUIDE: FULL SERVICE OVENPRODUCTDETAILS9.1 easyToUCH MAIN MENU &KEYBOARD SCREENMAIN MENU SCREEN:1. DEVELOPMENT MODE enables multistagecooking programs to be developed, then storedunder a name and symbol for reuse.2. PRESS & GO allows quick access to use thecooking programs that are already stored.3. COOKBOOK contains the oven’s cookingprograms. It displays Favourites, Cooking ProgramGroups and a complete listing of all cookingprograms available.4. CLEANING/TEMP CHANGE allows the oventemperature to be changed and the oven to beprepared for cleaning with reminders displayed toassist during the cleaning process.5. SETTINGS are used to control the oven settingsand functions including time and language, loadingcooking programs and for service and maintenancepurposes.6. KEYBOARD SCREEN is used to enter an authorisedpassword to enter data for programs and mayrestrict operator access to some functions.1 DEVELOPMENTMODE2 MENUSHORTCUT3 COOKBOOK4 CLEANING/TEMP CHANGE5 SETTINGS6SCREENCLEAR SCREENKEYBOARDFor Program Names, Program Group Namesand Passwords use 1-20 characters in 2 linesmax.For Stage instructions use 1-54 characters in5 lines max.SPACEBARKEYBOARDSCROLLENTER / OKPREVIOUSSCREEN14Service & Parts Manual original InstructionsPart Number 32Z3809 GBIssue 2BackspaceRETURN
9.2 DEVELOPMENT MODE: CREATING ACOOK PROGRAM11. Select the ‘chef’s hat’ symbol from the main menuto enter development mode.2. The temperature displays the set preheated oventemperature.To increase or decrease the temperature required,select the temperature symbol (2), enter thetemperature in the keypad within the limitsdisplayed and select OK.3. Select and set the cooking time up to a maximumof 10 minutes.For example : Enter 110 (1minute and 10 seconds).4. Select and set the Microwave Power [0, 5-100%]5. Select and set a Fan speed (if available) within thelimits shown.6. Select the information icon to enter an instruction(Optional). The instruction appears in the display atthe beginning of that stage.For example : ‘Stage 1 place product in the oven’.Enter stage 2 of the program (Optional).PRODUCTDETAILSEnter stage 1 of the programExample below; setting the cooking time (step 3):To Set the cooking TimeEnter the cooking timeselect the Time symbol.on the pad.Select OK to accept thetime.23456CLEAR77. Programs can have up to a maximum of 6 stages.Repeat the steps 2-6 from stage 1 above.STAGE 1DISPLAYEDSTAGE 2DISPLAYEDADD STAGEBACK TO STAGE 1DELETE STAGERunning and saving the program1. Select OK to confirm the Program.WARNING: ensure product is in theoven and all safety precautionsare followed before running theprogram.2. Run the program (optional).If the results are not satisfactory, select thebackspace, change the cooking settings and retest.3. Select the save Cookbook symbol to record theprogram to the cookbook.4. Select the camera icon to open pictures.5. Select a picture to represent the program. (Usethe scroll arrows for more pictures.)6. Enter the name for the cooking program, usinga maximum of 20 characters, for example, ‘1BURGER’, then select OK to save the program to theCookbook.A green tick on a book indicates the program has beensaved to the Cookbook.123456Service & Parts Manual original InstructionsPart Number 32Z3809 GBIssue 215
9.3 PRESS & GORunning a cooking program from the Press &Go menu.123PRODUCTDETAILS1. Select ‘PRESS & GO’ from the main menu screen.2. Select the item required to cook.3. The display shows the temperature, cooking time,microwave power and fan speed while the timercounts down. The timer bar turns red to indicate thecooking cycle has finished.Choosing which cooking programs are shown inthe ‘PRESS & GO’ menu screen.1. After selecting ‘PRESS & GO’ from the main menuscreen, select the EDIT symbol.2. Two lists are displayed, the ‘PRESS & GO’ menuitems are shown in the upper list and the lower listshows other menu items which are available. Bothlists can be scrolled up or down using the arrows onthe extreme right.3. Select an item, then choose whether to change itsorder within the menu or to remove it into the lowerlist.4. Select an item to move into the upper list, makingit available in the ‘PRESS & GO’ menu.5. Select backspace to return to the menu screenwhen finished.9.4 USING A COOKBOOK PROGRAMTo find the required Program in the cookbook.WARNING: Ensure there is foodproduct in the oven beforestarting a cooking program.1. Select ‘COOKBOOK’ from the main menu screen.2. Select the ALL MENUS symbol.3. Use scroll up/down arrows to find the program.NOTE: if an image has a red line around it the oventemperature is set too high or too low for thatrecipe. See ‘CHANGING THE OVEN TEMPERATURE’.Taking all the necessary precautions to ensure youdo not burn yourself, place the food product intothe hot oven cavity and close the door.WARNING:Hot surface Hazard16Service & Parts Manual original InstructionsPart Number 32Z3809 GBIssue 212Change theorder of aselected itemshown in thePress & Goscreen.3Move aselected itemto or from thePress & Goscreen.45Select to scrolla list up ordown.123
4569.5 CHANGING THE OVENTEMPERATURE12312345PRODUCTDETAILS4. Select the required cooking program to startcooking.For example, ‘1 BURGER’.5. The program either starts immediately displayinga countdown timer, or an instruction is displayedfirst; follow the stage instruction then select OK tostart cooking. If the oven door is not opened within30 seconds a warning message appears.6. The cooking timer counts down to zero andmakes a sound to indicate an operator action isrequired at the end of a cooking stage or the end ofa cooking program.Once the cooking program has finished, openingthe oven door to remove the food returns thedisplay to the ‘COOKBOOK’ screen.Note; opening the oven door during cooking stops thecooking program and displays a warning. Closing thedoor allows the user to continue or cancel the cookingprogram.To check the oven temperature when cooking, lightlytap the temperature displayed, the oven cavitytemperature is shown with an asterisk.1. Take note of the temperature required for therecipe and select OK.2. Select the temperature symbol.3. An asterisk next to the number indicates thepresent oven temperature, select the required oventemperature for the recipe. Once the oven is at therequired temperature continue from selecting the‘COOKBOOK’ in step 1.9.6 VIEWING & EDITING PROGRAMS1. Select ‘COOKBOOK’ from the main menu screen.2. Select the ALL MENUS symbol.3. Select ‘EDIT COOKBOOK’.4. Use the up/down scroll arrows on the right side ofthe screen to find the cooking program, for example1 BURGER and select the view/edit cooking programsymbol.5. View or adjust the program as required, seeDevelopment mode for details.Service & Parts Manual original InstructionsPart Number 32Z3809 GBIssue 217
9.7 ADDING A NEW PROGRAM GROUP123456123To add a new Program Group.PRODUCTDETAILS1. Select ‘COOKBOOK’ from the main menu screen.2. Select ‘EDIT COOKBOOK’.3. Select the ‘ADD A NEW GROUP’ symbol.4. Select the camera icon to open pictures.5. Select a picture to represent the Group. (Use thescroll arrows for more pictures.)6. Enter a name for the new Program Group (max. 20characters) and select OK to save the Program Groupto the Cookbook.Select backspace to return to the ‘COOKBOOK’.9.8 MOVE A PROGRAM WITHIN APROGRAM GROUPExample moving the position of the ‘4 BURGERS’cooking program within the program group called‘BURGERS’.1. Select ‘COOKBOOK’ from the main menu screen.2. Select the ‘BURGERS’ program group.3. Select ‘EDIT COOKBOOK’.4. Use the up/down scroll arrows on the right sideof the upper part of the edit screen to view thecooking programs in the group.Then select the cooking program to be moved (‘4BURGERS’) and use the up/down arrows on theleft side of the upper screen to move the selectedprogram within the program group.Select backspace to return to the ‘COOKBOOK’screen.18Service & Parts Manual original InstructionsPart Number 32Z3809 GBIssue 2Program GroupMove theselectedprogram withinthe ProgramGroup4Scroll to showprograms inthe currentProgramGroup
9.9 ADDING A PROGRAM TO A GROUP12345612To add a cooking program to an existingPROGRAM GROUP.1. Select ‘COOKBOOK’ from the main menu screen.2. Select the ‘BURGERS’ Program Group.3. Select ‘EDIT COOKBOOK’.4. In the lower part of the screen use the up/downscroll arrows on the right side to find and select the‘4 BURGERS’ cooking program.5. Select the green UP arrow to add the ‘4 BURGERS’cooking program to the Program Group in theupper part of the screen, then select backspace toreturn to the cooking programs.6. Select backspace again to return to the‘COOKBOOK’.9.10 MANAGING PROGRAM GROUPS
5 installation 9 5.1 oven location and positioning 9 6 electrical installation 10 7 electrical installation guide 16.911 7.1 phase loading 1711 8 quick start guide: quick service oven 12 8.1 17.2start up 12 8.2 using a cooking program 1 3 8.3 screen saver 13 9 operating guide: full service oven 1814