Transcription
TACTIX 7 Owner’s Manual
2022 Garmin Ltd. or its subsidiariesAll rights reserved. Under the copyright laws, this manual may not be copied, in whole or in part, without the written consent of Garmin. Garmin reserves the right to change orimprove its products and to make changes in the content of this manual without obligation to notify any person or organization of such changes or improvements. Go towww.garmin.com for current updates and supplemental information concerning the use of this product.Garmin , the Garmin logo, tactix , ANT , ANT , Approach , Auto Lap , Auto Pause , Edge , inReach , QuickFit , TracBack , VIRB , Virtual Partner , and Xero are trademarks ofGarmin Ltd. or its subsidiaries, registered in the USA and other countries. Body Battery , Connect IQ , Firstbeat Analytics , Garmin Connect , Garmin AutoShot , Garmin Explore ,Garmin Express , Garmin Golf , Garmin Index , Garmin Move IQ , Garmin Pay , Health Snapshot , HRM-Dual , HRM-Pro , HRM-Run , HRM-Swim , HRM-Tri , Rally , tempe ,TrueUp , Varia , and Vector are trademarks of Garmin Ltd. or its subsidiaries. These trademarks may not be used without the express permission of Garmin. Android is a trademark of Google LLC. Applied Ballistics is a registered trademark of Applied Ballistics, LLC. Apple , iPhone , iTunes , and Mac are trademarks of Apple Inc.,registered in the U.S. and other countries. The BLUETOOTH word mark and logos are owned by the Bluetooth SIG, Inc. and any use of such marks by Garmin is under license. TheCooper Institute , as well as any related trademarks, are the property of The Cooper Institute. Di2 is a trademark of Shimano, Inc. Shimano is a registered trademark of Shimano,Inc. iOS is a registered trademark of Cisco Systems, Inc. used under license by Apple Inc. STRAVA and Strava are trademarks of Strava, Inc. Training Stress Score (TSS),Intensity Factor (IF), and Normalized Power (NP) are trademarks of Peaksware, LLC. Wi‑Fi is a registered mark of Wi-Fi Alliance Corporation. Windows is a registered trademarkof Microsoft Corporation in the United States and other countries. Zwift is a trademark of Zwift, Inc. Other trademarks and trade names are those of their respective owners. This product is ANT certified. Visit www.thisisant.com/directory for a list of compatible products and apps.
Table of ContentsIntroduction.1Getting Started. 1Device Overview. 1Enabling and Disabling theTouchscreen. 2Using the Watch. 2Clearing User Data with the Kill SwitchFeature. 2Clocks. 2Setting an Alarm. 2Editing an Alarm. 3Starting the Countdown Timer. 3Deleting a Timer. 3Using the Stopwatch. 4Adding Alternate Time Zones. 4Editing an Alternate Time Zone. 5Flying. 5Selecting a Favorite Airport. 5Viewing NEXRAD Weather Radar. 6Flying Activity. 6Starting a Flight. 6Viewing Your SpO2 Readings inFlight. 7Navigating to the Nearest Airport.8Stopping Navigation. 8Viewing Waypoint Information. 9Horizontal Situation Indicator.10Disabling the Automatic FlightTimer. 10Routes and Flight Plans. 10Finding a Waypoint. 11Creating a Flight Plan on YourWatch. 11Following a Flight Plan. 11Viewing a Flight Plan on the Map. 11Reversing and Following a FlightPlan. 12Editing a Flight Plan. 12Deleting a Flight Plan. 12Activities and Apps.12Starting an Activity. 13Tips for Recording Activities. 13Table of ContentsStopping an Activity. 13Evaluating an Activity. 14Running. 14Going for a Track Run. 14Tips for Recording a Track Run. 14Going for a Virtual Run. 14Calibrating the Treadmill Distance. 15Recording an Ultra Run Activity. 15Swimming. 15Swim Terminology. 15Stroke Types. 16Tips for Swimming Activities. 16Auto Rest and Manual Rest. 16Training with the Drill Log. 17Multisport. 17Triathlon Training. 17Creating a Multisport Activity. 17Indoor Activities. 18Health Snapshot . 18Recording a Strength TrainingActivity. 18Recording a HIIT Activity. 19Using an ANT Indoor Trainer. 19Climbing Sports. 20Recording an Indoor ClimbingActivity. 20Recording a Bouldering Activity. 21Starting an Expedition. 21Recording a Track Point Manually. 21Viewing Track Points. 21Going Hunting. 22Going Fishing. 22Skiing. 22Viewing Your Ski Runs. 22Recording a Backcountry SkiingActivity. 23Cross-Country Skiing Power Data. 23Golfing. 24Playing Golf. 24Golf Menu. 26Moving the Flag. 26Measuring Distance with TouchTargeting. 26Viewing Measured Shots. 27Manually Measuring a Shot. 27Keeping Score. 27Recording Statistics. 27i
About Stableford Scoring. 28PlaysLike Distance Icons. 28Viewing the Direction to the Pin. 28Saving Custom Targets. 28Big Numbers Mode. 29Jumpmaster. 29Planning a Jump. 29Jump Types. 30Entering Jump Information. 30Entering Wind Information for HAHOand HALO Jumps. 30Resetting Wind Information. 30Entering Wind Information for a StaticJump. 31Constant Settings. 31Customizing Activities and Apps. 31Adding or Removing a FavoriteActivity. 31Changing the Order of an Activity inthe Apps List. 31Customizing the Data Screens. 32Adding a Map to an Activity. 32Creating a Custom Activity. 32Activities and App Settings. 33Activity Alerts. 35Activity Map Settings. 36Routing Settings. 36Using ClimbPro. 37Enabling Auto Climb. 37Satellite Settings. 38Applied Ballistics . 38AB Synapse - Garmin App. 38Applied Ballistics Options. 39Quickly Editing ShootingConditions. 39Environment. 39Editing the Environment. 39Enabling Auto Update. 39Range Card. 40Customizing the Range CardFields. 40Editing the Range Increment. 40Setting the Base Range. 40Targets. 40Changing the Target. 40Editing the Target. 40iiProfile. 40Selecting a Different Profile. 40Adding a Profile. 41Deleting a Profile. 41Customizing the Profile DataScreen. 41Editing Bullet Properties. 41Editing Gun Properties. 41Calibrating the Muzzle Velocity. 41Calibrating the Drop ScaleFactor. 42Viewing the Drop Scale FactorTable. 42Editing the Muzzle Velocity andTemperature Table. 42Clearing the Muzzle Velocity andTemperature Table. 42Applied Ballistics Glossary of Terms. 43Training. 45Workouts. 45Following a Workout From GarminConnect. 46Starting a Workout. 46Following a Daily SuggestedWorkout. 46Customizing an Interval Workout. 47Starting an Interval Workout. 47Following a Pool Swim Workout. 47Recording a Critical Swim SpeedTest. 48Editing Your Critical Swim SpeedResult. 48About the Training Calendar. 48Using Garmin Connect TrainingPlans. 48PacePro Training. 48Downloading a PacePro Plan fromGarmin Connect.49Creating a PacePro Plan on YourWatch. 49Starting a PacePro Plan. 50Segments. 50Strava Segments. 51Viewing Segment Details. 51Racing a Segment. 51Setting a Segment to AdjustAutomatically. 51Table of Contents
Using Virtual Partner . 52Setting a Training Target. 52Racing a Previous Activity. 52History. 53Using History. 53Multisport History.53Personal Records. 53Viewing Your Personal Records. 53Restoring a Personal Record. 54Clearing Personal Records. 54Viewing Data Totals. 54Using the Odometer. 54Deleting History. 54Pausing and Resuming YourTraining Status. 72Controls. 73Customizing the Controls Menu. 75Using the LED Flashlight. 75Garmin Pay. 75Setting Up Your Garmin PayWallet. 75Paying for a Purchase Using YourWatch. 76Adding a Card to Your Garmin PayWallet. 76Changing Your Garmin PayPasscode. 76Appearance. 54 Sensors and Accessories. 76Watch Face Settings. 54Default Watch Faces. 55Customizing the Watch Face.55Glances. 56Viewing the Glance Loop. 58Customizing the Glance Loop. 58Viewing Aviation WeatherInformation. 58Viewing METAR Information.59Viewing TAF Information. 60Body Battery. 60Tips for Improved Body BatteryData. 61Performance Measurements.61About VO2 Max. Estimates. 62Viewing Your Fitness Age. 63Viewing Your Predicted RaceTimes. 63Heart Rate Variability and StressLevel. 64Performance Condition. 64Getting Your FTP Estimate. 65Lactate Threshold. 66Viewing Your Real-TimeStamina. 67Training Status. 68Training Status Levels. 69Heat and Altitude PerformanceAcclimation. 69Training Load. 69Recovery Time. 71Table of ContentsWrist Heart Rate. 77Wearing the Watch. 77Tips for Erratic Heart Rate Data. 77Wrist Heart Rate Monitor Settings. 78Setting an Abnormal Heart RateAlert. 78Broadcasting Heart Rate Data. 78Pulse Oximeter. 79Getting Pulse Oximeter Readings. 80Setting the Pulse Oximeter Mode. 80Tips for Erratic Pulse OximeterData. 80Compass. 80Setting the Compass Heading. 80Compass Settings. 81Calibrating the CompassManually. 81Setting the North Reference. 81Altimeter and Barometer. 81Altimeter Readings. 81Altimeter Settings. 82Calibrating the BarometricAltimeter. 82Barometer Settings. 82Calibrating the Barometer. 82Wireless Sensors.83Pairing Your Wireless Sensors. 84Running Dynamics. 84Training with Running Dynamics. 85Tips for Missing Running DynamicsData. 85Using the Varia Camera Controls. 85iii
inReach Remote. 85Using the inReach Remote. 86VIRB Remote. 86Controlling a VIRB ActionCamera. 86Controlling a VIRB Action CameraDuring an Activity.87Xero Laser Location Settings. 87Map. 87Viewing the Map.88Saving or Navigating to a Location onthe Map. 88Navigating with the Around MeFeature. 89Map Settings. 89Managing Maps. 90Map Themes. 90Marine Map Settings. 90Showing and Hiding Map Data. 90Music. 91Connecting to a Third-Party Provider.91Downloading Audio Content from aThird-Party Provider. 91Downloading Personal AudioContent. 91Listening to Music. 92Music Playback Controls. 92Connecting Bluetooth Headphones. 92Changing the Audio Mode. 92Connectivity. 93Phone Connectivity Features. 93Pairing Your Phone.93Enabling Bluetooth Notifications. 93Viewing Notifications. 93Receiving an Incoming PhoneCall. 94Replying to a Text Message. 94Managing Notifications.94Turning Off the Bluetooth PhoneConnection. 94Turning On and Off Phone ConnectionAlerts. 94Playing Audio Prompts During anActivity. 95Wi‑Fi Connectivity Features. 95ivConnecting to a Wi‑Fi Network. 95Phone Apps and ComputerApplications. 95Garmin Connect.96Using the Garmin Connect App. 96Using Garmin Connect on YourComputer. 97Manually Syncing Data with GarminConnect. 97Connect IQ Features. 97Downloading Connect IQFeatures. 98Downloading Connect IQ FeaturesUsing Your Computer. 98Garmin Explore . 98Garmin Golf App.98Connecting to the Garmin Pilot App. 98Updating the Aviation Database. 99Syncing Manually with the AviationDatabase. 99User Profile. 99Setting Up Your User Profile. 99Viewing Your Fitness Age. 99About Heart Rate Zones. 99Fitness Goals. 100Setting Your Heart Rate Zones. 100Letting the Watch Set Your Heart RateZones. 100Heart Rate Zone Calculations. 101Setting Your Power Zones. 101Safety and Tracking Features. 102Adding Emergency Contacts. 102Adding Contacts. 102Turning Incident Detection On andOff. 102Requesting Assistance. 103Starting a GroupTrack Session. 103Tips for GroupTrack Sessions. 103GroupTrack Settings. 103Health and Wellness Settings. 104Auto Goal. 104Using the Move Alert. 104Intensity Minutes.104Table of Contents
Earning Intensity Minutes. 104Sleep Tracking.104Using Automated Sleep Tracking.105Navigation. 105Viewing and Editing Your SavedLocations. 105Saving a Dual Grid Location. 105Navigating to a Destination. 105Navigating to a Point of Interest. 106Navigating to the Starting Point of aSaved Activity. 106Navigating to Your Starting PointDuring an Activity. 107Viewing Route Directions.107Navigating with Sight 'N Go. 107Marking and Starting Navigation to aMan Overboard Location. 108Stopping Navigation. 108Courses. 108Creating and Following a Course onYour Device. 108Creating a Round-Trip Course. 109Creating a Course on GarminConnect. 109Sending a Course to YourDevice. 109Viewing or Editing Course Details. 110Projecting a Waypoint. 110Navigation Settings.110Customizing Navigation DataScreens. 110Setting Up a Heading Bug. 111Setting Navigation Alerts. 111Power Manager Settings. 111Customizing the Battery SaverFeature. 111Changing the Power Mode. 112Customizing Power Modes. 112Restoring a Power Mode. 112System Settings. 113Aviation Settings. 114Time Settings. 114Setting Time Alerts. 114Syncing the Time. 115Table of ContentsChanging the Screen Settings. 115Customizing Sleep Mode. 115Customizing the Hot Keys. 115Changing the Units of Measure. 116Syncing Activities and PerformanceMeasurements. 116Viewing Device Information. 116Viewing E-label Regulatory andCompliance Information. 116Device Information. 117Charging the Watch. 117Solar Charging. 117Tips for Solar Charging. 117Specifications.118Battery Information. 118Device Care. 119Cleaning the Watch. 119Changing the QuickFit Bands. 120Data Management. 120Deleting Files. 120Troubleshooting. 121Product Updates. 121Contacting Garmin Aviation ProductSupport. 121Getting More Information. 121My device is in the wrong language.121Is my phone compatible with mywatch?. 121My phone will not connect to thewatch. 122Can I use my Bluetooth sensor with mywatch?. 122My headphones will not connect to thewatch. 122My music cuts out or my headphoneswon't stay connected. 122Restarting Your Watch. 122Resetting All Default Settings. 123Tips for Maximizing the Battery Life. 123Acquiring Satellite Signals. 123Improving GPS Satellite Reception 124The temperature reading is notaccurate. 124Activity Tracking. 124My step count does not seemaccurate. 124v
The step counts on my device and myGarmin Connect account don'tmatch. 124The floors climbed amount does notseem accurate. 124Appendix. 125Data Fields. 125Color Gauges and Running DynamicsData. 138Ground Contact Time BalanceData. 138Vertical Oscillation and Vertical RatioData. 139VO2 Max. Standard Ratings. 139FTP Ratings. 140Wheel Size and Circumference. 141Symbol Definitions. 142viTable of Contents
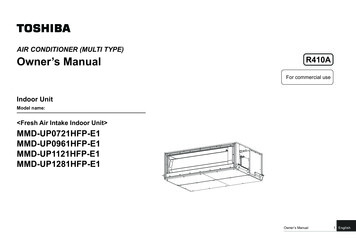
IntroductionWARNINGSee the Important Safety and Product Information guide in the product box for product warnings and otherimportant information.Always consult your physician before you begin or modify any exercise program.Getting StartedWhen using your watch the first time, you should complete these tasks to set it up and get to know the basicfeatures.1 Press LIGHT to turn on the watch (Device Overview, page 1).2 Follow the on-screen instructions to complete the initial setup.During the initial setup, you can pair your smartphone with your watch to receive notifications, sync youractivities, and more (Pairing Your Phone, page 93).3 Charge the device (Charging the Watch, page 117).4 Start an activity (Starting an Activity, page 13).Device OverviewTouchscreen Tap to choose an option in a menu. Hold the watch face data to open the glance or feature.NOTE: This feature is not available on all watch faces. Swipe up or down to scroll through the glance loop and menus. Swipe right to return to the previous screen. Cover the screen with your palm to return to the watch face and turn down the screen brightness.LIGHT Press to turn on the device. Press to turn the backlight on and off.Introduction1
Quickly press twice to turn on the flashlight. Hold to view the controls menu.UP·MENU Press to scroll through the glance loop and menus. Hold to view the menu.DOWN Press to scroll through the glance loop and menus. Hold to view the music controls from any screen.START·STOP Press to choose an option in a menu. Press to view the activity list and start or stop an activity. Hold to save your current location using dual grid coordinates.BACK·LAP Press to return to the previous screen. Press to record a lap, rest, or transition during a multisport activity. Hold to view the watch face from any screen.Enabling and Disabling the Touchscreen Hold LIGHT, and select . Hold MENU, select System Touch, and select an option.TIP: To quickly enable or disable the touchscreen, you can assign a hot key shortcut to the hold function ofthe buttons (Customizing the Hot Keys, page 115).Using the Watch Hold LIGHT to view the controls menu (Controls, page 73).The controls menu provides quick access to frequently used functions, such as turning on do not disturbmode, saving a location, and turning the watch off. From the watch face, press UP or DOWN to scroll through the glance loop (Glances, page 56). From the watch face, press START to start an activity or open an app (Activities and Apps, page 12). Hold MENU to customize the watch face (Customizing the Watch Face, page 55), adjust settings (SystemSettings, page 113), pair wireless sensors (Pairing Your Wireless Sensors, page 84), and more.Clearing User Data with the Kill Switch FeatureThe Kill Switch feature quickly removes all saved user-entered data and resets all settings to the factory defaultvalues.Hold BACK·LAP and LIGHT.TIP: You can press any button to cancel the Kill Switch feature during a 10-second countdown.After 10 seconds, the watch deletes all user-entered data.ClocksSetting an AlarmYou can set multiple alarms.1 From the watch face, hold MENU.2 Select Clocks ALARMS Add Alarm.3 Enter the alarm time.2Clocks
Editing an Alarm1234From the watch face, hold MENU.Select Clocks ALARMS Edit.Select an alarm.Select an option: To turn the alarm on or off, select Status. To change the alarm time, select Time. To set the alarm to repeat regularly, select Repeat, and select when the alarm should repeat. To select the type of alarm notification, select Sound and Vibe. To turn the backlight on or off with the alarm, select Backlight. To select a description for the alarm, select Label. To delete the alarm, select Delete.Starting the Countdown Timer1 From the watch face, hold MENU.2 Select Clocks TIMERS.3 Select an option: To set and save a countdown timer for the first time, enter the time, press MENU, and select Save Timer. To set and save additional countdown timers, select Add Timer, and enter the time. To set a countdown timer without saving it, select Quick Timer, and enter the time.4 If necessary, press MENU, and select an option: Select Time to change the time. Select Restart On to automatically restart the timer after it expires. Select Sound and Vibe, and select a type of notification.5 Press START to start the timer.Deleting a Timer1234From the watch face, hold MENU.Select Clocks TIMERS Edit.Select a timer.Select Delete.Clocks3
Using the Stopwatch1234From the watch face, hold MENU.Select Clocks STOPWATCH.Press START to start the timer.Press LAP to restart the lap timer.The total stopwatch timecontinues running.5 Press STOP to stop both timers.6 Select an option: To reset both timers, press DOWN. To save the stopwatch time as an activity, press MENU, and select Save Activity. To reset the timers and exit the stopwatch, press MENU, and select Done. To review the lap timers, press MENU, and select Review.NOTE: The Review option only appears if there have been multiple laps. To return to the watch face without resetting the timers, press MENU, and select Go to Watchface. To enable or disable lap recording, press MENU, and select Lap Key.Adding Alternate Time ZonesYou can display the current time of day in additional time zones on the alternate time zones glance. You canadd up to four alternate time zones.NOTE: You may need to add the alternate time zones glance to the glance loop (Customizing the Glance Loop,page 58).1 From the watch face, hold MENU.2 Select Clocks ALT. TIME ZONES Add Alt. Time Zone.3 Select an option: Select Use Airport Ident. to search for a time zone by entering the alphanumeric identifier for an aviationwaypoint. Select Use Map to choose a time zone for a geographic location.4 Select a time zone.5 If necessary, rename the zone.4Clocks
Editing an Alternate Time Zone1234From the watch face, hold MENU.Select Clocks ALT. TIME ZONES Edit.Select a time zone.Select an option: To enter a custom name for the time zone, select Rename Zone. To change the time zone, select Change Zone. To change the location of the time zone in the glance, select Reorder
inReach Remote.85 Using the inReach Remote.86 VIRB Remote.86 Controlling a VIRB Action