Transcription
Mastercycler epBedienungsanleitung · Operating instructions · Mode d’emploiInstruzioni d’impiego · Manual de Instrucciones
CertificateAuthorized Thermal Cycler, is an Authorized Thermal Cycler.This instrument, Serial No. 5344, is an Authorized Thermal Cycler.This instrument, Serial No. 5345, is an Authorized Thermal Cycler.CertificateThis instrument, Serial No. 5341Its purchase price includes the up-front fee component of a license under United States Patent Nos. 4,683,195,4,683,202 and 4,965,188, owned by Roche Molecular Systems, Inc., and under corresponding claims in patents outsidethe United States, owned by F. Hoffmann-La Roche Ltd., covering the Polymerase Chain Reaction ("PCR") process, topractice the PCR process for internal research and development using this instrument. The running royalty component ofthat license may be purchased from Applied Biosystems or obtained by purchasing Authorized Reagents. Thisinstrument is also an Authorized Thermal Cycler for use with applications licenses available from Applied Biosystems. Itsuse with Authorized Reagents also provides a limited PCR license in accordance with the label rights accompanyingsuch reagents. Purchase of this product does not itself convey to the purchaser a complete license or right to performthe PCR process. Further information on purchasing licenses to practice the PCR process may be obtained bycontacting the Director of Licensing at Applied Biosystems, 850 Lincoln Centre Drive, Foster City, California, 94404,USA.No rights are conveyed expressly, by implication or estoppel to any patents on real-time methods, including but notlimited to 5' nuclease assays, or to any patent claiming a reagent or kit.Applied Biosystems does not guarantee the performance of this instrument.B 5341 900.060-03/10031
Inhalt / Contents / Sommaire / Indice / IndiceBedienungsanleitung . 3Operating instructions . 53Inhalt / Contents / Sommaire / Indice / IndiceMode d’emploi. 105Instruzioni d’impiego . 157Manual de Instrucciones . 166No part of this publication may be reproduced without the prior permission of the copyright ownerCopyright 2003 Eppendorf AG, Hamburg.Mastercycler is a registered trademark – US Reg. No. 2,273,536 – Canadian Reg. No. TMA510572Mastercycler ep is protected by US-Patent No. 6,210,9582
Table of contentsSafety precautions. 2.4.32.4.42.4.4.12.4.4.2Installation . 56Delivery package . 56Setting up the device. 56Removing the transport securing device on devices with a motorized lid . 57Transport securing device for manual lids. 58Functional units . 59Mastercycler ep . 59ESP (electronic sample protection) Heated lid . 60Control Panel . 60Starting up the device . 61Connecting a Mastercycler ep to a control panel. 61Connection of several Mastercycler ep to one control panel . 61Networking of up to 30 Mastercycler ep . 63Connection of additional components (printer / mouse) . 63Printer . 63PS/2 mouse . .7.53.7.5.13.7.63.7.7Operation. 64Control Panel keys. 64Navigation tree. 66First start-up / Administrator settings. 66Logging in as administrator . 67Setting up new users . 67Deleting users . 68System nodes . 68Logfile . 68LCD Contrast. 68Date Time . 69Country settings . 69Beeper . 69PIN . 69DebugLog . 69UserLog . 69Cycler nodes . 70MultiMediaCardTM . 71Operation in the navigation tree . 71Login . 71User change . 72Creating folders . 73Creating programs. 74Copying programs and folders . 74Copying programs and folders to/from the MultiMediaCardTM . 75Deleting programs and folders . 76Properties . .14.3.24.3.3Programming . 77Program editor . 77Function keys in the editor . 77Program steps . 78TEMP – Temperature . 78Cycle . 80Hold . 80Pause . 80Sound . 81End . 81Create program . 81Header settings . 81Create program with program template . 83Create program without template. 84TTable of contents153
Table of contentsTable of contentsT544.44.4.1Transfer program . 87Transfer program from Mastercycler / Mastercycler gradient to the Mastercycler ep . 5.4.45.55.6PCR run / operation . 88Preparation . 88Sample loading. 88Sample volume . 88Start program . 88Status display . 90Exit the status display. 90Calling up the status display . 90Functions in the status display . 91Interruption under a running program . 91Opening and closing the ESP heated lid . 91Continue program. 91Abort program . 91Protocol . 92Remove from operation . 9266.16.2Maintenance . 93Cleaning . 93Emergency unlocking of the heated lid . 947Troubleshooting . 9588.18.28.38.48.58.68.78.88.9Short instructions . 96Login . 96Creating folders and programs . 96Copying of files and programs . 96Deleting programs and folders . 97Creating a program . 97Starting the program . 98Program run . 98Calling up the status display . 99Switching off the device . 9999.19.2Technical data . 100Mastercycler ep . 100Control Panel . 10010Ordering information . 10111Ordering information for USA and Canada . 103
1 Safety precautionsPlease read the operating insructions carefully before using the Mastercycler ep. The Mastercycler ep mayonly be used to carry out PCR and related methods by qualified specialists in the research lab.The following instructions must be unconditionally observed:The safety regulations valid for the lab are to be constantly observed when working with the device.1In order to avoid damage through condensation, the device may first be switched on 12 hours after being set up. This isalso the case when the location of the device is changed.Safety precautionsThe mains voltage must coincide with the information on the identification plate.The device must be connected to a grounded socket.The device must be switched off and the plug pulled before maintenance work, and cleaning are carried out. Wait for theblock to cool.A flow of compensating current can occur when several Mastercycler ep are networked incorrectly. The connectionsmust be checked prior to commissioning.The Mastercycler ep must stand completely on the stable work surface.There must be enough space available to avoid blocking the front and rear ventilation slots. It should also be possible forcooling air to find its way beneath the device.The distance between the rear air slots and the wall should be at least 10 cm.It should be ascertained that the air slots remain free and that the exhaust slots are not blocked.There should be no paper or other objects under the device that might lead to the blocking of the ventilation.It should be ascertained that the control panel is held securely in the holding clamp.The control panel may not be placed on the device or the lid.The control panel may not be separated from a switched on Mastercycler ep.If the lid is in the cleaning position, components with sharp edges are exposed. Extra caution should be exercised whencleaning the heated lid (particularly with respect to the sharp edged rollflex cable).Don’t place the fingers between the lid and the housing of the device when opening or closing the lid or when cleaning.The fingers could otherwise be caught between them.Don’t reach underneath the heated lid.Sample material may not be filled directly into the Thermoblock.Damage to the block and the heated lid can result from using sample tubes other than those recommended.Unsuitable tubes can be damaged to such an extent that sample material may escape. This is especially important toremember when working with infectious materials.It should be ascertained that the PCR plates are correctly situated in the block. Damage to the block and the lid, orescape of sample material may otherwise result.If tubes are heated in the block without using the heated lid, these can burst when the temperature is too high, potentiallycausing the escape of sample material.55
1 Safety precautions / 2 InstallationThe Thermoblock, the inner side of the heated lid and micro test tubes / PCR plates can reachtemperatures of over 50 C very quickly. There is a risk of burns!The heated lid should be kept closed until temperatures of around 30 C or less are reached. Do not usematerials (tubes, PCR plates, caps, foils, mats) that are not sufficiently temperature resistant (to 120 C).1/2Safety precautions / InstallationCaution: Hot SurfaceSymbol on the Thermoblock:Warns of a potentially hot Thermoblock ( ) or a hot inner side of the heated lidshows, that gradient operation can result in the( ).temperature being hotter on the right side than on the left side.Explosive, flammable and volatile materials may not be heated in the Mastercycler ep. The device may not be operatedin rooms at risk of explosion.The appropriate safety regulations should be observed when working with pathogenic material, radioactive materials orother health-damaging materials.It should be ascertained that no liquids penetrate into the device.Repairs should only be carried out by an Eppendorf AG authorized specialist. The authorization can only be obtainedthrough participation in a certified course of training.2.1 Delivery packageThe following parts are included in the delivery package:1 Mastercycler ep gradient / Mastercycler ep gradient S / Mastercycler ep 3841 power cable1 operating insructions1 Certificate of Conformity1 pouch of PCR tubes 0.2 ml2 PCR plates twin.tec skirted / semi-skirted1 pouch sealing material2 tools for emergency unlocking of lid2.2 Setting up the deviceIn order to avoid damage caused by condensation, the device may first be switched on 12 hours after setting up. Thisalso applies to a change of location.The Mastercycler ep must stand completely stable on the work surface.There must be sufficient space that the front and rear air slots are not covered and that cooling air can reach below thedevice.The distance between the air slots and the wall must be at least 10 cm.Space requirement:Width:Depth:Height:26.0 cm41.0 cm30.5 cmMains connection:An earthed wall socket for the Mastercycler ep. The control panel is also supplied through themains connection of the Mastercycler ep.It should be ensured that the air slots are free, and that the supply and exhaust air paths are not blocked. There shouldbe no paper under the device. This can block the ventilation path.The mains voltage must agree with the information on the name plate.The device must be connected to a grounded socket.The delivery carton should be kept in order to be able to ship the device in case repairs are necessary.56
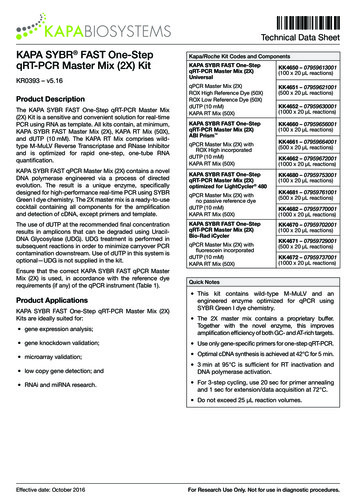
2 Installation2.2.1 Removing the transport securing device on devices with a motorized lidBefore the Mastercycler ep is started up, the transport securing device must be removed!The transport securing devices should be retained and replaced at the intended point for any transport operation in orderto avoid transport damage!2On devices with a motorized lid, the transport securing device attached behind the lid is removed as follows andreplaced in reverse sequence if needed:InstallationIn order to be able to use the transport safety device, the block must be loaded with empty tubes and the lid closedunder the Cycler node in the LID menu (see Ch. 3.5). As soon as the lid is in the front position, the device can beswitched off at the mains power switch and the transport safety device inserted into the guide rail.Warning! Any time the device is transported, the transport securing device must be replaced in this position!To remove the transport securing device under the heated lid, the above-described transport securing device mustfirst be removed on a device with a motorized lid.–Then connect the mains cable to the mains supply and the mains connection socket (see Chapter 2.3.1, Fig. 2).Switch on the device at the mains switch.–Once the device has been switched on, the heated lid automatically moves into the rear position.–As soon as the lid is in the rear position, switch the device off again and pull out the mains plug.Proceed as follows to remove the transport securing device.–Open lid upwards–Remove the transport securing device by slowly pulling the redtab in the direction of the arrow (see illustration).Hold the lid steady in the upright position during this process.The transport securing devices must be retained in case the devicerequires shipping.Warning! Any time the device is transported, the transportsecuring device must be replaced in this position!57
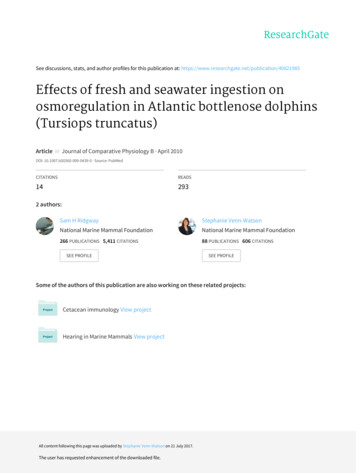
2 Installation2.2.2 Transport securing device for manual lidsThe transport safety device must be removedprior to starting up the Mastercycler ep!Proceed as follows to remove the transport safety device:Installation2–Push the lid of the Mastercycler ep into the rear positionand open upwards.–Remove the transport securing device by slowly pullingthe red tab in the direction of the arrow (see illustration).Hold the lid steady in the upright position during thisprocess.The transport securing device must be retained in case thedevice requires shipping.Warning! Any time the device is transported, thetransport securing device must be replaced in thisposition!58
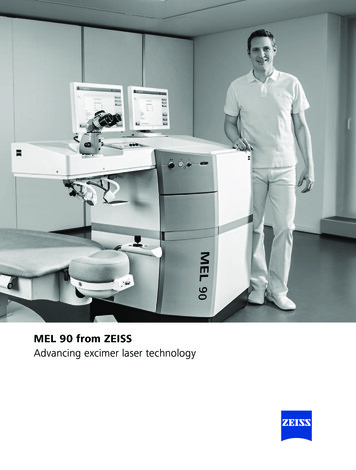
2 Installation2.3 Functional units2.3.1 Mastercycler ep5212412345ESP Heated lid (opened)Status displayThermoblockHolding clamp for control panelOpening for emergencyunlocking of lid6 Identification plateInstallation3Fig. 1: Front view6123Fig. 2: Rear view1 ESP Heated lid (closed)2 Opening for emergencyunlocking of lid3 Air slots4 Mains connection socket5 Mains switch 0 off / I on6 Terminal block (see Fig. 3)456Fig. 3: Terminal block12345671 Printer: parallel interface2 RS232: serial interface3 Control Panel:Connection Control Panel4 CAN out5 CAN in6 Term: Terminal resistance7 Address: Rotary switch addressOnly devices meeting the IEC 950/EN 60950 (UL1950) norms may be connected to the interfaces.59
2 Installation2.3.2 ESP (electronic sample protection) Heated lidAll variants of the Mastercycler ep are equipped with a novel ESP heated lid technology. With this technology, thelowering point and the loading pressure of the ESP heated lid are entirely electronically controlled. The optimal pressureis applied for all sample tubes and PCR plates, effectively minimizing evaporation. Due to the controlled lowering point ofthe ESP heated lid, the samples are thermally protected during the heating-up procedure.2There are two variants of the ESP heated lid, one for manual closing and a motorized heated lid.InstallationThe manual heated lid is simply drawn forward over the inserted tubes following sample loading prior to starting aprogram.The motorized heated lid is also processible and need not be drawn over the inserted sample tubes. This solution isespecially suited for use in automated systems.When opening and closing the lid, or when popping up into the cleaning position, avoid placing the fingersbetween the cover and the housing of the device.Do not reach beneath the lid when the heated lid is open.2.3.3 Control PanelThe control panel can be suspended in the holding clamp of the Mastercycler ep or placed separately on a planarsurface.1234Fig. 4: Control panel1 Display2 Serial interface3 Connection for PS/2mouse4 Receptacle forMultiMediaCard Only devices meeting the IEC 950/EN 60950 (UL1950) norms may be connected to the interfaces.60
2 Installation2.4 Starting up the device2.4.1 Connecting a Mastercycler ep to a control panelControl PanelConnect the connecting cable of the control panel with the "Control Panel" on the rear side of theMastercycler ep.2TermInstallationSet the Term switch on the rear side of the Mastercycler ep to ON.ONAddressSet the "Address" of the Mastercycler ep. To do this carry out the adjustment 01 with the Addressrotary switched on the rear side of the Mastercycler ep.(This would mean, that the arrowpoint of the left rotary switch would be set to 0 and that of theright rotary switch to 1).Connect the mains cable to the Mastercycler ep and then to the power main.(see Fig. 2 rear view).Before switching on the device it must be ensured that the mains voltage is the correct one for the device. To thispurpose please compare the information given on the name plate (see Ch. 2.3.1, Fig. 2).After switching on the device, the connected Mastercycler ep will be automatically recognized by the software andpresented in the control panel display.The control panel may not be separated from a switched on Mastercycler ep.Connection and start-up of a printer is described in Chapter 2.4.4.1. A PS/2 mouse can also be connected to thecontrol panel (see Chapter 2.4.4.2).2.
Repairs should only be carried out by an Eppendorf AG authorized specialist. The authorization can only be obtained through participation in a certified course of training. The following parts are included in the delivery package: 1 Mastercycler ep gradient / Mastercycler ep gradient S / Mastercycler ep 384 1 power cable 1 operating insructions