Transcription
Top-Loading WasherUse and Care GuideLaveuse à chargement par ledessus guide d’utilisation etd’entretienPara una versión de estas instrucciones en español, visite www.whirlpool.comTable of ContentsTable des matièresWASHER SAFETY. 2WHAT’S NEW UNDER THE LID?. 3CONTROL PANEL AND FEATURES. 4CYCLE GUIDE . 6USING YOUR WASHER . 7WASHER MAINTENANCE . 10TROUBLESHOOTING . 11WARRANTY . 16ASSISTANCE OR SERVICE .BACK COVERSÉCURITÉ DE LA LAVEUSE. 17QUOI DE NEUF SOUS LE COUVERCLE?. 18TABLEAU DE COMMANDE ETCARACTÉRISTIQUES . 19GUIDE DE PROGRAMMES. 21UTILISATION DE LA LAVEUSE . 22ENTRETIEN DE LA LAVEUSE. 25DÉPANNAGE . 27GARANTIE . 34ASSISTANCE OU SERVICE . COUVERTURE ARRIÈREDesigned to use only HE High Efficiencydetergents.Conçue pour l’utilisation d’un détergent hauteefficacité seulement.W10860705AW10862388A-SP
Washer Safety2
What’s New Under the Lid?Your new washer will operate differently than your past agitator-style washer.Lid LockSounds allow for higher spin speeds, the lid will lock and theToLid Locked light will turn on. When this light is lit, the lid islocked and cannot be opened. When this light is blinking,the washer is paused. When this light is off, the lid can beopened. After a cycle is started, the washer will fill to theappropriate water level. When the washer is done filling,it will start to agitate. If you need to open the lid to add agarment after this point, the lid will remain unlocked duringthe entire agitation portion of the wash phase. The cyclewill automatically pause when the lid is opened, and thecycle will resume once the lid is closed. The lid will lockbefore the spin phase begins. If you need to pause or stopafter this point, you must press the START/Pause buttonand wait for the lid to unlock. The lid will only unlock afterwasher movement has stopped. Depending on when inthe cycle you try to pause, it may take several seconds toseveral minutes for the lid to unlock. Press START/Pauseto resume the cycle. t different stages of the wash cycle, you mayAhear sounds and pauses that are different from thoseof your previous washer. For example, you may hear aclicking and hum at the beginning of the spin phase asthe lid lock goes through a self-test. There will be differentkinds of humming and whirring sounds as the agitatortests for load balance or moves the load. And, sometimes,you may hear nothing at all as the washer allows time forclothes to soak.Water Level OptionsSet the Water Level knob to the Auto Sensing setting andthe washer automatically adjusts the water level to the loadsize. Set the Water Level knob to the Deep Water Washsetting and the washer will fill to the maximum water level.SensingChoosing the Right DetergentUse only High Efficiency detergents. The package will bemarked “HE” or “High Efficiency.” Using non-HE detergentwill likely result in longer cycle times and reduced rinsingperformance. It may also result in component malfunctionand, over time, buildup of mold or mildew. HE detergentsshould be low-sudsing and quick-dispersing to producethe right amount of suds for the best performance. Theyshould hold soil in suspension so it is not redepositedonto clean clothes. Not all detergents labeled as HighEfficiency are identical in formulation and their ability toreduce suds. For example, natural, organic, or homemadeHE detergents may generate a high level of suds. Alwaysfollow the detergent manufacturer’s instructions todetermine the amount of detergent to use.This washer will perform a series of spins to check for loadbalance. During this time, a series of clicks and a whirringnoise signal that sensing technology is determining if thereis an off-balance load.Use only High Efficiency (HE) detergent.Spray Rinse elect cycles default to a spray rinse. During these cycles,Syou will hear water enter the washer as the tub spins,allowing the rinse water to penetrate clothes. Check the“Cycle Guide” for details.IMPORTANT: The lid must be closed before the washer basket fills with water and for the wash cycle to start. If the lid is open and filling stops,close the lid and press START/Pause button to complete the cycle." Rinse options must be set to either 1 Rinse with softener or 2 Rinses with softener when using fabric softener in the fabric softenerdispenser. This ensures that fabric softener is added at the correct time in the rinse phase and is evenly distributed.3
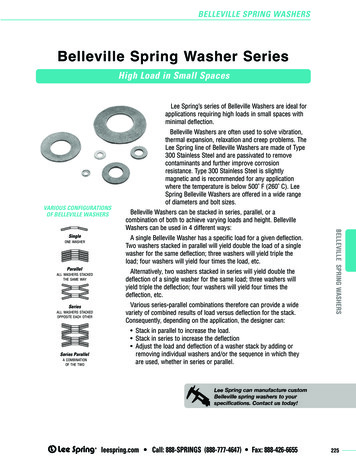
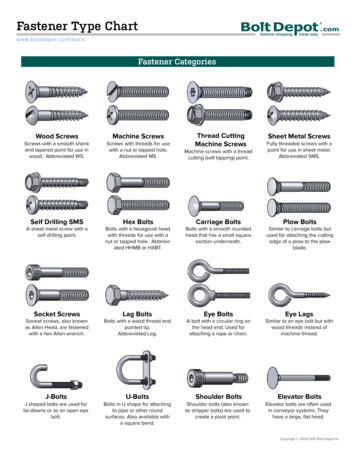
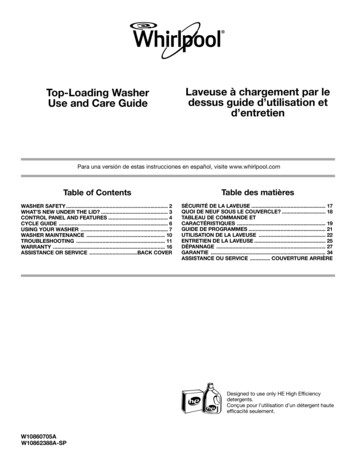
Control Panel and Features1234567Not all features and options are available on all models.Appearance may vary.1SOIL LEVEL52WASH TEMPWash Temp senses and maintains uniform watertemperatures by regulating incoming hot and cold water.Select a wash temperature based on the type of fabricand soils being washed. For best results, and followingthe garment-label instructions, use the warmest washwater safe for your fabric. On some models and cycles, warm and hot water maybe cooler than your previous washer. Even in a cold- and cool-water wash, some warm watermay be added to the washer to maintain a minimumtemperature.WATER LEVELSet the Water Level knob to the Auto Sensing setting and thewasher will automatically sense the appropriate water levelfor the load size and type.Set the Water Level knob to the Deep Water Wash settingand the washer will fill to the maximum water level.NOTE: Expect longer cycles times due to extended fill timeswhen using the Deep Water Wash option.Select the setting most suitable for your load. For heavilysoiled and sturdy fabrics, select Heavy Soil Level for morewash time. For lightly soiled and delicate fabrics, select LightSoil Level for less wash time. A lighter soil-level setting willhelp reduce tangling and wrinkling.6START/PAUSE BUTTONPress to start the selected cycle; press again to pause thecycle and unlock the lid.NOTE: If the washer is spinning, it may take several minutesto unlock the lid. Press and hold for 3 seconds to cancela cycle.7PROGRESS LIGHTSAll rinses are cold.3WASH CYCLE KNOBUse the Wash Cycle knob to select cycles on your washer.See “Cycle Guide” for detailed descriptions of cycles.4RINSE OPTIONSThe following options may be added to most cycles. See“Cycle Guide” for additional details.1 RINSEThis option is used to limit a cycle to one rinse.2 RINSESThis option can be used to automatically add a secondrinse to most cycles.1 RINSE WITH SOFTENERThis option must be selected if using fabric softenerduring a cycle. It ensures that fabric softener is addedat the correct time in the rinse for even distribution.2 RINSES WITH SOFTENERThis option turns on both the Fabric Softener and the2 Rinses option.4The Progress Lights show the progress of a cycle. At eachstage of the process, you may notice sounds or pauses thatare different from your previous washer.SENSINGWhen the START/Pause button is pressed and the WaterLevel knob is set to Auto Sensing, the washer will fill andbegin sensing to determine load size and balance. Oncesensing is complete, the washer will fill to the appropriatelevel for the detected load size and then begin the washphase of the cycle.NOTE: Sensing and wash phases will be paused byopening the unlocked lid. Close the lid to resume thecycle. If the lid is left open for more than 10 minutes, thewasher will cancel the cycle and pump out the water.The lid will lock after the wash phase to begin the initialspinout and remain locked for the remainder of the cycle.
WASHThe washer will fill to the correct water level basedon the load size and the Water Level selection.Certain cycles may agitate during the fill processto boost cleaning. You will hear the agitator rotatefollowed by a pause lasting several seconds. Whenthe wash cycle begins, you will hear the agitatorincrease speed. The motor sounds may change atdifferent stages in the wash cycle while the washerperforms different wash actions.RINSECertain cycles use a spray rinse, which adds water tothe tub while the basket spins. When a fabric softeneroption is selected, you will hear sounds similar to thewash cycle as the washer rinses and moves the load.You may hear the motor turning on briefly (short hum)to move the basket while filling.SPINThe washer spins the load at increasing speeds forproper water removal based on the selected cycleand spin speed.DONEOnce the cycle is complete, this light will come on.For best results, remove the load promptly.LOCKEDThe Lock feature allows for higher spinspeeds. When lit, the lid is locked andcannot be opened without pausing thecycle. When the light is off, the lid canbe opened.To open the lid after it has beenlocked, press START/Pause. The lidwill unlock once the washer movementhas stopped. This may take severalminutes if the load was spinning athigh speed. Press START/Pause whilethe lid is closed to resume the cycle.5
Cycle GuideFor best fabric care, choose the cycle that best fits the load being washed. Recommended settings for best performance are shownin Bold. Not all cycles and options are available on all models.Items to wash:Cycle:Temperature*:SpinSpeed:Lightly soiled fabricsQuick WashHotWarmCoolColdTap ColdHighUse this cycle to quickly wash a small number of lightlysoiled items.Machine-washsilks, hand-washedfabricsDelicateHotWarmCoolColdTap ColdLowUse this cycle to wash lightly soiled garments indicating“Machine Washable Silks” or “Gentle” cycle on the carelabel. Place small items in mesh garment bags beforewashing.No-iron fabrics,cottons, perm.press, linens,syntheticsCasualHotWarmCoolColdTap ColdLowUse this cycle to wash loads of no-iron fabrics such as sportshirts, blouses, casual business clothes, permanent press,and blends.Cold WashColdHighCold water with an additional wash action gently liftsstains while caring for fabrics. Settings may be adjustedas desired but must use only cold water settings.Cottons, linens,and mixed-garmentloadsNormalHotWarmCoolColdTap ColdHighUse this cycle for normally soiled cottons and mixed-fabricloads.Heavily soiled sturdyfabrics, colorfastitems, towels, jeansSuper WashHotWarmCoolColdTap ColdHighProvides maximum water temperatures and water levelswhile using the most aggressive wash actions for toughstains and soils. Use this cycle for heaviest soiledsturdy items.Sturdy fabrics,colorfast items,towels, jeansHeavy DutyHotWarmCoolColdTap ColdHighUse this cycle for heavily soiled sturdy items.Large items suchas sheets, sleepingbags, smallcomforters, jackets,small, washablerugsBulky Items/SheetsHotWarmCoolColdTap ColdLowUse this cycle to wash large items such as jackets and smallcomforters. The washer will fill with enough water to wetdown the load before the wash portion of the cycle beginsand uses a higher water level than other cycles.Hand-washedgarments ordripping-wet itemsDrain &SpinN/AHighThis cycle uses a spin to shorten drying times for heavyfabrics or special-care items washed by hand. Use thiscycle to drain washer after cancelling a cycle or completinga cycle after a power failure.Swimsuitsand itemsrequiring rinsingwithout detergentRinse & SpinCold Rinse OnlyHighCombines a rinse and spin for loads requiring an additionalrinse cycle or to complete a load after power interruption.Also use for loads that require rinsing only.No clothes inwasherClean Washerwith affresh HotWarmCoolColdTab ColdLowUse this cycle every 30 washes to keep the inside of yourwasher fresh and clean. This cycle uses a higher water level.Use with affresh Washer Cleaner tablet or liquid chlorinebleach to thoroughly clean the inside of your washer. Thiscycle should not be interrupted. See “Washer Care.”IMPORTANT: Do not place garments or other items in thewasher during the Clean Washer with affresh cycle. Usethis cycle with an empty wash tub.Heavily soiledfabrics.SoakHotWarmCoolColdTap ColdNo SpinBright or darklycolored cottons,linens, casual andmixed loads*All rinses are cold.6Cycle Details:Use this cycle to soak small spots of set in stains onfabrics. The washer will use intermittent agitation andsoaking. After time has expired, water will drain, but thewasher will not spin. Cycle is complete. To set a follow-upcycle, select Drain & Spin, add additional detergent, andselect a cycle based on fabric type.
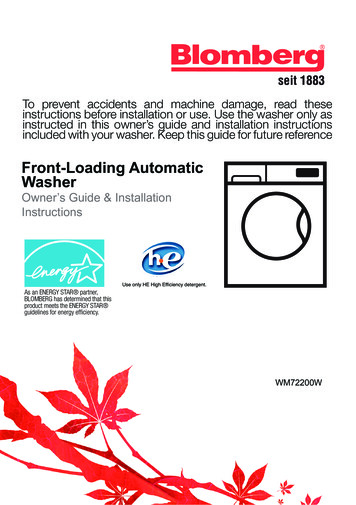
Using Your Washer1.Sort and prepare your laundry2.Add laundry products Empty pockets. Loose change, buttons, or any smallobject can pass under the agitator and become trapped,causing unexpected sounds. Sort items by recommended cycle, water temperature,and colorfastness. Separate heavily soiled items from lightly soiled. Separate delicate items from sturdy fabrics. Do not dry garments if stains remain after washingbecause heat can set stains into fabric. Treat stains promptly. Close zippers, fasten hooks, tie strings and sashes, andremove non-washable trim and ornaments. Mend rips and tears to avoid further damage to itemsduring washing.Helpful Tips: When washing water-proof or water-resistant items,load evenly. Use mesh garment bags to help avoid tangling whenwashing delicate or small items. Turn knits inside out to avoid pilling. Separate lint-takersfrom lint-givers. Synthetics, knits, and corduroy fabrics willpick up lint from towels, rugs, and chenille fabrics.NOTE: Always read and follow fabric-care-label instructionsto avoid damage to your garments.Add a measured amount of HEdetergent or single-dose laundrypacket into the basket.If using Oxi-type boosters, color-safebleach, or fabric-softener crystals, addto the bottom of the washer basket before adding clothes.IMPORTANT: Use only High Efficiency detergents. Thepackage will be marked “HE” or “High Efficiency.” Usingregular detergent will likely result in longer cycle timesand reduced rinsing performance. It may also result incomponent failures and noticeable mold or mildew. HEdetergents are made to produce the right amount ofsuds for the best performance. Follow the manufacturer’sinstructions to determine the amount of detergent to use.NOTE: Follow the manufacturer’s instructions to determinethe amount of laundry products to use.7
3.Load laundry into washerLoad garments in loose heaps evenlyaround basket wall. For best results, donot pack the load tightly. Do not wraplarge items such as sheets around theagitator; load them in loose piles aroundthe sides of the basket. Try mixingdifferent-sized items to reduce tangling.IMPORTANT: Do not tightly pack orforce items into washer. Items need to move freely for bestcleaning and to reduce wrinkling and tangling.4.Add liquid chlorine bleachto dispenserDo not overfill, dilute, or use more than 1 cup (250 mL).Do not use color-safe bleach or Oxi products in the samecycle with liquid chlorine bleach.5.Add fabric softener to dispenserPour a measured amount of liquid fabricsoftener into dispenser; always followmanufacturer’s directions for correct amountMAX FILLof fabric softener based on your load size.Dilute liquid fabric softener by filling the dispenser with warmwater until liquid reaches the underside of the rim. See Max Fillline arrows.IMPORTANT: The Rinse Options knob must be set to either 1Rinse with softener or 2 Rinses with softener when using fabricsoftener in the fabric softener dispenser. This ensures that fabricsoftener is added at the correct time in the rinse phase and isevenly distributed.Adding Liquid Fabric Softener Manuallyto Wash LoadDuring the final rinse, wait until the washer has completedfilling and press the START/Pause button to pause the washer.Lift the lid and add the measured, recommended amount ofliquid fabric softener. Do not use more than the recommendedamount. Close the lid and press the START/Pause button againto start the washer.6.Select cycleLiquidChlorine BleachDo not overfill, dilute, or use more than 1 cup (250 mL).Do not use color-safe bleach or Oxi products in the samecycle with liquid chlorine bleach.Turn cycle knob to choose your wash cycle. For moreinformation, see “Cycle Guide.”8
7. Select SOIL LEVEL9. Select cycle options, if desiredOnce you select a cycle, select the soil level by turning theSoil Level knob to the desired setting.8. Select WASH TEMPSelect the number of rinses by turning the Rinse Optionsknob to the desired setting.IMPORTANT: The Rinse Options knob must be set to anoption "with Fabric Softener" when using the fabric softenerdispenser. This ensures that fabric softener is added at thecorrect time in the rinse for even distribution.Set the Water Level knob to the Auto Sensing setting andthe washer will automatically sense the appropriate waterlevel for the load size and type.Set the Water Level knob to the Deep Water Wash settingand the washer will fill to the maximum water level.Note: The cycle will be longer due to extended fill timeswhen using the Deep Water Wash setting.10. Press START/Pauseto begin wash cycleSelect the Wash Temp by turning the Wash Temp knob to thedesired setting.Always read and follow fabric-care-label instructions toavoid damage to your items.All rinses are cold.Wash TempSuggested FabricsHotSome cold water is added to saveenergy. This will be cooler thanyour hot-water-heater setting.Whites and pastelsDurable itemsHeavy soilsAdding garment(s)WarmSome cold water will be added, sothis will be cooler than what yourprevious washer provided.Bright colorsModerate to light soilsCoolWarm water is added to assist insoil removal and to help dissolvedetergents. Cool is slightly warmerthan cold.Colors that bleedor fadeLight soilsColdWarm water may be added toassist in soil removal and to helpdissolve detergents.Tap ColdThis is the temperature from yourfaucet.Press the START/Pause button to start the wash cycle. Whenthe cycle has finished, the Done indicator will light. Promptlyremove garments after cycle has completed to avoid odor,reduce wrinkling, and prevent rusting of metal hooks, zippers,and snaps.Dark colors thatbleed or fadeLight soilsDark colors thatbleed or fadeLight soilsIf you need to open the lid to add 1 or 2 missed garments:Press START/Pause. The lid will unlock once the washermovement has stopped. This may take several minutes if theload was spinning at high speed. Add garments, close lid, andpress START/Pause again to restart the cycle.NOTE: Washer will not fill with the lid open.IMPORTANT: If lid is left open for more than 10 minutes, thewater will pump out automatically.Manual SoakIf you would like to manually soak your garments at any timeduring the wash portion of the cycle, press START/Pauseand leave the lid closed. Once your desired soak time haselapsed, press START/Pause again to continue the cycle. Aslong as the lid remains closed, your soak time can be longerthan 10 minutes. However, if the lid is opened during the soakand remains open for more than 10 minutes, the water willpump out automatically.9
Washer MaintenanceWATER INLET HOSESReplace inlet hoses after 5 years of use to reduce the risk ofhose failure. Periodically inspect and replace inlet hoses ifbulges, kinks, cuts, wear, or leaks are found.When replacing your inlet hoses, mark the date of replacementon the label with a permanent marker.NOTE: This washer does not include inlet hoses. See theInstallation Instructions for more information.WASHER CARERecommendations to Help Keep Your Washer Clean andPerforming at its Best1. Always follow the detergent manufacturer’s instructionsregarding the amount of detergent to use. Never use morethan the recommended amount because that may increasethe rate at which detergent and soil residue accumulateinside your washer, which in turn may result in undesirableodor.2. Use warm- and hot wash-water settings sometimes (notexclusively cold-water washes) because they do a betterjob of controlling the rate at which soils and detergentaccumulate.3. Always leave the washer lid open between uses to help dryout the washer and prevent the buildup of odor-causingresidue.Cleaning Your Top-Loading WasherRead these instructions completely before beginning theroutine cleaning processes recommended below. This washermaintenance procedure should be performed, at a minimum,once per month or every 30 wash cycles, whichever occurssooner, to control the rate at which soils and detergent mayotherwise accumulate in your washer.Cleaning the Inside of the WasherTo keep your washer odor-free, follow the usage instructionsprovided above and use this recommended monthly cleaningprocedure:Recommended Cycle for Cleaning the WasherRefer to the “Cycle Guide” for the optimal cycle for cleaningthe inside of the washer. Use this cycle with affresh WasherCleaner or liquid chlorine bleach as described below.Begin procedure1. affresh Washer Cleaner Cycle Procedure (Recommendedfor Best Performance):a. Open the washer lid and remove any clothing or items.b. Place an affresh Washer Cleaner tablet in the bottom ofthe washer basket.c. Do not place an affresh Washer Cleaner tablet in thedetergent dispenser.d. Do not add any detergent or other chemical to the washerwhen following this procedure.e. Close the washer lid.f. Select the cycle recommended for cleaning the insideof the washer.g. Press the START/Pause button to start the cycle.NOTE: For best results, do not interrupt cycle. If cycle mustbe interrupted, press START/Pause once. After the cyclehas stopped, run a Rinse & Spin cycle to rinse cleanerfrom washer.2. Chlorine Bleach Procedure (Alternative):a. Open the washer lid and remove any clothing or items.b. Add 1 cup (236 mL) of liquid chlorine bleach to the bleachcompartment.10WASHER CARE (cont.)NOTE: Use of more liquid chlorine bleach than isrecommended above could cause washer damage overtime.c. Close the washer lid.d. Do not add any detergent or other chemical to the washerwhen following this procedure.e. Select the cycle recommended for cleaning the inside ofthe washer.f. Press the START/Pause button to start the cycle.NOTE: For best results, do not interrupt cycle. If cycle mustbe interrupted, press START/Pause once. After the cyclehas stopped, run a Rinse & Spin cycle to rinse cleaner fromwasher.Cleaning the DispensersAfter a period of using your washer, you may find some residuebuildup in the washer’s dispensers. To remove residue fromthe dispensers, wipe them with a damp cloth and towel dry.Do not attempt to remove the dispensers or trim for cleaning.The dispensers and trim are not removable. If your model hasa dispenser drawer, however, remove the drawer and cleanit before or after you run the Clean Washer cycle. Use an allpurpose surface cleaner, if needed.Cleaning the Outside of the WasherUse a soft, damp cloth or sponge to wipe away any spills. Useonly mild soaps or cleaners when cleaning external washersurfaces.IMPORTANT: To avoid damaging the washer’s finish, do notuse abrasive products.NON-USE AND VACATION CAREOperate your washer only when you are home. If moving, ornot using your washer for a period of time, follow these steps:1. Unplug or disconnect power to washer.2. Turn off water supply to washer to avoid flooding dueto water-pressure surge.WINTER STORAGE CAREIMPORTANT: To avoid damage, install and store washerwhere it will not freeze. Some water may stay inhoses, and freezing can damage washer. If storing or movingduring freezing weather, winterize your washer.To winterize washer:1. Shut off both water faucets; disconnect and drain waterinlet hoses.2. Put 1 qt. (1 L) of R.V.-type antifreeze in basket and runwasher on Rinse & Spin cycle for about 30 secondsto mix antifreeze and remaining water.3. Unplug washer or disconnect power.TRANSPORTING YOUR WASHER1. Shut off both water faucets. Disconnect and drain waterinlet hoses.2. If washer will be moved during freezing weather, follow"Winter Storage Care" directions before moving.3. Disconnect drain hose from drain system and drain anyremaining water into a pan or bucket. Disconnect drainhose from back of washer.4. Unplug power cord.5. Place inlet hoses and drain hose inside washer basket.
TRANSPORTING YOUR WASHER (cont.)REINSTALLING/USING WASHER AGAIN6. Drape power cord over edge and into washer basket.7. Place packing tray from original shipping materials backinside washer. If you do not have packing tray, place heavyblankets or towels into basket opening. Close lid and placetape over lid and down front of washer. Keep lid tapeduntil washer is placed in new location. Transport washer inupright position.To reinstall washer after non-use, vacation, winter storage,or moving:1. Refer to Installation Instructions to locate, level, andconnect washer.2. Before using again, run washer through the followingrecommended procedure:To use washer again:1. Flush water pipes and hoses. Reconnect water-inlet hoses.Turn on both water faucets.2. Plug in washer or reconnect power.3. Run washer through Bulky Items/Sheets cycle to cleanwasher and remove antifreeze if used. Use half themanufacturer’s recommended amount of detergent for amedium-size load.TroubleshootingFirst try the solutions suggested here or visit our website at www.whirlpool.com/product helpin Canada www.whirlpool.ca for assistance and to possibly avoid a service call.If you experiencePossible CausesSolutionVibration or Off-BalanceCheck the following forproper installation orsee “Using YourWasher” section.Feet may not be in contact with thefloor and locked.Front and rear feet must be in firm contact with floor, andwasher must be level to operate properly.Washer may not be level.Check floor for flexing or sagging. If flooring is uneven, a 3/4"(19 mm) piece of plywood under your washer will reduce sound.See “Level the Washer” in Installation Instructions.Load could be unbalanced.Load dry items in loose heaps evenly around basket wall.Adding wet items to washer or adding more water to basketcould unbalance washer.Wash smaller loads to reduce imbalance.Do not tightly pack. Avoid washing single items.Use Bulky Items/Sheets cycle for oversized, non-absorbentitems such as jackets and small comforters. See “Cycle Guide.”See “Cycle Guide” and “Using Your Washer” in this Use andCare Guide.NoisesClicking or metallicnoises.Objects caught in washer drainsystem.Empty pockets before washing. Loose items such as coinscould fall between basket and tub or may block pump.It may be necessary to call for service to remove items.It is normal to hear metal items on clothing such as snaps,buckles, or zippers touch against the basket.Gurgling or humming.Washer may be draining water.It is normal to hear the pump making a continuous hummingsound with periodic gurgling or surging as final amounts ofwater are removed during the Drain & Spin cycles.Humming.Load sensing may be occurring.You may hear the hum of the sensing spins after you havestarted the washer. This is normal.Whirring.Basket deceleration may beoccurring.You may hear the whirring sound of the basket decelerating.This is normal.11
TroubleshootingFirst try the solutions suggested here or visit our website at www.whirlpool.com/product helpin Canada www.whirlpool.ca for assistance and to possibly avoid a service call.If you experiencePossible CausesSolutionWater LeaksCheck the following forproper installationWasher not level.Water may splash off basket if washer is not level. Check thatload is not unbalanced or tightly packed.Fill hoses not attached tightly.Tighten fill-hose connection.Fill hose washers.Make sure all four fill-hose flat washers are properly seated.Drain-hose connection.Pull drain hose from washer cabinet and properly secure it todrainpipe or laundry tub.Do not place tape over drain opening.Check household plumbing for leaksor clogged sink or drain.Water can back up out of a clogged sink or drainpipe. Check allhousehold plumbing for leaks (laundry tubs, drain pipe, waterpipes, and faucets).Washer not loaded asrecommended.Improper loading can cause basket to be out of alignmentand cause water to splash off tub. See “Using Your Washer”for loading instructions.Washer Not Performing As ExpectedNot enough waterin washerLoad not completely coveredin water.This is normal operation for a high efficiency washer. If the WaterLevel knob is set to Auto Sensing, the load will not be completelyunder water. The washer senses the load size and adds thecorrect amount of water for optimal cleaning.Turn the Water Level knob to Deep Water Wash to increase theamount of water used to wash.Run Clean Washer with affresh cycle to optimize the water leveland wash performance due to soil build-up in washer basket.Washer won’t runor fill, washer stopsworking, or wash lightremains on (indicatingthat the washer wasunable to fillappropriately)Check for proper water supply.Both hoses must be attached and have water flowing toinlet valve.Both hot and cold water faucets must be turned on.Check that inlet-valve screens have not become clogged.Check inlet hoses for any kinks, which can restrict water flow.Check proper electrical supply.Plug power cord into a grounded 3-prong outlet.Do not use an extension cord.Ensure there is power to outlet.Reset a tripped circuit breaker. Replace any blown fuses.NOTE: If problems continue, contact an electrician.12
TroubleshootingFirst try the solutions suggested here or visit our website at www.whirlpool.com/product helpin Canada www.whi
See "Cycle Guide" for detailed descriptions of cycles. RINSE OPTIONS The following options may be added to most cycles. See "Cycle Guide" for additional details. 1 RINSE This option is used to limit a cycle to one rinse. 2 RINSES This option can be used to automatically add a second rinse to most cycles. 1 RINSE WITH SOFTENER